 |
|
 01-26-2014, 11:32 AM
|
#1
|
Rivet Master 
1973 27' Overlander
Portsmouth
, Virginia
Join Date: Jun 2012
Posts: 776
|
Phase 2 has started, new kitchen cabinets and front underbelly, floor and restoration
I started working on my '73 Overlander back in November 2012 and redid the rear bath as well as removing the belly pan and glass insulation. That work is documented here: http://www.airforums.com/forums/f46/...up-100164.html
Now that the holiday season is behind I need to get going and get the front half of the trailer going and is going to include:
- Removal of the belly pan from the front to just forward of the wheel wells (where I stopped last year). I'll clean up the frame and look for any floor damage. New foam board insulation will go on the bottom and I'll replace or patch any rusted outriggers (there are two that I can see) and then button up the lower aluminum panels and replace the trim.
- Remove the kitchen stove/sink cabinet and replace it with a custom wooden cabinet. For this part of the project I've got a white corian countertop with a seamless sink that I got at a local habitat restore last year parked out on the back deck. Along with the new cabinet I want to do something with all the dark and dreary '70s inspired fake wood trim and go lighter tone along with some aluminum or stainless accents.
- Replace the last vestiges of copper plumbing with pex and simplify the gas plumbing mess that was under the cabinet.
- Install a small microwave and replace the old dometic fridge with a new appliance, possibly an all electric one.
- Clean up and seal up the front curved glass windows.
- Replace the gaucho with a custom U-shaped dinette
- Install a small flatscreen TV.
- Sand and refinish the current parquet flooring.
My target date is to get this done by about April this year so we will actually have time to use the trailer, unlike last year when the April deadline swept by it wasnt till September that we actually got the old girl on the road for a short trip to test out all the improvements. So keeping that in mind, I will not be tearing the whole front half apart but working on a "Minimally Invasive" approach so that if we run short on time, we can still use the trailer and hold our breath till next winter to continue work.
Of course there were plenty of nice warm days in December that I could have gotten ahead on this project, but in reality I started pulling off the lower wraps about a week ago. Virginia is being hit with the cold like much of the upper half of the country and It's just not fun or healthy to work outside on the cold ground so I've only got a couple of hours into removing the belly pan so far. What I found isnt terrible, but its not peachy either. There has been water working its way down from the front window and there is some punky wood at the very front as well as one small spot near the door. I havent gotten any of the belly pan fully off, but have been able to get a look at the flooring and the condition of the outriggers. Two outriggers have some rust through spots on them and I am contemplating whether to cut them off and replace or cut some sheet steel and weld over to reinforce. Since the PO GLUED down the parquet flooring, I don't want to wholesale replace large sections unless its really needed structurally. I'm not crazy about the parquet but trying to pull it all up and then put something else down would get ugly and take up too much time.
Here are some shots of the lower wraps and banana wraps coming off last week.


I started dismantling the stove/sink cabinet the other day and finished it up today. Here are a few pix of the results:


Surburban furnace, looks to be in good shape, we have never fired it up to test.

I'm not reusing any of the parts of the cabinet, if anybody wants something, let me know. I dont have the space to store the pieces for a long while, but I can hold on to them for a bit if somebody needs something like aluminum trim or tambour.
|

|

|


|
01-26-2014, 02:18 PM
|
#2
|
Rivet Master
1973 27' Overlander
Currently Looking...
Jupiter
, Florida
Join Date: Apr 2006
Posts: 2,062
|
I envy your weather. It's lethal outside at the moment here.
After pulling my '73 galley & interior out I was aghast at the ratio of our interiors' "hidden/inaccessible surface area" to the percentage "accessible for cleaning" surfaces. It was the thumbprint that had grown a mossy ring almost two feet across in a hidden area that drove that point across...
While you have the galley out take a close look at the water inlet - it's not sanitary by any means, water sloughing down the shell tries to enter the FW tank. Inspect it for hairline cracks AND BE GENTLE with it, after years of relaxing it wants to jump away from the shell, shattering to hang free.
That FW inlet cover assembly with its double-cut key (that is hard to pick) has value to folks that Joe Somewhen broke into years back, I patched over the entire outside area and sent my cover to Texas, and will use a Marine quality filler inlet when the time comes...
__________________
The days are short and the night is long and the stars go tumbling by.. . ~Airstream~
|
|
|
|
|
01-26-2014, 06:48 PM
|
#3
|
Rivet Master
1973 27' Overlander
Portsmouth
, Virginia
Join Date: Jun 2012
Posts: 776
|
Quote:
Originally Posted by Wabbiteer

I envy your weather. It's lethal outside at the moment here.
After pulling my '73 galley & interior out I was aghast at the ratio of our interiors' "hidden/inaccessible surface area" to the percentage "accessible for cleaning" surfaces. It was the thumbprint that had grown a mossy ring almost two feet across in a hidden area that drove that point across...
While you have the galley out take a close look at the water inlet - it's not sanitary by any means, water sloughing down the shell tries to enter the FW tank. Inspect it for hairline cracks AND BE GENTLE with it, after years of relaxing it wants to jump away from the shell, shattering to hang free.
That FW inlet cover assembly with its double-cut key (that is hard to pick) has value to folks that Joe Somewhen broke into years back, I patched over the entire outside area and sent my cover to Texas, and will use a Marine quality filler inlet when the time comes...
|
Thanks. Really hadn't thought that much about the water inlet. I did notice the unconventional section of hose that somebody had inserted a while back, that ill get replaced along with all the plumbing before the cabinetry goes in.

|
|
|
|
|
01-31-2014, 07:31 PM
|
#4
|
2 Rivet Member 
1965 22' Safari
Shelter Island
, New York
Join Date: Aug 2010
Posts: 89
|
Quote:
Originally Posted by aquinob
Surburban furnace, looks to be in good shape, we have never fired it up to test.
.
|
I think the conventional wisdom around here would say don't fire it up - too dangerous!
__________________
Come on a (1965) Safari with me!
|
|
|
|
|
01-31-2014, 08:24 PM
|
#5
|
Rivet Master
1973 27' Overlander
Currently Looking...
Jupiter
, Florida
Join Date: Apr 2006
Posts: 2,062
|
Quote:
|
don't fire it up - too dangerous!
|
Stop. Open inspection ports on heating ducts and look very closely.
Mammals of the order Rodentia, characterized by a single pair of continuously growing incisors in each of the upper and lower jaws that must be kept short by gnawing, use the ducts as superhighways.
Do not unknowingly heat & aerosolize whatever may be there SO check first.
Then clean the heck out of it anyway.
~~~ Lecture mode off ~~~
Hot metal given years to corrode in the firebox turns to tissue paper strength - even though it looks good blah blah blather blah...
__________________
The days are short and the night is long and the stars go tumbling by.. . ~Airstream~
|
|
|
|
|
01-31-2014, 10:27 PM
|
#6
|
|
Registered User

1972 27' Overlander
Sandpoint
, Idaho
Join Date: Jan 2013
Posts: 39
|
So, I've been following you since you first started your project. We have a '72 and thanks to you, I've gone from "make it functional" to "make it mine" mode. Thanks for keeping up with the postings Bob!
|
|
|
|
|
02-01-2014, 02:37 PM
|
#7
|
Rivet Master
1973 27' Overlander
Portsmouth
, Virginia
Join Date: Jun 2012
Posts: 776
|
Quote:
Originally Posted by spencerhut
So, I've been following you since you first started your project. We have a '72 and thanks to you, I've gone from "make it functional" to "make it mine" mode. Thanks for keeping up with the postings Bob!
|
You're more than welcome. Glad the postings help with your progress. Would love to see some pix.
|
|
|
|
|
02-01-2014, 02:40 PM
|
#8
|
Rivet Master
1973 27' Overlander
Portsmouth
, Virginia
Join Date: Jun 2012
Posts: 776
|
Quote:
Originally Posted by Wabbiteer
Stop. Open inspection ports on heating ducts and look very closely.
Mammals of the order Rodentia, characterized by a single pair of continuously growing incisors in each of the upper and lower jaws that must be kept short by gnawing, use the ducts as superhighways.
Do not unknowingly heat & aerosolize whatever may be there SO check first.
Then clean the heck out of it anyway.
~~~ Lecture mode off ~~~
Hot metal given years to corrode in the firebox turns to tissue paper strength - even though it looks good blah blah blather blah...
|
I think that will be the prudent course of action. I tried out the heat strip in the new ac and it barely takes the chill off. From the outside it looks fine, I'll poke a light in where the sun dont shine to see what I can see.
|
|
|
|
|
02-14-2014, 02:33 PM
|
#9
|
Rivet Master
1973 27' Overlander
Portsmouth
, Virginia
Join Date: Jun 2012
Posts: 776
|
Finally a warm day with no precipitation. Took advantage and got out and pulled down the remaining underbelly pan after I cut a gas line to the fridge that was holding it up. As I suspected, it's not terrible underneath but it's not great either. All the way at the front of the trailer there is some rotten plywood under the streetside window as well as the spot that is under the window forward of the door. There is more rust on the bottom of the large frame members than just surface rust, but it doesnt appear to go all the way through so I think I should be able to wirebrush it down and then preserve and paint it. The only part of the subfloor I havent seen yet is the part below the water tank. Pictures tell the story, here are a few more:
Streetside frame and outriggers looking aft. Some rust and a few rust-through spots on one outrigger:

Looking toward the middle, more rust on the bottoms of the frame members. Most likely from the fiberglass insulation holding water:

More rust on the bottoms:

A rusty closeup:

Curbside looking in:

I knew about the rust through on this outrigger. I might just weld some thin plate steel over it to seal it up.

The hole that went from the parquet under the front side window all the way through the bottom.

More rust, some staining but I think the ply is still sound.

Looking at the front, there is some rotten wood along with the staining, from the leaking front window.

Current plan is still to preserve the frame, make some repairs for the rust and then cover the plywood with the pink foam board. I may not replace the belly pan right away if at all. Once the underside is done then I'll start work on a new stove/sink cabinet. Depending on how long that takes I may hold off on trying to repair the front flooring by the window so I can combine that with redoing the gaucho into a U shaped dinette. The PO glued down the parquet flooring and I don't want to try and pull it up but just patch it where I can. The goal is to use this trailer by about April so any work undone will have to wait till the end of the year.
I do have a question for those in the know. What happens when I drop the plywood under the water tank? Is the tank held in by some sort of metal strap or bar or is it going to drop like a rock on my head?
|
|
|
|
|
02-14-2014, 03:02 PM
|
#10
|
2 Rivet Member
1971 21' Globetrotter
Cave Creek
, Arizona
Join Date: Apr 2012
Posts: 61
|
It will fall out under it's own weight, if it's the same as our 1971 Globetrotter. If all the water is out of it, though, it's not too heavy.
__________________
"Money frees you from doing things you dislike. Since I dislike doing nearly everything, money is handy." Groucho Marx
|
|
|
|
|
03-15-2014, 05:59 PM
|
#11
|
Rivet Master
1973 27' Overlander
Portsmouth
, Virginia
Join Date: Jun 2012
Posts: 776
|
Progress but at the cost of an eye injury
Making steady progress on the front half of the trailer, not as fast as I would like, but we seem to get a couple of nice days here and there and on some of them (like today) I have to work. Oh well. So far I have removed all the loose rust, coated the metal with ospho (similar chemically to por) and then primed and painted. That part of the job unfortunately came at a personal cost, I got a small rust particle in my left eye and had to have it removed at a local eye Dr. That would have been the end of it except that it lodged itself right in the center of the pupil so now all the vision in that eye is slightly blurry and at night, all pinpoint lights have halos. I've got an appointment with a cornea specialist this week to see what can be done to correct it. Of course all the Dr. bills weren't in the original budget either. But I did have my safety glasses on, I was just unlucky enough that it managed to make it underneath.
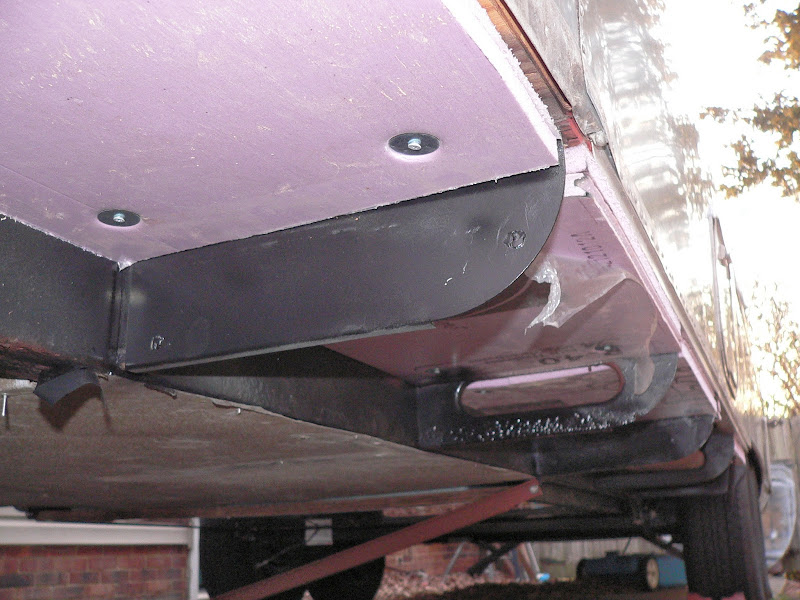
So here are some progress pictures taken along the way. I put a single layer of the 3/4" foam board in the area above the water tank and in the area of the spare tire well. I measured it and should have enough clearance getting the tank back in along with the 1" plywood that originally held it in. I still have to clean out the tank with some bleach, that will go till next week and hopefully warmer weather. Everywhere else I used a double layer of foam for about R8. I hold the foam up with coated decking screws and fender washers, dimpling the surface enough for a tight fit but without breaking the surface, similar to what you do with drywall. I'm going to pick up some new aluminum sheet stock and reinstall a belly pan probably next week. I can get 4x10 sheets locally so those should work well for the 60" dimension across the main frame rails.


Front with the doubled up small sections:

Other side:

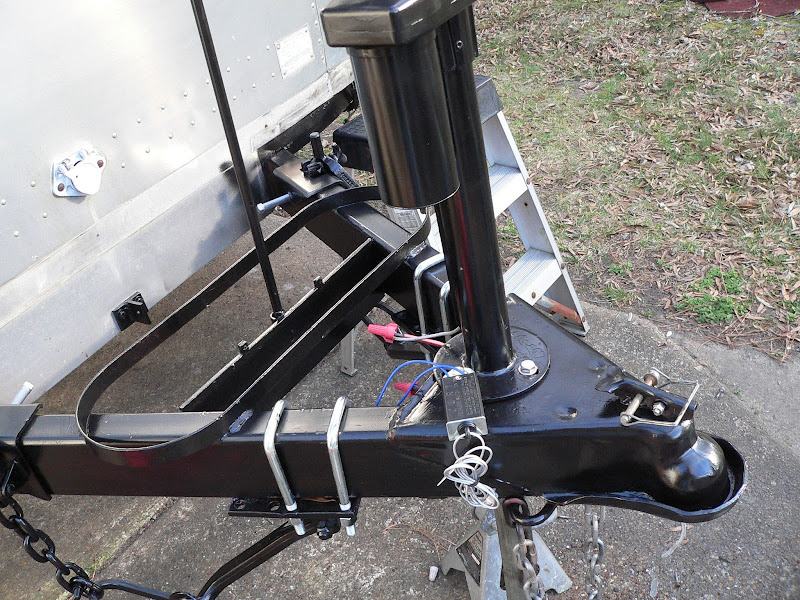
I've also been working on the tongue. It was painted in that same aluminum paint as the rest of the frame, that had to go. The tongue was brought down to bare metal, primed and painted. All the hitch parts were sandblasted by a friend, and then I primed and painted them as well. The jack was cleaned up and painted too. Of course this came with an injury as well. The wire wheel on the grinder got caught on the break away wire and it started to whip my right hand. I dropped the grinder to the ground and on the way down it whipped my leg, breaking the skin without tearing the denim of the jeans. Lucky I had some cheap HF gloves on, otherwise my hands would have been really tore up. There's a lesson to be learned somewhere, hopefully I'll figure it out someday. 
Some progress pictures of that work:


With some fresh paint and new hardware including stainless bolts:

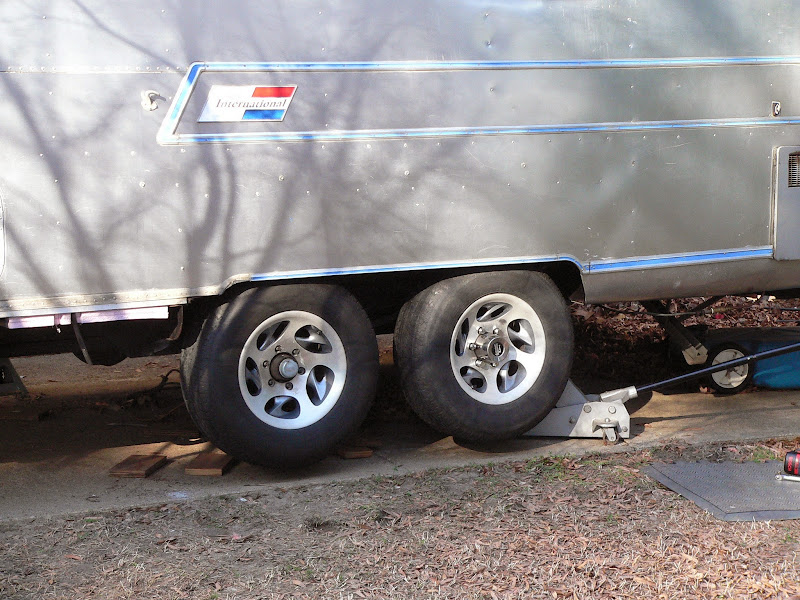
And on a very "Color me happy" point, I have been looking for a nice set of aluminum rims to replace the black rims without hubcaps that came with the trailer. I finally got lucky with one of the members here, "Charlie" who had a set of rims and tires that he was upgrading and he offered them to me at a very good price. These are American Racing rims that came as OEM wheels on Airstream for about 1-2 years back around 1999 when the factory ran out of the rims that had been using. My wife and I made a short (4 hour one way) trip up to Dover DE and picked up the rims and some good condition Goodyear marathon tires plus a steel rim spare. I ordered some McGard lugs and mounted them this afternoon. Here she is with her pretty new sneakers: 
That's it for now, thanks for reading.
|
|
|
|
|
03-18-2014, 04:03 PM
|
#12
|
Rivet Master
1973 27' Overlander
Currently Looking...
Jupiter
, Florida
Join Date: Apr 2006
Posts: 2,062
|
I wore a magnet taped to my back to get a wire-brush bristle end to work back out - they narrow down to the finest hypodermic needle size, break loose, and then seek out a blood meal. I made up a magnetic sweep with $50 worth of N50 rare-earth magnets on it after that.
And for the running grinders with a brush in them? There will be weaselly drones someday armed with 1/2" shank angle grinder wire brushes.
The first time you pull into an asphalt parking lot on a hot summer day I think you'll appreciate the time taken with the sub-floor insulation.
Make sure the A-frame tubes are blocked against rodents - stainless steel pot scrubbers caulk-glued inside the openings or a couple of press-fit sheet metal inserts with vulkem beads to glue them in place...
__________________
The days are short and the night is long and the stars go tumbling by.. . ~Airstream~
|
|
|
|
|
03-23-2014, 06:38 AM
|
#13
|
Rivet Master
1973 27' Overlander
Portsmouth
, Virginia
Join Date: Jun 2012
Posts: 776
|
Had three nice days to work on the trailer this last week. Got some good work done, not as much as I would have liked, but progress always goes more slowly than we would all like. I had to loosen up the front axle and reset it. For some reason, it didn't sit square when I installed it last year, but this time it slid right in to the expanded notch in the frame. Thought I would have had to do some filing, so I bought the HF pneumatic file but didnt get to use it there. Instead, I used it to fix the steps going into the trailer. I enlarged the notch one one side so it would lock evenly on both sides, previously it only would lock on one side. Wear on one side of the link arms had made them uneven, and I tried to remove it with the thought of fabricating a new one. Unfortunately the hex head screw was rounding out and it would have been a day just trying to remove the screw and then finding a replacement, so this was the easier fix for sure.
The water tank was cleaned out. I cant believe the amount of black gunk (I'm assuming mildew) that was in there. I flushed it out with fresh water, (don't stand the tank on end, it balloons out real bad) and then refilled with a gallon of bleach. That seemed to get most of it. Due to the design of the tank, its almost impossible to get everything to flush out, especially the two little wings on the outlet end. Knowing what I know now, I'm glad I never used any of the water in that tank for drinking water, guess its not to be unexpected of a tank that is 40 years old and has never been drained.
I also learned that it is much easier to remove the tank than it is to reinstall it. Luckily, I had a friend to help me position it in while I got a jack with a strong back underneath to support it. I wasn't sure if the tank would fit with the 3/4" solid foam board up as insulation, and sure enough, it make for a very tight fit at the outlet end. I had to cut out about a foot at the outlet end and that gave enough clearance for the board to slide in, though it was a tight fit. At least I know that the tank will not shift, though we blocked it in with spare pieces of the foam board to be sure.
I was also able to get 3 of the outriggers repaired, especially the one in front of the curbside axle. It had rust through and had to be patched or would put lots of water where it shouldn't go if the trailer were to be driven in the rain. I had them fabricated at a local sheet metal shop along with a new piece of aluminum for the water tank cover and I kept the "Drop" from the 4x10 sheet to use for replacement belly pan on the rear of the trailer. Total cost for the whole sheet with two cuts and fabrication of the steel parts was 75 bucks. Not shabby considering their cost on the aluminum is about 49 for the 4x10 .032 material.
Here are some pix of the outrigger faces and the new aluminum tank cover. I had them bend a tab on the bottom for the aluminum wrap to attach to:


Installed in front of the wheel well:

My not so pretty weld job, but it should hold well enough:

New aluminum on the tank cover:


New outriggers on the streetside. These are more like covers, they beef up the existing metal and provide a good flange to secure the lower wraps on. Probably should have had one more made, but all of them were structurally sound if not all that pretty, so I think this fix will be fine.
Finally got all four "New" wheels on, really happy with these mags. If you are reading this Charlie, thanks a bunch.


And thank you all for reading.
|
|
|
|
|
03-23-2014, 07:16 AM
|
#14
|
Rivet Master
1964 17' Bambi II
Vintage Kin Owner
Schererville
, Indiana
Join Date: Jul 2005
Posts: 2,637
|
This thread reminds me of my adventures with my underside of my previous trailer (1986 Sovereign) in this thread:
http://www.airforums.com/forums/f476...pan-58333.html
The best part is when you're finished, and the worst part is that no one will ever see or appreciate all that work you put in to the underside of your trailer! Keep up the great work!
__________________
Becky
1964 Bambi II
1988 Avion 32S
|
|
|
|
|
03-23-2014, 07:46 AM
|
#15
|
Rivet Master
1973 27' Overlander
Portsmouth
, Virginia
Join Date: Jun 2012
Posts: 776
|
Quote:
Originally Posted by beckybillrae
This thread reminds me of my adventures with my underside of my previous trailer (1986 Sovereign) in this thread:
http://www.airforums.com/forums/f476...pan-58333.html
The best part is when you're finished, and the worst part is that no one will ever see or appreciate all that work you put in to the underside of your trailer! Keep up the great work! |
And I read that whole thread a while back when we were first getting started. So I had a good idea of what is involved, but it always takes 3x as long to get it done then you initially anticipate. Cabinet making and interior remodeling is always fun and everybody loves to see it all look new and different, but without the ugly work on the underside its all lipstick on a pig. Thanks for your kind words.
|
|
|
|
|
03-30-2014, 06:00 AM
|
#16
|
Rivet Master
1972 27' Overlander
Denver
, North Carolina
Join Date: Aug 2004
Posts: 768
|
Go Bob GO!! I am about ready to start putting things back to together on my 72 Overlander. This is inspirational!
|
|
|
|
|
04-04-2014, 06:31 PM
|
#17
|
Rivet Master
1973 27' Overlander
Portsmouth
, Virginia
Join Date: Jun 2012
Posts: 776
|
Weather is getting nicer and I am making progress on putting it all back together. The lower wraps are back on and the belly pan is back on to the front axle. I have always liked to the look of the dark grey on the lower wraps on the later models and decided to replicate that on this trailer.
The lower wraps and banana wraps were sanded with a sanding sponge to rough up the surface and were sprayed with self etching primer. I then used graphite color mag wheel paint and then sprayed a clear finish on top. I think it does a good job of covering up the less than perfect lower sheet metal and gives the old girl a bit more of a modern look. And the better half likes it too, so that's all that matters. Here are some more pix:
Taped off:


Primed:

Reflectors sprayed:

Done:

Just LOVE the new wheels <points up >

Just about ready to start work on the inside. Will be resizing the corian sink top to fit the kitchen and starting on the cabinetry this next week. Finally the fun stuff... 
|
|
|
|
|
04-05-2014, 08:48 AM
|
#18
|
Rivet Master
1972 31' Sovereign
Lexington
, Minnesota
Join Date: Feb 2009
Posts: 3,991
|
Paint job looks nice! I'm waiting for the 10" snow fall from yesterday to melt off and it to get warm enough to paint our lower blue stripe. I see yours is blue, ours was never as far as we can tell.
Your top is white? We are going to paint ours this summer (on the list and we have the paint, anyway). Do you like it?
Kay
|
|
|
|
|
04-07-2014, 06:25 PM
|
#19
|
Rivet Master
1973 27' Overlander
Portsmouth
, Virginia
Join Date: Jun 2012
Posts: 776
|
Quote:
Originally Posted by Minno
Paint job looks nice! I'm waiting for the 10" snow fall from yesterday to melt off and it to get warm enough to paint our lower blue stripe. I see yours is blue, ours was never as far as we can tell.
Your top is white? We are going to paint ours this summer (on the list and we have the paint, anyway). Do you like it?
Kay
|
The top was done last year. It is the ceramiflex coating and I'm very happy with it. It completely seals up the roof and it dramatically reduces the temp of the metal on a hot sunny day. When we replaced the roof AC last year you couldn't put your hand on the uncoated aluminum, but the coated surface was just warm to the touch. That job was documented here: http://www.airforums.com/forums/f478...lex-98479.html

|
|
|
|
|
04-07-2014, 06:38 PM
|
#20
|
Rivet Master
1973 27' Overlander
Portsmouth
, Virginia
Join Date: Jun 2012
Posts: 776
|
I hadn't planned on it but over the weekend we found a used Dometic RV fridge on the local CL. It's about the same size as the original unit but is about 25 years newer. Was in pretty good shape and it seems to run well. So today I set about pulling out the old unit to make way to putting this one in.
Didn't really have much to go on on how the old fridge would come out, So I started removing screws and prying the wood panels back to see what else would be holding it in. As it turns out, most of the support was on the outside edge in the form of two sheetmetal brackets, one at the top on the side and one at the bottom. I had to pull out the end panel to expose the brackets and then it was easy enough to remove the screws. The top and left side had some plywood attached to the unit that had wood screws going through the cabinetry to hold it in. And of course the parquet flooring the PO put in didnt help as it was another lip I had to drag the carcass up and over to move it out of the way. And since we all like pix, here are a few more:
New(er) unit in front, old behind.

Not sure why the plastic discolored.

Sitting next to the dirty hole the old one came out of. You can see the sheet metal bracket toward the top of the hole:

|
|
|
|
|
|
|
Currently Active Users Viewing This Thread: 1 (0 members and 1 guests)
|
|
|
 Posting Rules
|
You may not post new threads
You may not post replies
You may not post attachments
You may not edit your posts
HTML code is Off
|
|
|
|

 Recent Discussions
 |
|
|
|
|
|
|
|
|
|
|
|
|
|
|
|
|
|
|
|
|
|


 Linear Mode

