 |
|
 10-07-2007, 02:43 PM
|
#1
|
3 Rivet Member 
2007 25' Safari FB SE
Lake Forest
, Illinois
Join Date: Oct 2006
Posts: 184
|
Water Pump Access for 2007 Safari FB
With all the help from the members of the forum I plan to winterize in the next few weeks. My water pump is located under the closet in another small area with a small door that opens to the left .There is a heating duct attached to the door so its tough to get to the pump.I removed the heating duct but I still cant locate the place to install the fitting that I purchased to pump in antifreeze.Is it possible that the shelf board ontop of the small bottom closet can be removed for clearance? Also exactly where do I screw on the valve that allows the antifreeze to be pumped in? It seems that we have different water pumps on each model year. Or should I just add antifreeze to the fresh water and let the pump work after I drain and blow out the line?
Thanks
Allen
|

|

|


|
10-07-2007, 04:56 PM
|
#2
|
4 Rivet Member 
2000 31' Land Yacht
Join Date: Sep 2003
Posts: 497
|
Whatever you do, don't put antifreeze in the water tank. You may never get the taste out.
My 2002 Safari had a panel on the floor of the closet that came out. Don't know how your unit is. If it doesn't have a removable panel, you might want to make one.
The antifreeze line should be attached to the inlet side of the pump.
|
|
|
|
|
10-07-2007, 08:33 PM
|
#3
|
4 Rivet Member
2007 25' Safari FB SE
North/East
, New Jersey
Join Date: Nov 2006
Posts: 367
|
Quote:
|
Originally Posted by woodedareas
With all the help from the members of the forum I plan to winterize in the next few weeks. My water pump is located under the closet in another small area with a small door that opens to the left .There is a heating duct attached to the door so its tough to get to the pump.I removed the heating duct but I still cant locate the place to install the fitting that I purchased to pump in antifreeze.Is it possible that the shelf board ontop of the small bottom closet can be removed for clearance? Also exactly where do I screw on the valve that allows the antifreeze to be pumped in? It seems that we have different water pumps on each model year. Or should I just add antifreeze to the fresh water and let the pump work after I drain and blow out the line?
Thanks
Allen
|
Try to access the pump from the storage door that opens under your refrig. There is a thin white fiberboard panel that lines the back of the acess panel under the refrig that prevents the stuff your storing from going under the refrig.
My 2007 25' FBSE has the optional Aquatec pump and the intake (supply) line to the pump is located on the outboard/aft side of the pump. There is a special quick-connect fitting that is used to connect the supply to the pump fitting. You can puchase a hose and fitting from Aquatec that would allow you to disconnect the supply fitting to the pump and temporarily replace it with a fitting with the hose that you can stick into your container to do yor winterizing.
|
|
|
|
|
10-08-2007, 11:46 AM
|
#4
|
3 Rivet Member
2007 25' Safari FB SE
Lake Forest
, Illinois
Join Date: Oct 2006
Posts: 184
|
Quote:
|
Originally Posted by 2dabeach
Try to access the pump from the storage door that opens under your refrig. There is a thin white fiberboard panel that lines the back of the acess panel under the refrig that prevents the stuff your storing from going under the refrig.
My 2007 25' FBSE has the optional Aquatec pump and the intake (supply) line to the pump is located on the outboard/aft side of the pump. There is a special quick-connect fitting that is used to connect the supply to the pump fitting. You can puchase a hose and fitting from Aquatec that would allow you to disconnect the supply fitting to the pump and temporarily replace it with a fitting with the hose that you can stick into your container to do yor winterizing.
|
This evening I will look for the possible access under the frig. I have ordered the valve and hopefully when I can get a decent view of the pump I will be able to dtermine where the fitting attaches.My first assignment is to get to the pump. I can't beleive tha Airstream doesn't make some effort to make winterizing a little more consumer friendly.
Thanks
|
|
|
|
|
10-08-2007, 02:49 PM
|
#5
|
Rivet Master  
2006 25' Safari FB SE
St. Cloud
, Minnesota
Join Date: Aug 2003
Posts: 13,280
|
Hi Allen -- I noticed that you had bought a longer FB Airstream since the Moraine View rally. You will have to unscrew the water pump from the floor if this is like the 25' FB. Make sure the main access door is completely removed. I got additional access to pull the heating duct out of the way by temporarily taking out the piece of fiberboard at back of the small storage space under the fridge -- it's held on by 4 enamel white Phillips head screws -- this also helped me get a trouble light into the space from more angles, etc.
I pretty much used john hd's method but ended up writing about it in a different thread. My picture here is taken from the under-fridge opening I took advantage of. I said you'd have to unscrew the water pump because when you install the Camco winterizing valve the waterpump is forced more than 2" toward the midline of the trailer -- where you will screw it into new position. This works pretty easy with an electric drill and you will not have to predrill the holes -- there's pretty good purchase drilling thru the linoleum and into the plywood. There was no other way to do it with the pex tubing attached to the inboard side of the wheel well.
Hi from Susie and me to both you and Karen (isn't that right...?).
|
|
|
|
|
10-08-2007, 03:43 PM
|
#6
|
Rivet Master
1987 32' Excella
Nepean
, Ontario
Join Date: Mar 2006
Posts: 1,414
|
This is all good stuff Allen. Remember, too, as I mentioned in our telephone conversation to locate the bypass valves for the hot water tank, and to drain the hot water tank. I don't have the motorhome back yet, so I can't take the photo of the drain cock that I've installed to drain the hot water tank, but it's one of these small jobs that, when you open them, the water drains out the center of the valve. I replaced the cap with a brass cap that has a threaded hole for the valve.
On my AS '94LY, there are 3 valves on the side of the hot water tank - normal operation is for the top valve to allow hot water to flow out to the hot water plumbing, for the bottom valve to allow cold water to flow into the tank and for the center one to be closed not to allow any bypass. To winterize, you want to bypass the tank, so the top and bottom valves are closed and the center one is opened up - this has the effect of allowing water to flow through the system as thought there is no hot water tank. Then the hot water tank is drained, which requires on opening at the top (for air to flow in) and at the bottom (for the water to flow out). The top is opened by releasing the pressure relief valve, and the bottom is where I installed the drain cock in place of the cap.
As well, make sure that any water that is in the hose or pipe leading from the fresh water tank to the pump is either drained out or blown out. Remember to make sure your air pressure does not exceed 25 lbs/sq.in - you don't want to blow up your plumbing.
Howard
__________________
VE3JDZ
AIR 12148
1987 Excella 32-foot
1999 Dodge Ram 2500HD Diesel
WBCCI 8080
|
|
|
|
|
10-08-2007, 05:49 PM
|
#7
|
3 Rivet Member
2007 25' Safari FB SE
Lake Forest
, Illinois
Join Date: Oct 2006
Posts: 184
|
Quote:
|
Originally Posted by CanoeStream
Hi Allen -- I noticed that you had bought a longer FB Airstream since the Moraine View rally. You will have to unscrew the water pump from the floor if this is like the 25' FB. Make sure the main access door is completely removed. I got additional access to pull the heating duct out of the way by temporarily taking out the piece of fiberboard at back of the small storage space under the fridge -- it's held on by 4 enamel white Phillips head screws -- this also helped me get a trouble light into the space from more angles, etc.
I pretty much used john hd's method but ended up writing about it in a different thread. My picture here is taken from the under-fridge opening I took advantage of. I said you'd have to unscrew the water pump because when you install the Camco winterizing valve the waterpump is forced more than 2" toward the midline of the trailer -- where you will screw it into new position. This works pretty easy with an electric drill and you will not have to predrill the holes -- there's pretty good purchase drilling thru the linoleum and into the plywood. There was no other way to do it with the pex tubing attached to the inboard side of the wheel well.
Hi from Susie and me to both you and Karen (isn't that right...?). |
Hi Bob and Susie
Its great to hear from you. Caryn and I enjoyed meeting you and we are looking forward to next year. I opened the door under the frig and after unscrewing the thin white board I was unable to remove it because of the narrow space behind it. It is beyond my comprehension how inept the engineers at Airstream are to design a vehicle that requires removing the water pump inorder to winterize the system. I agree that the pump should be moved inorder to access the proper side for the new valve. So I have decided it is not worth my time and I will drop the trailer off at Airstream and let them do it for me. They can install it in a manner so that next year I can simply turn a valve. Thanks for the help and we look forward to seeing you both
Allen & Caryn
|
|
|
|
|
10-08-2007, 05:52 PM
|
#8
|
3 Rivet Member
2007 25' Safari FB SE
Lake Forest
, Illinois
Join Date: Oct 2006
Posts: 184
|
Quote:
|
Originally Posted by blkmagikca
This is all good stuff Allen. Remember, too, as I mentioned in our telephone conversation to locate the bypass valves for the hot water tank, and to drain the hot water tank. I don't have the motorhome back yet, so I can't take the photo of the drain cock that I've installed to drain the hot water tank, but it's one of these small jobs that, when you open them, the water drains out the center of the valve. I replaced the cap with a brass cap that has a threaded hole for the valve.
On my AS '94LY, there are 3 valves on the side of the hot water tank - normal operation is for the top valve to allow hot water to flow out to the hot water plumbing, for the bottom valve to allow cold water to flow into the tank and for the center one to be closed not to allow any bypass. To winterize, you want to bypass the tank, so the top and bottom valves are closed and the center one is opened up - this has the effect of allowing water to flow through the system as thought there is no hot water tank. Then the hot water tank is drained, which requires on opening at the top (for air to flow in) and at the bottom (for the water to flow out). The top is opened by releasing the pressure relief valve, and the bottom is where I installed the drain cock in place of the cap.
As well, make sure that any water that is in the hose or pipe leading from the fresh water tank to the pump is either drained out or blown out. Remember to make sure your air pressure does not exceed 25 lbs/sq.in - you don't want to blow up your plumbing.
Howard
|
Howard
I have given up as it is a waste of my time. I will take it over to the dealerthis week end and leave it there until winterize it. I will give themall of the parts I ordered and let them have fun. I have better things to do that I actually enjoy.
Give our regards to Rosie
|
|
|
|
|
10-10-2007, 10:45 AM
|
#9
|
Rivet Master
1987 32' Excella
Nepean
, Ontario
Join Date: Mar 2006
Posts: 1,414
|
Hi Allen, it's a good idea to have the daler do it the first time and watch to learn what he does. Meanwhile, here are the 2 photos that show the drain cock and where it is installed.
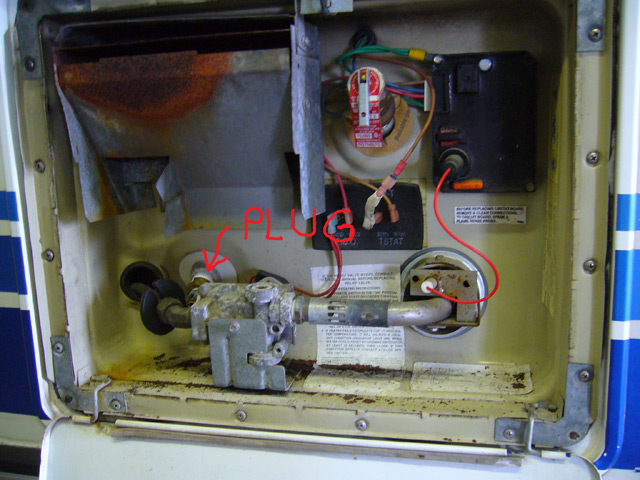
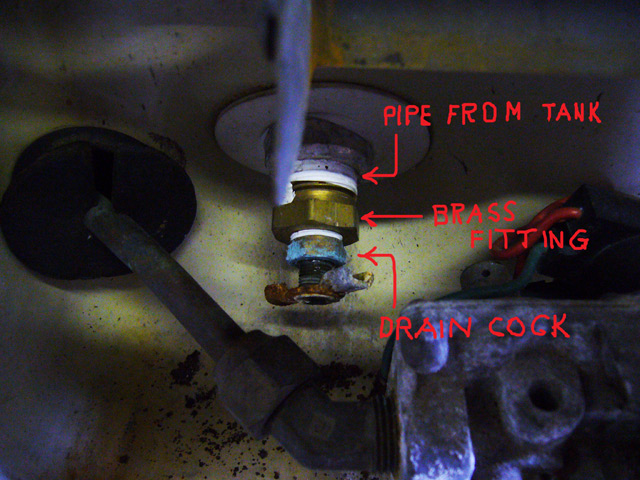
Note that before you start, there will be a round plastic/nylon white plug. This is removed, the brass plug with the threaded hole in the middle for the drain cock replaces this. Make sure that you use teflon plumbing tape to ensure a good seal.
I've had this on my AS for a couple of years, and before that I had the same setup for over 10 years on an old Shasta trailer.
Howard
__________________
VE3JDZ
AIR 12148
1987 Excella 32-foot
1999 Dodge Ram 2500HD Diesel
WBCCI 8080
|
|
|
|
|
10-11-2007, 06:09 PM
|
#10
|
3 Rivet Member
2007 25' Safari FB SE
Lake Forest
, Illinois
Join Date: Oct 2006
Posts: 184
|
Quote:
|
Originally Posted by blkmagikca
Hi Allen, it's a good idea to have the daler do it the first time and watch to learn what he does. Meanwhile, here are the 2 photos that show the drain cock and where it is installed.
Note that before you start, there will be a round plastic/nylon white plug. This is removed, the brass plug with the threaded hole in the middle for the drain cock replaces this. Make sure that you use teflon plumbing tape to ensure a good seal.
I've had this on my AS for a couple of years, and before that I had the same setup for over 10 years on an old Shasta trailer.
Howard |
Hi Howard
Thanks for the photographs. Ths Airstream factory was not able to figue out how to proceed even after 2 calls. I purchased an electric jig saw. I think I may cut out a square area on the floor of my closet and this will allow access to the pump. I will replace the board with only a few screws for easy access next year.I will use a cedar board and while I am at it i will use cedar on all sides of the closet. I thought it would be worth a try as I think with your help and the Forum I understand the wintering procedure quite well. I would be done by now if the darn pump was accessable.
Thanks
Allen
|
|
|
|
|
10-11-2007, 06:46 PM
|
#11
|
3 Rivet Member
2003 25' Safari
spokane
, Washington
Join Date: Sep 2005
Posts: 114
|
winterizing blues
"I can't believe AS doesn't make an effort to make winterizing easier....." like maybe installing a line and valve for us or maybe putting the pump where you can get at it????? Gosh that sounds like a LOT of work and a huge engineering effort.
Do yourself a favor, get a short length of soft PEX for the inlet side, remove the screws holding the pump down, and relocate the pump so you can access it. Use the soft/flex PEX to hook up to that little filter thing (and remember to remove it in the winter).
I figure the guy who put the pump in in my Safari 25B was pissed of at AS and that installing it the way he did would get back at them. Thanks a lot.
Jack
|
|
|
|
|
10-11-2007, 09:29 PM
|
#12
|
4 Rivet Member
2007 25' Safari FB SE
North/East
, New Jersey
Join Date: Nov 2006
Posts: 367
|
 Be careful when your sawing
Be real careful when you start sawing the bottom of the wardrobe with your jig saw, as the area down there has a lot of gear! See attached.
|
|
|
|
|
10-13-2007, 12:20 PM
|
#13
|
3 Rivet Member
2003 25' Safari
spokane
, Washington
Join Date: Sep 2005
Posts: 114
|
wow
hope you find a way to get to your pump, when you do take a very long hard look at relocating it where you can get at it. I swear the factory built my system up then shoved it up against the wheel well/wall so tight it was damn near inpossible to unscrew the inline filter and remove it so I could get my line attached to suck the antifreeze in. So after three years of cursing etc I moved the darn thing. took me all of 5 minutes to do it this year. So I'm a slow learner....
Jack
first photo shows how the water pump was moved out towards the closet door. I put a soft piece of pex inline between the filer and pump, the whole piece now comes right out.....
|
|
|
|
|
10-14-2007, 09:18 AM
|
#14
|
3 Rivet Member
2007 25' Safari FB SE
Lake Forest
, Illinois
Join Date: Oct 2006
Posts: 184
|
No Factory Solution
I have discussed the lack of accessability with a representative of the factory on two occassions. They said they would get back to me with a solution but I never heard from them. The only practical method of reaching the back side of the pump is to saw an opening through the floor of the closet which I really do not want to do. I have asked the local dealer if they have a method and they did not so it doesn't make much sense to have them create a costly solution of sawing a hole in a place where I do not want it. I have decided to simply put the RV antifreeze in the water supply even thoughthis is not the ideal solution. I will continue to flush the system in the spring. I will continue to keep in touch with the factory as I expect them to find a solution and pay for it as this is a design flaw and a rather stupid one at that. I wonder how they stay in business. The answer is rather simple. People like me buy Airstreams.
|
|
|
|
|
10-14-2007, 09:21 AM
|
#15
|
3 Rivet Member
2007 25' Safari FB SE
Lake Forest
, Illinois
Join Date: Oct 2006
Posts: 184
|
Great photos. I guess you can chalk this up to what we call UNskilled labor. They just do what someother unskilled person tells them to do.I f I could just accesss the pump I would have a fighting chance. I have now decided to put the antifreeze in the water supply even though this is not the ideal solutuion.
Thanks for the help.
Allen
|
|
|
|
|
10-14-2007, 10:15 AM
|
#16
|
Rivet Master
2006 25' Safari FB SE
St. Cloud
, Minnesota
Join Date: Aug 2003
Posts: 13,280
|
Quote:
|
Originally Posted by woodedareas
The only practical method of reaching the back side of the pump is to saw an opening through the floor of the closet which I really do not want to do.
|
Quote:
|
Originally Posted by woodedareas
I could just accesss the pump I would have a fighting chance. I have now decided to put the antifreeze in the water supply even though this is not the ideal solutuion.
|
Allen, did you look at removing the 4 screws that attach the pump to the floor? I found this to be a very easy solution. The 27' & 25' FB are so similar in other ways. I'll post a straight on picture of my under wardrobe space maybe within 7-10 days.
I sure wouldn't put antifreeze into the water tank. Pay to have a dealer winterize it this time instead. Remember to pull the carbon cartridge from the kitchen faucet yourself before you take it in -- the glycol will ruin it. I don't put it back in until the spring when there's no possibility of antifreeze in the system.
Here are some other pics. The first is a hose thread port with a rubber tipped compressor attachment that I use -- it's not as handy as john hd's cuz it takes 2 people -- not a problem for once a year. The 2nd has the water valves by my hot water heater -- they are all open as if I would be blowing it out (HW heater not to be drained yet). Valves 2 & 4 are closed in normal camping operation. We can discuss this at any time in the future when you want to tackle it.
|
|
|
|
|
10-14-2007, 10:53 AM
|
#17
|
3 Rivet Member
2007 25' Safari FB SE
Lake Forest
, Illinois
Join Date: Oct 2006
Posts: 184
|
Quote:
|
Originally Posted by CanoeStream
Allen, did you look at removing the 4 screws that attach the pump to the floor? I found this to be a very easy solution. The 27' & 25' FB are so similar in other ways. I'll post a straight on picture of my under wardrobe space maybe within 7-10 days.
I sure wouldn't put antifreeze into the water tank. Pay to have a dealer winterize it this time instead. Remember to pull the carbon cartridge from the kitchen faucet yourself before you take it in -- the glycol will ruin it. I don't put it back in until the spring when there's no possibility of antifreeze in the system.
Here are some other pics. The first is a hose thread port with a rubber tipped compressor attachment that I use -- it's not as handy as john hd's cuz it takes 2 people -- not a problem for once a year. The 2nd has the water valves by my hot water heater -- they are all open as if I would be blowing it out (HW heater not to be drained yet). Valves 2 & 4 are closed in normal camping operation. We can discuss this at any time in the future when you want to tackle it.
|
Bob
Iwill definitely remove the caetridge. I can access the two pump screws facing me and I can try and reach over and see if i can reach the other 2 pump scews and then pull the pump forward or turn it towards me so I cann access the inlet side and connect the adapter.I will give it a try. The dealer would proably have to do the same thing or cut the botoom of the closet floor board. I am so busy right now I don't have the time to pull the trailer to the dealer.
Thanks
Allen
Allen
|
|
|
|
|
10-16-2007, 06:42 PM
|
#18
|
3 Rivet Member
2007 25' Safari FB SE
Lake Forest
, Illinois
Join Date: Oct 2006
Posts: 184
|
Quote:
|
Originally Posted by wasafari
hope you find a way to get to your pump, when you do take a very long hard look at relocating it where you can get at it. I swear the factory built my system up then shoved it up against the wheel well/wall so tight it was damn near inpossible to unscrew the inline filter and remove it so I could get my line attached to suck the antifreeze in. So after three years of cursing etc I moved the darn thing. took me all of 5 minutes to do it this year. So I'm a slow learner....
Jack
first photo shows how the water pump was moved out towards the closet door. I put a soft piece of pex inline between the filer and pump, the whole piece now comes right out.....
|
I decided to give it the old college try. I loosened the 4 screw on the water pump. The screws on the other side of the pump facing away from me had to be removed by touch and feel as I could not see the. Finally I was able to move the pump but only an inch or two due to all of the other wire, heating ducts and water lines. I could not get adequate access to the pump to remove the water line and install the new valve.So I replaced the screws and now will revert to the only method I have left and that is to use antifreeze in the street water tank after I blow out the lines. I am still working on the last srew replacement as I can not see what I am doing and must go by touch and feel. What a great experience.I don't think I am having a good time.
|
|
|
|
|
10-16-2007, 06:52 PM
|
#19
|
Rivet Master
2006 25' Safari FB SE
St. Cloud
, Minnesota
Join Date: Aug 2003
Posts: 13,280
|
So sorry.... Karma for trying!
|
|
|
|
|
10-18-2007, 06:09 PM
|
#20
|
3 Rivet Member
2007 25' Safari FB SE
Lake Forest
, Illinois
Join Date: Oct 2006
Posts: 184
|
Reply from Airstream re: Winterizing
Finally I talked with a person in the Airstream service department. I explained my problem and I was shocked by his answer. He said that they do not pump antifreeze through the pump so they do not have to access the pump under the closet. They drain all systems and the with about 45 # of pressure blow out the lines. They they pour antifreeze into all of the traps and the toilet. He then explained that I could have ordered the valve on the water pump when I ordered the Airstream.This will be the last of my post on this subject but thought you might be interested in the comments from Airstream.
|
|
|
|
|
|
|
Currently Active Users Viewing This Thread: 1 (0 members and 1 guests)
|
|
|
 Posting Rules
|
You may not post new threads
You may not post replies
You may not post attachments
You may not edit your posts
HTML code is Off
|
|
|
|

 Recent Discussions
 |
|
|
|
|
|
|
|
|
|
|
|
|
|
|
|
|
|
|
|
|
|


 Linear Mode

