 |
 09-23-2020, 09:46 AM
|
#1
|
2 Rivet Member 
Join Date: Jul 2015
Posts: 42
|
Interior Wall Install
Hi all:
Anyone know how interior walls are fastened?
Im told rivets but hard to vision
Pictures would be amazing
__________________
Ryan
1965 International
Palm Beach, FL
|

|

|
|
09-23-2020, 10:27 AM
|
#2
|
Rivet Master  
1956 22' Safari
2015 27' Flying Cloud
Vintage Kin Owner
Conifer/Evergreen
, Colorado
Join Date: Feb 2002
Posts: 12,707
|
Yes, in a 1965, the rivets are fastened through the vinyl wallcoverering coated skin to the ribs. Just Aluminum pop-style rivets (not bucked) except where panels are pre-assembled before attaching to the ribs - like at the end caps & ceiling.
If you look real close, you can see them in this picture:
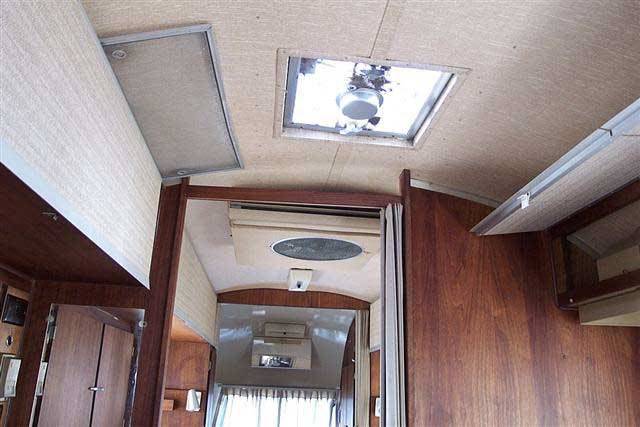
About 3-4 " on either side of the vent going down the center of the ceiling. The strip down the center, covers where the two ceiling panels come together.
Shari 
|
|
|
|
|
09-23-2020, 10:58 AM
|
#3
|
2 Rivet Member
Join Date: Jul 2015
Posts: 42
|
Quote:
Originally Posted by InsideOut

Yes, in a 1965, the rivets are fastened through the vinyl wallcoverering coated skin to the ribs. Just Aluminum pop-style rivets (not bucked) except where panels are pre-assembled before attaching to the ribs - like at the end caps & ceiling.
If you look real close, you can see them in this picture:
About 3-4 " on either side of the vent going down the center of the ceiling. The strip down the center, covers where the two ceiling panels come together.
Shari |
Awesome! I should have specified that I meant the bulkhead divider walls
I have the interior skins riveted up
__________________
Ryan
1965 International
Palm Beach, FL
|
|
|
|
|
09-23-2020, 11:02 AM
|
#4
|
3 Rivet Member 
1967 17' Caravel
Austin
, Texas
Join Date: Apr 2016
Posts: 221
|
The only fasteners on the wood walls are at the floor (via blocks) and top of the end cap. The plywood panel simply rides in the C-channel receiver that is riveted to the exterior walls. This allows differential movement. Also, the panel is probably screwed to the end of the overhead storage cabinet.
|
|
|
|
|
09-23-2020, 11:16 AM
|
#5
|
Rivet Master
1956 22' Safari
2015 27' Flying Cloud
Vintage Kin Owner
Conifer/Evergreen
, Colorado
Join Date: Feb 2002
Posts: 12,707
|
Oh, okay - sorry I mis-understood. That same picture shows how the walls are attached too - in the upper right corner by the overhead cabinet. In both our previous '64 and our current '56, there is an aluminum ' U-Channel' with a leg:

That trim is riveted to the skins and the wood panels slide into it (ours is bigger 1"+/- & original, but the link product is the same). They then attached rivets through the u-channel/wood sandwich to hold the panels in place at the head/wall. They are also fastened at the floor with wood blocks as David mentioned.
This picture (our '56) shows the u-channel with a panel in place:

You can see the rivets periodically about 1:12" along the trim.
Hope this helps ~
Shari
|
|
|
|
|
09-23-2020, 11:55 AM
|
#6
|
2 Rivet Member
Join Date: Jul 2015
Posts: 42
|
Quote:
Originally Posted by InsideOut
Oh, okay - sorry I mis-understood. That same picture shows how the walls are attached too - in the upper right corner by the overhead cabinet. In both our previous '64 and our current '56, there is an aluminum ' U-Channel' with a leg:
That trim is riveted to the skins and the wood panels slide into it (ours is bigger 1"+/- & original, but the link product is the same). They then attached rivets through the u-channel/wood sandwich to hold the panels in place at the head/wall. They are also fastened at the floor with wood blocks as David mentioned.
This picture (our '56) shows the u-channel with a panel in place:

You can see the rivets periodically about 1:12" along the trim.
Hope this helps ~
Shari |
Ok gorgeous!
Am I crazy to use really thin plywood to replace?
Just realizing its heavier and thicker than what I ripped out
__________________
Ryan
1965 International
Palm Beach, FL
|
|
|
|
|
09-23-2020, 12:38 PM
|
#7
|
Rivet Master
1956 22' Safari
2015 27' Flying Cloud
Vintage Kin Owner
Conifer/Evergreen
, Colorado
Join Date: Feb 2002
Posts: 12,707
|
What's " really thin plywood"?
The wood panels in our trailer are 1/4" birch ply...both the existing & replaced walls weigh about the same - we matched what was there.
Shari
|
|
|
|
|
09-23-2020, 01:41 PM
|
#8
|
2 Rivet Member
Join Date: Jul 2015
Posts: 42
|
Quote:
Originally Posted by InsideOut
What's " really thin plywood"?
The wood panels in our trailer are 1/4" birch ply...both the existing & replaced walls weigh about the same - we matched what was there.
Shari |
My guy helping renovate wants to uses 3/8 for sturdiness then sand 1/8 in the back for the channels
Good idea or bad? [emoji848]
__________________
Ryan
1965 International
Palm Beach, FL
|
|
|
|
|
09-23-2020, 03:39 PM
|
#9
|
Rivet Master
1956 22' Safari
2015 27' Flying Cloud
Vintage Kin Owner
Conifer/Evergreen
, Colorado
Join Date: Feb 2002
Posts: 12,707
|
Quote:
Originally Posted by beckettnole
My guy helping renovate wants to uses 3/8 for sturdiness then sand 1/8 in the back for the channels
Good idea or bad?
|
IMO > BAD Idea.
If 1/4" was good when it was built, 55+ years ago, it'll be fine now and will last another 50+ years. No need for the added weight. Also the "sanding down 1/8" in the back" opens up the possibility of it de-laminating with the movement down the road & jiggling against the trim. The wall panels in an Airstream are so small they don't span much without support - 1/4" is very sturdy. The only place we used 3/8" was on the horizontal seat & bed platforms under the cushions.
Shari
|
|
|
|
|
10-31-2020, 07:35 AM
|
#10
|
3 Rivet Member
1967 17' Caravel
Austin
, Texas
Join Date: Apr 2016
Posts: 221
|
I agree, stick with 1/4”. BTW, my walls were not riveted to the wall channel. My thought is allowing them to float will keep much of the stresses out of the woodwork.
|
|
|
|
|
01-20-2021, 08:23 PM
|
#11
|
|
New Member
Ramona
, California
Join Date: Sep 2019
Posts: 2
|
Quote:
Originally Posted by InsideOut
IMO > BAD Idea.
If 1/4" was good when it was built, 55+ years ago, it'll be fine now and will last another 50+ years. No need for the added weight. Also the "sanding down 1/8" in the back" opens up the possibility of it de-laminating with the movement down the road & jiggling against the trim. The wall panels in an Airstream are so small they don't span much without support - 1/4" is very sturdy. The only place we used 3/8" was on the horizontal seat & bed platforms under the cushions.
Shari |
Thank yall for the information. Im replacing two walls in my 1977 Land Yacht.
|
|
|
|
|
04-26-2021, 03:55 PM
|
#12
|
1 Rivet Member 
1979 25' Tradewind
Victoria
, British Columbia
Join Date: Feb 2021
Posts: 9
|
thank you all for those comments - i am too far along now and used 1/2 in ply in some areas. Has anyone tried to remove one side of the u channel to adapt to be able to reuse the existing? thanks Lori
|
|
|
|
|
|
Currently Active Users Viewing This Thread: 1 (0 members and 1 guests)
|
|
|
 Posting Rules
|
You may not post new threads
You may not post replies
You may not post attachments
You may not edit your posts
HTML code is Off
|
|
|
|

 Recent Discussions
 |
|
|
|
|
|
|
|
|
|
|
|
|
|
|
|
|
|
|
|
|
|


 Linear Mode

