 |
|
 02-01-2016, 03:43 PM
|
#41
|
4 Rivet Member 
1968 24' Tradewind
1968 26' Overlander
Detroit
, Michigan
Join Date: May 2015
Posts: 467
|
Axles are on!
Update from this past weekends work
I fabricated and attached the axle/shock mounting brackets to the frame. It was a sigh of relief when the axles fit exactly as planned (had to factor that in before the first weld on the frame was made). Prior to welding the axle mount to the frame we double checked it was perpendicular to the center line of the trailer (ensuring equal measurements from the coupler to each axle spindles). I was pleased to see the frame remains true and level after adding all the varies pieces and parts (Ive learned that welding can push and pull metal around).
Prior to reinstalling the wheels, i spent some time wire brushing and cleaning them (for paint prep). I was happy to see I had 6 bolt/5.5" bolt pattern wheels with the baby moon clips. Anyone source hubcaps for this type of wheel? Looks like those at VTS are not what I need.
We used the gantries to flip the trailer onto its tires and installed the new jack. Its starting to look like a trailer.

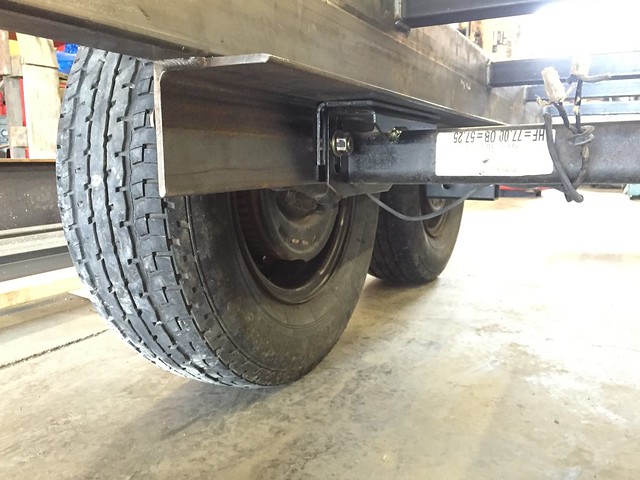
Someone on the forum came up with the great idea to add a short (6) receiver hitch on the curb side of the trailer. This is located between the tires and can be used to mount a small table for outdoor cooking (think outdoor food prep while boon docking at a trail head, etc). Of course we could simply bring along a small table but we like to camp high in the rockies where the wind really blows. This will provide a more secure place to fry some bacon. 

|

|

|


|
02-01-2016, 07:58 PM
|
#42
|
Rivet Master  
1986 34' Limited
1975 27' Overlander
1969 21' Globetrotter
Conifer
, Colorado
Join Date: Jun 2009
Posts: 8,322
|
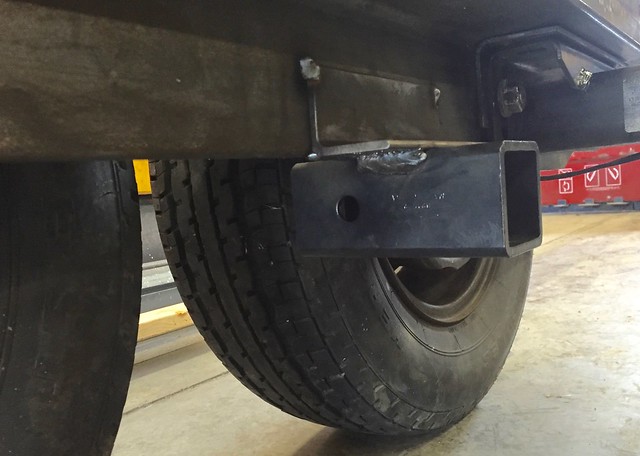
It's looking like a very stout trailer frame indeed. May I ask about the axle specs? Maybe Dexter 3500 pound, 10 inch drums, 32 degree start angle? Just curious.
I suppose the outriggers come next. Then you gotta cut a subfloor that matches the shell corners.
I had never seen such a table mount before. It will not blow over in the wind, that's for sure.
David
|
|
|
|
|
02-02-2016, 06:40 AM
|
#43
|
4 Rivet Member
1968 24' Tradewind
1968 26' Overlander
Detroit
, Michigan
Join Date: May 2015
Posts: 467
|
Atomic's 1968 Tradewind Twin Renovation
The trailer came with two 2010 Dexter 3500 pound (7000 total) axles, 10 inch drums, 22 degree start angle.
In general these are my remaining steps on the new frame:
- outriggers (got 'em cut but they need end curves and two need slots for the step)
- front hold down plate
- galvanized sheet above the step
- entry step
- bumper and bumper box
- LP tank holder
- rear receiver hitch for bike rack
- spare tire support structure
- holding tank supports
- if needed, install a few gussets (TBD) to resist inward rotation of the bottom of the main frame rail
- pre drill holes for 4 BAL stabilizing jacks
- paint frame and wheels
Anyone have an estimate for how much weight your gear, food, clothes, etc adds to the trailer on trip? I'm sure it depends on # of people and trip length but any guesses? Knowns for us: 30 gallons of water (240 pounds), ~ 100 pounds of food and ~100 pounds of personal items (clothes, toiletries) for 7 days for 5 people. I'll have 52 gallons of grey and 20 gallons of black water capacity.
|
|
|
|
|
02-02-2016, 08:02 PM
|
#44
|
Rivet Master
1986 34' Limited
1975 27' Overlander
1969 21' Globetrotter
Conifer
, Colorado
Join Date: Jun 2009
Posts: 8,322
|
Thanks for the info on your Dexter axles. My axles are also 10" drums and 22 degree start angle. Mine are 3000 pound axles. The gear we load into our trailers varies a lot. I travel with about 1/2 a tank of fresh water. My waste tanks are mostly empty although I keep about 5 gallons in the black tank just to keep it wet and sloshing. I doubt if we load a 100 pounds of clothes or food. I carry about 80 pounds of propane. The battery is about 55 pounds. The microwave is about 30 pounds. There is maybe 30 pounds of dishes and cooking utensils.
I have a question concerning your folding step that you took off. I have learned that the rear most links follow the slot in the outrigger with a simple follower on the end of the link. How are the front links attached? Can I pry the links away from the slot and have the follower come out like on the rear links? Or do I need to take some belly pan material away to access a fastener under there. I need to remove my folding step as it was bent by a stump when it wasn't stowed properly before pulling away. (Called a dumb ars attack!)
Thanks,
David
|
|
|
|
|
02-03-2016, 07:15 PM
|
#45
|
4 Rivet Member
1968 24' Tradewind
1968 26' Overlander
Detroit
, Michigan
Join Date: May 2015
Posts: 467
|
David, I have not removed my step from my old frame yet. When I do I'll take a picture from the back side. I'm not sure if this is the same as ours but this is on eBay. Can't tell if there is a bolt to loosen. 
|
|
|
|
|
02-03-2016, 07:27 PM
|
#46
|
Rivet Master
1986 34' Limited
1975 27' Overlander
1969 21' Globetrotter
Conifer
, Colorado
Join Date: Jun 2009
Posts: 8,322
|
Thanks for the ebay pictures Atomic. I don't think it is the same step as ours, it looks like a newer version. But the followers attached to the end of the links look similar. The rear links on my step are bent and are out of the slot. It appears it was designed so the strength of the link holds the follower in the slot.
It would be nice to know how this front link is attached to the outrigger.
I hope I'm not diverting you from more important tasks, like welding outriggers and the like.
David
|
|
|
|
|
02-04-2016, 06:04 AM
|
#47
|
4 Rivet Member
1968 24' Tradewind
1968 26' Overlander
Detroit
, Michigan
Join Date: May 2015
Posts: 467
|
The frame is a couple hours away from me, at present. I'll be certain to post a picture on the weekend of 2/13 (my next opportunity to work on the AS). I know for sure the inner most arms hold the pegs in place with tension. Don't recall how the outermost connection looks.
|
|
|
|
|
02-04-2016, 12:45 PM
|
#48
|
4 Rivet Member
1968 24' Tradewind
1968 26' Overlander
Detroit
, Michigan
Join Date: May 2015
Posts: 467
|
David, I talked a family member into texting me a photo for you. Here is the step connections to the outrigger. The rear pin can indeed be removed by flexing the arms. The front connection appears to be pressed on and likely requires you access the area to remove it.  
|
|
|
|
|
02-04-2016, 06:42 PM
|
#49
|
Rivet Master
1986 34' Limited
1975 27' Overlander
1969 21' Globetrotter
Conifer
, Colorado
Join Date: Jun 2009
Posts: 8,322
|
Thank you Atomic, I owe you! Now I know what I need to do to remove the bent steps.
I enjoyed seeing the Kansas City sunshine in your photos. And you can see exactly why you built a new frame for your Airstream. Corrosion is the bane of ferrous materials.
David
|
|
|
|
|
02-21-2016, 08:28 AM
|
#50
|
4 Rivet Member
1968 24' Tradewind
1968 26' Overlander
Detroit
, Michigan
Join Date: May 2015
Posts: 467
|
Parts trailer
Well, life always throws you curve balls... grab a cup of coffee, this will be a long post.
I've been looking for a parts trailer to replace various parts and pieces that were either missing or damaged on my '68 TradeWind. In particular I was hoping to find one with exterior end cap panels in decent shape. I was also looking for period correct rear and side windows. As luck would have it I found one (1968 Overlander, International Double). Ironically, this is the trailer my wife wanted all along.
The down side it was 600 miles away. The up side was it was priced right --- very right, to be honest. So my son and I changed our plans from making further progress on frame welding for my TradeWind to taking a road trip for our second airstream recovery mission.
It involved the usual, lots of miles full of apprehension that the photos looked better than reality, that it would even be there after the 8 hour drive, and that we wouldn't be another Craigslist scam victim. But, surprisingly, it all worked out great. After replacing the tires, being glad I brought all the right tools, diligently checking the axle hubs, and pushing through a nasty midwestern ice/snow storm, we made it back to Kansas. After washing off the road salt, I can't be any happier with the shape the exterior shell is in (don't mind the blue tape - I was hoping to not to loose anything on the drive home).
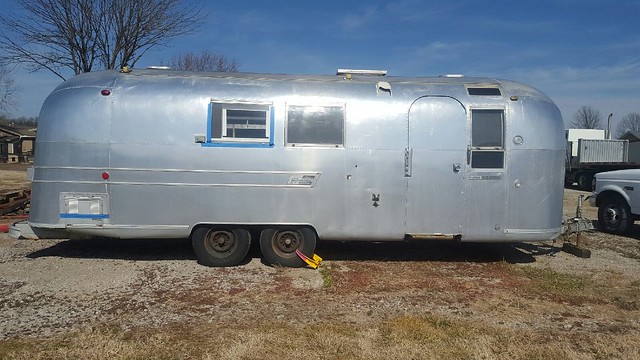
It was a trailer that has been passed down through a nice family since the mid '90, with a single owner prior to that. For the past 25 years, it has either been parked as a fish camp by a river on their property or driven the 10 miles back to their home. Overall, it's seen limited use during it's 48 years.
Like so many other AS owners, the grandson had aspirations to restore it and began disassembling the interior but life got in the way of the project. Regrettably, he informed us that all the bathroom components were beyond repair and he had discarded them. It's in need of a solid cleaning, because fish camps aren't meant to be clean and time wears all things down. The current residents (mice) have enjoyed their home. Perhaps they don't know it yet but they now live in Kansas and are about to be harassed by one very hungry farm cat.
So now we are faced with a tough question... which do we keep and which do we sell? Given the trailers are only 2 feet different in length it seems silly to have both. The fortunate thing is that both trailers can complement each other and have extra parts the other trailer needs. So in the long run, both are better off now, with exception of the bathroom area. Obviously, the trailer we keep will get priority regarding parts but I'm really happy that the secondary trailer has potential to make a nice airstream for someone else. I've also considered simply trying to sell as many parts of the TradeWind to help other trailers further along in the process. For now, we are leaning towards restoring the Overlander as our trailer. Here is why:
- It's the trailer we were looking for all along
- It will more comfortably sleep 5 (the size of my family)
- It's an international line, so it has more bells and whistles
- We prefer the look of walnut wood over ash
- The shell is in better condition
- The missing parts in the Overlander are available in the TradeWind and will make a 100% complete trailer
- Amazingly, my newly welded frame will work with a simple ~ 16" addition to the rear frame rails.
- The Overlander frame (which hopefully is in good shape) can be easily modified to fit our TradeWind.
During the process of swapping parts, we plan to keep the new owners of our TradeWind in mind and make decisions and investments that we'd have made if we were keeping it ourselves. My family has a long history of taking pride in craftsman quality work.
As for the disposition of the TradeWind, it will have to take a back burner position. Once we get the Overlander's shell on the new frame and everything water tight, I might divert my attention to the TradeWind, getting it ready to sell. If we decide against making the TradeWind a parts trailer, I'm not sure how far I should restore it before trying to sell it. I know for sure I'd want to modify the original Overlander's frame, add a fish plate to the C channel to improve it's strength, and treat it with POR 15. We'd need to add a new plywood floor and reattach the shell. It only makes sense to get it water tight, as well, so I don't have to keep it covered in our shop (which has limited space). To, me this would be a great opportunity for someone who wants to restore an airstream right, but doesn't have the space, time, tools, or skills to do a shell off restoration. I'm leaning towards not rewiring and closing up the interior skins as I suspect the next owner would want to do some work on the dents, dings, and scratches. Guess it boils down to how much I want to sell it for and how much time I have. Perhaps, it would take less time and money to part the trailer out... tough decision.
|
|
|
|
|
02-21-2016, 07:18 PM
|
#51
|
Rivet Master
1986 34' Limited
1975 27' Overlander
1969 21' Globetrotter
Conifer
, Colorado
Join Date: Jun 2009
Posts: 8,322
|
How about that! Aluminum-itus is a disease you know. There are folks on these forums who have several and keep wanting more. They're fun to work on and travel with.
I think you are wise to shift the focus to the 68 Overlander considering your family. You can create the sleeping spaces you'll need. The international trim is nice indeed. The Overlander may have been Airstream's top selling model in 68, just like the 25s and 27 footers are currently. You're shell off frame restoration on the Overlander will go quicker now that you have done it. Building a new bath is a big project.
I'd recommend preparing the Trade Wind for sale as a project trailer. Finish it with the new strong frame, axles, subfloor, good windows and doors, and ready for towing (exterior lights and brakes all work). The next phase the new owner would initiate is interior design with associated plumbing and wiring. I'd leave the belly pan off so the new owner can arrange the waste water tanks they need in the locations they need. I'd leave the interior skins off also, but maybe clearly label them so they can be replaced more easily. The new owner will need them off to complete the wiring upgrade and insulate it to their satisfaction. Lastly, I'd include any parts like cabinets bulkhead walls and the like for reuse or patterns for new. The interior of your Trade Wind looked quite good and the new owner will likely want that originality.
Now what is a 68 Trade Wind like that worth? I like to say, although there are lots who disagree, that a good vintage Airstream shell is worth $5000. Dents and missing windows and doors significantly detracts from that price. A good shell along with a new frame and new running gear add significant value. I don't think many of us amature restorers expect to get paid much for our labor or overhead. You may take a haircut on the Trade Wind, but you may make it up on the Overlander.
Coffee gone...
David
|
|
|
|
|
02-22-2016, 07:31 AM
|
#52
|
Rivet Master
1963 26' Overlander
Austin
, Texas
Join Date: Feb 2008
Posts: 2,640
|
I'm an Overlander guy.
But the TW is a great trailer, if you decide to change plans, it'll make a good camper for someone else.
Good Luck!
-Marcus
|
|
|
|
|
03-15-2016, 09:29 PM
|
#53
|
4 Rivet Member
1968 24' Tradewind
1968 26' Overlander
Detroit
, Michigan
Join Date: May 2015
Posts: 467
|
I burned a few vacation days to move the Tradewind closer to having its shell back on.
I used a plasma cutter and jig to create curves on the outriggers and then attached them to the frame (making sure they were square and level with frame rails).
My brother helped me fabricate the slotted step outriggers with his mill.

The step needed some repair work but it's working great now. 
I installed 2" straps for belly pan attachment down the center of the frame and along the outriggers. The outrigger straps needed moved outward to accommodate the 6" deep frame (my skins will not reach as far under the frame).

I torched the bumper from the old frame and attached it to the 6" frame rail by tapering a 12" section of rectangular tubing (since the bumper is 5" and my frame is 6")

We decided to use 16 gauge galvanized steel for the front hold down plate. Hopefully it will play nicely with the Alclad. Might still isolate it.
Lastly, I fabricated a spare tire holder under the A frame. I need to add a center bolt to keep the tire from sliding off the holder.

Next up is painting the frame, installing plywood, and everything that goes in the belly pan (tanks, sensor and break wires, 7 pin wire, insulation, etc.)
|
|
|
|
|
03-15-2016, 09:36 PM
|
#54
|
4 Rivet Member
1968 24' Tradewind
1968 26' Overlander
Detroit
, Michigan
Join Date: May 2015
Posts: 467
|
It's nice to be nearing the completion of the frame welding. It's dirty and hard work, but I've really enjoyed it. 
|
|
|
|
|
03-16-2016, 01:49 PM
|
#55
|
4 Rivet Member
1968 24' Tradewind
1968 26' Overlander
Detroit
, Michigan
Join Date: May 2015
Posts: 467
|
Holding tanks arrive today!
I finished up a few minor projects and regrettably need to head back to work. 
The subfloor end curve patterns and measurements match up well with the frame.

Pre fit the propane tank rack (will paint separately from the frame)

Repaired the ends of my wheel wells.

Added a second welding pass to my coupler (should be super strong).

Painted the wheels.

|
|
|
|
|
03-17-2016, 09:45 AM
|
#56
|
3 Rivet Member 
1967 24' Tradewind
Blairstown
, New Jersey
Join Date: Jul 2007
Posts: 136
|
<Regrettably, he informed us that all the bathroom components were beyond repair and he had discarded them. >
Check your PM.
Wayne
|
|
|
|
|
03-17-2016, 11:45 AM
|
#57
|
4 Rivet Member
1968 24' Tradewind
1968 26' Overlander
Detroit
, Michigan
Join Date: May 2015
Posts: 467
|
@ David - Among other things, I rebuilt my TradeWind's step this past week and learned a bit more about it in the process. On closer inspection it appears Airstream inserted an unthreaded elevator bolt (essentially a flat head on a smooth shaft) through the outrigger into the step arm and then welded the shaft to the step arm. To remove it, I suggest you grind the weld down to the level of the arm and then use a punch and drill to bore out the rest of the shaft.
You'll need to decide if you want to replace the connection with a similar attachment system (which requires welding). Since the step arms have a very tight clearance, a standard bolt head cannot be used on the step arm as it would prevent the step from being fully closed. I decided to cut the head off a bolt and weld it to the step arm while it was in place on the outrigger (see picture on previous page). I then added a locking nut on the bold protruding outside of the outrigger.
In retrospect, I suggest you source a 3/8" elevator bolt and push this through the step arm into the outrigger. The elevator bolt head should clear the other arm. Then put the locking nut on the outside of the outrigger. This would negate the need to weld anything and allow the step to be removed in the future with simple tools (no grinding, drilling, or welding required). You'd want to modify the skin so that you can access the locking nut for maintenance.
|
|
|
|
|
03-17-2016, 08:12 PM
|
#58
|
Rivet Master
1986 34' Limited
1975 27' Overlander
1969 21' Globetrotter
Conifer
, Colorado
Join Date: Jun 2009
Posts: 8,322
|
Thank you very much for taking the time to explain how Airstream attached the folding step on these old trailers. I find it curious that Airstream decided to weld the "pivot" shaft to the arm and make it much more difficult to remove in the likely event it got bent.
I like your idea of providing a flat head bolt welded to the arm, and a lock nut on the back side of the outrigger. Yeah, you still have to drill out rivets on the lower part of the skin and belly pan, but you can remove the step without cutting or grinding the bolt.
I think I can proceed with the step repair on our 69 Globetrotter. Thanks again!
You are making great progress on your Trade Wind frame. It sure looks sturdy and rigid. It won't be long before you will perform "touch down" marrying the shell (body) to the new frame. Bolt it down to those beefy outriggers and new subfloor and away it goes.
David
|
|
|
|
|
03-17-2016, 08:36 PM
|
#59
|
Rivet Master
1972 31' Sovereign
1975 31' Excella 500
Currently Looking...
Benton
, Arkansas
Join Date: Mar 2013
Posts: 5,868
|
Very nice work!!!
Talis gentium ceciderunt.
__________________
The fact that I am opinionated does not presuppose that I am wrong......

|
|
|
|
|
03-17-2016, 09:35 PM
|
#60
|
|
NO HUMBLE OPINION
1968 20' Globetrotter
ANN ARBOR
, THE GREAT LAKES
Join Date: Apr 2011
Posts: 670
|
Been following your rebuild adventure... Serious Frame Envy here!
|
|
|
|
|
|
|
Currently Active Users Viewing This Thread: 1 (0 members and 1 guests)
|
|
|
 Posting Rules
|
You may not post new threads
You may not post replies
You may not post attachments
You may not edit your posts
HTML code is Off
|
|
|
|

 Recent Discussions
 |
|
|
|
|
|
|
|
|
|
|
|
|
|
|
|
|
|
|
|
|
|


 Linear Mode

