 |
|
 03-26-2010, 10:43 PM
|
#21
|
Rivet Master  
1959 26' Overlander
Powder Springs
, Georgia
Join Date: Jan 2010
Posts: 671
|
After looking at picture again, there's no way our fresh water tank will fit under the SS twin. (With the water heater and the wheel well there's no room.)
Thanks for the diagram, Brad.
Ken, yes I mean June 2010.  We're not working on it full time... just nights (almost every) and weekends.
__________________
~Lynnetta
|

|

|


|
03-27-2010, 06:20 AM
|
#22
|
Rivet Master
1963 26' Overlander
Austin
, Texas
Join Date: Feb 2008
Posts: 2,640
|
Quote:
Originally Posted by nmbosa

Yep, the 59's had the old aluminum fresh water tank up front with an air compressor. I thought your's came like that also originally. Do you know if your fresh water tank was possibly moved by a previous owner?
Norm
|
I'm pretty sure the original galvanized air-pressure freshwater tank resided under the SS twin. Terry didn't show it as he had already removed it, but he talks about it here in post #50.
 http://www.airforums.com/forums/f109...tml#post158647
He replaced it with a small plastic tank in the same position, and found a vintage 70s on-demand PAR water pump (which I am still using to this day, it works great if a bit loud!).

I have since replaced that small tank with a larger 30-gallon one, sent to me gratis courtesy of the ever-generous and kind Rob Baker of VAP fame. I was going to post a picture of the new tank from my thread, but then realized I never posted one. I think I was waiting to take pictures until I had "cleaned up" a bit on the PEX routing, and just never went back and did it.
Anyway, what all of that means is that I think Airstream changed this tank location somewhere between 1959 and 1962, because Frank's 62 Overlander has the freshwater tank in the same place as mine.
Someday, I bet you could fit a new on-demand water tank under the SS twin if you wanted to, they tend to be a little more manageable than the older galvanized ones.
-Marcus
|
|
|
|
|
03-27-2010, 07:37 AM
|
#23
|
Rivet Master
1975 Argosy 26
1963 24' Tradewind
Seattle
, Washington
Join Date: Aug 2002
Posts: 2,341
|
For the record, my 63 TW also had the tank adjacent to the wheel well on the streetside.. as well as the hot water tank.
Marc
|
|
|
|
|
03-27-2010, 07:56 AM
|
#24
|
Rivet Master
1977 27' Overlander
1973 27' Overlander
1963 19' Globetrotter
Naples
, Florida
Join Date: Nov 2007
Posts: 1,259
|
3/8 pex
Quote:
Originally Posted by nmbosa
That is exactly right. The original copper line is pretty small (I think 1/2 inch outside diameter, but someone here probably knows better) and the finishing trim piece that hides the line is a tube like cove molding that fits over the line. Unfortunately, that trim piece won't fit over PEX.
There is just a cold water line coming from the fresh water tank back to the kitchen and then on to the hot water heater. The hot lines T off the hot water heater with one going forward to the kitchen sink and one going aft to feed the shower and bathroom sink.
|
Though you may not find it at HDepot,3/8 pex does exist, 1/2 od.,you should be able to find it at any major plumbing supply house.The water tank on my 63 GT is upfront,and I plan to run the 3/8 pex around to the k sink cab. Dave
|
|
|
|
|
04-08-2010, 09:32 AM
|
#25
|
Rivet Master
1959 26' Overlander
Powder Springs
, Georgia
Join Date: Jan 2010
Posts: 671
|
Help! We're stuck!
We're trying to put the fiberglass endcaps in without much success. We've worked on one endcap for two evenings and have a grand total of 15 clecos installed along the top edge. So far we haven't been able to get any more holes to line up.
other information:
We're using a helping hand....
There's no floor in yet... just frame, spacers, and outside skin...
Any advice would be appreciated!
__________________
~Lynnetta
|
|
|
|
|
04-08-2010, 09:36 AM
|
#26
|
|
Vintage Alum. Enthusiast
1959 24' Tradewind
Phoenix
, Arizona
Join Date: Feb 2002
Location: I currently do not own a 2nd Airstream
Posts: 4,360
|
Just how far off are the holes? I have found that using an awl or an ice pick helps to get the holes aligned until you can get a clecko put in.
Good luck. You're making great progress.
Brad
FF
__________________
4CU 2699 / AIR 10 / TAC AZ-1
I'm haunted by aluminum.
Charter Member of the 4 Corners Unit.
|
|
|
|
|
04-08-2010, 09:54 AM
|
#27
|
Rivet Master
1962 22' Safari
1957 22' Custom
1963 16' Bambi
Vacationland
, Maine
Join Date: Apr 2006
Posts: 956
|
Quote:
Originally Posted by Someday'59
We're trying to put the fiberglass endcaps in without much success. We've worked on one endcap for two evenings and have a grand total of 15 clecos installed along the top edge. So far we haven't been able to get any more holes to line up.
other information:
We're using a helping hand....
There's no floor in yet... just frame, spacers, and outside skin...
Any advice would be appreciated!
|
Is the trailer parked on a level surface? Or was it moved after fiberglass was removed?
I know the frame and body does move and flex and this my be why holes are not lining up. could try jacking one side while trailer is attached to vehicle, and make a few sharpe marks next to wall and fiberglass.
|
|
|
|
|
04-08-2010, 10:02 AM
|
#28
|
Rivet Master
1962 22' Safari
1957 22' Custom
1963 16' Bambi
Vacationland
, Maine
Join Date: Apr 2006
Posts: 956
|
Quote:
Originally Posted by Someday'59
I know this is kind of a weird question... but the PO took out most of the original plumbing in our trailer. We're getting ready to put in PEX but we're not sure where exactly to put it. Does it go under the twin beds? kitchen sink? Do part of the pipes go under the floor? In the wall? Where do the pipes go that lead to the bathroom sink? Please help!
|
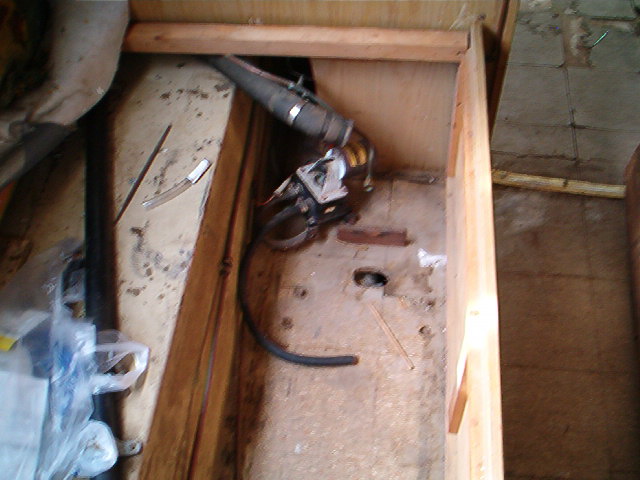
Here is a layout for my Safari double if this helps with how to plan your plumbing.
|
|
|
|
|
04-08-2010, 10:07 AM
|
#29
|
Rivet Master
1957 22' Caravanner
Port Hadlock
, Washington
Join Date: Dec 2008
Posts: 864
|
Is your front window frame removed? Can't tell from the pic. I just put my endcap back in my '57 by myself and once it was hanging on the window frame it all lined up just fine. I don't believe mine had nearly as many rivets holding it on as you have clecos in your picture. Aren't some of those holes used for attaching the interior skin later?
You guys are making progress so fast it's putting the rest of us to shame. 
cheers,
steve
|
|
|
|
|
04-08-2010, 10:43 AM
|
#30
|
Rivet Master
, Minnesota
Join Date: Aug 2003
Posts: 7,721
|
You might need to push hard in the center of the endcap. The clearance between the outer aluminum and the endcap may be as little as 3/4 inch.
Also try working the clecoes up from each side rather than starting at the top.
|
|
|
|
|
04-08-2010, 12:29 PM
|
#31
|
Rivet Master
1959 26' Overlander
Powder Springs
, Georgia
Join Date: Jan 2010
Posts: 671
|
Quote:
Originally Posted by flyfshr
Just how far off are the holes? I have found that using an awl or an ice pick helps to get the holes aligned until you can get a clecko put in.
|
Some are off by only 1/4 inch... others as much as 1 1/2 inches... we'll try the awl tonight...
Quote:
Originally Posted by safari62
Is the trailer parked on a level surface? Or was it moved after fiberglass was removed?
I know the frame and body does move and flex and this my be why holes are not lining up.
|
The trailer is on a level surface and we haven't moved it since we took the endcaps out...but we have had some major shell shifting... I think we've got that under control now with spacers and bolts.
Quote:
Originally Posted by pbearsai35283lor
Is your front window frame removed? Can't tell from the pic.
|
Yes, the window and frame are out right now.
Quote:
Originally Posted by pbearsai35283lor
I just put my endcap back in my '57 by myself and once it was hanging on the window frame it all lined up just fine.
|
WOW! By yourself!?!
Quote:
Originally Posted by pbearsai35283lor
I don't believe mine had nearly as many rivets holding it on as you have clecos in your picture. Aren't some of those holes used for attaching the interior skin later?
|
I wish. We have another row of rivet holes where the next sheet of interior skin attaches.
Quote:
Originally Posted by pbearsai35283lor
You guys are making progress so fast it's putting the rest of us to shame. |
Thanks.
Quote:
Originally Posted by markdoane
Also try working the clecoes up from each side rather than starting at the top.
|
We tried this the first day. We got a grand total of THREE clecoes in. 
__________________
~Lynnetta
|
|
|
|
|
04-08-2010, 01:14 PM
|
#32
|
Rivet Master
1957 22' Caravanner
Port Hadlock
, Washington
Join Date: Dec 2008
Posts: 864
|
Just doesn't sound right to be that far off. I'd sure be inclined to put the endcaps on the backburner for awhile. You mentioned in earlier posts that the shell had shifted. Why not get the new subfloor installed and attached to the shell, so that you know it's all true and level. On my trailer the endcaps are the first pieces of upper interior that needs to go back in, but you're not to the point that you need to hurry getting them reinstalled. You'll be amazed how much stiffer the trailer will be with the new subfloor.
cheers,
steve
|
|
|
|
|
04-08-2010, 01:36 PM
|
#33
|
Rivet Master
1956 22' Safari
2015 27' Flying Cloud
Vintage Kin Owner
Conifer/Evergreen
, Colorado
Join Date: Feb 2002
Posts: 12,702
|
Is it possible that you have the front & back dome switched? Although if that was the case, I doubt any of them would line up... 
Shari 
|
|
|
|
|
04-08-2010, 01:38 PM
|
#34
|
Rivet Master
1959 26' Overlander
Powder Springs
, Georgia
Join Date: Jan 2010
Posts: 671
|
Quote:
Originally Posted by InsideOut
Is it possible that you have the front & back dome switched? Although if that was the case, I doubt any of them would line up...
Shari |
Nope. The front panel has travel decals on it... the back one doesn't.... good thought though.
__________________
~Lynnetta
|
|
|
|
|
04-09-2010, 08:20 AM
|
#35
|
Rivet Master
1959 26' Overlander
Powder Springs
, Georgia
Join Date: Jan 2010
Posts: 671
|
Quote:
Originally Posted by pbearsailor
Why not get the new subfloor installed and attached to the shell, so that you know it's all true and level. On my trailer the endcaps are the first pieces of upper interior that needs to go back in, but you're not to the point that you need to hurry getting them reinstalled. You'll be amazed how much stiffer the trailer will be with the new subfloor.
cheers,
steve |
Ok. Good point. We'll try again after we get the sub-floor installed. We were hoping to get the endcaps up and out of the way... but it doesn't look like it's going to happen. We wasted another evening trying to get the endcaps in (even tried the other endcap.) Time to move on to something else (more electrical and tanks) until after we get the floor in.
__________________
~Lynnetta
|
|
|
|
|
04-09-2010, 08:27 AM
|
#36
|
|
Vintage Alum. Enthusiast
1959 24' Tradewind
Phoenix
, Arizona
Join Date: Feb 2002
Location: I currently do not own a 2nd Airstream
Posts: 4,360
|
OK, I know this probably a really dumb but obvious question but are you certain you're putting the right end cap on the right end of the trailer?
I know, I know - shame in me for asking. 
Brad
FF
__________________
4CU 2699 / AIR 10 / TAC AZ-1
I'm haunted by aluminum.
Charter Member of the 4 Corners Unit.
|
|
|
|
|
04-09-2010, 10:13 AM
|
#37
|
Rivet Master
1959 26' Overlander
Powder Springs
, Georgia
Join Date: Jan 2010
Posts: 671
|
Quote:
Originally Posted by flyfshr
OK, I know this probably a really dumb but obvious question but are you certain you're putting the right end cap on the right end of the trailer?
|
Yes. Positive. We have travel stickers on the front endcap. There aren't any stickers on the back endcap. I'm starting to wonder if we have the wrong trailer though. hehe.
__________________
~Lynnetta
|
|
|
|
|
04-23-2010, 08:51 AM
|
#38
|
Rivet Master
1959 26' Overlander
Powder Springs
, Georgia
Join Date: Jan 2010
Posts: 671
|
 (Drilling?) out rivets
When we took the windows and drip caps off of our trailer we used a drill to drill off the rivet heads. Now, we're almost ready to put the windows back in but we still have the rivet remnants in the holes. What's the best method for removing these? Our current method is a #20 bit and a drill. (With our fingers crossed that we don't slip and scratch up the skin.) Is there an easier way to remove these posts?
Thanks.
__________________
~Lynnetta
|
|
|
|
|
04-23-2010, 09:46 AM
|
#39
|
Rivet Master
1963 26' Overlander
Austin
, Texas
Join Date: Feb 2008
Posts: 2,640
|
Quote:
Originally Posted by Someday'59
When we took the windows and drip caps off of our trailer we used a drill to drill off the rivet heads. Now, we're almost ready to put the windows back in but we still have the rivet remnants in the holes. What's the best method for removing these? Our current method is a #20 bit and a drill. (With our fingers crossed that we don't slip and scratch up the skin.) Is there an easier way to remove these posts?
Thanks.
|
The posts have rarely stayed in the hole when I've drilled out rivets. Usually the head screws up onto the bits, and the post drops down behind. Occasionally, the post comes along with the head and runs up the drill bit as well.
If your posts are sticking in the holes, you might try pushing them through with a punch awl or a coat hanger or something.
But that is not a problem I've encountered very often.
-Marcus
|
|
|
|
|
04-23-2010, 09:55 AM
|
#40
|
Rivet Master
1959 26' Overlander
Nowhere
, Washington
Join Date: Dec 2008
Posts: 573
|
I had this post from Inland Andy in my notes from a while back. You should be using a #21 bit to drill out the rivets. All the drip cap, window and exterior shell rivets are 5/32nd.
"There are 3 drill bit sizes for the rivets that Airstream has used for many years.
1/8" rivets use #30 drill bit
5/32" rivets use #21 drill bit
3/16" rivets use #11 drill bit.
#21 is .159"
#20 is .161"
|
|
|
|
|
|
|
Currently Active Users Viewing This Thread: 1 (0 members and 1 guests)
|
|
|
 Posting Rules
|
You may not post new threads
You may not post replies
You may not post attachments
You may not edit your posts
HTML code is Off
|
|
|
|

 Recent Discussions
 |
|
|
|
|
|
|
|
|
|
|
|
|
|
|
|
|
|
|
|
|
|


 Linear Mode

