 |
 05-15-2021, 08:44 PM
|
#1
|
2 Rivet Member 
1981 31' Excella II
Tallahassee
, Florida
Join Date: Oct 2017
Posts: 61
|
Journey of a Thousand Miles
Hi, I'm MaryPat. I'm married to Darrell. This thread is to document progress with our 1981 Excella II & also to keep myself motivated. The past couple of years I've discovered that this renovation is like a journey of a thousand miles. My challenge is to work on it as frequently as possible. But with each new step in the process, I find myself paralysed by decision fatigue and/or the fear that comes with learning a new skill. This fear leads to procrastination. Then my procrastination draws on from days into weeks. So in the hopes of getting this sucker done, I'm committing to setting daily small goals & trying not to get overwhelmed.
We brought our Airstream home in September 2018. She was the first one we looked at, & we decided to buy her because we liked the center bath layout. In retrospect, our reno would've probably been easier if we had kicked a few more tires. She needed a good bit of repair work to the rear frame, so we decided to do the full Monty, shell off, new subfloor.  
To date she has been gutted, with much of her bits & pieces saved in our old chicken coop. We removed the shell, & sent the frame to the welder to be repaired & painted. They did a mediocre paint job,so I repainted her. Meanwhile, I took apart, cleaned, polished & reassembled all her double-pane windows.
I've reinstalled the steps. I've repaired, re-galvanized & painted the tank pans. Currently I'm patching the shell - where there used to be an antenna, where the awning anchor got ripped out, weird patches on the exterior roof, etc. I've riveted the fixed windows back in place. This week I installed a new lock on the door, re-insulating, fixing a BB gun hole & patching holes left by a deadbolt.
 
My goal this month is to finish buttoning up the shell, get the belly pan riveted back on, install the subfloor, tanks, insulation & marry the shell & trailer back together. Y'all pray for us! If you've read this far, thanks!
MaryPat
|

|

|


|
05-15-2021, 10:55 PM
|
#2
|
1 Rivet Member 
1981 31' Excella II
Tucson
, Arizona
Join Date: Jun 2019
Posts: 15
|
Wow!
MaryPat, what amazing work you've done!!
Here's to your future!
Lynne
|
|
|
|
|
05-16-2021, 05:24 PM
|
#3
|
2 Rivet Member
1981 31' Excella II
Tallahassee
, Florida
Join Date: Oct 2017
Posts: 61
|
Journey of a Thousand Miles
For months our shell has been on 2x12s, resting on its c-channel, still embedded with a strip of plywood. Now that we are getting closer to installing the new subfloor, I need that c-channel.
So our goal today was, after bracing the sides, to lift the shell about six inches. I thought that my hubby would want to move the gantries back over the shell & lift it that way. Since half our work area is a narrow alley, he chose to muscle it up instead. He braced the shell side to side. Then Darrell lifted each corner by the bracing board & I slid in one remnant pine flooring boards at a time. We leveled the shell up (the ground is very slightly slanted) then he beat stakes into the ground, screwing them to the cross-members. This set-up is pretty solid.

Should someone else use this technique to lift their shell? I have no idea. Since he didn't want to bother with the gantries, my suggestion was a jack. But he said setting it up over & over was too time consuming so he just muscled it up. But Darrell is a carpenter with 35 years experience so I totally trust his judgement. He can build anything, & he is one strong dude.
I managed to get one c-channel off before dinner time. So my goal tomorrow is to remove all of the c-channel & remove the plywood left in the channel.
Have a great evening,
MaryPat
|
|
|
|
|
05-16-2021, 06:27 PM
|
#4
|
Rivet Master  
1966 22' Safari
1955 22' Flying Cloud
Fredericksburg
, Texas
Join Date: May 2015
Posts: 2,955
|
MaryPat/Darrell, glad you started a thread on your rebuild. You have a ton of the crummy stuff behind you. It may seem overwhelming now, but when you start going back with parts/pieces, the progress becomes obvious. Progress is what encourages us to continue on. I was a commercial bricklayer for many years. When my boss would give me blueprints for a building with a quarter million brick, I felt overwhelmed. He would just say spread your crew out and build one wall at a time until its done. You eat an elephant one bite at a time. Keep the progress going and continue to post the pictures. Following along
|
|
|
|
|
05-17-2021, 04:49 PM
|
#5
|
2 Rivet Member
1981 31' Excella II
Tallahassee
, Florida
Join Date: Oct 2017
Posts: 61
|
Quote:
Originally Posted by Bubba L

MaryPat/Darrell, glad you started a thread on your rebuild. You have a ton of the crummy stuff behind you. It may seem overwhelming now, but when you start going back with parts/pieces, the progress becomes obvious. Progress is what encourages us to continue on. I was a commercial bricklayer for many years. When my boss would give me blueprints for a building with a quarter million brick, I felt overwhelmed. He would just say spread your crew out and build one wall at a time until its done. You eat an elephant one bite at a time. Keep the progress going and continue to post the pictures. Following along
|
Hey Bubba! I love that saying about eating an elephant one bite at a time, it's super-relevant to working on an Airstream. They are such beautiful trailers, but until you take one apart down to the aluminum studs, you don't fully realise all the tiny details involved in the systems.
I have the next two week's daily work planned out on a calendar. If I complete each job, we will be putting the shell onto the frame on Memorial Day. Each day is another bite of that piece of the elephant. Then I'll move on to wiring. I have to take it in small chunks. When I think about the entire project, I get overwhelmed. Thanks for the encouragement. 
MaryPat
|
|
|
|
|
05-17-2021, 04:59 PM
|
#6
|
2 Rivet Member
1981 31' Excella II
Tallahassee
, Florida
Join Date: Oct 2017
Posts: 61
|
Progress 5/17
Today's accomplishment was removing the c-channel. It was a rough day & I have a sore back but I'm very happy to be finished.
Tomorrow I'm prepping the back center for new aluminum. The area just above the bumper is corroded.
I'm tired & it's time to make dinner. Thank God for frozen buffalo wings. Pineapple margaritas afterward are the award to celebrate finishing today's job.
Peace,
MaryPat
|
|
|
|
|
05-19-2021, 09:50 AM
|
#7
|
2 Rivet Member
1981 31' Excella II
Florence
, Alabama
Join Date: Sep 2016
Posts: 58
|
It is going to look great! We have an '81 Excella II, 31', and we love it, so I know you will too. Ours didn't need a frame-off, we just reno'd the inside, replaced the axles, and several other bits along the way. These are great units and we've traveled thousands of miles in it with a family of 5 (plus the occasional friend). About to head out on an 8 month journey...
Do you plan to use the bits you removed from inside the camper, or are you open to selling anything? There are two elusive parts I need that I cannot seem to find anywhere: bathroom sliding door handle, and some drawer rollers for the bedroom. Let me know if you're interested in parting with them.
And if there's anything we can help with, we're always happy to compare notes.
|
|
|
|
|
05-23-2021, 08:06 AM
|
#8
|
2 Rivet Member
1981 31' Excella II
Tallahassee
, Florida
Join Date: Oct 2017
Posts: 61
|
Quote:
Originally Posted by losfeliz
Do you plan to use the bits you removed from inside the camper, or are you open to selling anything? There are two elusive parts I need that I cannot seem to find anywhere: bathroom sliding door handle, and some drawer rollers for the bedroom. Let me know if you're interested in parting with them.
And if there's anything we can help with, we're always happy to compare notes.
|
It's possible that I have the sliding door handle. The door is in the rear of the chicken coop so it may take a while to get back there. I'm sure I don't have the drawer rollers unfortunately. We didn't keep any cabinets.
MaryPat
|
|
|
|
|
05-23-2021, 09:03 AM
|
#9
|
2 Rivet Member
1981 31' Excella II
Tallahassee
, Florida
Join Date: Oct 2017
Posts: 61
|
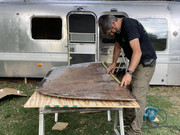
Putting away the rivet gun for now
Well I think I have finally finished all the buck riveting on the exterior. Woohoo!!! Thanks of course to my riveting partner, Sophia. She is my 16 year old daughter & she held the bucking bar for every single rivet we have hammered, We cut off the corroded bottom section of the back center panel & replaced it with new aluminium. In retrospect I wish the top rivet line was closer to the edge, but it's not a deal-breaker for me.

While inspecting the shell for leaks, I realised that the rear bottom driver side corner panel had been replaced previously. The rivets weren't buck or Olympic, & the seam line had no butyl or sealant. So I drilled these rivets, sealed with butyl tape & re-riveted. It's not a pretty job, the frame piece was not absolutely true to the curve of the aluminium shell. I pondered what I was going to do about this situation for days, talking to Darrell about the options. I seriously considered ordering a new curved frame piece. But honestly I don't know if the frame piece is the problem or the shell. There are Olympic rivets in the upper curved corner shell piece, so this was worked on previously as well. So it's possible that we could order a new curved frame piece & still have an issue.
At the end of the day we decided to buck rivet the seam with the existing frame piece. It has some dimpling at the belt line, but it's a structurally sound, water-tight seam.

My last repair was caused by the previous owner apparently leaving the awning up in windy conditions. There was a small tear in the shell aluminium which I already patched. But when I tested for water leaks I discovered that the nearby seam had some Olympic rivets that had the backs popped off. So we sealed the seam with butyl, & buck riveted it back together. (I dunno why this picture posted sideways.) I still need to reattach the awning mounting bracket.

I also painted my wheel wells with truck bed liner. We decided to install the original wheel wells: exterior, insulation, interior & then for extra protection build a plywood box on top. Just in case we have a blow-out in future.
After putting away my tools I started sealing shell rivet backs & seams with TremPro 635. I went through three tubes pretty quickly so I ordered a bunch more - 20 tubes. I found it for $5.50 at Wholesale Glass & Supply online which I thought was a great deal. I should buy stock in this stuff & butyl tape.
Today I am putting the tank pans on the frame & hopefully beginning to install all the tanks. I have the fittings, tank valves & new sensors ready & waiting for me. Anyhoo, that's where we are at right now. Thanks for reading my ramblings.
MaryPat
|
|
|
|
|
07-06-2021, 08:38 AM
|
#10
|
2 Rivet Member
1981 31' Excella II
Tallahassee
, Florida
Join Date: Oct 2017
Posts: 61
|
 Busy Month Catch-Up
I havent posted in over a month, so lets catch-up. Darrell cut & screwed down the new subfloor. Happily we hung onto the old (nasty) floor pieces so he could use them as patterns.

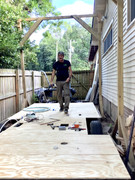
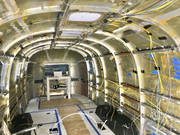
Then I routered the outer edges down about an 1/8 & installed & bolted down the c-channel. (Major fail admission: we painted the outer edge to protect against future water damage. I routered the edge down a bit so the c-channel would fit. Did NOT paint the routered part. DOH!!! Maybe I can get some Thompsons Water Seal to soak in under the c-channel?) Next we lifted the shell with gantries & reattached the shell. There was a lot of adjustments & jacking different corners up or down to get the shells aluminum beams seated correctly. This was such a frustrating job. Darrell & I were scratching our heads for over an hour because the driver-side just would not seat totally. I think the problem ended up being a rivet from the belt line that wasnt entirely drilled out. Then we used pop-rivets to attach the beams to the c-channel.
Darrell installed the two fans into the ceiling. We have a skylight ordered from Maxim skylights that will be installed in the galley area. I covered the a/c & skylight roof openings with coroplastthat rigid corrugated plastic& duct tape as a temporary water-tight patch.
We installed all the awning windows in the shell. Theyve been re-built with new gaskets so theyre good to go. There are some repairs that need to be done to the opening mechanisms & locks that Ill tackle later.
I covered every seam & rivet on the shell with Trem-pro 635. Soooooooooooo much Trem-pro. It rains here almost every afternoon in summer which has helped us quadruple check for leaks.
Darrell is wiring now. As a guide we have the wiring diagram from our owners manual. When we demoed I made a drawing of the interior that noted outlets, switches, etc.
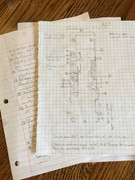
These together helped us make small changes & map out the updated wiring plan. The main change was adding USBs instead of the old 12 volt outlets. Do we need any 12 volt outlets, maybe for the televisions?
I marked the trailers layout, walls, cabinets, etc.we arent changing anything majoron the floor with painters tape. Then I made labels with painters tape & placed the shell walls to mark outlets, USBs, puck lights, switches, cable, etc.
So thats where we are now.
We are still nowhere near getting the belly pan installed. We have our new axles, but we havent tackled them yet either. When we ordered them, we increased the mounting angle which should add a couple of inches of ground clearance. We also ordered a lift kit. What do yall think? Is both overkill? The maximum added height could be as much as 5.
If you actually read this all the way to the end, cheers!
MaryPat
|
|
|
|
|
07-06-2021, 09:57 AM
|
#11
|
Rivet Master
1958 26' Overlander
Battle Ground
, Washington
Join Date: Jun 2013
Posts: 871
|
Great work so far, look forward to folowing along.
For the length of your AS I'd add the lift kit. Don't want to drag the tail leaving the gas station. 
|
|
|
|
|
07-06-2021, 10:49 AM
|
#12
|
Rivet Master
2014 20' Flying Cloud
Sag Harbor
, New York
Join Date: Jun 2015
Posts: 17,523
|
Quote:
Originally Posted by Happy2BeHere
. . .
. . . The main change was adding USB’s instead of the old 12 volt outlets. Do we need any 12 volt outlets, maybe for the televisions?
. . . |
Why not add a few? Very simple to do now . . . maybe some "retro" 12-volt-plug-in trinket will catch your eye, like a coil immersion heater, which folks used to heat up water for tea in a china mug?
https://www.amazon.com/FTVOGUE-Porta...5590222&sr=8-3
Thanks for a great thread, and for your recent update and photos!
Cheers,
Peter
|
|
|
|
|
07-07-2021, 09:47 AM
|
#13
|
2 Rivet Member
1981 31' Excella II
Tallahassee
, Florida
Join Date: Oct 2017
Posts: 61
|
Quote:
Originally Posted by 57Vintage
Great work so far, look forward to folowing along.
For the length of your AS I'd add the lift kit. Don't want to drag the tail leaving the gas station. |
You make a great point. Id never considered that the longer your tail behind the axles, the greater chance to hit asphalt. Thanks!
MaryPat
|
|
|
|
|
07-07-2021, 09:51 AM
|
#14
|
2 Rivet Member
1981 31' Excella II
Tallahassee
, Florida
Join Date: Oct 2017
Posts: 61
|
Quote:
Originally Posted by OTRA15
Why not add a few? Very simple to do now . . . maybe some "retro" 12-volt-plug-in trinket will catch your eye, like a coil immersion heater, which folks used to heat up water for tea in a china mug?
https://www.amazon.com/FTVOGUE-Porta...5590222&sr=8-3
Thanks for a great thread, and for your recent update and photos!
Cheers,
Peter |
Youre right, its always good to have options. I think we will add a couple just in case.
MaryPat
|
|
|
|
|
07-26-2021, 10:23 AM
|
#15
|
2 Rivet Member
1981 31' Excella II
Tallahassee
, Florida
Join Date: Oct 2017
Posts: 61
|
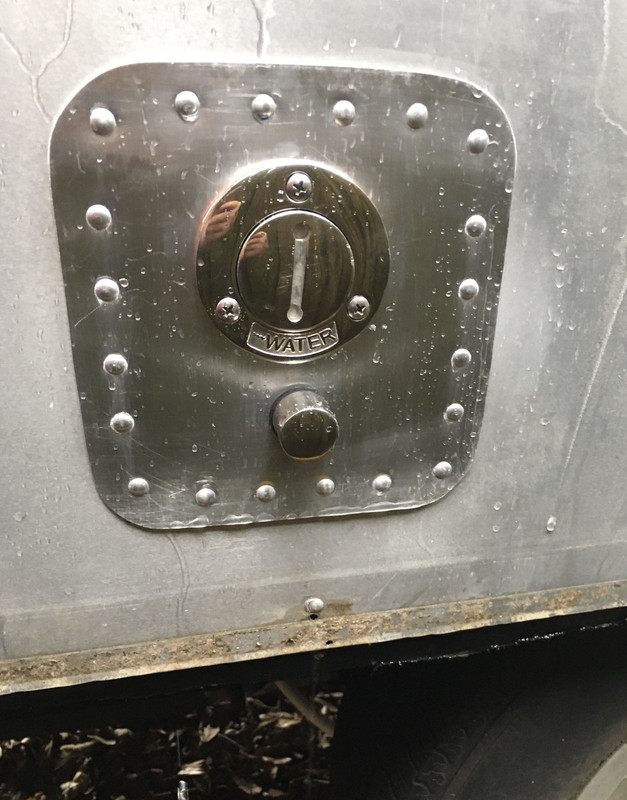
Monday Morning Reno Update
Happy Monday!!! A quick update today.
We decided to replace the fresh water tank inlet. The original didnt fully seal so rainwater & whatever was on the roof/sides of the airstream got funneled into the tank - gross! Also it was plastic & cracked.

I saw a marine style inlet & vent fitting that another contributor here posted. Im sorry but I dont remember who. Anyhoo, here it is:
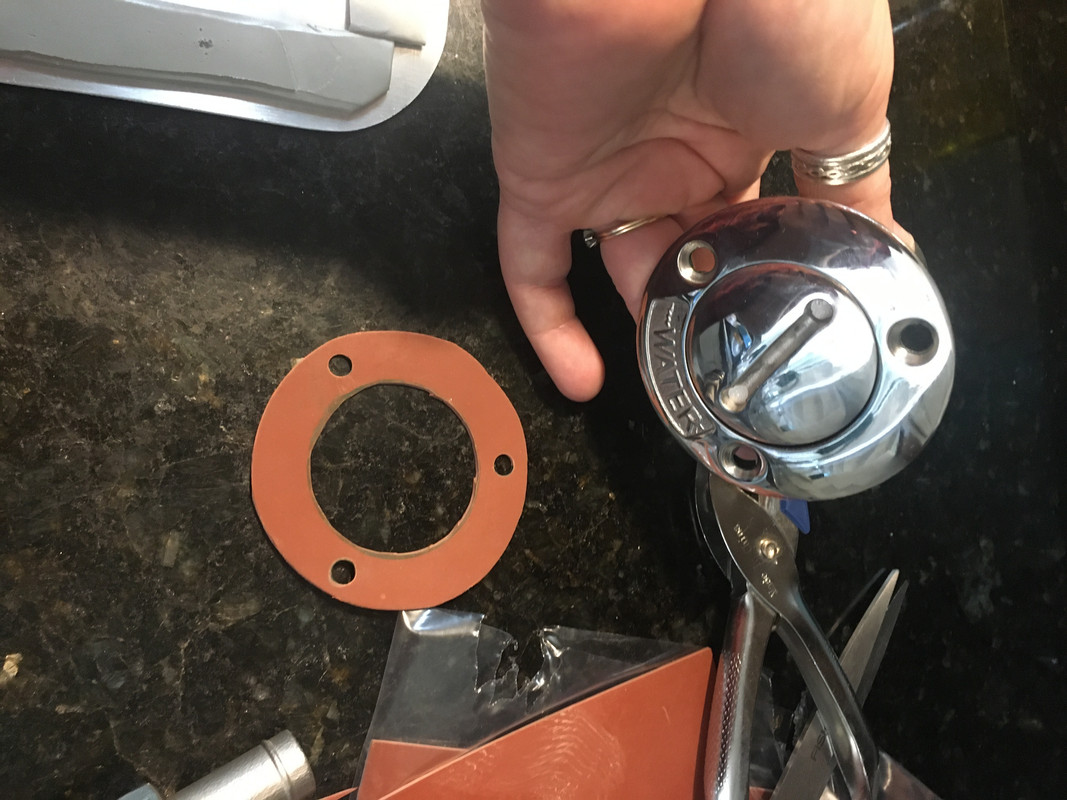
It came without a gasket so I made one from rubber gasket sheet from HD.
We are moving the power inlet out of the bumper hatch, updating to 50 amp. We had a Marinco 30 amp inlet fixture & retrofitted it with the 50 amp plug. Installed a new cable hookup to the same area.
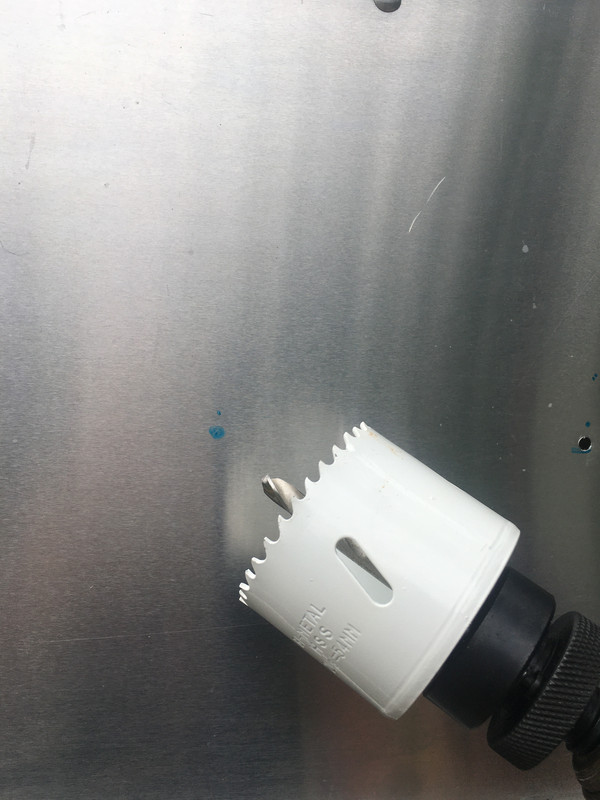
Cutting a new hole in the aluminum is always stressful. 

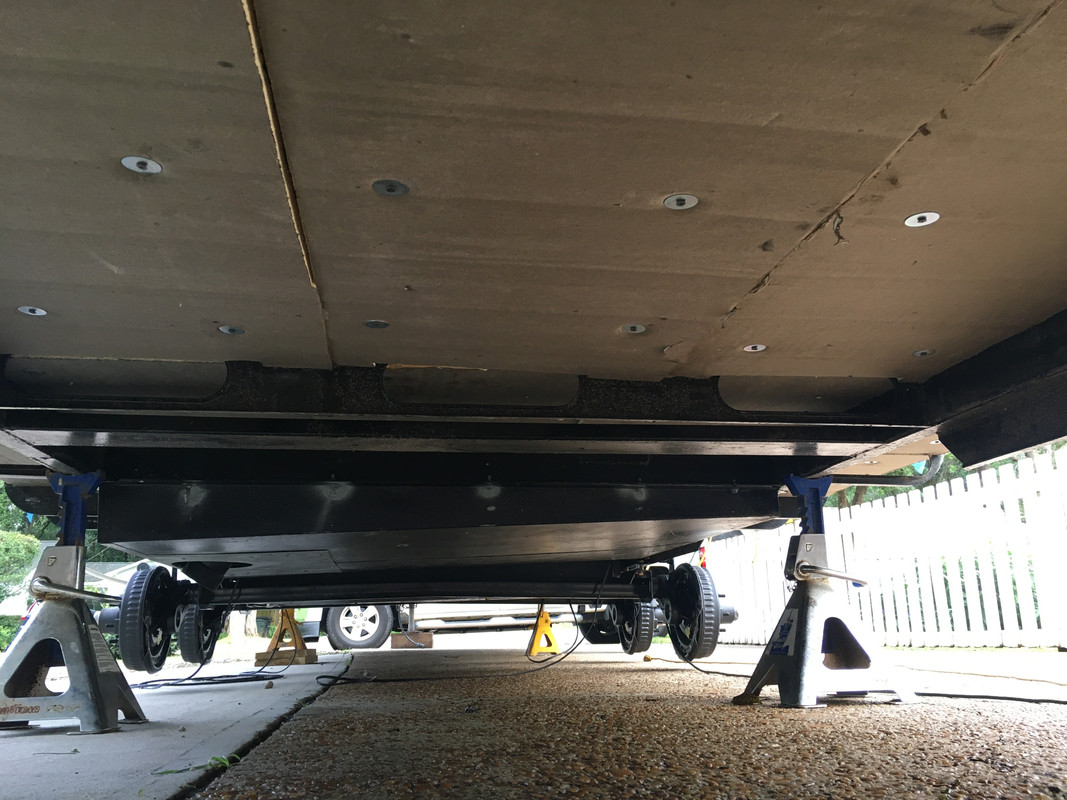
We moved the Airstream onto the front driveway. Darrell put it on lift jacks, & removed the wheels & axles. Then he installed the lift kit & new Dexter axles.
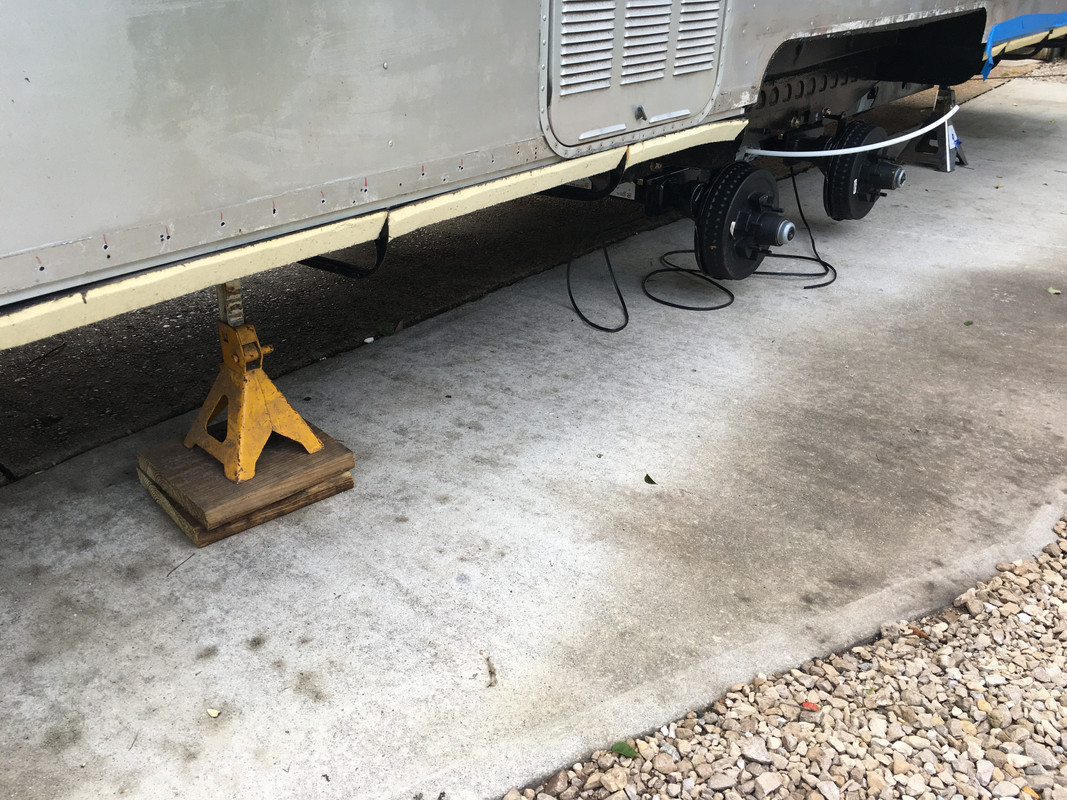
We ordered our axles & lift kit through Colin Hyde. When we began the installation we had two snafus. First we realized that we were missing the lug nuts. I emailed Colin & got no response back. So I spent another $50 buying McGard lug nuts. Second snafu was realizing that we need to move the mounting pin for the shocks. Considering that we increased the axle mount angle and added the lift kit, I guess it makes sense. I dont know a lot about shocks & wonder if there is an option that is longer that we could use instead of changing the configuration. I think Ill give Inland RV a call & see what they say. Id appreciate any advice on this.
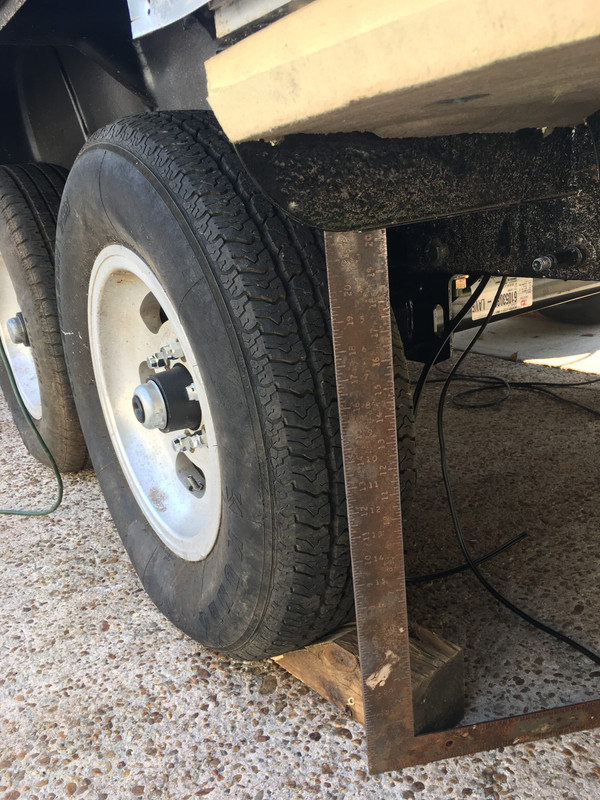
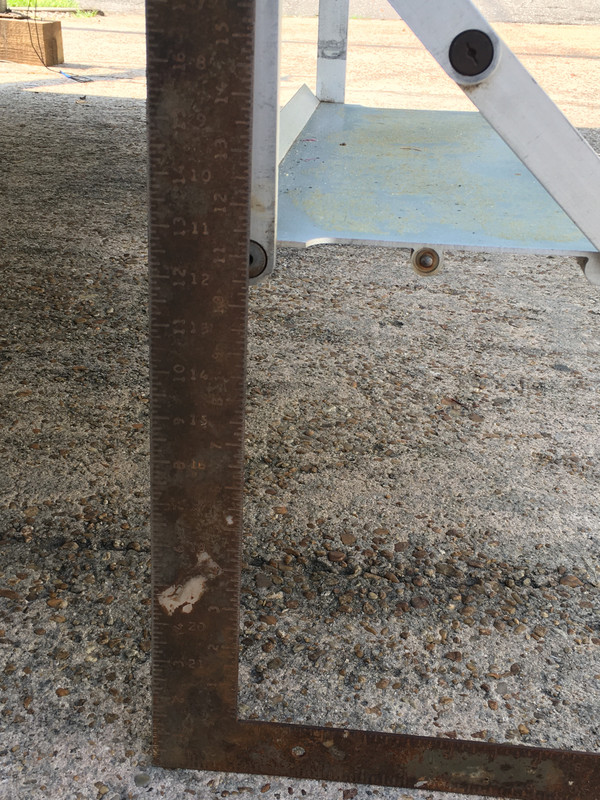
BTW, Im pretty amazed at how much clearance height we gained. It now measures just over 20 at the bottom of the outriggers & about 12 from the bottom step. (Sorry for the rusty framing square, I cant find my tape measure this morning.) 
I got the subfloor insulated, Yay!!! This was a nasty job & Im thrilled to be finished. We were given the foam insulation by a roofer friend & it was clad with a thin fiberglass surface that made for itchy work. I wore a mask when cutting & long sleeves but I was still miserable for a few days. Construction adhesive & screws with washers were used to attach to the underside of the subfloor.
Alright, thats enough for now. Im super happy to have the Airstream back on its wheels again. I cannot wait to get new tires and wheels for her. Darrell is very close to finishing with the interior wiring. Im sooo excited because Id love to start on the interior. Realistically the belly pan needs to be installed so thats my next big project. While the Airstream is on the front drive Ive started polishing. Its stupid hot here, so I polish for two hours on weekdays beginning between 8-9 a.m. Im trying to keep my neighbors happy by not starting too early.
We are working on new running lights, tail lights etc & Ill post about that soon.
Have a good one!
MaryPat
|
|
|
|
|
07-26-2021, 08:36 PM
|
#16
|
3 Rivet Member 
1982 27' Excella
Harrisburg
, Oregon
Join Date: Dec 2020
Posts: 191
|
MaryPat, I love your thread. Keep up the great work of showing us what you're all up to.
Scott
|
|
|
|
|
|
Currently Active Users Viewing This Thread: 1 (0 members and 1 guests)
|
|
|
 Posting Rules
|
You may not post new threads
You may not post replies
You may not post attachments
You may not edit your posts
HTML code is Off
|
|
|
|

 Recent Discussions
 |
|
|
|
|
|
|
|
|
|
|
|
|
|
|
|
|
|
|
|
|
|


 Linear Mode

