 |
|
 08-14-2016, 10:12 AM
|
#1
|
|
New Member
1972 23' Safari
Tonka Bay
, Minnesota
Join Date: Aug 2016
Posts: 4
|
Build a new dinette
This week I fulfilled a my dream of an Airstream purchased a 1972 Safari. My husband and I would like to replace the front pull out sofa with a dinette. We are thinking a "U" shape option or possibly just benches with a table in the middle. If anyone has done this, I would appreciate any input. Lessons learned, dimensions, photos of your projects etc.
I'm sure this is one of many questions I'll have as we continue to enjoy our new home on wheels.
Thanks!
Cheryl
|

|

|
|
08-14-2016, 09:24 PM
|
#2
|
Rivet Master 
1974 Argosy 26
Morrill
, Nebraska
Join Date: Nov 2009
Posts: 6,014
|
I did the same thing in my '74 Argosy. Can't provide dimensions as I doubt any two trailers are exactly the same. I can provide pics if you send me an email address. I have used up my photo space here.
|
|
|
|
|
08-14-2016, 10:02 PM
|
#3
|
Rivet Master
1978 25' Tradewind
Metro Phoenix
, Arizona
Join Date: Jun 2003
Posts: 1,524
|
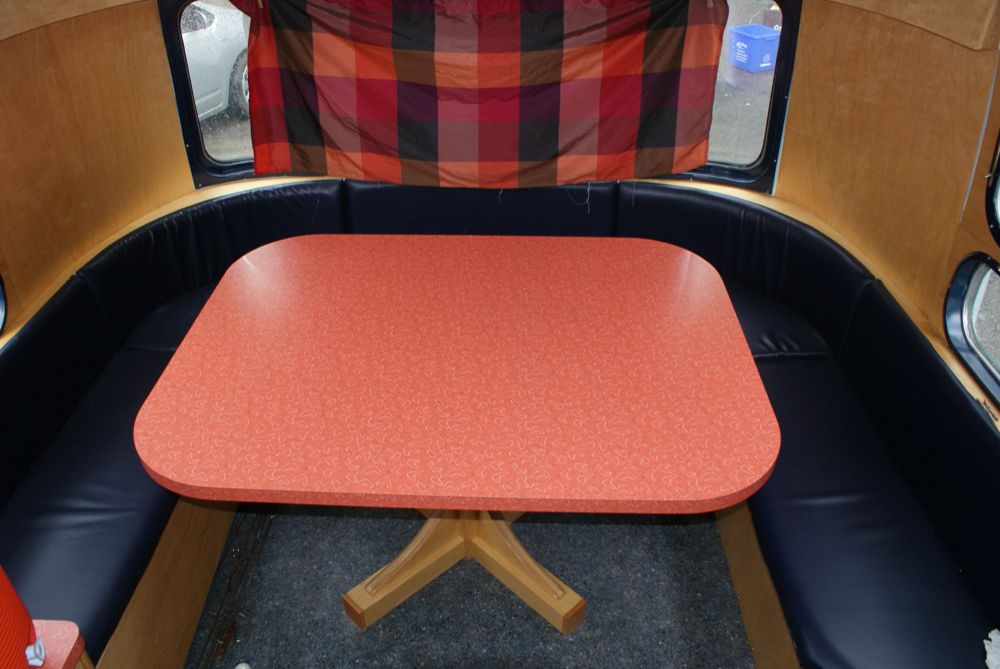
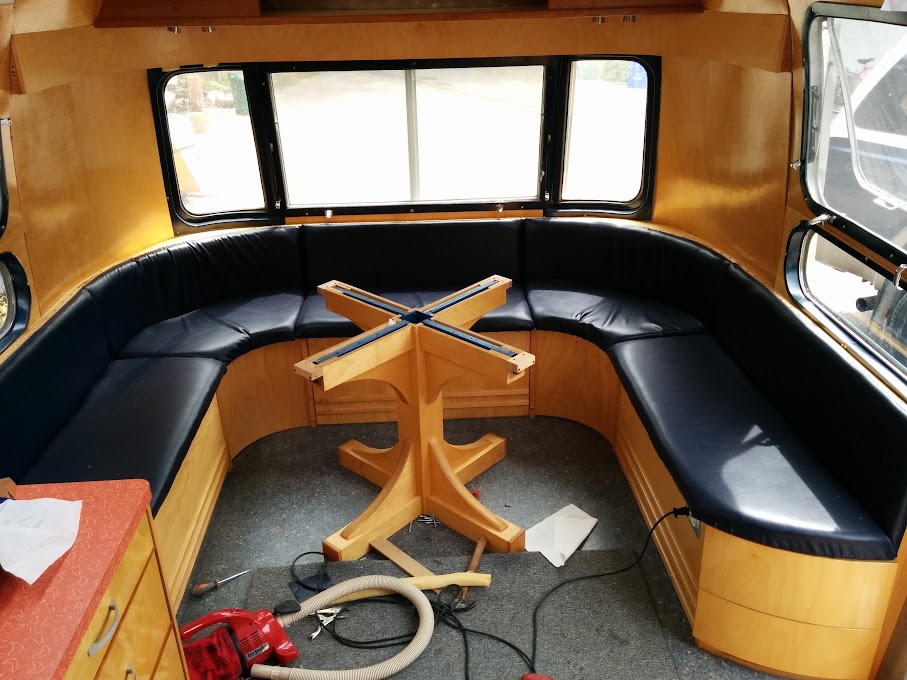
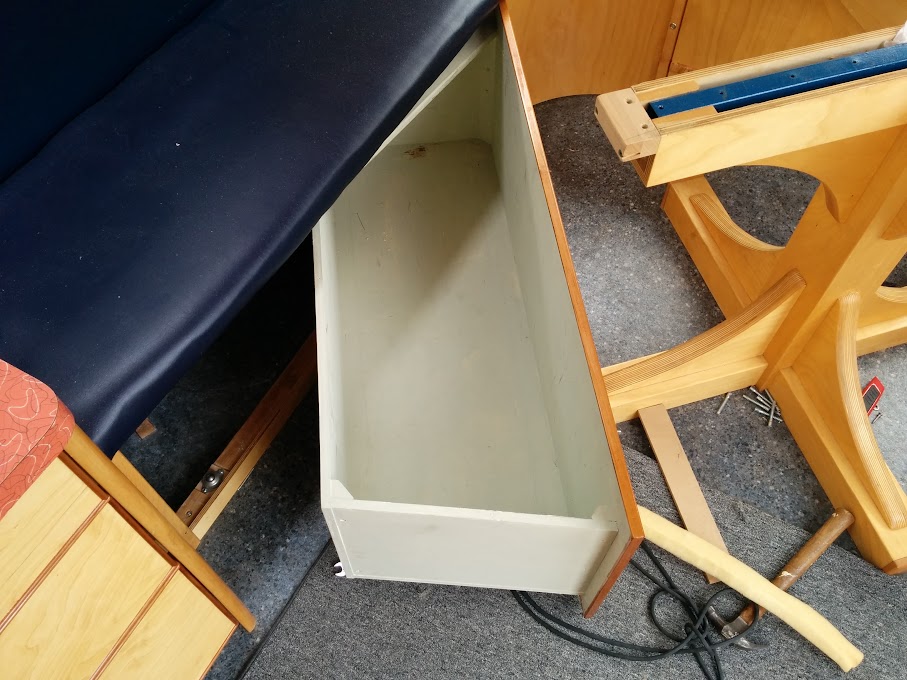
I threw my old dinette out and made a new one. Like so:
__________________
"Between what matters and what seems to matter, how should the world we know judge wisely?" - E.C. Bentley, Trent's Last Case
|
|
|
|
|
08-15-2016, 12:54 AM
|
#4
|
3 Rivet Member 
1979 31' Sovereign
Black Diamond
, Washington
Join Date: Oct 2015
Posts: 193
|
|
|
|
|
|
08-15-2016, 05:21 AM
|
#5
|
Rivet Master
Join Date: Mar 2003
Posts: 2,190
|
I shored up my front dinette
Also new cushions and table
HAVE NOT USED IT ONCE !!!!!!!!!!
I like eating outside.
|
|
|
|
|
08-15-2016, 11:57 AM
|
#6
|
2 Rivet Member 
1969 27' Overlander
Sun Lakes
, Arizona
Join Date: Aug 2015
Posts: 36
|
Cheryl,
We want to do the same to our AS. I wish I could offer some advise but like you we're still in the planning phase. I'm actually posting here so that I can see other replies and get ideas.
Great question thanks - See you on the open road
Tony and Irene
Huck the Mutt and Finn too
69 Overlander - Sentimental Journey
2015 Tundra - Rig-O-Tony
Sun Lakes, AZ
WBCCI 2876
|
|
|
|
|
08-15-2016, 12:03 PM
|
#7
|
1 Rivet Member 
1969 27' Overlander
Palm Desert
, California
Join Date: Aug 2015
Posts: 15
|
Hey Pygmypoacher,
Your photos would be most helpful for my own renovation. Any chance you that they are available in larger format than on the forum? Thanks.
|
|
|
|
|
08-15-2016, 12:22 PM
|
#8
|
Rivet Master
1972 29' Ambassador
Boynton Beach
, Florida
Join Date: Dec 2013
Posts: 568
|
I was going to do a U-shaped dinette, but decided against it. The table is much more secure when attached to the front wall rather than two wobbly posts. It's difficult to slide all the way around, then realize you forgot the salt.
Those are super-sized slide out drawers under the seating that can fit an airline-bin-max suitcase. Everything is built from 3/4" Eurolite marine ply, with cherry accents. Table is Lagoon Alabaster veneer, with wenge and aspen. I like the folding side leaves; much easier to get in and out during the daytime. The ledge near the open window hides the flatscreen TV (see this thread: http://www.airforums.com/forums/f317...ml#post1830709 )
Looking back, I wish that I'd sloped the drawer faces backwards, to give more heel room. If someone comes in with hiking boots, they leave lots of black marks on the drawers. I was also trying to make my cushions as large as possible, which was a mistake. A smaller cushion that is directly attached to the hatch lid is easier to lift up and get stuff out from under it. I rarely use the forward lockers because it's such a hassle.
|
|
|
|
|
08-15-2016, 12:31 PM
|
#9
|
Rivet Master
1964 26' Overlander
1974 31' Sovereign
Milton
, ON
Join Date: Oct 2002
Posts: 1,225
|
This is what we came up with in our '74 Sovereign. The space does not convert into a bed, we had that in our '64 Overlander and got tired of changing it back and forth so for this trailer we incorporated enough sleeping for 6 in the rear and had a dedicated dining area. This table is comfortable for 6 adults, and you could fit 8 or 9 if need be.
The table has a core of pine and resin impregnated honeycomb cardboard. Benches were framed with 2x2s with 1/8" Baltic Birch plywood fronts. Here's a photo with the table removed. The panel under the front bench is held in place with a magnet for easy access to that space for things not often used. There's also access to the umbilical wire connections. The strips on the front of the plywood were added recently to try to minimize the scuff marks from shoes.

Next photo shows the swing-out drawer under the street side bench. It pivots on hinges at one end and runs on a couple of ball casters across the front.


The balls run on strips of aluminum on the bottom of the drawer to prevent the plywood bottom from wearing. We usually keep folding chairs in here.
Long drawers under the curb side bench are easily accessible from outside.

Initially I attached the vinyl to the back of the seats, but had trouble getting them tight against the "deck" behind the benches. Recently I redid them with strips of wood to hold them down. Not the most elegant solution but cheap and easy. I'm sure a professional upholsterer would be able to do better!

We took a month-long trip with the table in place but without the laminate on it as the laminate had been ordered but didn't come in on time. This turned out to be a blessing in disguise as we found that the table was about 2" too big in each direction. It was hard to know this until we'd used it for a few weeks. I was able to easily cut it down since the laminate was not yet installed. The other good thing about all this was that Lowes didn't charge for the laminate because they messed up the order.
|
|
|
|
|
08-15-2016, 12:49 PM
|
#10
|
3 Rivet Member
1958 17' Pacer
Vintage Kin Owner
Damascus
, Oregon
Join Date: Oct 2013
Posts: 111
|
We are just finishing the build out of our 1958 Pacer.
We head to our first Rally this coming weekend......soooooo excited.
Leather seat cushions to follow.
1/2" & 3/8" Baltic Birch Ply for full build.


|
|
|
|
|
08-15-2016, 01:00 PM
|
#11
|
3 Rivet Member
1979 31' Sovereign
Black Diamond
, Washington
Join Date: Oct 2015
Posts: 193
|
Quote:
Originally Posted by DesertRat223

Hey Pygmypoacher,
Your photos would be most helpful for my own renovation. Any chance you that they are available in larger format than on the forum? Thanks.
|
PM me your personal email. I'll send full size pics.
|
|
|
|
|
08-15-2016, 01:31 PM
|
#12
|
1 Rivet Member
1972 31' Sovereign
Houston
, Texas
Join Date: Jul 2016
Posts: 14
|
Toddzilla, I like the insulator turned pendant light. How did you make the hole in the glass?
|
|
|
|
|
08-15-2016, 01:31 PM
|
#13
|
3 Rivet Member
1972 25' Tradewind
fort lauderdale
, Florida
Join Date: Apr 2010
Posts: 205
|
Grant,
I really like your design but your first pic is the only one visible. Could you please re-attach.
thank you
ERic
|
|
|
|
|
08-15-2016, 03:38 PM
|
#14
|
3 Rivet Member
1999 30' Excella 1000
Chatham
, Virginia
Join Date: Jul 2012
Posts: 111
|
Dinette
We are in the process of making our dinette a comfortable 2 seater rather then a a tight 4. Gives us 10" more floor space in the kitchen. Pictures coming.
|
|
|
|
|
08-15-2016, 06:22 PM
|
#15
|
Rivet Master
1964 26' Overlander
1974 31' Sovereign
Milton
, ON
Join Date: Oct 2002
Posts: 1,225
|
Quote:
Originally Posted by ehodg66
Grant,
I really like your design but your first pic is the only one visible. Could you please re-attach.
thank you
ERic
|
Sorry about that, here's the post again. If a moderator sees this, feel free to delete my previous post.
This is what we came up with in our '74 Sovereign. The space does not convert into a bed, we had that in our '64 Overlander and got tired of changing it back and forth so for this trailer we incorporated enough sleeping for 6 in the rear and had a dedicated dining area. This table is comfortable for 6 adults, and you could fit 8 or 9 if need be.

The table has a core of pine and resin impregnated honeycomb cardboard. Benches were framed with 2x2s with 1/8" Baltic Birch plywood fronts. Here's a photo with the table removed. The panel under the front bench is held in place with a magnet for easy access to that space for things not often used. There's also access to the umbilical wire connections. The strips on the front of the plywood were added recently to try to minimize the scuff marks from shoes.
Next photo shows the swing-out drawer under the street side bench. It pivots on hinges at one end and runs on a couple of ball casters across the front.
The balls run on strips of aluminum on the bottom of the drawer to prevent the plywood bottom from wearing. We usually keep folding chairs in here.
Long drawers under the curb side bench are easily accessible from inside or standing outside in the doorway.

Initially I attached the vinyl to the back of the seats, but had trouble getting them tight against the "deck" behind the benches. Recently I redid them with strips of wood to hold the vinyl down. This allowed me to screw through the backs of the benches before final attachment of the vinyl. Not the most elegant solution but cheap and easy. I'm sure a professional upholsterer would be able to do better!

This project would have been much easier if we hadn't needed the space provided by the wrap-around bench! That adds a lot of complication in construction of the bench backs and making everything fit.
We took a month-long trip with the table in place but without the laminate on it as the laminate had been ordered but didn't come in on time. This turned out to be a blessing in disguise as we found that the table was about 2" too big in each direction. It was hard to know this until we'd used it for a few weeks. I was able to easily cut it down since the laminate was not yet installed. The other good thing about all this was that Lowes didn't charge for the laminate because they messed up the order.
|
|
|
|
|
08-15-2016, 06:55 PM
|
#16
|
3 Rivet Member
1958 17' Pacer
Vintage Kin Owner
Damascus
, Oregon
Join Date: Oct 2013
Posts: 111
|
Quote:
Originally Posted by BayRat
Toddzilla, I like the insulator turned pendant light. How did you make the hole in the glass?
|
Glass drill bit in a drill press and squirt it with water.
|
|
|
|
|
08-15-2016, 07:14 PM
|
#17
|
Rivet Master
1964 26' Overlander
1974 31' Sovereign
Milton
, ON
Join Date: Oct 2002
Posts: 1,225
|
Quote:
Originally Posted by Toddzilla
Glass drill bit in a drill press and squirt it with water.
|

That is a very cool light! Do you have a way of keeping it from swinging when you're travelling, or does that matter?
|
|
|
|
|
08-15-2016, 10:13 PM
|
#18
|
3 Rivet Member
1958 17' Pacer
Vintage Kin Owner
Damascus
, Oregon
Join Date: Oct 2013
Posts: 111
|
Quote:
Originally Posted by DavidsonOverlander
That is a very cool light! Do you have a way of keeping it from swinging when you're travelling, or does that matter?
|
I created a hook above the front window and we put a sock over it.
|
|
|
|
|
08-16-2016, 02:55 PM
|
#19
|
2 Rivet Member
1976 25' Tradewind
Kimberton
, Pennsylvania
Join Date: Apr 2015
Posts: 51
|
The PO removed the gaucho sofa/bed from the front of our 25 TW to replace the flooring. She found that a standard IKEA sofa/bed (click-clack like the gaucho) fit easily into the space. The stretchers on the frame make for a more comfortable sleeping surface than the solid plywood base of the old AS gaucho. I recently bought a recycled pizza shop two seat dinette that I find useful for one or two travelers who would sleep on the gaucho midship and on a cot if nec. set up forward. Im going to attempt attaching photos of the two. If they dont appear in this thread then look for them in the gallery.
|
|
|
|
|
08-17-2016, 06:39 AM
|
#20
|
3 Rivet Member
1973 23' Safari
1970 27' Overlander
Boerne
, Texas
Join Date: Jun 2015
Posts: 222
|
|
|
|
|
|
|
|
Currently Active Users Viewing This Thread: 1 (0 members and 1 guests)
|
|
|
 Posting Rules
|
You may not post new threads
You may not post replies
You may not post attachments
You may not edit your posts
HTML code is Off
|
|
|
|

 Recent Discussions
 |
|
|
|
|
|
|
|
|
|
|
|
|
|
|
|
|
|
|
|
|
|


 Linear Mode

