 |
|
 11-13-2017, 09:10 AM
|
#21
|
Rivet Master 
2007 30' Classic
KW
, Ontario
Join Date: May 2012
Posts: 998
|
Quote:
Originally Posted by DannyClark

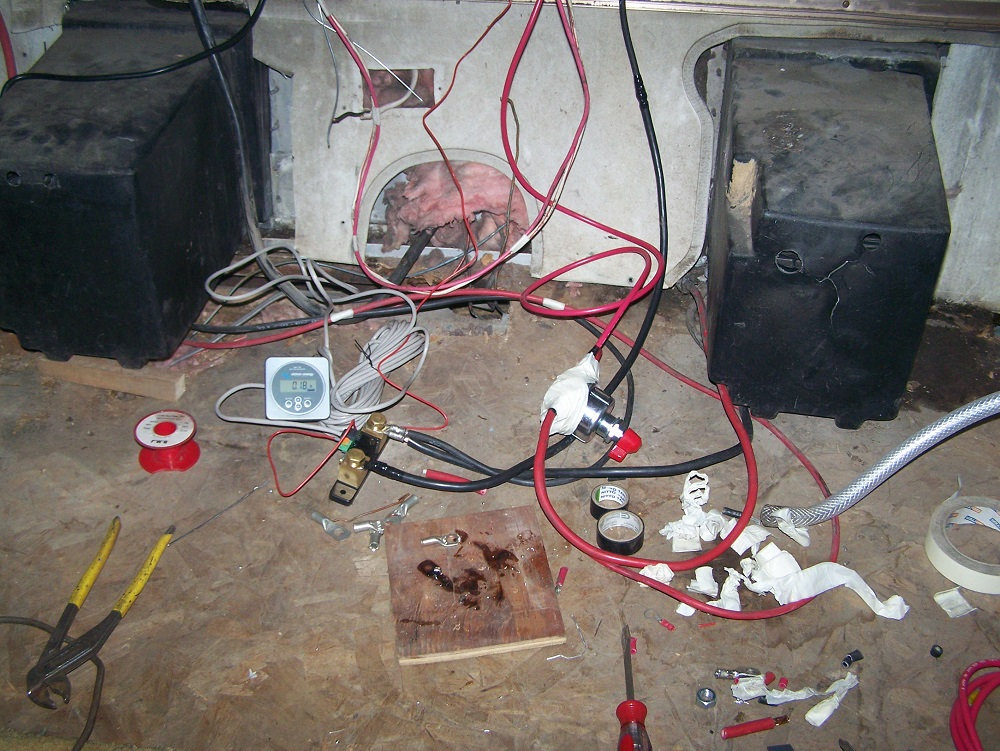
What I did was cut the 4awg cable in the electrical space on my 26U (front roadside under dinnette bench) and installed the ring terminals on cut ends. I picked this cable as it was the thickest (less resistance/more accurate in my mind lol). I installed the 4awg cable directly from Battery B onto shunt side 1 and ran 4awg cable from the inverter to side 2 of the shunt. Then I mounted a 6awg jumper from the bus bar (where the 6awg from Battery and all other negatives are located) to side 2 of the shunt.
So to recap, the shunt has one 4awg directly from Battery B negative to to side 1. Then going from shunt side 2, one 4awg to inverter and one 6awg to common bus bar. Ta Da.
|
For the shunt to work properly it needs to detect all of the loads in the trailer. It sounds like you are just measuring the load of the inverter. You are bypassing the other loads connected to battery A. Battery A and B negative should terminate at one side of the shunt and then on the other side of the shunt you can connect as before. All loads should connect to one side of the shunt no matter what the load is. Some shunts cannot handle all these wire lugs connected to them so using a common bus bar or even another terminal is sometimes required.
Personally I would connect the 2 batteries in the battery compartment together with #2 and run one #2 into the trailer for the common to the shunt and one for the #2 for the positive. That to me is a cleaner install.
|

|

|


|
11-21-2017, 12:51 PM
|
#22
|
Rivet Master
2019 27' Globetrotter
Salem
, Oregon
Join Date: Nov 2015
Posts: 691
|
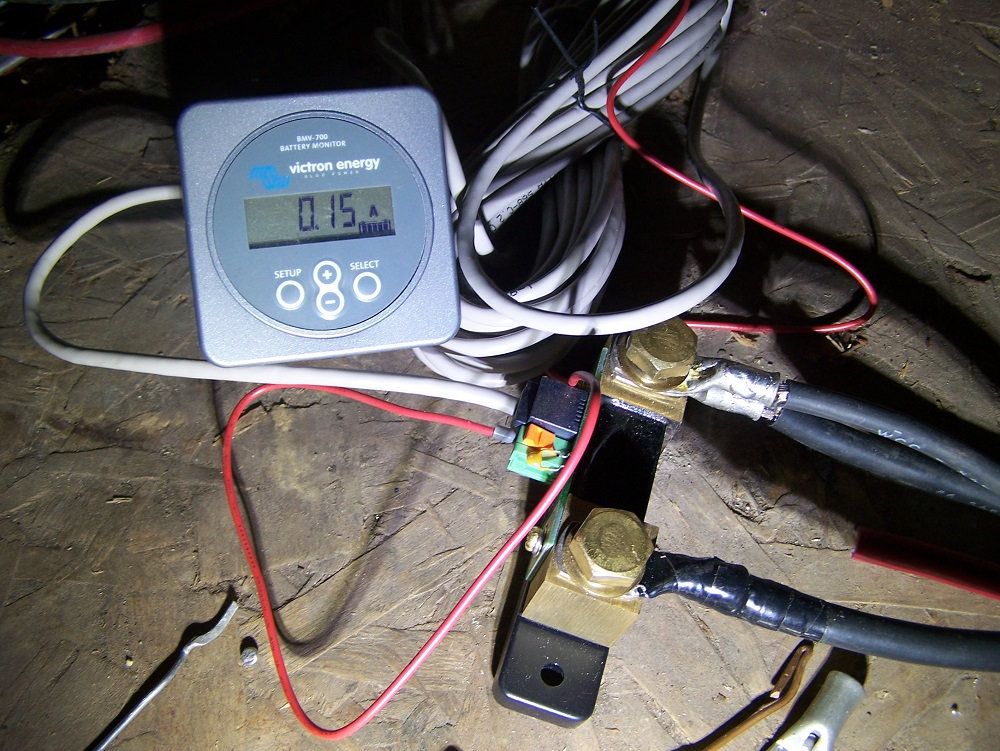
Zero Current Calibration. I was constantly getting 12.52 volts and .20 or .30A when reading my BMV-702. After checking my wiring many times, I came up with the answer. You may have to use the Zero Current Calibration.
Solved my problem and hope this saves some one else time.
Dave
|
|
|
|
|
11-27-2017, 06:36 PM
|
#23
|
3 Rivet Member 
2017 25' Flying Cloud
Bushnell
, Florida
Join Date: Jul 2015
Posts: 128
|
Quote:
Originally Posted by uncle_bob
Hi
As mentioned above, when you are done with a two battery in parallel install:
1) You have a cable from the negative on battery A to the negative on battery B
2) You have a cable from the negative on battery A to the shunt side 1
(that's everything that is hooked to the battery negatives).
3) You have a cable from shunt side 2 going to the inverter
4) You have a cable from shunt side 2 gong to the rest of the 12V stuff via the bus bar
You get to pick which battery is A or B. If AS decided to wire your inverter to the bus bar rather than the battery, you wire accordingly. They have a lot of variations .... The key is that all loads go on side 2 (the "not battery side") of the shunt. None of the loads go on side 1 (the "battery only side") of the shunt.
Bob |
I just got my shunt installed by an Airstream dealer on our 2017 25 FB and it displays the battery voltage but no other values change unless I use the inverter. Reckon they got the wiring wrong? Im assuming if I plug in something to USB it should show up on the app, right?
|
|
|
|
|
11-27-2017, 07:00 PM
|
#24
|
|
Full time Airstreamer
2014 30' FB FC Bunk
Anywhere
, USA Living.Somewhere.Yonder
Join Date: Jan 2014
Posts: 1,359
|
If you aren't plugged in any 12v load should have an impact.
__________________
@living.somewhere.yonder | Instagram
|
|
|
|
|
11-27-2017, 08:53 PM
|
#25
|
|
Site Team

2017 30' International
Broomfield
, Colorado
Join Date: Apr 2009
Posts: 3,555
|
Victron BMV702 Install
Quote:
Originally Posted by wareaglewalt
I just got my shunt installed by an Airstream dealer on our 2017 25 FB and it displays the battery voltage but no other values change unless I use the inverter. Reckon they got the wiring wrong? Im assuming if I plug in something to USB it should show up on the app, right?
|
Sounds like they connected the neg inverter cable to the shunt but not the main negative lead that everything else rides off of. (There are 2 negative cables leading to the battery and both need to run through the shunt)
|
|
|
|
|
11-28-2017, 07:20 AM
|
#26
|
|
Half a Rivet Short
2017 30' Classic
2022 Interstate 24X
Carlisle
, Pennsylvania
Join Date: May 2017
Posts: 15,742
|
Quote:
Originally Posted by wareaglewalt
I just got my shunt installed by an Airstream dealer on our 2017 25 FB and it displays the battery voltage but no other values change unless I use the inverter. Reckon they got the wiring wrong? Im assuming if I plug in something to USB it should show up on the app, right?
|
Hi
Some of the USB outlets run off of 120V / shore power. If you are on one of those, it will not do anything on the meter.
As mentioned above, you may have missed one of the negative cables to the battery. I have *many* negative side cables on my trailer. Each trailer is set up a bit different so listing every single cable is difficult. It also is not at all obvious where each cable goes.
You should have one jumper wire going between the battery posts for positive and one jumper wire going between the posts for negative. Absolutely nothing at all should connect to either of the negative posts except:
1) The jumper wire
2) The wire to the shunt
If anything else connects to either of the negative posts, that's bad.
======
If you want to take a stab at it the other way around:
1) The negative lead for the Zamp solar moves to the far side of the shunt.
2) The negative lead for the inverter moves to the far side of the shunt.
3) The negative lead for the converter moves to the far side of the shunt.
4) The negative lead for the jack(???) moves to the far side of the shunt .. i haven't really tracked that one down. Some things it's just easier to move.
5) That other black wire moves over to the far side of the shunt.
6) The jumper wire stays on the battery side.
Yes, that's approximate. It's been almost 15 hours since I played around in there .... 
Bob
|
|
|
|
|
11-29-2017, 05:59 PM
|
#27
|
3 Rivet Member
2017 25' Flying Cloud
Bushnell
, Florida
Join Date: Jul 2015
Posts: 128
|
When you say:
If anything else connects to either of the negative posts, that's bad.
What does "bad" mean exactly? After the dealer got the wiring done right where I can see any and all loads on the iPhone app, there's still the Zamp solar lead going to one of the battery negative posts. Other than that the negative posts have nothing else on them.
|
|
|
|
|
11-30-2017, 07:53 AM
|
#28
|
|
Half a Rivet Short
2017 30' Classic
2022 Interstate 24X
Carlisle
, Pennsylvania
Join Date: May 2017
Posts: 15,742
|
Quote:
Originally Posted by wareaglewalt
When you say:
If anything else connects to either of the negative posts, that's bad.
What does "bad" mean exactly? After the dealer got the wiring done right where I can see any and all loads on the iPhone app, there's still the Zamp solar lead going to one of the battery negative posts. Other than that the negative posts have nothing else on them.
|
Hi
Bad means that the current from that source or to that load will not be measured by the monitor. Since the monitor is an "infinite memory" device, anything that runs past it messes up it's monitoring.
In the case of the Zamp on the "wrong side", the current from the Zamp is not added into what the monitor thinks the battery has in it. The charge level reads 90% when it actually is 100%. If you hook a fan to the Zamp connector and run it for a while, the battery has 90% in it when the monitor thinks it has 100%. This is a cumulative error ....it stays that way and does not correct. The only option would be to reset the controller. If you have to do that ... why have the fancy controller?
Bob
|
|
|
|
|
11-30-2017, 10:11 AM
|
#29
|
3 Rivet Member
2017 25' Flying Cloud
Bushnell
, Florida
Join Date: Jul 2015
Posts: 128
|
So is it recommended that I take the Zamp negative lead from the battery and move it to the shunt?
|
|
|
|
|
11-30-2017, 10:16 AM
|
#30
|
|
Half a Rivet Short
2017 30' Classic
2022 Interstate 24X
Carlisle
, Pennsylvania
Join Date: May 2017
Posts: 15,742
|
Quote:
Originally Posted by wareaglewalt
So is it recommended that I take the Zamp negative lead from the battery and move it to the shunt?
|
Hi
If you plan to ever use the Zamp connector, yes, you should move it to the "not battery" side of the shunt. If you never ever will use the Zamp, take it off and throw it away.....
Bob
|
|
|
|
|
11-30-2017, 10:52 PM
|
#31
|
Rivet Master
2019 27' Globetrotter
Salem
, Oregon
Join Date: Nov 2015
Posts: 691
|
What about a Zamp or other portable solar panel. A lot use just clip to the battery. Do you suggest putting a seperate post somewhere in the battery box with a wire to the negative size of the shunt for this purpose or using a zamp connector and running it to the negative side of the shunt. Since this is not used all the time is this really necessary?
What about the jack?
|
|
|
|
|
12-02-2017, 08:28 AM
|
#32
|
|
Half a Rivet Short
2017 30' Classic
2022 Interstate 24X
Carlisle
, Pennsylvania
Join Date: May 2017
Posts: 15,742
|
Quote:
Originally Posted by NoResults
What about a Zamp or other portable solar panel. A lot use just clip to the battery. Do you suggest putting a seperate post somewhere in the battery box with a wire to the negative size of the shunt for this purpose or using a zamp connector and running it to the negative side of the shunt. Since this is not used all the time is this really necessary?
What about the jack?
|
Hi
Yes, it really *is* something that must be done.
Why?
These gizmos look at every single bit of current into the battery. They add it all up in their little brain. They look at every single bit of current out of the battery, they subtract it from what went in. Whatever the difference is, that's the number they display for "battery %". (yes, time and possibly temperature are also involved ... ).
They remember the math forever and ever. Make a "mistake" a year ago and they still are running on that data now. The fancy name for this is coulomb counting. It's not perfect. It has no way to deal with internal battery leakage. At some point the likely is a little elf in there that fudges the math a bit. Best not to make him work to hard or get him confused ....
The jack is a pretty big load and it gets used fairly often it you are moving around. If you routinely connect a solar panel, it's also a pretty big contributor. Neither one is going to be down in the "ignore it" range. Yes, that *is* the downside of a system like this.
Bob
|
|
|
|
|
01-08-2018, 10:33 AM
|
#33
|
Rivet Master
2019 27' Globetrotter
Salem
, Oregon
Join Date: Nov 2015
Posts: 691
|
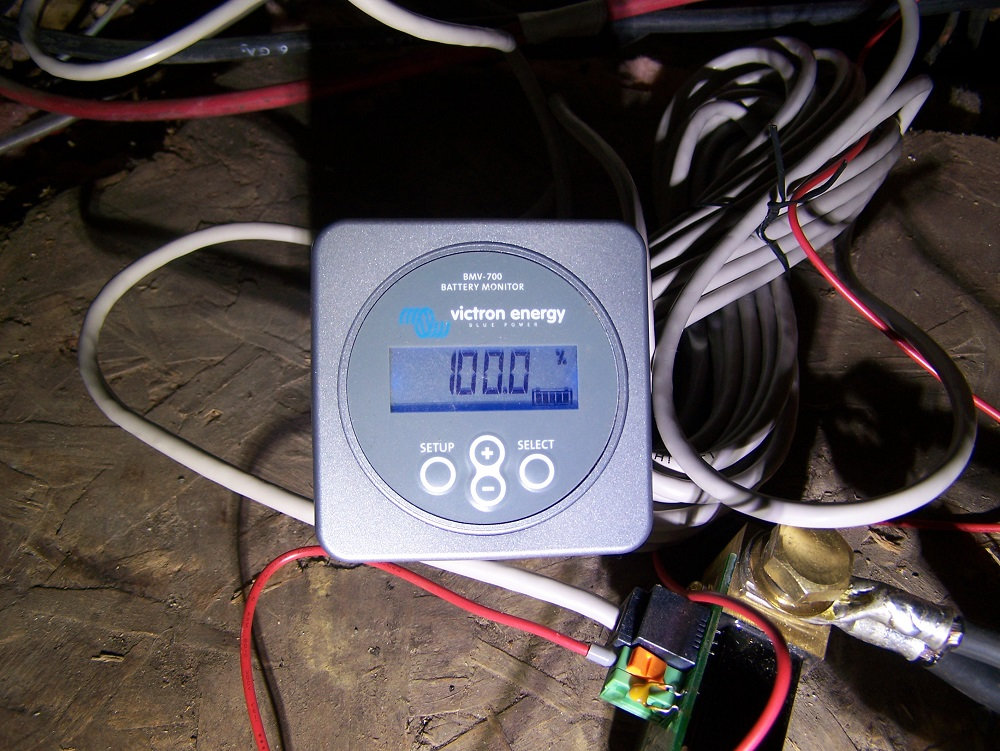
I constantly get 100% battery charge indication with my BMV-702 Last week with battery disconnected fully charged 12.6 volts. This week 12.32 still 100%.
I know that one of my batteries needs replacing. Can this be why I can't get correct readings?
I have previously re set the monitor to 100% about 3 or 4 hours after recharging.
Dave
|
|
|
|
|
01-08-2018, 11:09 AM
|
#34
|
|
.-. -...
2017 25' International
Niagara-on-the-Lake
, ON Canada
Join Date: May 2016
Posts: 1,837
|
Quote:
Originally Posted by uncle_bob
Hi
If you plan to ever use the Zamp connector, yes, you should move it to the "not battery" side of the shunt. If you never ever will use the Zamp, take it off and throw it away.....
Bob |
Sorry to jump in late, but I have just purchased the Victron BMV-712 (built in BlueTooth).
With things like the Zamp solar, or in my case, using my TV alternator and booster cable (2 gauge) to the battery, am I correct in thinking that only the negative (-) cable of these items needs to go to non-battery side of the shunt and the positive (+) cables can stay connected to the positive terminal of the battery?
__________________
Ray B.
|
|
|
|
|
01-08-2018, 12:32 PM
|
#35
|
2 Rivet Member 
1985 25' Sovereign
Doubs
, France
Join Date: Jan 2016
Posts: 52
|
Hello.
Happy chance.
A few days ago I temporarily wired my Victron controller.
I need lighting and heating during the works in my Airstream.
I need to keep power.
But I rebuilt much wiring on my Airstream.
Very simple to wire when everything is disassembled and redone.
Display's location is not final. Obviously.
It seems to work well.
|
|
|
|
|
01-08-2018, 08:02 PM
|
#36
|
3 Rivet Member
2018 25' International
Belmont
, California
Join Date: Dec 2017
Posts: 150
|
Does anybody have power consumption readings from the Victron device they can share?
I don't have one installed but I took some reading with a handheld meter - I get 1.7 A for the coach with nothing but the fridge running, plus .4 A for the inverter when off. Total 2.1A before any lights or the furnace. Is that about right?
|
|
|
|
|
01-09-2018, 01:42 AM
|
#37
|
2 Rivet Member
1985 25' Sovereign
Doubs
, France
Join Date: Jan 2016
Posts: 52
|
Quote:
Originally Posted by chugchug
Does anybody have power consumption readings from the Victron device they can share?
......
|
Mine says with some lamps and furnace : 7 A
0 when everything off.
Not yet activated the fridge.
I must also later test the autonomy.
Up to now this system seems efficient.
|
|
|
|
|
01-09-2018, 07:53 AM
|
#38
|
|
Half a Rivet Short
2017 30' Classic
2022 Interstate 24X
Carlisle
, Pennsylvania
Join Date: May 2017
Posts: 15,742
|
Quote:
Originally Posted by NoResults
I constantly get 100% battery charge indication with my BMV-702 Last week with battery disconnected fully charged 12.6 volts. This week 12.32 still 100%.
I know that one of my batteries needs replacing. Can this be why I can't get correct readings?
I have previously re set the monitor to 100% about 3 or 4 hours after recharging.
Dave
|
Hi
The battery monitors only look at what goes past the shunt. Anything that goes "around" the shunt does not get counted. We talk a lot about jumper cables and solar chargers. The other thing that does matter is internal leakage of the battery. If you have a battery that "leaks" 15% per month (as some in spec batteries apparently do) you will get down to 12 V from full charge pretty fast. If the battery is on it's last legs, that will happen even faster .....
Bob
|
|
|
|
|
01-09-2018, 11:18 PM
|
#39
|
Rivet Master
2019 27' Globetrotter
Salem
, Oregon
Join Date: Nov 2015
Posts: 691
|
Thanks Uncle Bob that answers my question.
|
|
|
|
|
03-29-2018, 01:39 PM
|
#40
|
2 Rivet Member
2018 25' Flying Cloud
Saint Thomas
, Ontario
Join Date: Nov 2017
Posts: 35
|
Access Question - BMV Install 2018 FC25FB Twin
I am preparing to install a BMV-700 into our 2018 FC25 FB twin and looking for a little advice.
First the electrics. I am not a pro but I have worked a lot on 12 volt marine systems. Aided by forum posts I am reasonably confident on a successful install. I share the view that everything must run through the shunt/monitor so that will be my approach. I also want to organize the wiring. Based upon what I can see through the small hatch, things look pretty disorganized down there.
My question is - How do I gain access to install the shunt and organize the wiring?
My battery cables enter through the curb-side floor under the head of the curb-side bed. Removing the plywood top of the bed is easy but does not provide necessary access to the inverter etc.. I need to remove the panel that runs the full width of the trailer including the cabinet-drawer in the middle. There are two obvious screws connecting the top panel to the AS body. It seems improbable that these are the only screws. I am hoping I do not have to pull the carpet-liner out of the front storage compartment to find more screws. Thoughts?
Thanks in advance.
|
|
|
|
|
|
|
Currently Active Users Viewing This Thread: 1 (0 members and 1 guests)
|
|
|
 Posting Rules
|
You may not post new threads
You may not post replies
You may not post attachments
You may not edit your posts
HTML code is Off
|
|
|
 Similar Threads
|
| Thread |
Thread Starter |
Forum |
Replies |
Last Post |
|
Victron Battery Monitor Install
|
NoResults |
Batteries, Univolts, Converters & Inverters |
82 |
01-23-2017 10:02 AM |
|
Victron BMV 702 install using solar prewire
|
Brav |
Batteries, Univolts, Converters & Inverters |
4 |
11-21-2016 01:22 AM |
|
Victron 702 Placement
|
stephenb |
Electrical - Systems, Generators, Batteries & Solar |
8 |
09-13-2016 11:33 AM |
|
Victron Battery Monitor with Bluetooth connection to smart phone
|
jhart657 |
Electrical - Systems, Generators, Batteries & Solar |
23 |
07-27-2016 01:56 PM |
|
Victron Multiplus Hybrid/Boosting Inverter/Charger Install
|
CA_Tallguy |
Electrical - Systems, Generators, Batteries & Solar |
7 |
03-15-2016 11:03 PM |
|

|
Recent Discussions |
|
|
|
|
|
|
|
|
|
|
|
|
|
|
|
|
|
|
|
|
|


 Linear Mode

