 |
|
 05-22-2015, 12:48 PM
|
#1
|
2 Rivet Member 
1975 25' Tradewind
Boerne
, Texas
Join Date: Jul 2013
Posts: 46
|
Replace Fuse Block
Well after numerous blown fuses I have finally found out my electrical problem. I have a cracked fuse block right under the connection to the glass fuse on breaker #3. Knowing is 1/2 the battle so now comes the other 1/2 of the battle - to replace the old block with a new one.
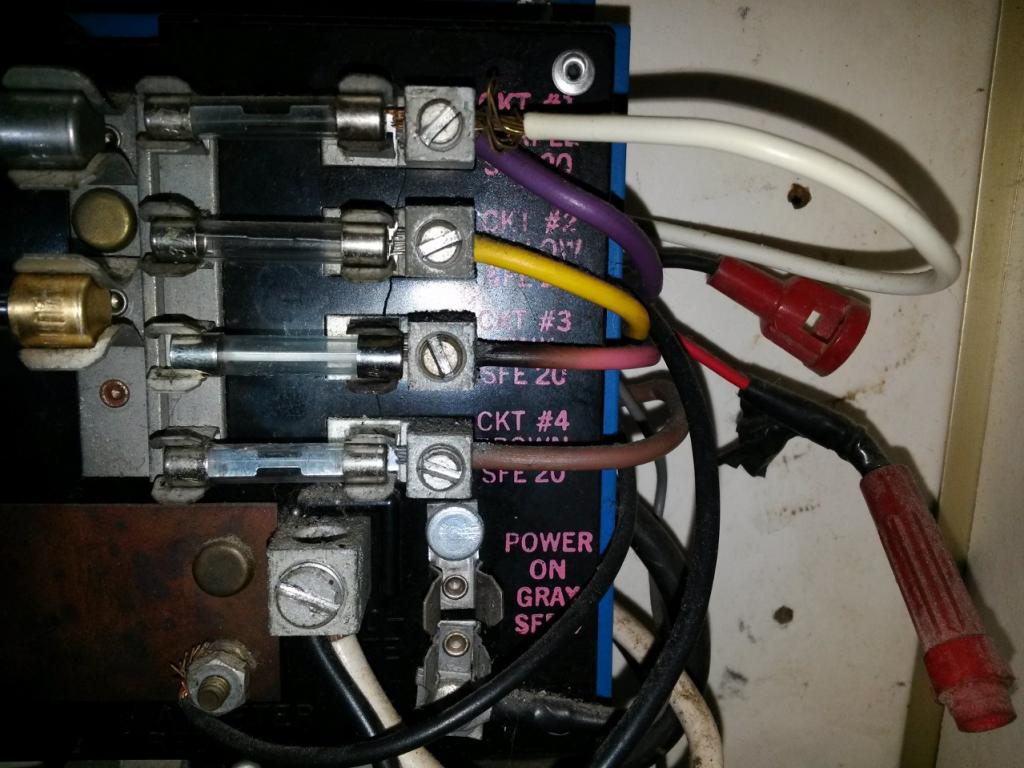
So I am reaching out to the forum to solicit help for getting everything wired back up to the new fuse block. I selected the BlueSea 12 circuit blade fuse block for my replacement so that I can quickly replace any blown fuse.
So now for the fun part -
This -

Needs to be switched over to this -

I think the main 4 wires (Circuit 1-4) are fairly straight forward as well as the red and blue battery and trailer but that leaves all of the other wires.
My main questions:
Which is positive and which is negative and what goes where on my new block?
What is the extra white wire on Circuit #1?
What is the metal plate in the middle with the black wire (near the bottom)?
I really appreciate any help from the knowledgeable folks on this forum.
Thanks!
__________________
TARH2O
------------
1975 25' Airstream TradeWind International - Under Renovation
2012 MB ML350 BlueTec
|

|

|


|
05-22-2015, 02:04 PM
|
#2
|
4 Rivet Member 
1979 31' Excella 500
Charlevoix
, Michigan
Join Date: Aug 2014
Posts: 350
|
What the year and model of your Airstream? That will help us determine some of the answers to your questions.
|
|
|
|
|
05-22-2015, 02:42 PM
|
#3
|
2 Rivet Member
1975 25' Tradewind
Boerne
, Texas
Join Date: Jul 2013
Posts: 46
|
1975 25' Airstream TradeWind International
__________________
TARH2O
------------
1975 25' Airstream TradeWind International - Under Renovation
2012 MB ML350 BlueTec
|
|
|
|
|
05-22-2015, 09:51 PM
|
#4
|
Rivet Master 
1974 31' Sovereign
1979 23' Safari
Wayland
, New York
Join Date: Jan 2012
Posts: 1,632
|
Bit of a bastardized setup, not as bad as mine was, replaced mine with same blue sea fuse block(bsfb) and love it. Looking at what you've got, top left two should be positive inputs, since they need fuses you can just connect them to the positive bottom half of the bsfb through one of the fuse ports, my battery input I put breakers on before the bsfb and then can be connected to bottom post. All the colored on the right top half are house circuit positive supply so get fused on bottom half of bsfb. All the stuff on the bottom half should be negative and return runs and a ground to the shell. A little tracing and it shouldn't be to tough to figure with a multimeter.
Since the ends of the old wires are bare , you'll need to put on some ring connectors. They can be crimped, but for safety recommend soldering too. On all mine I took off the insulating selves on the connectors, slid 2 pieces of heat shrink tubing up the wire, put some flux on the bare wire and them inserted wire into crimp connector, then crimped. Then I used a mini butane torch to heat the end and soldered the connection as well. Then I slid one piece heat shrink down and shrunk it, then slid the second down over the first and shrunk that one. Then screwed to the bsfb. I'll try to get pic tomorrow, in my trailer that looks like a tornado went through.
Those big wires will probably need heavy crimp connectors for the wire gage. The kind that you need a special tool and hammer for, but very similar crimp and solder.
|
|
|
|
|
05-22-2015, 10:03 PM
|
#5
|
Rivet Master
1974 31' Sovereign
1979 23' Safari
Wayland
, New York
Join Date: Jan 2012
Posts: 1,632
|
What is the extra white wire on Circuit #1? Not sure something added , white is usually always negative in the as wiring, you'll probably have to see if you can trace it .
What is the metal plate in the middle with the black wire (near the bottom)? It's the negative bus block, essentially replaced by the top half of bsfb.
Black wire going through fuse on bottom , not sure without being able to follow wire a little bit , may be from univolt or replacement converter.
|
|
|
|
|
06-01-2015, 05:23 PM
|
#6
|
2 Rivet Member
1975 25' Tradewind
Boerne
, Texas
Join Date: Jul 2013
Posts: 46
|
Oh man Joe THANK YOU!!!!! That helps a ton! I will begin the deconstruction this evening and try to get the original removed and make sure that I have all of the wires labeled. I will try and trace the wires and make sure that I know what they are.
As for the big black wire on the left that goes to the negative bus block does that go to the positive of the new BSFB? And the same big white wire on the right side of the bus block does that go to the negative of the BSFB?
I will try and see what the big black wire on the bottom that goes though a fuse is.
Again thank you so much!
__________________
TARH2O
------------
1975 25' Airstream TradeWind International - Under Renovation
2012 MB ML350 BlueTec
|
|
|
|
|
06-01-2015, 05:32 PM
|
#7
|
2 Rivet Member
1975 25' Tradewind
Boerne
, Texas
Join Date: Jul 2013
Posts: 46
|
Joe,
I took another picture of the original fuse block and the big black wire through the fuse at the bottom is a fuse from the converter that goes into the bus block at the bottom. So I will put an inline fuse holder for the new fuse.

I'm a little nervous about diving in but worst case I have to get someone to come and fix it for me.
Thanks again.
__________________
TARH2O
------------
1975 25' Airstream TradeWind International - Under Renovation
2012 MB ML350 BlueTec
|
|
|
|
|
06-01-2015, 05:53 PM
|
#8
|
2 Rivet Member
1975 25' Tradewind
Boerne
, Texas
Join Date: Jul 2013
Posts: 46
|
Alright the white wire on circuit #1 is running to the fridge for when running on propane and the black wire connected to the white large wire on the right of the bus block is the return ground from the fridge. So will that black ground wire from the fridge go to the same place as the other black wire on the bus block held in with the nut?
__________________
TARH2O
------------
1975 25' Airstream TradeWind International - Under Renovation
2012 MB ML350 BlueTec
|
|
|
|
|
06-02-2015, 03:48 PM
|
#9
|
2 Rivet Member
1975 25' Tradewind
Boerne
, Texas
Join Date: Jul 2013
Posts: 46
|
The plot thickens {Dun-Dun DUUUUUUUUUUUN}. I started the unhooking of all of the stuff this evening and behold there is a new twist. On the back of the old fuse block there are the two leads coming from the AC/DC converter.

Also the old original converter was still in there and it was a battery charger AND converter.
So this changes EVERYTHING!
So the big wire on the back with the red tag is the positive that will go on the (+) of the BSFB and the other black cable is the negative (-) for the BSFB. All of the other wires on the right side go as I thought.
Now for the battery connection stuff -
The big red wire on the left comes in from the battery and is confirmed to be positive (+). And the black big gauge wire on the left is negative (-) and goes back to the battery. Based on this I think that the two systems (one from the battery and one from the power converter) are in parallel and both power circuits 1-4 on the right side for whichever power source is available.
So where do I wire the battery stuff through to mimic the original setup? Do I connect the big red battery wire to the positive (+) on the BSFB along with the Positive from the converter? And does the big black battery wire get put on to the negative (-) terminal on the top with the converter wire?
Will this cause a short? Is this the correct setup?
And what happens to the blue wire from the car battery? Will that also go to the bottom positive (+) terminal?
Thanks again for the help.
__________________
TARH2O
------------
1975 25' Airstream TradeWind International - Under Renovation
2012 MB ML350 BlueTec
|
|
|
|
|
06-02-2015, 06:52 PM
|
#10
|
2 Rivet Member
1975 25' Tradewind
Boerne
, Texas
Join Date: Jul 2013
Posts: 46
|
Somebody up there likes me - Look what I found in my documentation...

__________________
TARH2O
------------
1975 25' Airstream TradeWind International - Under Renovation
2012 MB ML350 BlueTec
|
|
|
|
|
06-02-2015, 06:55 PM
|
#11
|
Rivet Master
1974 31' Sovereign
1979 23' Safari
Wayland
, New York
Join Date: Jan 2012
Posts: 1,632
|
First off, hope you're dry down there in TX.
I'm going to try to post a picture of what I have some up with on mine, hopefully it works.
The battery terminals can get connected to the center post on the top center and bottom center of the fuse block, before you do that though you need to have some sort of fuse or circuit breaker in the line from the fuse block to battery. Only need one, so for now you could connect to one of the positive fuse slots and fuse it with a 30a fuse. I used 2 50a circuit breakers, one on the positive and one on the negative from the battery, but only one is really necessary, 2 is a little safer in my opinion. You'll see the wires from the battery going to the circuit breakers and from the breakers to the fuse block.
On those refrigerator wires, if you have enough slack, I'd swap them so the black is positive and white is negative, you'll have to swap them on the back of the fridge too, but this way they follow the scheme of all the other wiring.
For the converter, it should have it's own fuse if it's somewhat new, if not you'll want to connect the positive wire to one of the positive fuse slots on bottom, and the negative can go to one of the negative posts on top. Pop in a 30a fuse and it'll tide you over for now. My converter has its own fuses so it's normally wired to the positive and negative posts top and bottom center, it's disconnected right now so it's not in the picture.
The positive charging line from the car goes on to one of the fused slots on the bottom. The top left white wire on my fuse block is the negative from the tow vehicle. In the positive fused section, the top left black wire is the positive from the vehicle, no fuse in there right now.
As long as all the positives go to the bottom positive portion of the block, and all the negatives/grounds go to the top portion of the block, you won't have any shorts or anything, it's just making sure positives are positives and negatives are negatives that can be the trick.
Going to post to see if pic chows up
|
|
|
|
|
06-02-2015, 07:08 PM
|
#12
|
Rivet Master
1974 31' Sovereign
1979 23' Safari
Wayland
, New York
Join Date: Jan 2012
Posts: 1,632
|
|
|
|
|
|
06-02-2015, 07:29 PM
|
#13
|
Rivet Master
1974 31' Sovereign
1979 23' Safari
Wayland
, New York
Join Date: Jan 2012
Posts: 1,632
|
Got it, sort of, got to be an easier way to post pictures.
Hopefully this helps, the converter wires aren't there right now, I've got it disconnected to work around. They normally go to the top and bottom posts, but could go to other positive and negative posts.
Finding that section in the manual is helpful. The electrical section of the manual has been my biggest go to by far.
In my picture i'll go through all the connections.
Top center, negative to the battery through 50a Circuit breaker.
Negative section on top third of fuse block.
Top left white - Negative connection to tow vehicle(TV) not the television.
Middle left green - Negative from the tongue jack and breakaway switch.
Bottom left white - ground from fridge, I ran a dedicated line for possible 3 way fridge.
Top right white - Negative connection/ground to the trailer skin.
Upper Middle right white - Negative connection/ground to the trailer frame.
Lower middle right white - the original negative line from all the house circuits.
Lower right - negative from the solar charge controller.
Bottom fused positive section
Bottom center - positive from battery.
Left top black - Positive from tow vehicle.
Left middle green - positive to dedicated fridge line.
Left bottom red - positive to tongue jack and breakaway switch.
Right top down: Pink / Blue / Brown / Yellow / Purple are original house circuits.
Bottom yellow is the positive from the solar charge controller.
The little grey hanging out there is from the original univolt, haven't decided what to do with it, it provided the AC available light on the control panel with the tank levels and stuff on it. New converter doesn't support it, may/may not jury rig something.
|
|
|
|
|
06-03-2015, 12:47 PM
|
#14
|
2 Rivet Member
1975 25' Tradewind
Boerne
, Texas
Join Date: Jul 2013
Posts: 46
|
Joe,
Thanks for the updates. You have a very nicely done setup - Kudos to you. I've taken a little time to list out the way I think you are describing the connections. Please see if it is what you are describing.
Original layout -


New layout -

And you are correct that the new converter already has fuses built in so there will not be any new ones there. I will be putting inline fuses for the battery but not for the car since it does not have one now.
Thanks for your feedback :-)
__________________
TARH2O
------------
1975 25' Airstream TradeWind International - Under Renovation
2012 MB ML350 BlueTec
|
|
|
|
|
06-04-2015, 01:26 AM
|
#15
|
2 Rivet Member
1978 31' Sovereign
1968 24' Tradewind
Salem
, Oregon
Join Date: Feb 2015
Posts: 25
|
Little grey wire hanging out there
Quote:
Originally Posted by HiJoeSilver

The little grey hanging out there is from the original univolt, haven't decided what to do with it, it provided the AC available light on the control panel with the tank levels and stuff on it. New converter doesn't support it, may/may not jury rig something.
|
Hey Joe.
How about a 12v ice cube relay and an 4a in-line fuse for the gray wire? This might work if the converter wire isn't too big.
I'm starting to see the big, complicated, yet simple picture.
Thanks
-johnny
__________________

|
|
|
|
|
06-04-2015, 10:10 PM
|
#16
|
Rivet Master
1974 31' Sovereign
1979 23' Safari
Wayland
, New York
Join Date: Jan 2012
Posts: 1,632
|
I think that grey+ might actually be a negative, from the looks of it, I think it's the negative return line from all the house circuits. One way to check is check resistance from white wire to the shell, if it's zero or close to it then it's the negative. The negative also uses the shell as a negative/ground path for some loads. There's a wire somewhere connecting the negative line to the shell with a screw or bolt.
Otherwise it looks good, it will work.
Yep, it's a big complicated picture that all works together like a bowl of spaghetti, you can look at the spaghetti and get the surface picture, which is good for 95% of the folks... or you can start pilling at the noodles and really get your head wrapped around it. If you go that far then when there are problems down the road they're easier to figure out.
Although even I have brainfarts sometimes, had a good one a couple days ago, when it finally hit me what was going on I was just DUH.
Troubleshooting the light above the door. Didn't work, had a good bulb. Unscrewed the housing and took off the shell, wire still attached. Needed serious cleaning, had to solder a little extra onto the center post to get good contact. Then conductivity was really spotty, came and went. DUH, unscrewed from shell, shell is the ground, good conductivity when it happened to be touching shell, not when wasn't touching shell strongly. Troubleshot for about 10 min before it finally hit me. Back together, works all peachy.
Little dremel brass wire brushes clean the inside of the 1156/1157 bulb sockets really well. Then wipe them with a little dielectric grease or nonox to get good conductivity and keep them corrosion free.
|
|
|
|
|
06-06-2015, 09:22 AM
|
#17
|
2 Rivet Member
1975 25' Tradewind
Boerne
, Texas
Join Date: Jul 2013
Posts: 46
|
Well today is the proof in the pudding. I will start the dismantle of the old system by labeling all of the wires then disconnecting the AS battery. Then its on to putting on new wire connectors and heat shrink wrapping them. Once I have all of the wires connected and double checked I will start by reconnecting the AS battery. If it all works then I will move on to connecting shore power and pray.
Thanks so much Joe for all of your insightful and wonderful advice. I will not be hooking up the grey water tank yet as I don't know what it does but I will at least go in and wire it up without a fuse so that if I should happen to find out how it works I can switch it on quickly. The rest of the wires will be put on and we will see how it comes together.
Stay tuned...
__________________
TARH2O
------------
1975 25' Airstream TradeWind International - Under Renovation
2012 MB ML350 BlueTec
|
|
|
|
|
06-06-2015, 09:52 AM
|
#18
|
Rivet Master
1978 25' Tradewind
Metro Phoenix
, Arizona
Join Date: Jun 2003
Posts: 1,524
|
Slightly distracting question: Why does Airstream additionally fuse the negative side of the circuit? Personally, I suspect that halucinogenic drugs may be involved.
__________________
"Between what matters and what seems to matter, how should the world we know judge wisely?" - E.C. Bentley, Trent's Last Case
|
|
|
|
|
06-07-2015, 04:05 PM
|
#19
|
2 Rivet Member
1975 25' Tradewind
Boerne
, Texas
Join Date: Jul 2013
Posts: 46
|
Well after 6 hours and some very rug burned knees I have successfully replaced the fuse block and re connected the entire system. No shorts anywhere and everything is working normally.
I cannot say thank you enough to the wonderful inputs from everyone- especially HiJoeSilver. You gave me the confidence and assurance that it can be done even by the novice craftsman.
I will post a picture of the final replacement as soon as I can upload a pic.
__________________
TARH2O
------------
1975 25' Airstream TradeWind International - Under Renovation
2012 MB ML350 BlueTec
|
|
|
|
|
06-07-2015, 04:19 PM
|
#20
|
2 Rivet Member
1975 25' Tradewind
Boerne
, Texas
Join Date: Jul 2013
Posts: 46
|

I have some cleanup to do with the wires on the left but at least everything is working.
__________________
TARH2O
------------
1975 25' Airstream TradeWind International - Under Renovation
2012 MB ML350 BlueTec
|
|
|
|
|
|
|
Currently Active Users Viewing This Thread: 1 (0 members and 1 guests)
|
|
|
 Posting Rules
|
You may not post new threads
You may not post replies
You may not post attachments
You may not edit your posts
HTML code is Off
|
|
|
|

 Recent Discussions
 |
|
|
|
|
|
|
|
|
|
|
|
|
|
|
|
|
|
|
|
|
|


 Linear Mode

