 |
|
 01-17-2012, 05:08 PM
|
#61
|
Rivet Master  
1991 34' Limited
Wichita
, Kansas
Join Date: Nov 2008
Posts: 817
|
|

|

|
|
01-17-2012, 05:15 PM
|
#62
|
Rivet Master
1991 34' Limited
Wichita
, Kansas
Join Date: Nov 2008
Posts: 817
|
I used an oscillating multi-tool with a saw blade installed to saw a kerf of limited depth on the interior skin. This is the first time that I've used this tool which I just bought through Amazon for this job as it's first initiation. I've thought about buying one of these for three to five years, but never took the plunge. I'm really impressed with its capabilities. The Porter Cable is a good tool as are a number of others on the market.

|
|
|
|
|
01-17-2012, 05:37 PM
|
#63
|
Rivet Master
1981 31' Excella II
New Market
, Alabama
Join Date: Sep 2011
Posts: 6,145
|
Why are you leaving any of that floor in there or are you just trying to get it out in managible chunks? I have a Dremel version of that tool and you can do some pretty cool stuff that you can't do with any other tool. The Dremel versions have weak speed controllers and they die an early death. Mine has bit the dust once already. The same goes for their rotary tools. I call that type of saw a bone saw because the surgeons have been using them for a while now. I used mine when I had rot problems on the back of my house when my window seals went south. I saved the windows with the saw by cutting right up to the glass to get the rotten wood out then made a new frame out of oak. I wish they made a hack saw attachment. Mine will only cut wood.
Perry
|
|
|
|
|
01-17-2012, 05:57 PM
|
#64
|
Rivet Master
1991 34' Limited
Wichita
, Kansas
Join Date: Nov 2008
Posts: 817
|
Now, here are my questions for any who would care to respond.
- How's the best way to determine where my leaks are coming from? I plan to start at the bottom and spray the heck out of the sides while someone else watches the inside. I may need to pull the insulation to see what's really going on.
- Are there any guidelines on what seams need to be sealed and the best approach. I have TremPro 635 caulking sealant and Parbond on hand.
If anyone has a good thread or two that they could link me to; that would be appreciated.
Steve
|
|
|
|
|
01-17-2012, 06:04 PM
|
#65
|
Rivet Master
1991 34' Limited
Wichita
, Kansas
Join Date: Nov 2008
Posts: 817
|
Quote:
Originally Posted by perryg114

Why are you leaving any of that floor in there or are you just trying to get it out in managible chunks?
Perry
|
Perry,
I'm going to replace the rear seven feet or so from side to side (in three parallel pieces). I'll also replace the floor under the bathroom. I'm just leaving the floor in place for now so that I have something to stand on until I've got everything done that I can before removing it, which won't be too long from now (weather permitting).
|
|
|
|
|
01-17-2012, 07:10 PM
|
#66
|
Rivet Master
1991 34' Excella
1963 26' Overlander
1961 26' Overlander
Central
, Mississippi
Join Date: Nov 2006
Posts: 5,919
|
That's great looking work Steve. Finding the leaks is tough and I have not found a magic method. I'm thinking of using a cage fan to pressure the interior...and see where soap bubbles...I'm not too confident on that as a back yard method.... I have at least one leak that my 'reseal everything' method has missed on the '91...the '63 has some leaks that I can sling a cat thru... ")
|
|
|
|
|
01-17-2012, 10:43 PM
|
#67
|
Rivet Master
1991 34' Limited
Wichita
, Kansas
Join Date: Nov 2008
Posts: 817
|
Vernon, thanks for your kind words and encouragement. We all need encouragement and advice.
I've read about pressurizing the interior and seen pictures of the commercial equipment that has been sold to do this for RVs.
|
|
|
|
|
01-18-2012, 02:25 PM
|
#69
|
Rivet Master
1991 34' Limited
Wichita
, Kansas
Join Date: Nov 2008
Posts: 817
|
Perry, thanks for the links to the threads. I will study them carefully!
Steve
|
|
|
|
|
01-18-2012, 03:05 PM
|
#70
|
Rivet Master
1964 17' Bambi II
Vintage Kin Owner
Schererville
, Indiana
Join Date: Jul 2005
Posts: 2,637
|
I have found some really small leaks by placing toilet paper along the area where I suspect the leak is coming from (if access to the inside is available). I then spray the outside from the bottom-up, waiting a minute or so for the toilet paper to have time to show if there is any moisture. It's much more sensitive to the moisture than a paper towel & if you string it up along the area where you think it's coming from, you can pinpoint it. It's a tedious thing, but I've been pretty successful that way. I prefer TremPro to Parbond. I've tried all the sealants & like it the best. It never gets hard like Parbond can do after a few years. I should add, that if access to the inside wall isn't available, you can still use the TP along the floor & at least pinpoint the area in the wall where the water is coming from. You do need to follow it up from the bottom up to the top, including all vents, to trace where it's coming from. I've tried the blower, etc. and have been most successful with the old hose method!
__________________
Becky
1964 Bambi II
1988 Avion 32S
|
|
|
|
|
01-18-2012, 03:10 PM
|
#71
|
Rivet Master
1991 34' Excella
1963 26' Overlander
1961 26' Overlander
Central
, Mississippi
Join Date: Nov 2006
Posts: 5,919
|
Quote:
Originally Posted by beckybillrae
... I prefer TremPro to Parbond. I've tried all the sealants & like it the best. It never gets hard like Parbond can do after a few years.
|
I agree with Becky, everyone has a favorite and mine is Tempro (even though it HAS to be the messiest compound known to mankind). I sealed my new LED sidemarkers with Parbond and the stuff has already spider cracked. Tempro can be applied cleanly in thin lines using masking tape as a boundry and it does stay flexible.
|
|
|
|
|
01-18-2012, 04:12 PM
|
#72
|
Rivet Master
1981 31' Excella II
New Market
, Alabama
Join Date: Sep 2011
Posts: 6,145
|
Well here in Alabama lately we have had no need for water hoses. It has rained more than not here lately. I keep thinking I have me leaks fixed and it is still there. I would remove some interior skin where the leak is on the floor and see where the water is coming from. You will most likely need to pull the stinky pink stuff out as well. It is not much trouble to remove the lower skins. Now you can tell where the leak is coming from. Is it coming from the adjacent section, the window above, or some rivets. You can't tell exactly where the leak is but you can narrow it down to a few square feet. My most persistant leak is in the Z-stringer rivet line to the right of the door frame. I put sealer on one last rivet under the awning so cross your fingers that I got it this time.
Perry
|
|
|
|
|
01-18-2012, 08:42 PM
|
#73
|
Rivet Master
2005 25' Safari
Salem
, Oregon
Join Date: Mar 2006
Posts: 8,376
|
 Hi, Steve. Looks like a lot of work. I sure hope you find the leaks and don't use OSB to fix your floor.
__________________
Bob 2005 Safari 25-B
"Le Petit Chateau Argent" Small Silver Castle
2000 Navigator / 2014 F-150 Eco-Boost / Equal-i-zer / P-3
YAMAHA 2400 / AIR #12144
|
|
|
|
|
01-18-2012, 09:47 PM
|
#74
|
Rivet Master
1991 34' Limited
Wichita
, Kansas
Join Date: Nov 2008
Posts: 817
|
All,
Looking at the pictures in post 61 http://www.airforums.com/forums/f36/...ml#post1095129 do you think that I should remove all of the insulation from the walls behind the lower side panels in the rear bedroom before doing the leak check? Note: I'll be removing the lower side wall interior on the curb side too, I just have about five more rivets to remove and saw a vertical kerf on the front of the panel.
Robert,
I'm planning to use 5/8 (AKA 19/32") ABX plywood for the floor and coat it top, bottom and edges with marine epoxy. I'll mill the edges with an electric hand planer like Vernon did on his floor (the factory used this same method on the OSB).
|
|
|
|
|
01-18-2012, 09:52 PM
|
#75
|
Rivet Master
2005 25' Safari
Salem
, Oregon
Join Date: Mar 2006
Posts: 8,376
|
Quote:
Originally Posted by Steve Bryant
All,
Looking at the pictures in post 61 http://www.airforums.com/forums/f36/...ml#post1095129 do you think that I should remove all of the insulation from the walls behind the lower side panels in the rear bedroom before doing the leak check? Note: I'll be removing the lower side wall interior on the curb side too, I just have about five more rivets to remove and saw a vertical kerf on the front of the panel.
Robert,
I'm planning to use 5/8 (AKA 19/32") ABX plywood for the floor and coat it top, bottom and edges with marine epoxy. I'll mill the edges with an electric hand planer like Vernon did on his floor (the factory used this same method on the OSB). |
Hi, Steve. Unless you see signs of leakage, and/or wet matted insulation in these areas, I wouldn't remove the insulation. From your pictures, the insulation looks good.
__________________
Bob 2005 Safari 25-B
"Le Petit Chateau Argent" Small Silver Castle
2000 Navigator / 2014 F-150 Eco-Boost / Equal-i-zer / P-3
YAMAHA 2400 / AIR #12144
|
|
|
|
|
01-18-2012, 10:05 PM
|
#76
|
Rivet Master
1991 34' Limited
Wichita
, Kansas
Join Date: Nov 2008
Posts: 817
|
Robert,
Thanks for your input. I'm inclined to agree with you and just try to find the leaks once I remove the last lower interior panel. Then, if I can't really tell where the leaks are coming from, I can judiciously start removing the insulation. I sure don't want to create work and expense for myself.
|
|
|
|
|
01-19-2012, 06:06 AM
|
#77
|
Rivet Master
1981 31' Excella II
New Market
, Alabama
Join Date: Sep 2011
Posts: 6,145
|
I don't think you are going to be able to tell much with the insulation on there. I think I was able to reinsulate the rear section you have exposed in about half a day using two layers of RMAX rigid foam with the aluminum on both sides. That stuff is easy to work with and it won't hold water. I was also able to seal around the tail light buckets and rivets that were never sealed from the awning mounts. You will probably have better R value that way. The problem with the pink stuff is that it has to become saturated before you even see a leak. Then it takes a long time to dry out. You can clean out the C-channel and waterproof that to keep water away from the sub floor. I cut some little sections of aluminum to bridge the gap between the end cap C-channel and the straight wall section C-channel. I glued them in with Tempro. These gaps are a major floor rot problem. You want to seal all the screws and bolts that go through the C-channel.
Perry
|
|
|
|
|
01-19-2012, 09:01 AM
|
#78
|
Rivet Master
1991 34' Limited
Wichita
, Kansas
Join Date: Nov 2008
Posts: 817
|
Perry, I'll look into the RMAX. Also, do you have any pictures of the bridge that you caulked/bonded into place between the C channel sections. I get the point, I'm just wondering about your approach.
Thanks,
Steve
|
|
|
|
|
01-19-2012, 09:04 AM
|
#79
|
Rivet Master
1991 34' Limited
Wichita
, Kansas
Join Date: Nov 2008
Posts: 817
|
Quote:
Originally Posted by beckybillrae
I have found some really small leaks by placing toilet paper along the area where I suspect the leak is coming from (if access to the inside is available). I then spray the outside from the bottom-up, waiting a minute or so for the toilet paper to have time to show if there is any moisture. It's much more sensitive to the moisture than a paper towel & if you string it up along the area where you think it's coming from, you can pinpoint it. It's a tedious thing, but I've been pretty successful that way.
|
Becky,
I've been pondering this technique and I can see its merit. I assume that I would need to strip out the fiberglas first. Is that correct? Do you have a thread or any pictures of how you've done this.
Thanks in advance,
Steve
|
|
|
|
|
01-19-2012, 11:59 AM
|
#80
|
Rivet Master
1981 31' Excella II
New Market
, Alabama
Join Date: Sep 2011
Posts: 6,145
|
I don't think I took a photo of it. I took a scrap piece of aluminum and bent it to a C or U shape to match the C-channel and just glued it in with Tempro. If you really want to be thorough you could also put a drain tube on each side of the bridge to drain the water under the floor that normally would have been on top of the floor. Something like this. You just want to make sure the pipe is sealed well to the C-channel so you don't end up soaking the wood. I was thinking something like copper or stainless tubing with the flare at the end where it goes through the C-channel. You can distort the hole in the C-channel with a tapered punch or awl to countersink the hole a little to fit the pipe flare.
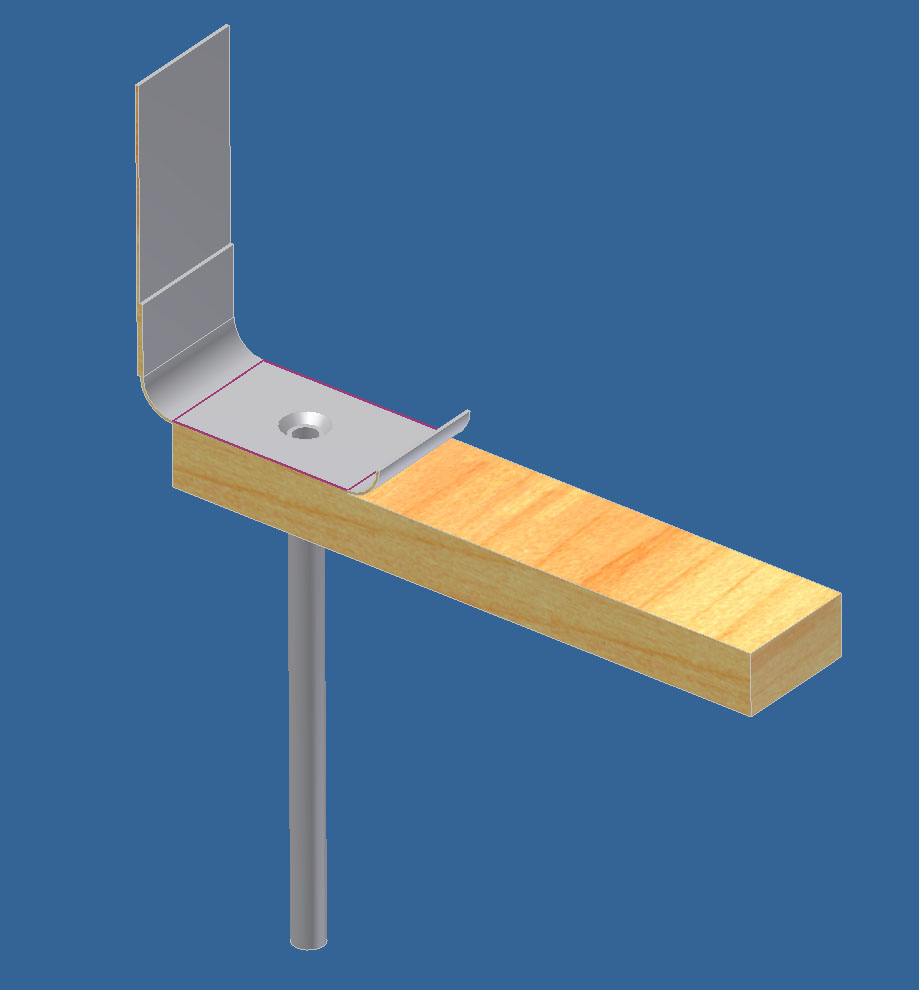 Perry
Perry
Quote:
Originally Posted by Steve Bryant
Perry, I'll look into the RMAX. Also, do you have any pictures of the bridge that you caulked/bonded into place between the C channel sections. I get the point, I'm just wondering about your approach.
Thanks,
Steve
|
|
|
|
|
|
|
|
Currently Active Users Viewing This Thread: 1 (0 members and 1 guests)
|
|
|
 Posting Rules
|
You may not post new threads
You may not post replies
You may not post attachments
You may not edit your posts
HTML code is Off
|
|
|
|

 Recent Discussions
 |
|
|
|
|
|
|
|
|
|
|
|
|
|
|
|
|
|
|
|
|
|


 Linear Mode

