 |
|
 05-03-2015, 03:05 PM
|
#41
|
3 Rivet Member 
1972 29' Ambassador
Cupertino
, California
Join Date: Jan 2015
Posts: 116
|
Posting some notes (as much for myself as the forum) to keep track of my plans for the areas I'm currently working on.
- replace oven with microwave
- electric fridge from home depot
- clean sink and stove
- replace water heater w/ LP tankless water heater
- new quiet water pump
- brita under counter water filter (before or after pump?)
- blue flame ventless heater w/ blower (one in kitchen area, one in bathroom)
- J lounge
- stereo / cb plans? (test stereo power)
- fix wiring on tow-connection (and document since different from manual)
- break-away switch replacement
- replace toilet 'fart fan'
- test ceiling vent fan
|

|

|


|
05-04-2015, 02:04 AM
|
#42
|
3 Rivet Member
1972 29' Ambassador
Cupertino
, California
Join Date: Jan 2015
Posts: 116
|
Update for Sunday. Furnace's out, water heater's out (with a huge puddle on the floor because the drain valve didn't work), can confirm there was clear water coming out of the fresh water tank (clear and no smell). A bit peeved that the old water heater dumped a full tank's worth all over inside, but managed to catch a lot of it in rags and old towels I had nearby for eventually cleaning the trailer. Fortunately it's warm out lately so I'm hoping it'll dry out in a day or so.
Pulled the cabinet / hood off from above kitchen counter, will be replacing it with a custom-made hood just for the stovetop. My father and I have both smacked our heads on that damn thing twice, and it makes the interior feel smaller than it is. Also, having the cabinet above the sink was utterly useless.
Removed the drapes framework from around the kitchen window. It was falling apart and I plan on doing something else for the windows.
I'm almost to the point where I'm ready to start building / installing stuff. I need to remove the passenger side midway bed and replace it with the old front pull-out bed, and remove the heater ducting. I'll be removing the cabinet frame work that was above the old fridge, but leaving the pantry space to the left of it, as I'm going to be building a new framework up when the new fridge goes in. Hopefully by the end of this week I will have ordered some of the new goodies. 
|
|
|
|
|
05-04-2015, 09:16 AM
|
#43
|
Rivet Master 
1981 31' Excella II
New Market
, Alabama
Join Date: Sep 2011
Posts: 6,145
|
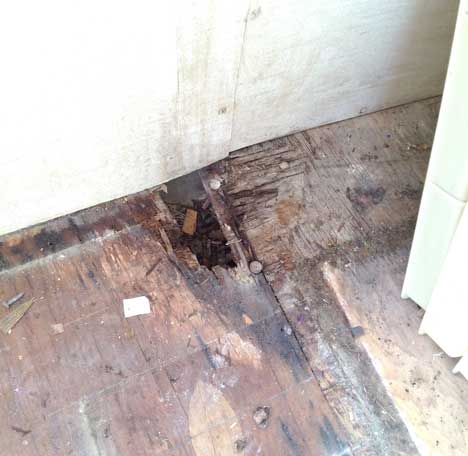
That leak in the corner is where the c-channel for the straight sections meets the curved section. There is a gap between the two. Water that enters the c-channels will exit there. If you pop the skin loose there, you will see what I am talking about. I bridged that gap and put drains in through the c-channel to drain any water out. On the side I did this, I don't have any leaks. On the other side that I have not gotten to yet, I still have some slight leaks. Best way to find out where the leaks are coming from is to pull those lower skins and sit out there during a big rain and find leaks. I had a seam in a fixed window that leaked because the gasket on the outside was letting water in and it exited through that crack on the inside. I would cut the rotten section out and put in a new piece in with other pieces underneath to support it.
Perry
|
|
|
|
|
05-04-2015, 02:55 PM
|
#44
|
3 Rivet Member
1972 29' Ambassador
Cupertino
, California
Join Date: Jan 2015
Posts: 116
|
Excellent, thanks Perry! I was planning on pulling the lower interior skins back before putting the new lounge in, now I've got a better idea of what to be looking for.
|
|
|
|
|
05-04-2015, 07:03 PM
|
#45
|
3 Rivet Member
1972 29' Ambassador
Cupertino
, California
Join Date: Jan 2015
Posts: 116
|
So I found out that the blue flame 'ventless' heaters are banned here in California. Bunch of killjoys!
Going to likely go with with a small electric heater or two at this point. I don't want to spend the money on a massive furnace (and it would conflict with my plans for the kitchen counter space). Kind of amazing that there doesn't appear to be any options for small propane space heaters that aren't free-standing or big enough to be overkill (and pricey).
If I was in a colder climate I'd consider spending the money, but then again most 'colder climate' areas already allow the ventless heaters.
|
|
|
|
|
05-05-2015, 07:57 AM
|
#46
|
Rivet Master
1981 31' Excella II
New Market
, Alabama
Join Date: Sep 2011
Posts: 6,145
|
The problem is with a ventless heater in an enclosed space is that they use up O2 and put out H20 if working correctly but they can also put out CO and CO2 if not working correctly. They will use up O2 pretty quick in something with little air flow. A heater strip in an overhead AC unit will usually heat the trailer with outside temps in the 30's.
Perry
|
|
|
|
|
05-05-2015, 11:47 AM
|
#47
|
3 Rivet Member
1972 29' Ambassador
Cupertino
, California
Join Date: Jan 2015
Posts: 116
|
Yup, the risks of the ventless (never mind the inaccessibility as a Californian) outweigh the rewards in this case. I will look into that heat-strip suggestion. The price is right from what I'm seeing for kits, and I believe the aftermarket AC unit in my trailer is supposed to either have one in the first place, or is designed to work with one. Will definitely have to read up on that.
|
|
|
|
|
05-05-2015, 12:43 PM
|
#48
|
Rivet Master
1981 31' Excella II
New Market
, Alabama
Join Date: Sep 2011
Posts: 6,145
|
Most of those heater strip kits are pretty generic. It is a horse shoe shaped element that you bolt inside the housing with a couple of sheet metal screws. As for how you control it, is another issue. My Dometic has an extra heat setting and it is on or off no thermostat. I used a baseboard heater thermostat on mine to turn it on and off.
Perry
|
|
|
|
|
05-08-2015, 12:59 PM
|
#49
|
3 Rivet Member
1972 29' Ambassador
Cupertino
, California
Join Date: Jan 2015
Posts: 116
|
Heater strip, new water pump (and sediment filter), and some misc electrical stuff ordered.
After digging around a good bit, I'm going to go with a newer water heater that isn't tankless. I'm not comfortable with the idea of using a 'home use' one that could develop problems from travel (never mind install difficulty), and the "RV approved" ones would all cost more than I paid for the trailer. Not spending more than that amount on any one item is my goal for this rebuild.
A new Atwood or the like with an electric ignition and on / off switch should be more than good enough for what I would need.
|
|
|
|
|
07-07-2015, 04:52 PM
|
#50
|
3 Rivet Member
1972 29' Ambassador
Cupertino
, California
Join Date: Jan 2015
Posts: 116
|
Way behind on updating this thread, will need to remember to clean up and upload some photos. Some of the things I've done include: - removing the TracVision S2 from the roof (still need to remove / fill the rivet holes from that)
- replacing all the exterior lights with LEDS
- ordered new LED interior lights
- cleaned and powdercoated the cooktop
- cleaned and 'coated' the sink
- new fridge and microwave picked up, as well as new kitchen counter setup
- working on repairing bumper and step lever
|
|
|
|
|
08-02-2015, 12:13 AM
|
#51
|
3 Rivet Member
1972 29' Ambassador
Cupertino
, California
Join Date: Jan 2015
Posts: 116
|
Finally got some photos for you folks!
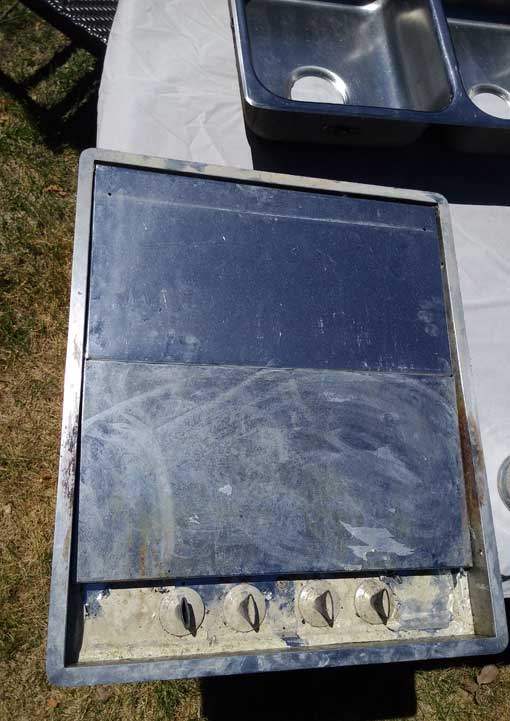
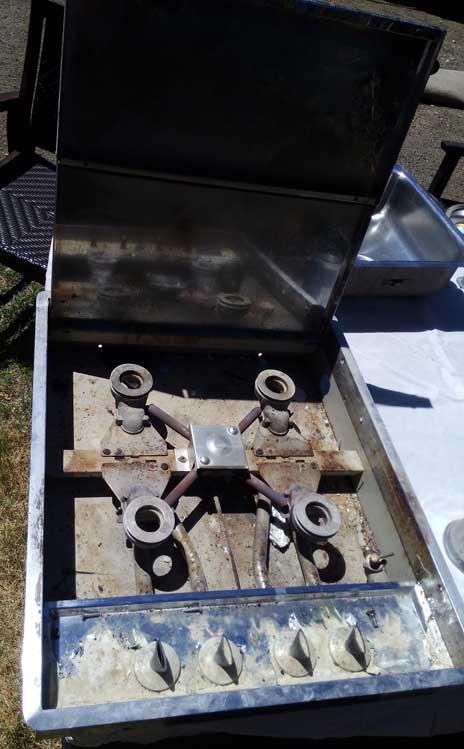
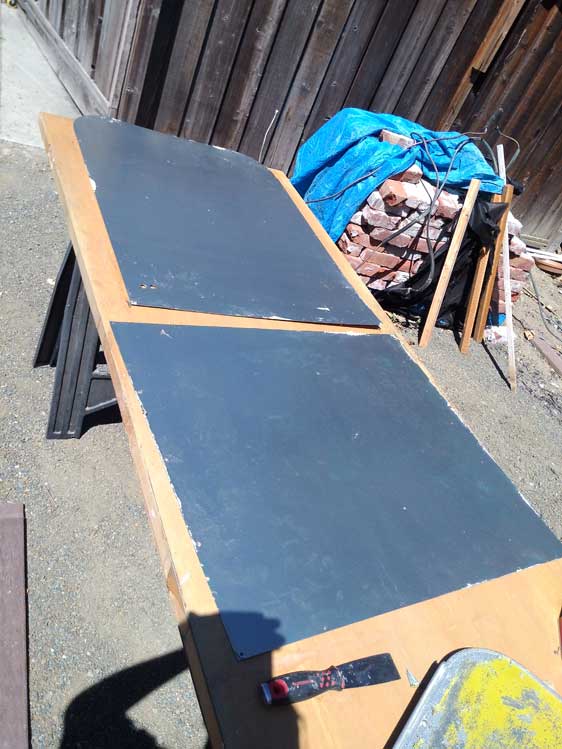
First off, I'll start with the cooktop fix-up.
It started out like this...
After much sanding, a couple of trips to the local powdercoating shop and hardware store, it's looking like this...

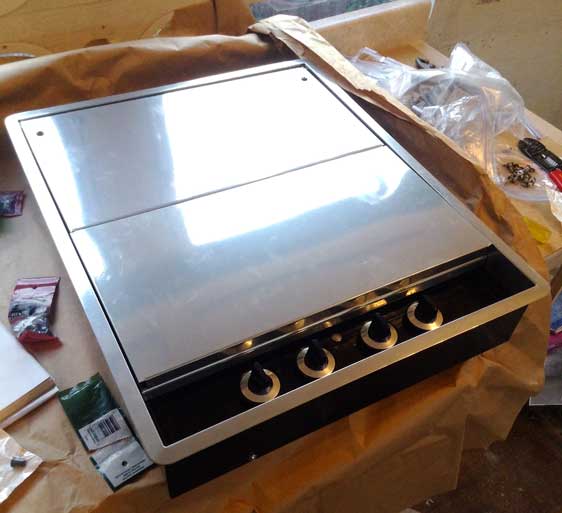
The shop accidentally sprayed the knob tray black, but I think the result looks a lot better than if it'd been coated silver. I got replacement knobs from Home Depot for a few dollars. The 'supports' (the grill bits the pots / pans actually sit on) are ceramic coated, so they'll stand up to the heat. The tray around that is powdercoated, but will have an insulator / barrier between it and the flame. I've removed the pilot light and will be using a bbq lighter instead. I've yet to hook it up as I'm still working on putting my redone kitchen area together.
One thing I would ask, if anyone has a similar cooktop, could you post some photos of what the bumpers / bumpstops look like for the folding lid? There weren't any on this unit when I pulled it apart, and the service manual doesn't go into that kind of detail
|
|
|
|
|
08-02-2015, 12:23 AM
|
#52
|
3 Rivet Member
1972 29' Ambassador
Cupertino
, California
Join Date: Jan 2015
Posts: 116
|
Next up, the door(s).
I don't have any photos handy, but the kludged together screen door has been welded back together and will soon be getting screen and reinstalled. Photos to come as I figure out where I saved them. 
The main door had a few things done. I had to pull the interior skins as I needed to replace the lock (the keyhole had been severely damaged). Out of Doors Mart provided the keyed lock, and that went together easily, so now I've got a bit more security.
While I've got the skins off, I decided to test out removing the vinyl. I figured if it didn't go well I'd just sand and repaint them, or something like that. Well, fortunately, no issues there.
A bit of reading around on the forum turned up numerous posts talking about Jasco Paint & Epoxy remover (picked up from Lowes / Home Depot). I tried it out on the door skins and, well... you tell me.
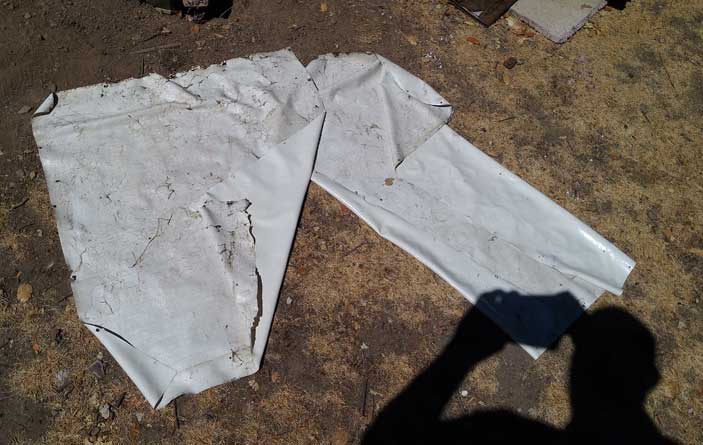
The skins quite literally peeled off like a hide. There were a few spots around the edges where I didn't brush on enough of the remover, but a second splash of that took care of those area.
Few words of advice if you want to try it out. - If you can remove the skins, do so and set them in the sun.
- If you can't, and are doing it inside the trailer, make damn sure to have it well ventilated and consider wearing a respirator.
- Cover the cap for the can with a rag or paper towel when opening. The chemicals like to off-gas and can build up pressure (especially when warm), venting and spray chemistry when you open it up. If you don't want to experience the "Jasco Burn" (something I know well from using the stuff on a project car years ago), heed this advice.
- Wear plastic throw-away gloves. Eye protection's recommended as well.
I will likely be applying this stuff around the kitchen area of my interior as well to clean that off (nice looking aluminum backsplash). I'd like to do more, but most of the interior's in and I don't want to take it out right now (slippery slope as my father's said about wanting to add more to the project).
|
|
|
|
|
08-02-2015, 12:31 AM
|
#53
|
3 Rivet Member
1972 29' Ambassador
Cupertino
, California
Join Date: Jan 2015
Posts: 116
|
Finally, my water fill port.
The one on the trailer had a busted key tumbler (and it looked to have been drilled out at some point). The housing was damaged as well. I'd read up on aquinob's thread about issues with debris dropping into the freshwater tank, so just replacing / repairing it with the same setup didn't seem smart to me.
I followed his lead and ordered this marine fill port and this marine vent port from Amazon, much as aquinob had. Something to note, that fill port did not come with the necessary key (though I can make do in the meantime).
Seeing as my job description is "mechanical designer and CNC router programmer / operator", I get some nice software and hardware to play with, which means I didn't have to freehand anything.

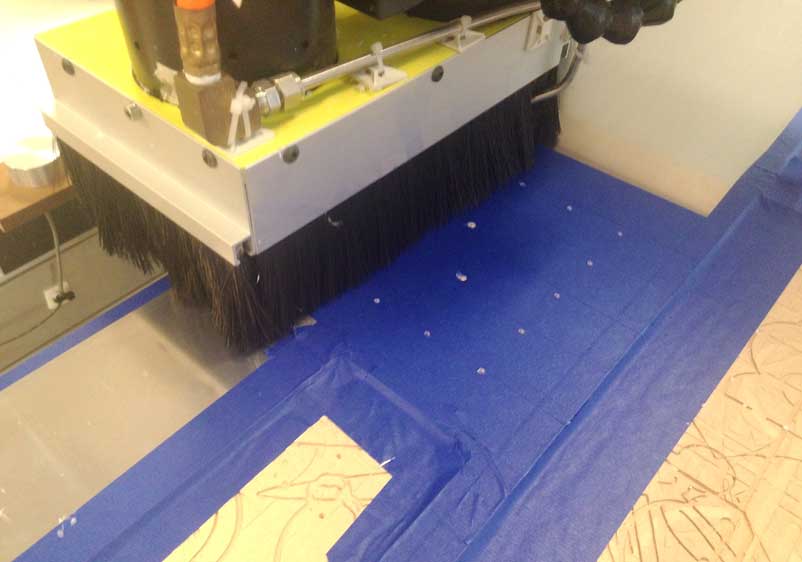
That taken care of, the end results compared to what was originally there look a lot better and work a lot better too. I considered mounting the plate inside the trailer, but I wasn't happy with how the opening looked, and the plate doesn't look bad sitting there.
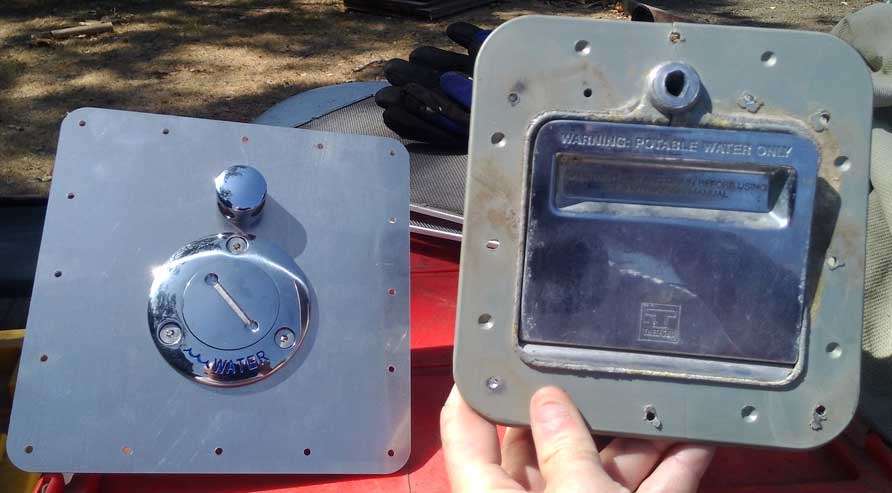
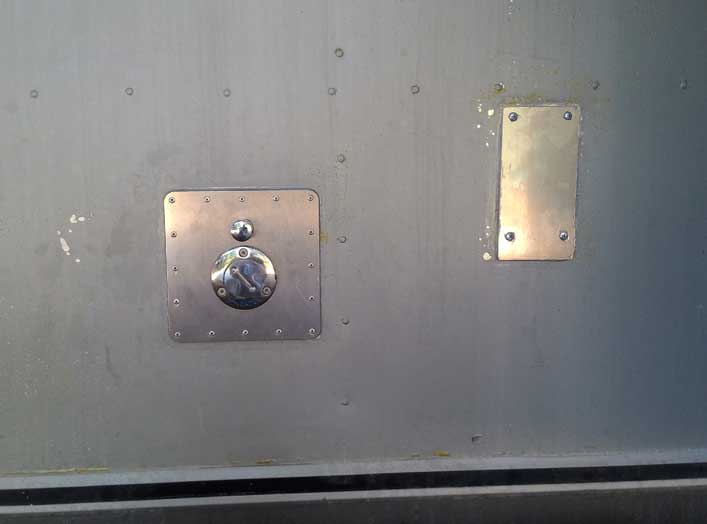
I'm very happy with the results, and am looking forward to plumbing this to the tank. The other plate you see there is a cover plate for where the heater inlet / outlet ports are. I took the heater out of the trailer as it wasn't working and would get in the way of the new kitchen counter setup. I've covered myself for heat with an addition to my AC system of a heater element, and for the kind of traveling we'll be doing it will be more than adequate for heat.
More to come as I get more done! 
|
|
|
|
|
08-02-2015, 06:22 AM
|
#54
|
Rivet Master
1973 27' Overlander
Portsmouth
, Virginia
Join Date: Jun 2012
Posts: 776
|
Very Cool. I'm jealous of your fabrication capabilities. A long time ago I worked in a manufacturing facility with a CNC system and made friends with one of the machinists. For some donuts for the boys I got a stainless rocker switch plate that was fitted flush into a teak instrument panel for a boat I was working on. All the cuts for the instrument panel were also done on the CNC. That is definitely the way to go.
|
|
|
|
|
08-02-2015, 08:53 AM
|
#55
|
4 Rivet Member 
1970 29' Ambassador
1959 22' Flying Cloud
1957 26' Overlander
Ashland
, Oregon
Join Date: May 2003
Posts: 254
|
Wow, that looks great! I am wanting to do the same for mine. Any chance you could sell me a plate just like that?
Quote:
Originally Posted by flaagan

Finally, my water fill port.
The one on the trailer had a busted key tumbler (and it looked to have been drilled out at some point). The housing was damaged as well. I'd read up on aquinob's thread about issues with debris dropping into the freshwater tank, so just replacing / repairing it with the same setup didn't seem smart to me.
I followed his lead and ordered this marine fill port and this marine vent port from Amazon, much as aquinob had. Something to note, that fill port did not come with the necessary key (though I can make do in the meantime).
Seeing as my job description is "mechanical designer and CNC router programmer / operator", I get some nice software and hardware to play with, which means I didn't have to freehand anything.
That taken care of, the end results compared to what was originally there look a lot better and work a lot better too. I considered mounting the plate inside the trailer, but I wasn't happy with how the opening looked, and the plate doesn't look bad sitting there.
I'm very happy with the results, and am looking forward to plumbing this to the tank. The other plate you see there is a cover plate for where the heater inlet / outlet ports are. I took the heater out of the trailer as it wasn't working and would get in the way of the new kitchen counter setup. I've covered myself for heat with an addition to my AC system of a heater element, and for the kind of traveling we'll be doing it will be more than adequate for heat.
More to come as I get more done! |
|
|
|
|
|
08-02-2015, 01:23 PM
|
#56
|
3 Rivet Member
1972 29' Ambassador
Cupertino
, California
Join Date: Jan 2015
Posts: 116
|
Quote:
Originally Posted by albert
Wow, that looks great! I am wanting to do the same for mine. Any chance you could sell me a plate just like that?
|
Yeah, should be able to. Will shoot you a PM about it.
|
|
|
|
|
08-02-2015, 02:59 PM
|
#57
|
4 Rivet Member
1970 29' Ambassador
1959 22' Flying Cloud
1957 26' Overlander
Ashland
, Oregon
Join Date: May 2003
Posts: 254
|
TRYING to send images, keep getting upload fail errors...
failed 6 times, I give up!
email address?
|
|
|
|
|
01-28-2019, 03:30 PM
|
#58
|
3 Rivet Member
1972 29' Ambassador
Cupertino
, California
Join Date: Jan 2015
Posts: 116
|
Just sold off the Ambassador, the project hadn't moved forward much at all in the past year or so, and the number of projects was getting to be too many. The prospects for using the trailer had diminished a good bit as well, so it made sense to let someone else tackle it. I'm looking forward to seeing how the buyers go forward with the trailer. As it is, I may consider a Bambi-sized trailer in the future (rent or buy), but that's not going to happen until I get some other project vehicles sorted out first. Been great being a part of this community, even briefly. Have fun!
|
|
|
|
|
|
|
Currently Active Users Viewing This Thread: 1 (0 members and 1 guests)
|
|
|
 Posting Rules
|
You may not post new threads
You may not post replies
You may not post attachments
You may not edit your posts
HTML code is Off
|
|
|
|

 Recent Discussions
 |
|
|
|
|
|
|
|
|
|
|
|
|
|
|
|
|
|
|
|
|
|


 Linear Mode

