Journey with Confidence RV GPS App RV Trip Planner RV LIFE Campground Reviews RV Maintenance Take a Speed Test Free 7 Day Trial ×
 

Go Back   Airstream Forums > Airstream Knowledgebase > Airstream Motorhome Forums > Land Yacht/Legacy Motorhomes
Click Here to Login
Register Vendors FAQ Community Calendar Today's Posts Search Log in

Reply
 
Thread Tools Search this Thread Display Modes
 
Old 11-10-2011, 07:21 PM   #1
Streamin'
 
BarnacleBill's Avatar
 
1995 30' Cutter Bus LE
Madison , New Mexico
Join Date: Nov 2008
Posts: 312
Images: 4
Waste Drain Valve Replacement

I am posting this in hope that it may help someone with the same project.

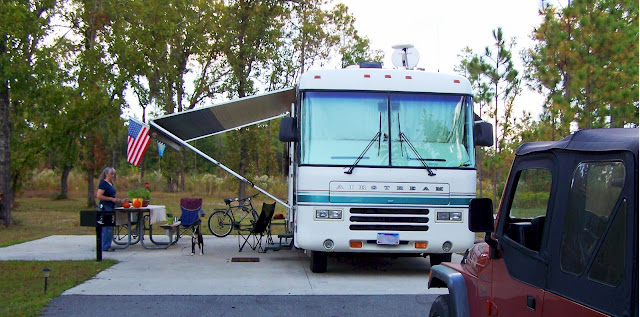
This adventure began on our trip from Maryland to Florida in the fall of 2011.

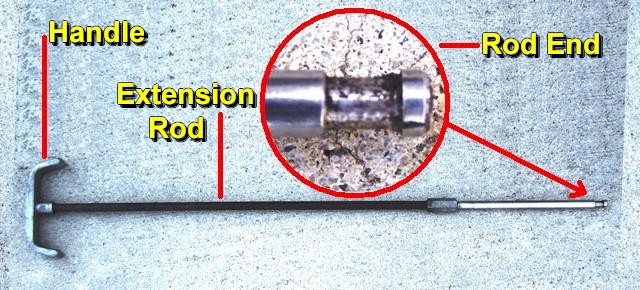
We stopped to see our friends at Magnolia RV Park in South Carolina. After a couple of days hanging out, we prepared to depart. I pulled on the Black Tank drain valve handle to empty the tank and the whole rod, rod extension and handle pulled out of the valve!

The valve has been hard to operate and I knew a new Waste Valve was in my future, but I was hoping it would wait until we where parked in Florida.

Now I know what the first fun thing will be for me to do when I get to The Sunshine State. And I have something to think about for the rest of the trip; how am I going to get the valve open to empty the tank and flush it so we can put in the new valve?

Here’s the “poop” on the project:

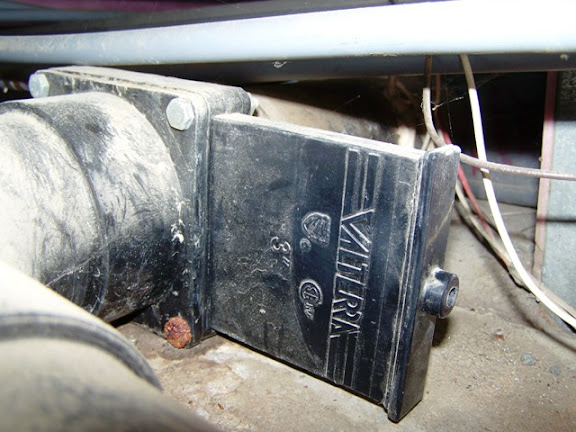
Valve: Black Tank Waste Drain Valve - Valterra 3” (blade type gate valve)
RV: 1995 30’ Land Yacht LE Motorhome

We arrived at our new winter home, met the new neighbors, and apologized in advance for what may be some bad smells and language.


Depending on the RV, the access to the valve will vary, but if the valve is a Valterra Bladex waste valve, the replacement procedure should be the same.

Gaining Access To The Valve

On the 30’ Land Yacht LE Motorhome the valves are located behind a locker that contains the water and sewer hookups and an out-door shower.


First you have to remove all the hardware; shower, fresh tank fill y-valve, hot and cold drain valves, city water hook-up, sewer hose storage and valve handles.


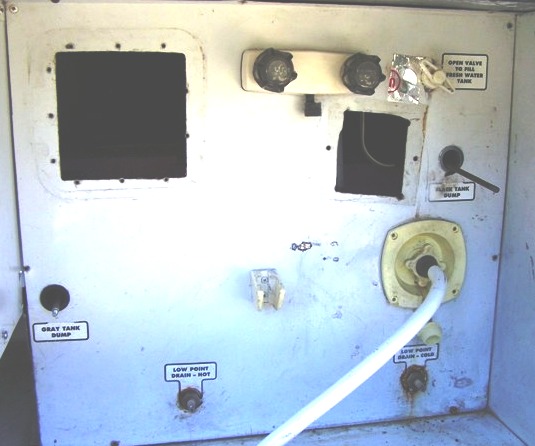
Then you remove the back of the locker that all this stuff was mounted on and you have access to the tank drain valves. The black tank valve is deep in the back (of course).


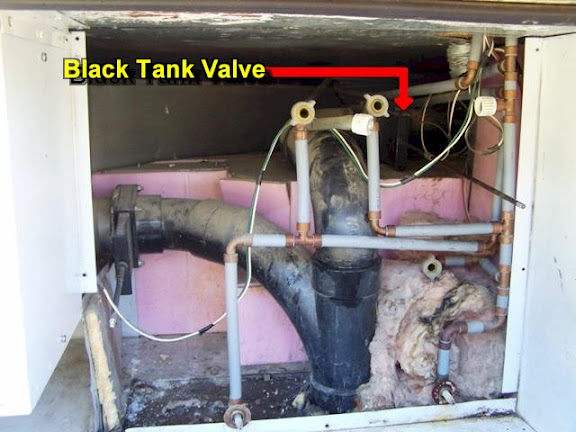
There was not much space around the valve to work and someone with short arms would be in trouble. You can not see the two bolts on the back side of the valve so they had to be removed and r-installed by feel alone.


Open the Valve without a Handle

The first task is to open the valve and drain the tank. Then after flushing the tank, I can remove the old valve and install a new one. The main goal here is to do this with as little mess as possible.

There is no way to reconnect the rod to the valve. The rod has a detent or groove and must have been molded into the plastic blade of the valve.
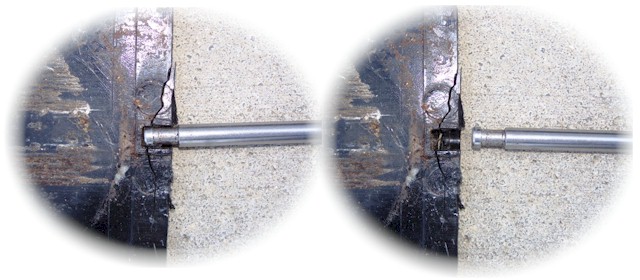


Here’s what the blade and valve looked like after we got it out.


The plan is to cut the blade housing away from the valve and use vice grips to grab the blade and pull it open and drain the tank.

I used a Dremal tool to cut off the end of the blade housing to see what I could find but you can’t see much peering into that little slit.


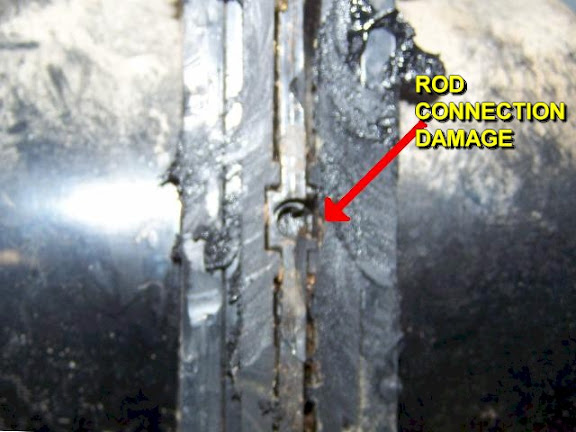
I removed the rest of the blade housing. By cutting about 1” at a time, I wound up cutting away the housing right down to the valve.


At this point I could see the end of the valve’s blade and the place where the rod was attached. I looked like the right side was damaged.


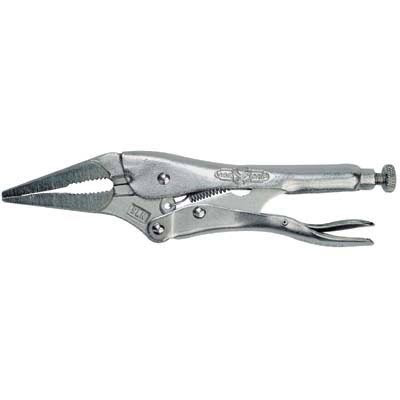
I used a Dremel high speed cutter like this one to cut away enough of the housing to get a grip on the blade.


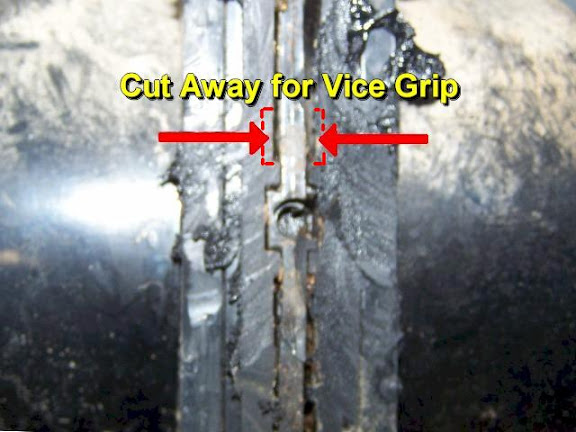
I used a set of needle-nose Vice Grips to grab the blade.


Then, very carefully, I pulled the blade out of the valve. I was afraid if the blade came all the way out I would be doing a Robin Williams moment with the poop fountain.

I got the valve open, with little mess, and drained and flushed the tank. Then removed the old valve and installed the new valve.


Spreading the two pipes on either side of the valve to install the new valve was one of the hardest parts of the job. The gaskets need to be carefully seated to avoid leaks and make the valve work smoothly. I used generous amounts of Vaseline to hold the gaskets in place during installation.

It’s all back together and no leaks!

Upon inspection of the old valve after removal, it appears one of the old gaskets was not installed correctly. It was pinched and crimped and may have been the reason the valve was hard to operate. It’s the one on the right…


I can’t tell you how glad I am that this job is done!

I hope this will help someone with this same project in the future. If anyone needs more help or advice, you can email me bill.thompsonn@gmail.com

Cheers,

Bill
BarnacleBill is offline   Reply With Quote
Old 11-10-2011, 07:41 PM   #2
Always learning
 
Lance M's Avatar
 
1972 29' Ambassador
1962 19' Globetrotter
1951 21' Flying Cloud
Central , Texas
Join Date: Oct 2010
Posts: 2,881
Images: 24
Blog Entries: 2
Send a message via Yahoo to Lance M
Great post on a successful story! Thanks for sharing.
__________________
Lance

Work is never done, so take time to play!
Lance M is offline   Reply With Quote
Old 11-10-2011, 08:04 PM   #3
Rivet Master
 
gloran's Avatar
 
1993 33' Land Yacht
Midland , Michigan
Join Date: Sep 2005
Posts: 508
Very impressive post Bill,and good job! Replacing the valve on my Land Yatch would be easier because of access, than your bus version, but neither would be and enjoyable job as you already said.
__________________
gloran - 1993 LY MH 33' - Banks System, Steer Safe, IPD front stabilizer, Super Steer - Bell Cranks, Motion Control, Coil

https://s1290.photobucket.com/user/gl...58808196506793
gloran is offline   Reply With Quote
Old 11-11-2011, 06:40 AM   #4
2 Rivet Member
 
Djmclean's Avatar
 
1988 35' Argosy 5th Wheel
Cumming , Georgia
Join Date: Jul 2011
Posts: 69
Images: 5
I see this in our future....It seems our valve is stuck open. The valve handle moves in and out, but I don't think the valve closes. It was a "surprise" when we hooked up to drain it for the first time. Quick hands averted a real nasty cleanup, but I know it needs to be fixed before further use.

Thanks for this great step by step. I can now appear to have the "poop" on the project and impress my hubby
Djmclean is offline   Reply With Quote
Old 11-11-2011, 07:19 AM   #5
4 Rivet Member
 
Airstream12557's Avatar
 
2015 30' Flying Cloud
Currently Looking...
Evansville , Indiana
Join Date: Jul 2004
Posts: 280
Thumbs up

Bill, thanks for the great post. I made a copy and put in my files, but I hope that is a project that I won't have to do. If I do, I will feel more confident about the project from your post.

Sam
Airstream12557 is offline   Reply With Quote
Old 11-11-2011, 09:03 AM   #6
Rivet Master
 
Foiled Again's Avatar
 
2012 25' FB Eddie Bauer
Vintage Kin Owner
Virginia Beach , Virginia
Join Date: Sep 2004
Posts: 7,801
Thanks

Even though we don't have "karma" any more, I sent you a thanks with a Karma attachment!

Sooner or later we will all have to replace a valve - and this shows us how to without fearing we'll need a hazmat suit, three gallons of bleach, a 15' x 15' tarp and five gallons of kerosene to burn the tarp with when we're done changing the valve.

Peace on, Karma and all that jazz, Paula
__________________
Today is a gift, that's why they call it the present.
Foiled Again is offline   Reply With Quote
Old 11-11-2011, 10:40 AM   #7
65th Anniversary CLIPPER
 
masseyfarm's Avatar
 
1996 36' Clipper Bus
Tub City , British Columbia
Join Date: May 2009
Posts: 3,309
Images: 61
Fantastic documentation BILL!
This type of detailed information with pictures is just not found easily when needed. Great that you have posted it here.
On the Clipper, the valves are in the open front area, so will be an easier job when it has to be done.

Thanks
Dave
masseyfarm is offline   Reply With Quote
Old 11-12-2011, 09:28 PM   #8
2 Rivet Member
 
Djmclean's Avatar
 
1988 35' Argosy 5th Wheel
Cumming , Georgia
Join Date: Jul 2011
Posts: 69
Images: 5
I found this today. It is my temporary fix until we are emotionally prepared to do the real fix.
Twist-on Waste Valve - Quick Fix for Leaky Valve - PPL Motor Homes

Looks like it should work. The only problem is that you have to empty the black water everytime you want to empty the gray water. It will probably involve running a lot of water in the black tank. I guess it will alleviate any clogs....
Djmclean is offline   Reply With Quote
Old 04-05-2012, 12:26 PM   #9
Rivet Master
 
Sneakinup's Avatar
 
1977 31' Sovereign
Tampa Bay , ^
Join Date: Jun 2002
Posts: 762
Images: 123
Since it was too wet to crawl under my trailer today, I decided to work on my waste valves. I should be working on my waste size, but that is for another day.

Getting the old valves off would have been IMPOSSIBLE if the tanks were not removed from the trailer. The "male" portion of the original Thetford had some kind of caulking or sealant on it that made it near impossible to remove without a heat gun to gently soften it up. I was of course extremely careful not to damage the tank flange.

The big question is... does anyone know what was used as a sealant on the flange? I doubt it was anything special, and was thinking of just using some silicone caulking, but if anyone knows of a "more correct" product, please let me know.
Attached Thumbnails
Click image for larger version

Name:	valve.jpg
Views:	192
Size:	234.6 KB
ID:	155082   Click image for larger version

Name:	valve2.jpg
Views:	154
Size:	172.3 KB
ID:	155083  

__________________
Out in the woods, or in the city, It's all the same to me.
When I'm drivin' free, the world's my home....When I'm mobile.


Sneakinup is offline   Reply With Quote
Old 04-05-2012, 12:57 PM   #10
Rivet Master
 
TG Twinkie's Avatar
 
1974 Argosy 26
Morrill , Nebraska
Join Date: Nov 2009
Posts: 6,014
Images: 2
Blog Entries: 5
I believe pipe dope compound is the right material to use in this situation.
It is typically used on black iron and galvanized pipe fittings. The stuff I use comes in a red and white can. Can't think of the brand name right now. Look for it in the plumbing section.
TG Twinkie is offline   Reply With Quote
Old 04-05-2012, 02:13 PM   #11
Rivet Master
 
Sneakinup's Avatar
 
1977 31' Sovereign
Tampa Bay , ^
Join Date: Jun 2002
Posts: 762
Images: 123
Thanks... I think I checked my can of dope (pipe dope that is) and it said not to use with plastics. I have had the can probably since the 70's, I will check to see what the new ones say.
__________________
Out in the woods, or in the city, It's all the same to me.
When I'm drivin' free, the world's my home....When I'm mobile.


Sneakinup is offline   Reply With Quote
Old 04-05-2012, 03:04 PM   #12
Rivet Master
 
TG Twinkie's Avatar
 
1974 Argosy 26
Morrill , Nebraska
Join Date: Nov 2009
Posts: 6,014
Images: 2
Blog Entries: 5
I think it is referring to threaded plastic pipe.
TG Twinkie is offline   Reply With Quote
Old 04-26-2012, 05:04 PM   #13
Registered User
 
1996 32' Cutter Bus
Petaluma , California
Join Date: Jul 2011
Posts: 112
Images: 34
Thanks!

Thanks Bill for that great tutorial! Mine looks basically the same on my '96 Cutter Bus Pusher. The black tank valve doesn't close completely so a little waste water goes past the valve. In addition, my fresh water inlet is kinda stuck, so I improvised a workaround for now. Now I see that I won't have to get this done at a repair shop. I plan on replacing both the black and gray tank valves, the fresh water inlet, and all the washers for all the drains and the outside shower. I like your fresh water filter setup too. Are they braced somehow? Now the next (blurry) picture is of my fresh water tank in the next compartment to the left. Any idea what those two valves are for? Thanks!
Attached Thumbnails
Click image for larger version

Name:	Picture 3134.jpg
Views:	211
Size:	623.2 KB
ID:	156822   Click image for larger version

Name:	Picture 3135.jpg
Views:	151
Size:	719.3 KB
ID:	156823  

AdamB is offline   Reply With Quote
Old 04-29-2012, 08:32 AM   #14
Streamin'
 
BarnacleBill's Avatar
 
1995 30' Cutter Bus LE
Madison , New Mexico
Join Date: Nov 2008
Posts: 312
Images: 4
Quote:
I like your fresh water filter setup too. Are they braced somehow? Now the next (blurry) picture is of my fresh water tank in the next compartment to the left. Any idea what those two valves are for? Thanks!
I am glad you found my write-up helpful Adam! The filter assembly isn't fastened down, it just sets there. When I first built it, I hooked it to the outside faucet with a short hose and then ran the output side to the coach. Now I put the short hose on the output side and just keep the assembly in the locker. One less thing to move and hookup when we stop for the night, and it will probably last longer in the locker than out in the sun.


As for those valves, we don't have the same setup on our tank, so I can only guess. A better photo would help, but I would guess the red one is a gate valve and it looks like it is on the fill. I cant tell what the other one is hooked to.
BarnacleBill is offline   Reply With Quote
Old 05-03-2012, 11:14 PM   #15
Registered User
 
1996 32' Cutter Bus
Petaluma , California
Join Date: Jul 2011
Posts: 112
Images: 34
I appreciate the follow up picture on your water filtration system. Your use of brass fittings will make it even more reliable. Great to learn tips like this from fellow Airstreamers. Unfortunately, I don't think Airstream made a manual for my particular Cutter (there aren't too many '32 Cutter pushers out there). I have all the documentation from the original owner and it includes a manual for a Land Yacht pusher. I'll be visiting the original owner in 2 weeks and I'll have a small list of questions for him. Talk to you soon!
AdamB is offline   Reply With Quote
Old 07-06-2012, 03:34 PM   #16
Registered User
 
1996 32' Cutter Bus
Petaluma , California
Join Date: Jul 2011
Posts: 112
Images: 34
Well I did it! Changed both grey and black valves, outside shower, water inlet and all the little cone washers a few days before leaving for San Diego. It's so nice not to have 2-3 cups of ooze to catch when I remove the black cap. I had to use a lubricating jelly as well. Thanks again Bill!
Attached Thumbnails
Click image for larger version

Name:	image-3511712161.jpg
Views:	145
Size:	401.3 KB
ID:	162500  
AdamB is offline   Reply With Quote
Old 07-06-2012, 04:49 PM   #17
Rivet Master
 
Join Date: Jan 2005
Posts: 811
I just went through this with my Safari travel trailer only I was lucky enough to have the grey not the black malfunction. The handle would pull out but the fluid wouldn't drain. The black valve was very sticky and a knew an unpleasant problem was not far away.
No way to get at the valves. I took it to a repair facility. It was a $650 job--ouch. They had to drop the tanks to get at the valves. Not a DIY job unless you have no sense of smell.
handn is offline   Reply With Quote
Old 07-09-2012, 10:19 AM   #18
3 Rivet Member
 
2000 31' Excella
Ontario , Canada
Join Date: Feb 2010
Posts: 215
Thumbs up

Thanks Bill for your excellent post. I'll print it off for future no no no no. What am I saying. I hope to never have to look at it again.

Bill, what type of filters are you using?

Thanks
woodytwo is offline   Reply With Quote
Old 07-09-2012, 10:43 AM   #19
Rivet Master
 
SmokelessJoe's Avatar
 
1976 Argosy 24
now being enjoyed by Heath and Mary in , Vermont
Join Date: Sep 2005
Posts: 1,432
Very useful post Barnacle Bill. Thank you.

I originally designed my Waste Managment Compartment without proper access to the valves but had that error corrected this summer before my now begun trek to Newfoundland.

I've often wondered how I would cope with a valve slider handel coming off in my hand and your good solution will be kept in mind, all the while hoping I won't have to use it.


Sergei,

Enroute on the iPad
SmokelessJoe is offline   Reply With Quote
Old 03-10-2013, 11:41 AM   #20
Ready to go campin?
 
wvabeer's Avatar
 
1992 33' Land Yacht
Evans , West Virginia
Join Date: May 2002
Posts: 349
Images: 49
On my black water tank where it connects to the valve is differant, what would I use? It appears silicone was used before. I have a steady drip, and black water drip ain't to good. There were large hose clamps on this but it still leaked.
Attached Thumbnails
Click image for larger version

Name:	2013-03-10_13-33-02_614.jpg
Views:	166
Size:	270.1 KB
ID:	180642  
__________________
92 Landyacht 33, 454 tag axle
wvabeer is offline   Reply With Quote
Reply

Tags
valve removal, waste, black tank


Currently Active Users Viewing This Thread: 1 (0 members and 1 guests)
 

Posting Rules
You may not post new threads
You may not post replies
You may not post attachments
You may not edit your posts

BB code is On
Smilies are On
[IMG] code is On
HTML code is Off
Trackbacks are Off
Pingbacks are Off
Refbacks are Off


Similar Threads
Thread Thread Starter Forum Replies Last Post
Threaded waste valve... mnmhays Waste Systems, Tanks & Totes 4 03-29-2012 05:45 AM
Thetford waste valve replacement Safari64 Plumbing - Systems & Fixtures 6 02-24-2012 08:32 PM
How to disassemble a drain valve flyflinger Fresh Water Systems 2 09-25-2011 11:17 PM


Featured Campgrounds

Reviews provided by

Disclaimer:

This website is not affiliated with or endorsed by the Airstream, Inc. or any of its affiliates. Airstream is a registered trademark of Airstream Inc. All rights reserved. Airstream trademark used under license to Social Knowledge LLC.


All times are GMT -6. The time now is 01:39 PM.


Powered by vBulletin® Version 3.8.8 Beta 1
Copyright ©2000 - 2024, Jelsoft Enterprises Ltd.