 |
|
 08-12-2007, 07:55 PM
|
#1
|
2 Rivet Member 
1969 31' Sovereign
Cogan Station
, Pennsylvania
Join Date: Aug 2007
Posts: 34
|
1969 - And so it begins...
|

|

|


|
08-12-2007, 08:17 PM
|
#2
|
|
Retired.
Currently Looking...
.
, At Large
Join Date: Jun 2003
Posts: 21,276
|
Looks like you've got a good start. Are you going back to finish it tomorrow, or are you waiting for next weekend? Also, you may want to check out the axle condition article at Inland RV's website: www.inlandrv.com/axle
__________________
Meddle not in the affairs of dragons, for you are crunchy, and taste good with ketchup.
Terry
|
|
|
|
|
08-12-2007, 08:19 PM
|
#3
|
Rivet Master 
1951 21' Flying Cloud
1960 24' Tradewind
West Coast
, BC
Join Date: Feb 2005
Posts: 3,790
|
Very nice. Geez, and all the parts nicely bagged - how the heck can you work like that with everything so clean and organized? You gotta put them all in a big plastic or tin container, shake it up a few times, put a little extra grease in there, and then try working with things. Oh, there's another way that allows you to do things simply and efficiently?
It looks like you had a decent day for tackling the job at hand. Have fun with it.
Barry
|
|
|
|
|
08-12-2007, 08:30 PM
|
#4
|
Rivet Master
1984 31' Airstream310
Central
, Ohio
Join Date: Feb 2007
Posts: 1,094
|
Great job so far! I LOVE the forums--if you have a question or a problem, you post it, and bang! someone usually posts a valid answer right away (hi Terry!). I am so glad they were helpful for you, too.
It is awesome to see you do such a neat and tidy job. Keep up the good work!
Susan 
__________________
"Despite the cost of living, have you noticed how popular it remains?"
1984 310 Limited Motor Home "The Rockin' A"
|
|
|
|
|
08-12-2007, 08:33 PM
|
#5
|
|
Moderator

2015 25' FB Flying Cloud
2012 23' FB Flying Cloud
2005 25' Safari
Santa Rosa Beach
, Florida
Join Date: Jul 2006
Posts: 13,159
|
I'm imprressed; you do good work!!!!!!!!!!!!!!!
__________________
SuEllyn & Brian McCabe
WBCCI #3628 -- AIR #14872 -- TAC #FL-7
2015 FC 25' FB (Lucy) with ProPride
2020 Silverado 2500 (Vivian)
2023 Rivian R1T (Opal)
|
|
|
|
|
08-12-2007, 09:10 PM
|
#6
|
2 Rivet Member
1969 31' Sovereign
Cogan Station
, Pennsylvania
Join Date: Aug 2007
Posts: 34
|
Thanks for the props fellow members!
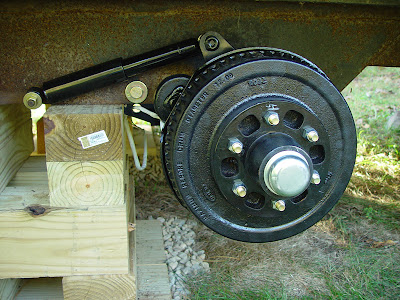
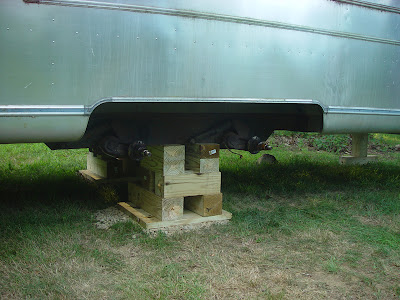
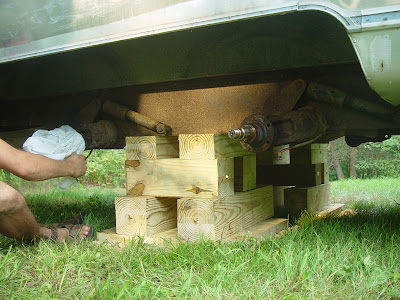
Overlander, I can't get back to Tilton until next weekend. So as for finishing the job, I guess it depends on whether or not I simply purchase new axles(complete). There is a local trailer sales and service compant that can get me Dexter replacements for about $500 a piece comlpete with all new everything(plates, brakes, drums, etc). I would like to save a few bucks and restore the existing stuff, but I do not think that the old axles have to 22.5 degree angle off frame that inland reccommends. However, I am not sure of the angle on my axles because I didn't put a speed square to them while I had the chance. My eye says that it is less than 22.5.
PizzaChop Highly reccommended just buying new to save alot of trouble, I'll bet he is right.
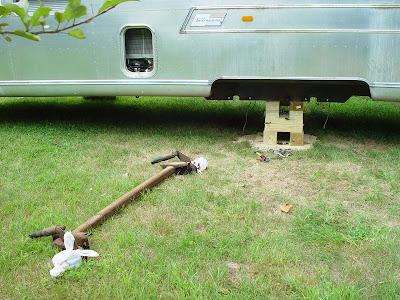
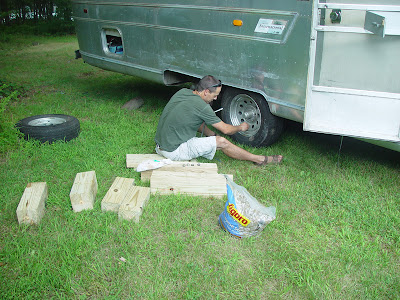
The way we went about jacking the trailer was simple. All you need is a half hour at home depot and $125. This price includes a 12 ton bottle jack. If anyone would like to know how we did it step by step, I would be more than happy to explain.
Again, thanks for all the great energy people!
|
|
|
|
|
08-12-2007, 09:16 PM
|
#7
|
Rivet Master Airstream Dealer
Corona
, California
Join Date: Feb 2002
Posts: 16,497
|
Quote:
|
Originally Posted by badelson
Hello everyone!
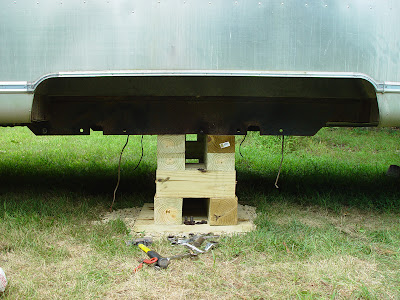
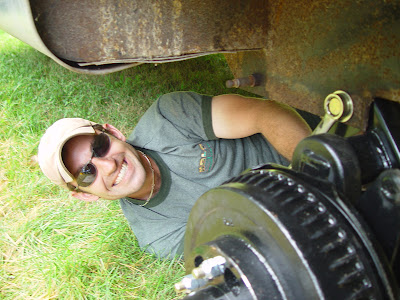
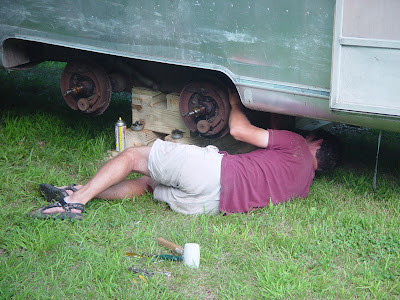
Today my buddy and I went up to Tilton, New Hampshire to begin work on the AS. Because of the long drive to and fro, I decided to jack and crib the camper so that we could remove all the tires, drums, brakes and backing plates. Interesting challenge, however, because of this GREAT forum, the project took all of 4 hours.
|
The position of your axles torsion arms, with zero load, indicate that your axles are history.
If the trailer was towed over a period of time with axles in that condition, it usually results in rear end separation as well.
Take a peak at the rear of the trailer at the junction of the frame and rub rail (the bottom molding). If there is "any" movement in that area, then the rear end separation is another task at hand for you.
Rear end separation problems are caused primarily by lack of proper running gear balance, and/or bad axles.
That repair is an early "must", since water will also damage the rear flooring, if it hasn't already.
Andy
|
|
|
|
|
08-12-2007, 09:20 PM
|
#8
|
|
Retired.
Currently Looking...
.
, At Large
Join Date: Jun 2003
Posts: 21,276
|
Quote:
|
Originally Posted by badelson
However, I am not sure of the angle on my axles because I didn't put a speed square to them while I had the chance. My eye says that it is less than 22.5.
If anyone would like to know how we did it step by step, I would be more than happy to explain.
Again, thanks for all the great energy people!
|
Your axles are at about 5 degrees unloaded, not good. I wasn't going to blatantly tell you they were bad, although at 38+ years old, they can't be in the greatest of shape. I remember when I was 38, I wasn't in great shape either, but that's another story. 
As for step by step explanations, that would be good, the people here like pictures, too.
Nowadays, Airstream is leaning toward something like 34 degrees of starting angle, when our trailers were built, the average tow vehicle was a Chrysler Newport wagon, now it's a Suburban or Pickup, both of which sit considerably higher off the ground, and the 34 degree start gives you an extra couple of inches of height.
I don't want to turn this into another axle thread  , so I'll instead ask about what luck you've had in getting windows. Have you been able to get all the right ones, or are there some that are giving you fits?
__________________
Meddle not in the affairs of dragons, for you are crunchy, and taste good with ketchup.
Terry
|
|
|
|
|
08-12-2007, 09:28 PM
|
#9
|
2 Rivet Member
1969 31' Sovereign
Cogan Station
, Pennsylvania
Join Date: Aug 2007
Posts: 34
|
Andy,
Thank you very much for posting here. I'll take your word for it and order new axles this week. As for the rear end separation, we noticed it today. If I grab the rear bumper and lift, I noticed the slightest movement between frame and the body. We looked carefully at this, I believe that the separation is only on the road side rear. I guess I'll find out soon enough.
I love a good project, but what am I looking at when it comes to fixing something like this? Do I have to tear the bathroom out or can this be worked on from below?
Thanks again!
|
|
|
|
|
08-12-2007, 11:04 PM
|
#10
|
Rivet Master Airstream Dealer
Corona
, California
Join Date: Feb 2002
Posts: 16,497
|
Quote:
|
Originally Posted by badelson
Andy,
Thank you very much for posting here. I'll take your word for it and order new axles this week. As for the rear end separation, we noticed it today. If I grab the rear bumper and lift, I noticed the slightest movement between frame and the body. We looked carefully at this, I believe that the separation is only on the road side rear. I guess I'll find out soon enough.
I love a good project, but what am I looking at when it comes to fixing something like this? Do I have to tear the bathroom out or can this be worked on from below?
Thanks again!
|
There are two ways to correct rear end separation.
The first, is the "elephant type" repair. It's a temporary fix at best and does not address the real problem.
The "real" problem, is the rear end attachment to the chassis needs to be improved.
The basic thing to understand is that the frame "does not" hold up the shell. The shell holds the frame up. From that, you can see that the frame wants to drop away from the shell.
The best way to correct the problem, is to decide to correct it, once and for all.
Briefly, to do that, the following procedure works perfectly.
First, remove the lower "belt line molding", from the rear shell. Both rear quarter panels and the rear panel are now ready for the next step.
Remove two thirds of the bottom rivets from the rear panel. Lift the rear panel up and tie it to the rear window. Cut both quarter panels in the center of the belt line that you removed. Remove the rivets. You will also need to carefully locate and shear the "blind" rivets that hold the front side of the quarter panels in place. Remove the quarter panels. Remove the fiberglass insulation. At this point, carefully examine the floor at the rear. If you find rotted plywood, it must be replaced. If the floor is ok, then examine the rear floor channel. You will probably find that it is cracked where the bolts go thru it to the frame. If it's cracked, it must be removed and welded back together. Drop the two rear banana wraps. Weld a 1/4 to 3/8 inch thick, section of steel angle thats about two inches long to the "outside" of the frame, below the floor and within the banana wrap.
At this point you can decide how much of the floor needs to be replaced. That answers the question about gutting the bathroom.
Using two bottle jacks, raise the frame back into proper position. Add as many pop rivets as you like, the more the better, holding the "inner" metal to the vertical ribs.
Cut two metal 3/8 inch steel plates about 6 inches long, and shape them so that they will fit within the floor channel above the frame.
Check out the rear steel hold down plate. If it's not in good shape, replace it.
Now your ready to reassemble.
Use about 20 3/8 inch bolts with fender washers on the top of the floor channel and at the bottom of the plywood.
Make sure you add bolts to the brackets that were welded to the outside of the frame. Add pop rivets thru the floor channel to hold the "interior" metal in place.
Again, make sure you have raised the rear of the frame back to it's correct position.
Add a strip of aluminum, to the backside of the top part of the quarter panels where the belt line molding was located. Keep the pop rivets within the outline of the belt line. Reinstall the quarter panels using vulkem sealer where necessary, especially on the aluminum strip. When the quarter panels are completed, then reinstall the rear plate as necessary, again using vulkem sealer on the back side of the panel. You will need some "olympic rivets" for the quarter panels and the rear plate.
Second last step is to remove the two jacks.
Last step????
Drag up a chair, open a cool one, and admire the completed job. 
Properly done, you will "never" have another problem with rear end separation, at least not with that trailer.
Anything short of the above, is a short cut approach to correcting the rear end separation problem, which will lead to an ultimate failure.
When you check the axles out, be sure to check for cracks in the frame and/or axle mounting plates.
Since you live in a part of the country that gets rain and snow, check all the window, access compartment and entrance door gaskets, especially the sewer vent pipe gaskets. Keeping the water on the outside will help your rebuilding projects. You may have to seal all the windows as well.
If you have more questions, fire away.
Andy
|
|
|
|
|
08-13-2007, 05:09 AM
|
#11
|
|
Retired.
Currently Looking...
.
, At Large
Join Date: Jun 2003
Posts: 21,276
|
I've documented how I did it, in this thread, starting about post #150, including replacing the last couple inches of floor: http://www.airforums.com/forums/f221...s-32395-2.html
Yours doesn't sound as bad as ours, and you probably won't have to work around a butcher job to get it done, but the photos should help you see what you're getting into.
I'll also be installing new axles in a couple of weeks, with more pictures, if you want to watch it happen, and know what, who, and how.
__________________
Meddle not in the affairs of dragons, for you are crunchy, and taste good with ketchup.
Terry
|
|
|
|
|
08-13-2007, 05:39 AM
|
#12
|
2 Rivet Member
1969 31' Sovereign
Cogan Station
, Pennsylvania
Join Date: Aug 2007
Posts: 34
|
HOLY MOLY!!
I was hoping for a simpler..1,2,3 sort of thing. All of the information given is fantastic. However, the reality is that I will not have the opportunity to work on the AS in that detail for a year or 2. As stated in a previous thread, I need to tow it down to Pa, about 450 miles away, so that I can live in it for one year while I remodel my house. After I move into the house, to AS will enjoy a full on restoration from top to bottom.
Axles, brakes, lights and a temporary rear end separation fix are the only things that I can attack at this point. It needs to be safe and legal. I hope that there is another type of fix for the rear end that will make the one way trip down a safe one. What are elephant ears and how do I go about installing this "temporary" fix?
Andy, thank you again for all the info and Overlander, thanks for the link. I will read the whole thread tonight when I get home from work.
Regardless of the extent of the projects, I am more excited than ever to get working on the old girl!
|
|
|
|
|
08-19-2007, 02:31 PM
|
#13
|
2 Rivet Member
1969 31' Sovereign
Cogan Station
, Pennsylvania
Join Date: Aug 2007
Posts: 34
|
Second weekend of fun
Hey everyone!
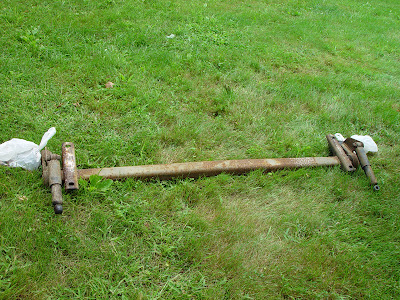
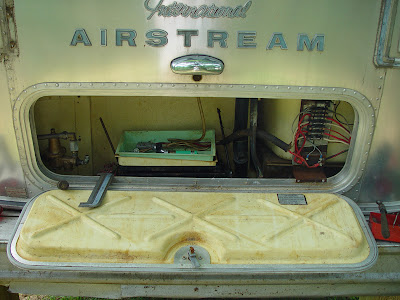
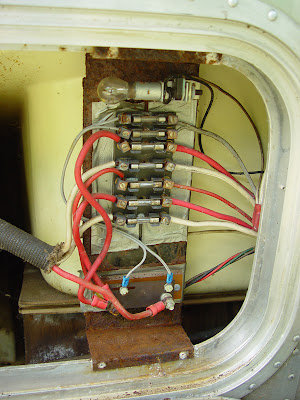
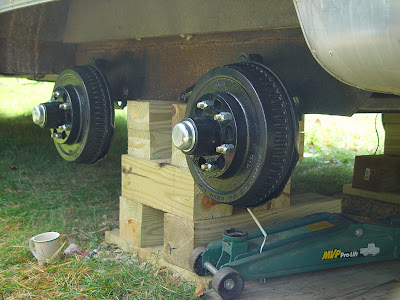
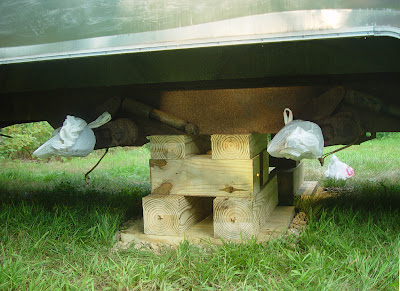
Today I drove up to Tilton to pull off the axles and work on the lights. The axles came off like noth'in. Twenty minutes to get them both off, no problem. Chasing the wires and t-shooting light issues, not so easy. I did however confirm that there is good continuity through most all of the wires required for trailering. Also, I had to pick the locks on the 2 small cover panels and the rear cover panel under the bathroom window. It took about an hour, but I manages to pick all 3. I will need new lock cores however.
Here are the axles removed:
In the rear compartment, I found a fuse panel and a spot for a battery. No battery installed. I am wondering what all of this is for. Do I need a battery?
Next, there is the rear end sag issue. There is one spot where I can feel plywood from the outside and it seems pretty rotten. However, when I reach down to the same are from inside the rear compartment, the plywood feels very strong. Any thoughts?
Thanks everyone! I look forward to reading some of your views and opinions.
Thanks!
|
|
|
|
|
08-19-2007, 03:17 PM
|
#14
|
|
Patriotic
1973 23' Safari
North of Boston
, Massachusetts
Join Date: May 2002
Posts: 4,546
|
yes, you need a battery. It is what powers all of the interior lights/appliances when you're not connected to shore power. It also provides emergency power to the brakes, should the trailer separate from the tow vehicle when towing. an emergency "break-away" switch will complete the brake circuit by means of a cable attached to the tow vehicle. the cable is attached to a pin in the switch. it actuates like the pin on a hand-grenade. the pin is holding the switch contacts open. when its pulled, the contacts close and compete the circuit, the trailer brakes activate, and stop the trailer. This system is required on all trailers with electric brakes, in every state.
__________________
Air:291
Wbcci: 3752
'73 Safari 23'
'00 Dodge Ram 1500 4x4 QC

|
|
|
|
|
08-19-2007, 04:55 PM
|
#15
|
|
Retired.
Currently Looking...
.
, At Large
Join Date: Jun 2003
Posts: 21,276
|
Your trailer's rear end sag is not as bad as ours was. We towed ours on a 500 mile round trip with it like that, with no further problems. So, you could most likely tow it with the sag, especially after putting cushy new axles under it for the trip.
A battery is required in your trailer to activate the brakes in the event the trailer comes unhitched from your truck while towing. When you get everything hooked up, and plug in to shore power, you should hear the telltale hum of the Univolt (battery charger/converter), if it hasn't been replaced by a quieter, more modern unit.
__________________
Meddle not in the affairs of dragons, for you are crunchy, and taste good with ketchup.
Terry
|
|
|
|
|
08-19-2007, 07:03 PM
|
#16
|
2 Rivet Member
1969 31' Sovereign
Cogan Station
, Pennsylvania
Join Date: Aug 2007
Posts: 34
|
Thanks for the replies!
Ahh...the break away switch! We have them on the dump trailers at work. This would make sense. I order new axles on monday. I think I'll grab a new switch as well. Will any old car battery work or is there a special one needed?
thanks again
|
|
|
|
|
08-19-2007, 07:14 PM
|
#17
|
|
Retired.
Currently Looking...
.
, At Large
Join Date: Jun 2003
Posts: 21,276
|
Quote:
|
Originally Posted by badelson
Thanks for the replies!
Ahh...the break away switch! We have them on the dump trailers at work. This would make sense. I order new axles on monday. I think I'll grab a new switch as well. Will any old car battery work or is there a special one needed?
thanks again
|
For your trip, any top post automotive battery will suffice. After you start to use it, you will want a group 24 or 27 deep cycle battery. If you have to buy a battery, you may as well buy the one you will need, but if you have one lying around, it will work.
__________________
Meddle not in the affairs of dragons, for you are crunchy, and taste good with ketchup.
Terry
|
|
|
|
|
08-21-2007, 05:40 PM
|
#18
|
2 Rivet Member
1969 31' Sovereign
Cogan Station
, Pennsylvania
Join Date: Aug 2007
Posts: 34
|
New Axles!
Hello everyone,
I ordered the reccommended complete Hension(sp?) axles for the Sovereign today. YAY! I am told that by doing this I will not have trouble with the installation and I will get long life out of them. It's like christmas, I can't wait.
I chacked with the local trailer sales company today about a new break away switch. Assuming that the existing wiring is still good, I will install a new battery in the designated spot in the back compartment and hopefully all will work well. However, if need be, the trailer place has a nice kit with a mini 12volt batter included that only runs $40. THis should make a nice temp fix for the road trip.
This weekend I hope to finally take care of all the camper lights and remove the window frames to get the replacement glass phase taken care of. I'll snap some more pics to show this coming Sunday.
|
|
|
|
|
08-21-2007, 07:39 PM
|
#19
|
|
Retired.
Currently Looking...
.
, At Large
Join Date: Jun 2003
Posts: 21,276
|
Ira, our axle replacement is slated for this weekend. I've already posted pics of the new axles, and I will be posting more pics covering the install. It isn't hard, I've done several with little or no problems. My biggest challenge will be to let others do the work I can no longer do, as I'm a hands-on guy.
__________________
Meddle not in the affairs of dragons, for you are crunchy, and taste good with ketchup.
Terry
|
|
|
|
|
10-10-2007, 04:13 PM
|
#20
|
2 Rivet Member
1969 31' Sovereign
Cogan Station
, Pennsylvania
Join Date: Aug 2007
Posts: 34
|
Howdy all!!
I apologize for not posting for the last month. I have been working like a mad man!
The AS is coming along nice. I purchased new Henschen Dura-Flex axles through Inland and installing them was a breeze. So nice to see them both bolt up without a problem.
I have replaced every light on the trailer with brand new stuff from Vintage RV. I could not seem to find tail light cans for my AS, so I had to weld new bulb sockets on all four and the plate light, due to heavy rust and corrosion. After a good blasting and painting they came out awsome. I believe that some mice chewed some wires causing some shorts that had to be figured out, but so far so good.
I installed a battery in the camper and found that most of the 12v system is in working order. I double checked to make sure that the system was properly fused before hooking it up. All that seems to be left is to hook up the emergency break away switch and then finally I can move it into the back yard. That is when the real fun begins.
I dropped some of the floor covering with hopes of finding some wires, but to no avail. I did however find that there is some serious floor rot. I was warned about this and so I guess I will be doing some repairs there before dring it down to PA.
I have one question for you all. Can I use a standard hollow hitch with a 2" ball to tow for an hour drive? The original hitch, with what I would assume are sway bars, is much to high up for my truck. I need to drop at least 4" from my tow package's receiver to level the AS. If I use the original hitch, well, the AS will be angled way up.
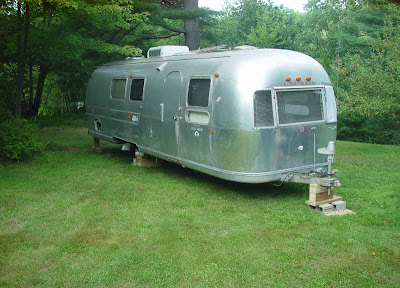
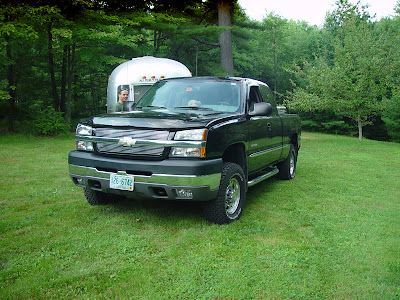
Here are some pics from 2 weeks back. Oh and by the way, I figured out real quick that we put the shock absorbers on upside down and fixed the error this last weekend.(for those of you who may catch the error in the pics)
Take care all!!

|
|
|
|
|
|
|
Currently Active Users Viewing This Thread: 1 (0 members and 1 guests)
|
|
|
 Posting Rules
|
You may not post new threads
You may not post replies
You may not post attachments
You may not edit your posts
HTML code is Off
|
|
|
|

 Recent Discussions
 |
|
|
|
|
|
|
|
|
|
|
|
|
|
|
|
|
|
|
|
|
|


 Linear Mode

