 |
|
 05-07-2017, 07:33 PM
|
#1
|
Rivet Master 
2017 Interstate Lounge Ext
Northern
, California
Join Date: Aug 2016
Posts: 1,299
|
Upgrading the solar charge controller from Atkinson to MPPT
I thought I'd start a separate thread on this so it's easier for folks to find if they decide they want to swap their Atkinson "Sun Explorer" solar charge controller for something that works MUCH better.
First, I want to explain why I did this. Due to a combination of HOA restrictions plus driveway/roadway slope angle, I can't leave my coach parked at my house. Therefore, it stays outside at a storage facility a few miles away. Not ideal, but not horrible. There are no indoor storage facilities anywhere near me, so I don't have the option of keeping the van plugged into shore power to keep my batteries topped up. All this leads to my sole reason for even caring about solar: maintaining my batteries, ALL of them, including the chassis, while I'm not using the coach. I only have the single 100W solar panel on the roof that my coach came with, and combined with the limited functionality of the supplied Atkinson solar charge controller, even in the California sunshine my house batteries never got much above 12.8v, and often times when I'd check on the rig my chassis battery would be 12.3 - 12.4v. Over time, these levels will slowly degrade the batteries and they won't last more than a few years. At $250+ each to replace them, I decided it would be a relatively cheap experiment to see if upgrading the solar charge controller to something a bit more advanced would extend my battery life.
So, there's the backdrop for this project. I'll also say this just so it's very clear: I have absolutely NO dillusions that my single 100W solar panel will provide much, if any (given where we camp, which is in the forests) benefit while camping. Also, I'm very aware that the OEM-supplied 160Ah AGM house batteries will provide a woefully inadequate amount of power while boondocking. At some point I will make a major upgrade to my rig for a week's worth of off-the-grid living, but for now, baby steps.....
The first step in this project was to choose a new solar charge controller. I know this is a sensitive topic for many, but please realize I made my choice for MY reasons, which I will explain, and by no means want anyone to think THEIR choice is "wrong". There were two main criteria that I was trying to meet. First, the new controller had to be programmable. I wanted control over every aspect of the charging cycle so I can tailor it to my current and future battery choices. There are a few PWM controllers out there that can do this, but nearly every MPPT controller has this ability. Second, I wanted the easiest install I could come up with, with the caveat that it had to have a remote monitor that installed in the same cabinet as the "Sun Explorer" panel that comes on our rigs. After doing a lot of searching, I decided on the Renogy Commander. All in, the controller plus remote monitor cost $170 delivered to my door (I got the 20A Commander, not the 40A as I didn't need the extra capacity).

The new hotness...... 
Why this controller? First, it is a MPPT controller and is fully programmable. I can tailor its settings to exactly match what the manufacturer specifies for various voltage levels throughout the charging cycle. For example, the preset voltage for Float mode for most multistage chargers is 13.7 - 13.8v at 70*F (default temp if no temp probe is used). Since I hope to have my batteries in this state most of the time, I wanted that to match the specs for my Lifeline batteries, but it's too high. The Lifeline's want to see 13.3 - 13.4v during this stage at that temp. This is easily changed on pretty much any MPPT controller, and the Renogy is no different. Second, and this really is what made this controller stand apart, the Renogy is the only MPPT controller that I could find that connected to the remote monitor via RJ45 jacks and RS432 cabling (Cat 5), which is what is used for the Atkinson setup. What this means is I didn't have to pull new cabling, which made this upgrade significantly easier. Just to be clear, the Renogy calls out RS485 cabling, but for short runs and low data rates like what we're talking about here, RS432 Cat 5 cabling works just fine. I've tested it, and it's working like a champ. I know some people are fine with the Victron w/ Bluetooth dongle and monitoring their solar via a smartphone, tablet, etc, and that's a great solution, but I didn't want to have to rely on having my mobile device nearby just to check on my system.
When the controller arrived, the first thing I noticed was "hmmm....this thing is really big". For all its warts, the Atkinson is a tiny thing at roughly 2" x 3". The Renogy is roughly 5" x 8". At the time I ordered it, I didn't know where the Atkinson was installed (or its size), so I didn't think much about it, but this did turn out to be a bit of an issue. The Atkinson is installed under the driver side jump seat in the back of the coach on my model ('17 Lounge EXT). To get to it, you need to remove the door and latch under that jump seat, then remove the 4 screws securing the wood panel that houses the breakers and fuses. At that point I saw what I was up against. The Renogy would never fit in that small space. Ugh. I ended up installing it on the outside of that seat base, facing the rear of the coach. It's out of the way (for the most part), is easily accessible should I ever need to fiddle with it, and really isn't visible unless you're looking for it. Not ideal, but I really didn't have many options.

Where I installed the new charge controller. I'll clean this up later.....
The actual install couldn't have been simpler. First, remove the remote "Sun Explorer" panel and disconnect the cable. Next, make sure house power is off, then reach in behind the breaker panel and clip the wires that are potted into the Atkinson (clip solar first, then battery). Add enough wire via butt connectors to the leads that go to the battery so they can reach up through the vent hole under the seat (since I had to mount the Renogy on the outside). The wires that go the solar panel and the cable for the remote monitor are plenty long enough as is. Then connect everything to the Renogy (be sure to connect the battery first!!!). I fused the hot lead going from the charge controller to the battery as a precaution. This should have been done at the factory with the Atkinson but wasn't, so shame on them. Last step was to plug in the new remote monitor.

Pic of breaker/fuse panel.

Where the evil little Atkinson solar controller hides..... 

Not much space in here for the big Renogy..... 

Where the Atkinson belongs.....on the floor!!! 
Viola! The monitor powered right up, showed that everything was healthy, and I was getting a whopping 14.5v to the batteries! I never got this with the Atkinson. I'm not sure if that's because it just couldn't go that high, or the presets built into the thing were incorrect for our batteries. In any case, the Lifelines want to see approx. 14.5v at 60*F during the Absorb phase, and since the inside of my rig was 60*F, that was right on target. The best part was the BIM was closed since the voltage on the house batteries was over 13.3v, so a quick check of the chassis battery at the tank monitor panel also showed 14.5v. Exactly what I wanted to see. Using the remote monitor I set the battery type to User so I could change the Float voltage to 13.4v (down from the preset of 13.8v), which will be in line with what the Lifeline's want to see, and still be high enough to ensure the BIM keeps the chassis battery connected.

All is good!!! Instantly went into Absorb. Not surprising given the SOC, no thanks to the previous charger controller. Also note this is a temp install just to get it in and working. I've got a plan for making this look much nicer.....

Note this is showing the chassis battery. It's never seen this much voltage from the solar before! 
At this point, I still need to permanently mount the remote monitor in the cabinet where the Sun Explorer was. Right now it's just being held in with one screw so I could program the controller the way I wanted it. Since the Renogy remote is a bit larger than the existing hole, in order to flush mount it I'll need to widen that hole a bit. Also, the part of the Renogy remote that gets recessed into the panel is round, so I'll need to use a a hole saw to get that done. Not a big deal, just a little time consuming as I want to do it right and not tear up the vaneer inside the cabinet. As long as I don't screw it up, once the new monitor is mounted it should look like a factory install and nobody will ever know the evil Atkinson was ever there.
So there you have it. My batteries are now being maintained by a much more efficient and flexible charge controller, which I hope will greatly extend the life of my rather expensive batteries. I'll report back in this thread after I get some time with the new setup to let you all know how it's working.
|

|

|


|
05-07-2017, 10:11 PM
|
#2
|
1 Rivet Member 
2016 Interstate Grand Tour Ext
Central Coast
, California
Join Date: Feb 2017
Posts: 15
|
Very nice! I really want to upgrade the solar in my recently acquired 2016 Grand Tour Twin. Unfortunately, I lack the expertise to do the self install you did. Would probably destroy something or electrocute myself if I tried. 
|
|
|
|
|
05-08-2017, 09:51 AM
|
#3
|
Rivet Master
2017 Interstate Lounge Ext
Northern
, California
Join Date: Aug 2016
Posts: 1,299
|
Quote:
Originally Posted by Newbie2016

Very nice! I really want to upgrade the solar in my recently acquired 2016 Grand Tour Twin. Unfortunately, I lack the expertise to do the self install you did. Would probably destroy something or electrocute myself if I tried. |
Thanks!
You can make this upgrade 100% safe with just a few extra steps. Cover the solar panel with a blanket so it doesn't generate any power, and crawl under the coach and disconnect the house batteries. With those two things done, there is no power being delivered to anything under that jump seat (assuming your not plugged into shore power....if you are, pull the plug!). If you do it that way, the only thing you have to remember when attaching your solar and battery to your new MPPT controller is after connecting all the wires, be sure to reconnect the house batteries BEFORE you remove the blanket from the solar panel. The instructions for my controller had about a dozen warnings to make sure the batteries were connected first or it could be damaged.
If you still feel uncomfortable doing this yourself, you may want to reach out to our resident solar/battery/all-things-Interstate-electrical expert Lew Farber on this site (site name is lewster) and see when he's going to be back on the left coast and arrange to have him do the work for you. It's a very worthwhile mod and I'm glad I made the time to get it done now so my batteries can benefit from all this sunshine we're getting. Summer is almost here! 
|
|
|
|
|
05-08-2017, 10:52 AM
|
#4
|
|
J&J In A Can
2016 Interstate Grand Tour Ext
Cottonwood
, Arizona
Join Date: Nov 2015
Posts: 74
|
Upgrading the solar charge controller from Atkinson to MPPT
I wonder how the Renogy will interact with the Magnum charger when on shore power, on a sunny day. I always thought the Atkinson was set low so it would turn off when the Magnum charger came on.
__________________
2016 Interstate GT Twin
 
|
|
|
|
|
05-08-2017, 01:58 PM
|
#5
|
Rivet Master
2017 Interstate Lounge Ext
Northern
, California
Join Date: Aug 2016
Posts: 1,299
|
Quote:
Originally Posted by LoveToWander
I wonder how the Renogy will interact with the Magnum charger when on shore power, on a sunny day. I always thought the Atkinson was set low so it would turn off when the Magnum charger came on.
|
None of the charging sources in our rigs current sense, they all voltage sense. As a result, when one charging source comes online (let's say it's the solar as the sun comes up), it will look at the voltage on the batteries and pick a mode (in the case of the Atkinson, it's basically "on" or "off", in the case of a controller with a brain it will decide between Bulk, Absorb, or Float). If you're plugged into shore power, in theory the batteries are being kept topped up (i.e. Float mode for the Magnum), which is 13.1v for AGM 1, which is the default. The solar charge controller will see this as the batteries being "full" and in the case of the Atkinson not turn on, and in the case of a "smarter" controller (multistage PWM or MPPT), go into Float mode and provide zero current, but only if you have set your "smart" controller to Float at the same voltage as the Magnum. In my case, I've set my Magnum to Flooded batteries so it Floats at 13.4v, and I've also set my Renogy to Float at 13.4v, so everyone is happy if I ever plug into shore power (which I never do.....).
Where things can get interesting is if the batteries are depleted and you have multiple charging sources available. There are tons of discussions about this on boating forums because they can have as many as 5 charging sources when docked (shore, wind, solar, genset, alternator) and 5 while on the water (wind, solar, hydro, genset, alternator), and I see opinions all over the place on how these systems will interact with each other. Maybe one of our more experienced members can chime in with their 2 cents on this topic, at least from the perspective of how things work on our Interstates (we'll leave the marine application to the boating forums  ). I think it would be a great discussion and I'm sure many of us would benefit from it.
|
|
|
|
|
05-08-2017, 04:25 PM
|
#6
|
Rivet Master 
2024 Interstate 19
Fulton
, Maryland
Join Date: May 2010
Posts: 3,879
|
FlyFishinRVr is correct all three sources of charging play together OK as they are all voltage sensing.
I have modified my boost switch so I can force the Sprinter alternator to help charge the house batteries when they are low and the sun is shinning. Otherwise the solar charging keeps the battery voltage high enough that the alternator is never connected via the BIM.
When plugged in the Magnum and solar controller ensure max charging.
Here is what AM Solar says about this topic in there FAQ page:
http://amsolar.com/diy-rv-solar-instructions/edfaq/
" Charge Controllers
Do I have to shut off the charge controller when I connect to shore power?
You can have multiple sources charging the same battery bank at the same time. Whether it is shore power, an alternator, a generator, solar panels, etc., it doesnt matter. Connect them all. Run them all at the same time. No additional protections or switching of any sort are necessary. Chargers of all types are protected against reverse current flows and base their output on the voltage of the battery bank they are charging. When a battery is getting charged by any source, its voltage will go up proportional to the amount of current being fed onto that battery. In some situations where you have a particularly strong charging source, like an alternator or shore power, the high current fed onto batteries will drive the battery voltage up to the point that the solar charge controller thinks the battery is full. When that happens, the solar charge controller will temporarily stop charging until the voltage returns to a lower level."
__________________
- - Mike
--------------------------
2024 Airstream Interstate 19e AWD
Previous: 2013 Airstream Interstate 3500 Ext Lounge
|
|
|
|
|
05-08-2017, 08:08 PM
|
#7
|
Rivet Master
2017 Interstate Lounge Ext
Northern
, California
Join Date: Aug 2016
Posts: 1,299
|
Update on my MPPT upgrade:
I went to the coach today because I left something in it from my install this past weekend, and when I checked on the batteries, the house was perfect at 13.4v and the Renogy was Floating away, but the chassis was down to 12.65v. I found this very odd so I double checked the logic of the BIM from its troubleshooting guide online, and I'm beginning to think it's the next piece of the puzzle that needs to find its way to the floor. I forgot the part that said if the house batteries are over 13.3v, the chassis battery needs to be below 12.6v before the BIM will close. ARGHHHHH!!!!!
How have others solved this? I know some have just ripped out the BIM and I assume left the 2 banks separated (particularly for those who have gone the lithium route), but has anyone with all AGMs done anything to fix this or is everyone just living with it? I'm thinking this could be as simple as a marine combiner like the one from Yandina that closes if the voltage is over 13v and opens if it's less, with a switch for manual override in emergencies.
|
|
|
|
|
05-08-2017, 08:45 PM
|
#8
|
|
J&J In A Can
2016 Interstate Grand Tour Ext
Cottonwood
, Arizona
Join Date: Nov 2015
Posts: 74
|
Well, that all sounds pretty good. I could see doing the same upgrade in our van. I'm not sure I would worry too much about the BIM in the 2016 since the chassis battery seems to be able to take care of itself, for the most part. And it does seem like it wouldn't work any different than plugging in to shore power. I will be watching to see if you come up with a better BIM. Thanks.
__________________
2016 Interstate GT Twin
|
|
|
|
|
05-08-2017, 11:55 PM
|
#9
|
Rivet Master
2017 Interstate Lounge Ext
Northern
, California
Join Date: Aug 2016
Posts: 1,299
|
Quote:
Originally Posted by LoveToWander
Well, that all sounds pretty good. I could see doing the same upgrade in our van. I'm not sure I would worry too much about the BIM in the 2016 since the chassis battery seems to be able to take care of itself, for the most part. And it does seem like it wouldn't work any different than plugging in to shore power. I will be watching to see if you come up with a better BIM. Thanks.
|
If you plug into shore power when you're not using your coach, then you really don't need to worry about the BIM. To maintain your chassis battery at a voltage higher than 12.6v (recommended), all you really need to do is plug a battery tender of some flavor (personally I'm a fan of the NOCO Genius line) into the 110v outlet behind the drivers seat and connect it to the chassis battery via the disconnect by the accelerator (or, if you go with the NOCO, you can get a 12v cigarette adapter for it that you can plug into the 12v socket in the dash....super easy!). It's a cheap and simple solution that should keep your chassis battery from continually bouncing off the 12.6v limit set by the BIM. If you want something that's a bit more efficient (vs. using your inverter) but a bit more involved to install, you can achieve the same thing with a Trik-L-Start or Amp-L-Start (these draw DC off your house batteries directly, so no need to keep your inverter on). All of these solutions run around $50-60 and should help extend the life of the chassis battery.
|
|
|
|
|
05-09-2017, 05:17 PM
|
#10
|
Rivet Master
2017 Interstate Lounge Ext
Northern
, California
Join Date: Aug 2016
Posts: 1,299
|
Quote:
Originally Posted by LoveToWander
I will be watching to see if you come up with a better BIM. Thanks.
|
After doing a bit of reading, something like this should do the trick:
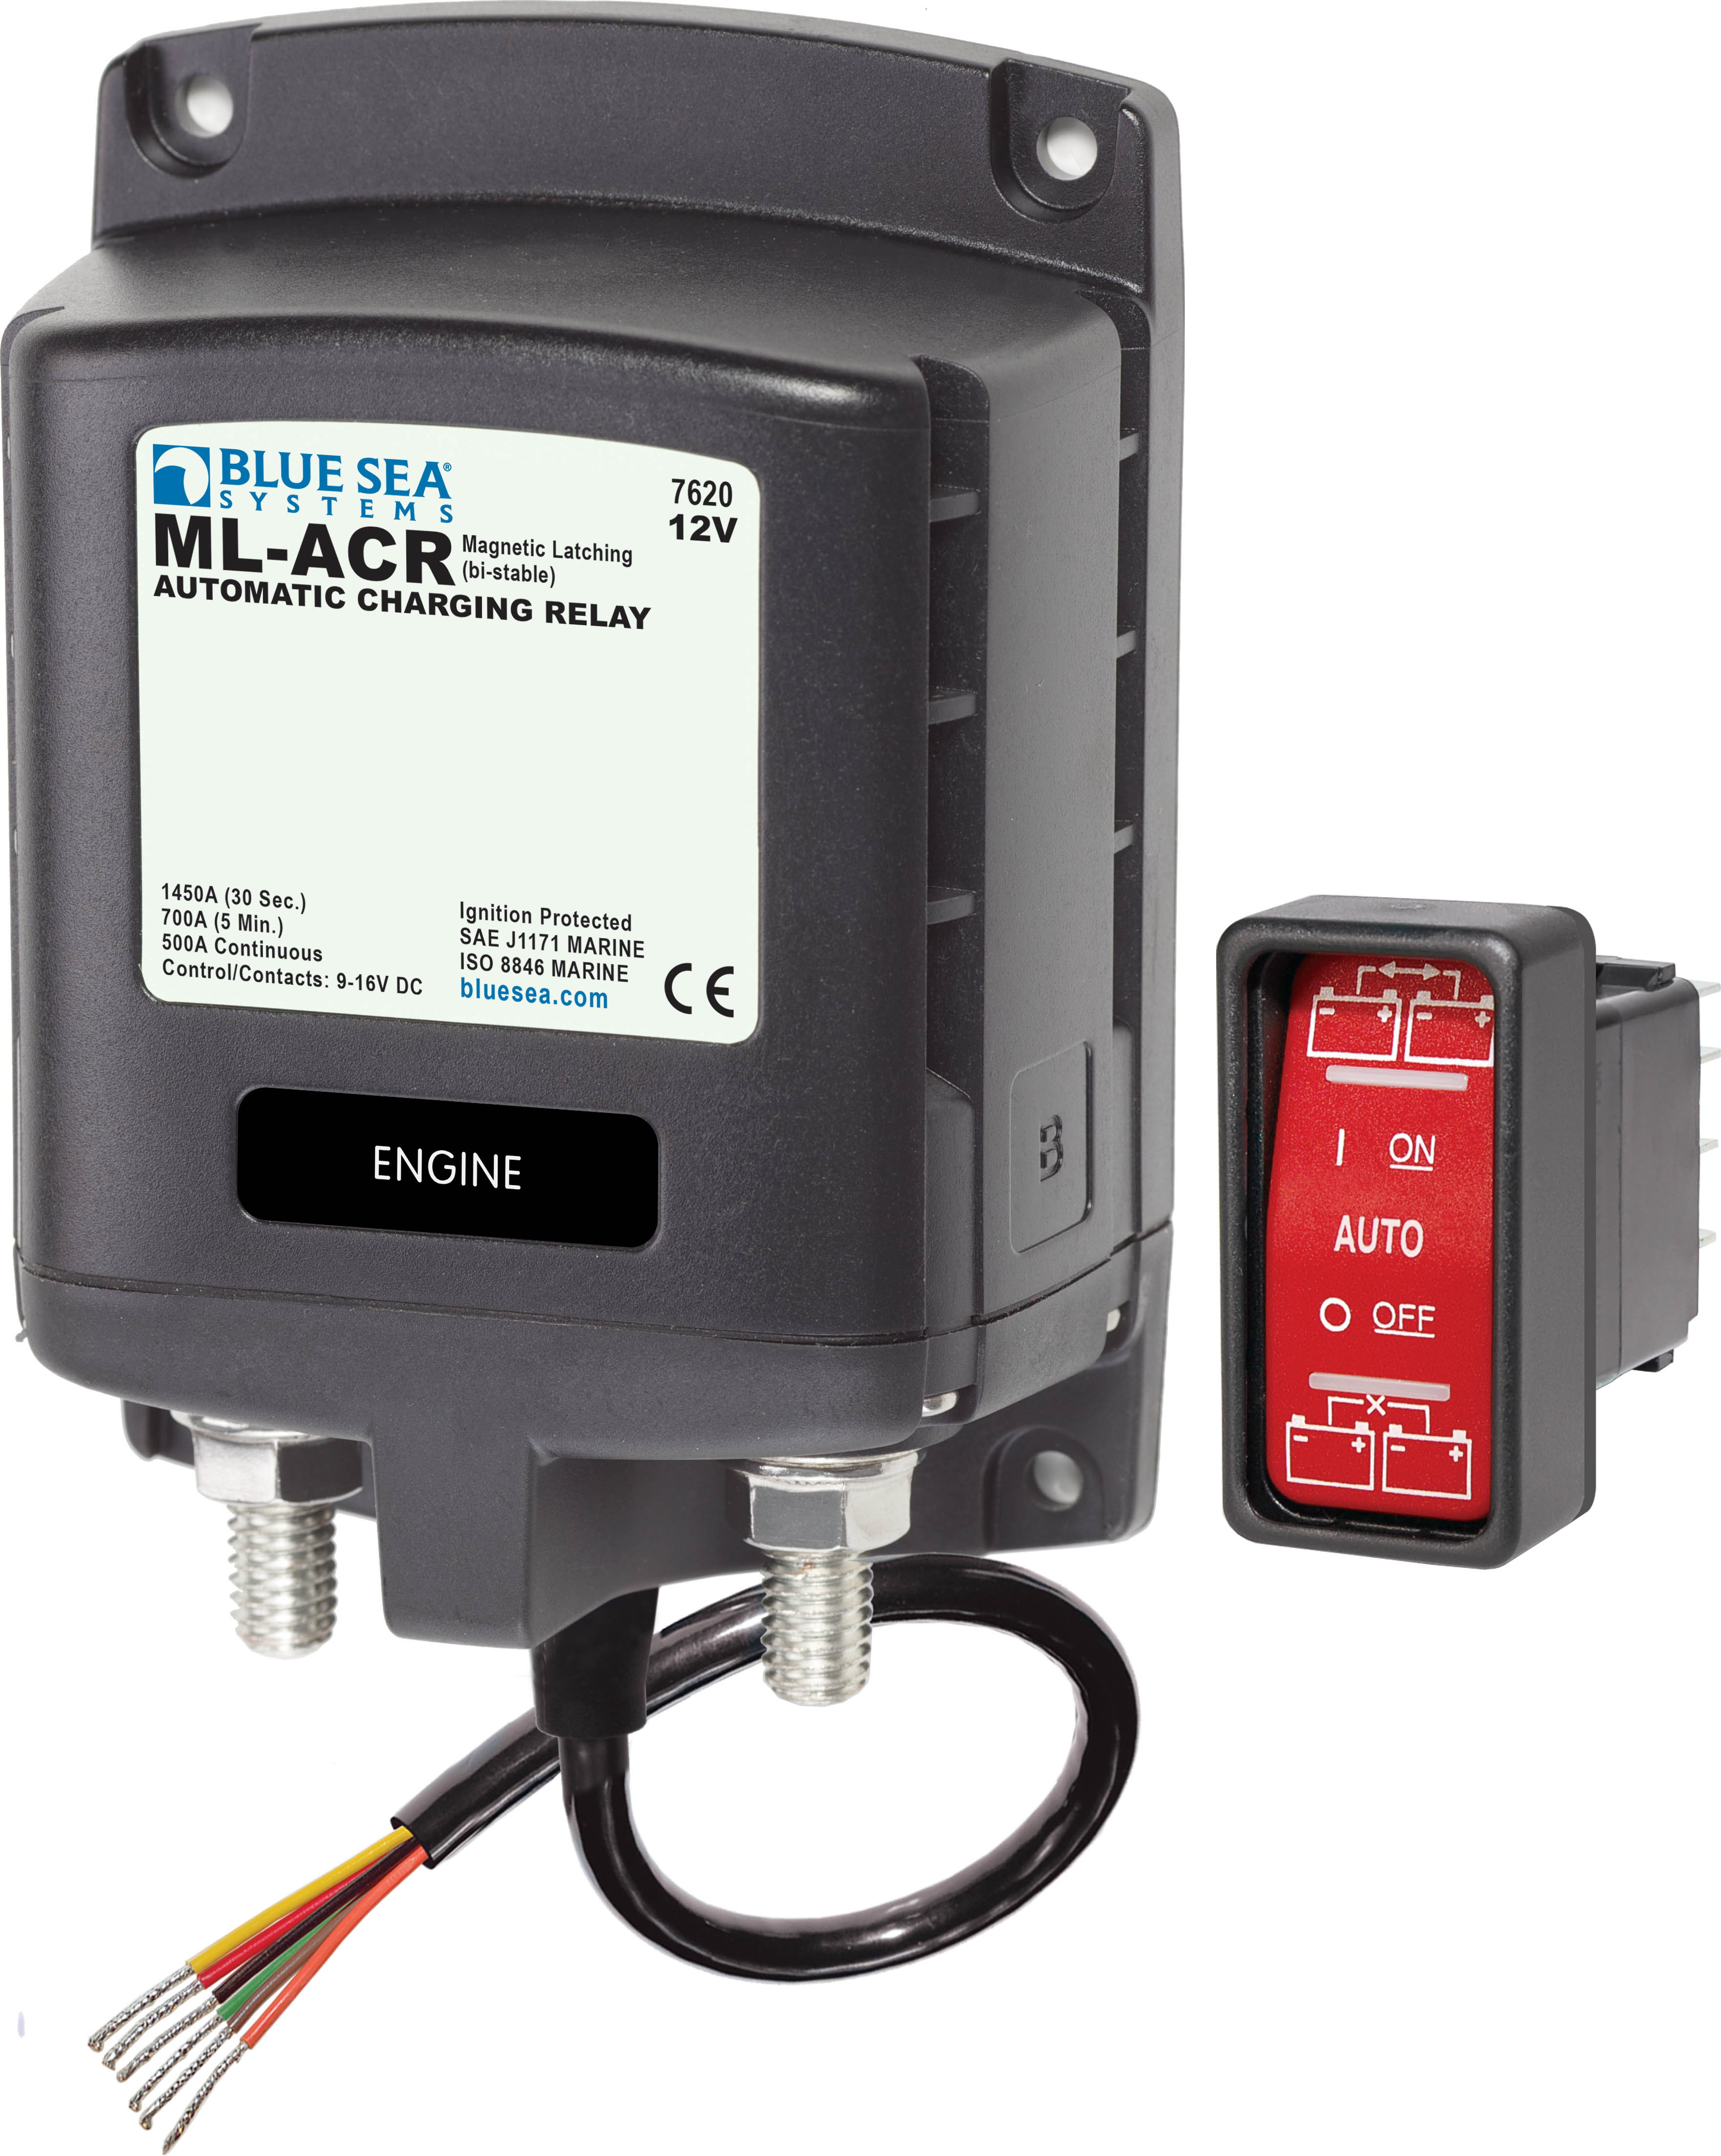
It will close (combine battery banks) when the voltage at either bank goes above 13v for 90 secs or 13.5v for 30 secs, and will open if either bank goes below 12.75v for 30 secs, or 12.35v for 10 secs. It uses a magnetic latch for really low "on" current draw, and even comes with a remote switch that will allow you to manually connect or disconnect the two banks. As a bonus, the switch contains a LED that lets you know if the banks are connected when it's in Auto mode. Seems about perfect for what I want! 
I'm not in a hurry to do this mod, so I'm going to keep looking around, but so far this seems pretty hard to beat. My only issue with it is it's expensive at just over $200 (Amazon Prime has it for $211), but since it's made for the marine industry, it's going to cost more than it should, as any boat owner will attest to..... ")
|
|
|
|
|
05-09-2017, 08:35 PM
|
#11
|
Rivet Master
2017 Interstate Grand Tour Ext
Houston
, Texas
Join Date: Jan 2017
Posts: 586
|
Quote:
Originally Posted by FlyFishinRVr
If you plug into shore power when you're not using your coach... connect it to the chassis battery via the disconnect by the accelerator...
|
I bought a battery tender and plan to connect it to the jump-start terminal under the hood of the Sprinter. That would work, right?
__________________
Leigh & Bettie
Houston TX
2017 Interstate GT
|
|
|
|
|
05-09-2017, 08:53 PM
|
#12
|
Rivet Master
1987 32' Excella
Nepean
, Ontario
Join Date: Mar 2006
Posts: 1,414
|
Blue Sky makes an excellent line of MPPT solar controllers. See http://www.blueskyenergyinc.com/
I had a cheapie one (non-MPPT) from Camping World and changed it for the Blue Sky 3000i. When I added more solar panels (now 540 watts), I had to upgrade to the Blue Sky 3024i.
__________________
VE3JDZ
AIR 12148
1987 Excella 32-foot
1999 Dodge Ram 2500HD Diesel
WBCCI 8080
|
|
|
|
|
05-09-2017, 10:03 PM
|
#13
|
Rivet Master
2017 Interstate Lounge Ext
Northern
, California
Join Date: Aug 2016
Posts: 1,299
|
Quote:
Originally Posted by TayaraTravel
I bought a battery tender and plan to connect it to the jump-start terminal under the hood of the Sprinter. That would work, right?
|
I don't see why not. Any point that's connected to the chassis battery should work fine.
Where do you intend to plug in the battery tender, the outside curbside AC outlet?
|
|
|
|
|
05-09-2017, 10:12 PM
|
#14
|
Rivet Master
2017 Interstate Lounge Ext
Northern
, California
Join Date: Aug 2016
Posts: 1,299
|
Quote:
Originally Posted by blkmagikca
Blue Sky makes an excellent line of MPPT solar controllers. See http://www.blueskyenergyinc.com/
I had a cheapie one (non-MPPT) from Camping World and changed it for the Blue Sky 3000i. When I added more solar panels (now 540 watts), I had to upgrade to the Blue Sky 3024i. |
Blue Sky makes a quality unit. I was just lazy and didn't want to pull new cabling through the coach to connect to their remote display. 
|
|
|
|
|
05-11-2017, 05:51 AM
|
#15
|
Rivet Master
2013 Interstate Coach
Waterloo
, Iowa
Join Date: Jun 2014
Posts: 1,598
|
I was concerned by the earlier post that said:
Cover the solar panel with a blanket so it doesn't generate any power, and crawl under the coach and disconnect the house batteries. With those two things done, there is no power being delivered to anything under that jump seat (assuming your not plugged into shore power....if you are, pull the plug!). If you do it that way, the only thing you have to remember when attaching your solar and battery to your new MPPT controller is after connecting all the wires, be sure to reconnect the house batteries BEFORE you remove the blanket from the solar panel. The instructions for my controller had about a dozen warnings to make sure the batteries were connected first or it could be damaged.
I typically remove the coach batteries for winter storage and have not covered the panels before doing so. I called Blue Sky and was told that I would not do any harm by disconnecting the batteries with the solar panels active. (Though the batteries are probably at/near 100% when I pull them, so little solar power is actually going into the batteries when I pull them.
When contacting Blue Sky they also reminded me of the absorption current requirements (0.5A/100 A-hr) of Lifeline batteries.
|
|
|
|
|
05-11-2017, 10:31 AM
|
#16
|
Rivet Master
2017 Interstate Lounge Ext
Northern
, California
Join Date: Aug 2016
Posts: 1,299
|
Quote:
Originally Posted by Titus
I was concerned by the earlier post that said:
Cover the solar panel with a blanket so it doesn't generate any power, and crawl under the coach and disconnect the house batteries. With those two things done, there is no power being delivered to anything under that jump seat (assuming your not plugged into shore power....if you are, pull the plug!). If you do it that way, the only thing you have to remember when attaching your solar and battery to your new MPPT controller is after connecting all the wires, be sure to reconnect the house batteries BEFORE you remove the blanket from the solar panel. The instructions for my controller had about a dozen warnings to make sure the batteries were connected first or it could be damaged.
I typically remove the coach batteries for winter storage and have not covered the panels before doing so. I called Blue Sky and was told that I would not do any harm by disconnecting the batteries with the solar panels active. (Though the batteries are probably at/near 100% when I pull them, so little solar power is actually going into the batteries when I pull them.
When contacting Blue Sky they also reminded me of the absorption current requirements (0.5A/100 A-hr) of Lifeline batteries.
|
Perhaps they have done a better job of protecting the controller, or maybe Renogy is just ultra paranoid. All I know is Renogy has warnings all over the place about connecting the battery first or the controller could be damaged.
It's good that you checked with Blue Sky and they don't have that issue, and it's probably a good lesson for anyone messing with these to check the manufacturer's recommendations for how to connect and disconnect them so they don't make a costly mistake.
|
|
|
|
|
05-11-2017, 09:22 PM
|
#17
|
Rivet Master
2017 Interstate Lounge Ext
Northern
, California
Join Date: Aug 2016
Posts: 1,299
|
Done with the remote install. Shaved 20mm off the bottom of the mounting frame and it fits perfectly.

Next I'll figure out some way to cover the controller. I have an idea....
|
|
|
|
|
05-17-2017, 08:08 AM
|
#18
|
3 Rivet Member 
2018 25' International
Columbia
, Missouri
Join Date: Jul 2016
Posts: 124
|
Do you know what gauge wire comes installed from Airstream from the included 100w panel to the solar controller? I was hoping to add two renogy 100w panels to the existing Airstream factory 100w panel (which looks like a flexible panel) and wire in parallel using the existing wiring to avoid more roof penetrations and pulling new wire. Also planning to get rid of the sunexplorer controller as you have and replace with a Victron unit 30a MPPT and monitor exclusively with Bluetooth thus abandoning the monitor in the controller area with the inverter remote and generator start. Anyone see any MAJOR issues with this?
|
|
|
|
|
05-17-2017, 09:52 AM
|
#19
|
Rivet Master
2017 Interstate Lounge Ext
Northern
, California
Join Date: Aug 2016
Posts: 1,299
|
Quote:
Originally Posted by Njg
Do you know what gauge wire comes installed from Airstream from the included 100w panel to the solar controller? I was hoping to add two renogy 100w panels to the existing Airstream factory 100w panel (which looks like a flexible panel) and wire in parallel using the existing wiring to avoid more roof penetrations and pulling new wire. Also planning to get rid of the sunexplorer controller as you have and replace with a Victron unit 30a MPPT and monitor exclusively with Bluetooth thus abandoning the monitor in the controller area with the inverter remote and generator start. Anyone see any MAJOR issues with this?
|
If I remember right, it was 12AWG, and per ABYC E-11, that's fine for carrying the 17-18A that your 3 panels will generate because it's a "non-critical" circuit with a run length of < 30'. It seems Airstream gauged everything relative to the solar for up to 20A (wiring plus controller capacity), which makes adding a few more panels pretty easy.
Good choice on the Victron. I think they make one of the best controllers in the industry. I know Lew really likes them, and he should know as he's done a bunch of installs using them. I think you will be very pleased with the results.
|
|
|
|
|
06-10-2017, 01:15 PM
|
#20
|
Rivet Master
2017 Interstate Lounge Ext
Northern
, California
Join Date: Aug 2016
Posts: 1,299
|
Update
I thought I'd give an update now that I've had the new solar controller installed for about a month. Overall, it's working as intended and keeping my house batteries at 13.4v rather than the 12.7v that the Atkinson was doing. Since I haven't replaced the BIM, I'm still stuck with my chassis battery going down to 12.6v before it gets recharged by the solar, so I'll have to live with that a while longer.
One thing I was really interested to see and wanted to mention was the output current difference between the Atkinson and the new MPPT controller. With the Atkinson, I would see about 4.4-4.6A at "solar noon" (i.e. sun right over head, highest solar output of the day). With the new MPPT controller, I'm seeing up to 5.4A, or about a 20% improvement. That seems to match what others have reported and what I've seen claimed by MPPT sales literature, so I'm happy to report that it's a real benefit and not just hype. While this increase in charge output wasn't my goal, it certainly is a nice side benefit. Note this is with just a single panel, and by all accounts MPPT really benefits most with multiple panels in series (vs. PWM), so I'm looking forward to putting a few more panels on the roof in preparation for phase 2 of my upgrades..... 
|
|
|
|
|
|
|
Currently Active Users Viewing This Thread: 1 (0 members and 1 guests)
|
|
|
 Posting Rules
|
You may not post new threads
You may not post replies
You may not post attachments
You may not edit your posts
HTML code is Off
|
|
|
|

 Recent Discussions
 |
|
|
|
|
|
|
|
|
|
|
|
|
|
|
|
|
|
|
|
|
|


 Linear Mode

