 |
|
 03-22-2022, 08:01 PM
|
#341
|
Rivet Master 
2006 22' Interstate
Port Angeles
, Washington
Join Date: Sep 2016
Posts: 940
|
I ran the Espar a couple of times, really puts out the heat!
So mounted the Easy Start Pro controller (also has thermostat)- below the stock T-Stat.
Crimped the small pin connectors that came with kit (I have the proper crimper).
Hooked it all together and it worked great!
I neatened up the wires some in the picture- finished and mounted the seat swivel and seat.
There is room to swivel the seat over the battery- I still need to make cover. I have some nice fibreglass sheet (at least 1/8 and quite sturdy) that I think if I make some legs it will work well. I want something I can pop off easily and quickly.
The disconnect I got had tiny little connectors, so I didnt use it. Ill get a good one. The fuse it quickly accessible if I need to kill it, but a switch would be good for anyone that may have to use it.
Loads of heat and quieter than the stock furnace inside. I have not really checked outside, but seems quieter than the stock Espar water heater the van comes with.
Overall I think it will be a great addition. I can still use the propane for a short heat session- but longer ones I can use the Espar and no waste my propane. Plus it wont be buiried at night with the jacknife couches made into a bed, and the heater wont be right by your head.
I took a short video to heat it (with seat off) but not allowed.
I will do a better one and post a youtube link after all done. Ill try my phone dB meter and see what it says too.
|

|

|


|
03-23-2022, 04:32 AM
|
#342
|
Rivet Master
2007 Interstate
League City
, Texas
Join Date: Oct 2014
Posts: 6,139
|
Quote:
Originally Posted by Lotus54

..
Pictures are of the original fuel pump for Espar engine/cabin heater alongside the new Espar airtronic.
It is angled right, although it is sort of hard to tell with the pictures.
.
|
In the video that you are going to make, if you could cover this part, I would appreciate it.
I see WHAT you did at the pump location, but I am not sure HOW you did it.
Thanks! Great job!
|
|
|
|
|
03-24-2022, 09:06 AM
|
#343
|
Rivet Master
2006 22' Interstate
Port Angeles
, Washington
Join Date: Sep 2016
Posts: 940
|
I don’t think a video would show much more, it is soft of hard to access.
I will try to draw it, but my drawing capabilities are atrocious.
I’ll describe again. The stock pump is mounted on a neat little bracket built into the van. It already has an angle and the stock pump is mounted on a ‘lord mount’. A rubber piece with a stud on each end.
The stud goes through the pump bracket on one side, and through the body mount bracket on the other.
I had some flat stock around, I drilled a hole for the lord mount stud to go through, then another for the new pump bracket to bolt through. I just put the flat stock so the lord mount stud went through it into the body mount, then bolted that up tightly. The other hole I bolted up the new pump and it is done.
I did wrap some old inner tube around the bracket so it could not have a chance to chafe on the fuel lines that go very near there- making it hard to see what is going on the in the pictures. Pretty darn easy.
Note that some of the Eberspächer pumps have the connector on the opposite ends and even the official videos show fuel flow direction the other way. But I did double check and the flow direction is right on the pump- so it is angled the correct way and fuel going through correctly.
I want to use a metal ‘T’, but couldn’t find one locally that small. I will order one and replace it later- although I’m sure this plastic one is just fine. I had some small fuel hose (I like the Motion Pro stuff, does not appear to harden) and I made a longer loop out of it so the plastic hose is going is straight and nowhere close to being chafed.
I ran the fuel line and power cable through a split cable housing, then up over the heat shield- all well tie-wrapped so it will stay well away from the shield and excessive heat.
I ran the exhaust up into the engine compartment (also slightly heating that area) and intake back and slightly down like they tell you. I didn’t take pictures of that and van is already back on the ground (filled propane and diesel yesterday ready for a trip). But I’ll try to take more with more detail soon.
Oh yeah, I ordered a more angled heat outlet and I’ll see if that directs it down the corridor well enough. Right now too much goes in toward the back of the driver’s seat.
Hope that makes sense. I ran it another couple of hours and it certainly works well. I had the roof vent open (the paint from under the seat I did still is flashing solvents) to air it out so no good test on how quickly it warms it up. But even with that open it was pretty comfortable in the very back.
|
|
|
|
|
03-30-2022, 06:42 PM
|
#344
|
Rivet Master
2006 22' Interstate
Port Angeles
, Washington
Join Date: Sep 2016
Posts: 940
|
I have not taken more final pics and the promised video (mostly to hear how much noise it makes).
But I did measure actual current draw. I got 2 Amps at full output. I believe less when it is running lower out put (when set temperature is reached). Sound is similar to stock Espar water/block heater on the outside- I think quieter than the stock furnace.
|
|
|
|
|
04-09-2022, 08:26 PM
|
#345
|
Rivet Master
2006 22' Interstate
Port Angeles
, Washington
Join Date: Sep 2016
Posts: 940
|
Took the Interstate out for a few days- the Cascade passes were closed part time and chains required part time…so went down by Portland and up the Columbia Gorge instead.
We stayed at a BLM spot not too far from Sprague, WA (west of Spokane) called ‘Hog Lake’. Dispersed camping- so free and no registrations etc- or services. I managed to get through a ‘ditch’ ok for a neat spot.
It was quite cold at night- all the puddles around had ice on top in the morning. The new diesel heater worked a treat. Once it warms up inside, it is very quiet, but kept it pretty comfy. Even at full chat it is quieter than the factory furnace. And doesn’t use any propane.
Next morning off to visit an old buddy in Montana (west of Dixon). Had loads of fun and dialed in the settings of the heater over the next two nights pretty well.
Coming back stopped at my brother’s in Maple Valley (WA) and left the heater on about 66f. Quiet and comfy.
I like it, while the Espar was a LOT more expensive than one of the knock-off Chinese ones, I feel better having this one inside the van than a $200 one that may or may not have good quality control. Plus those are quite a bit bigger.
|
|
|
|
|
04-11-2022, 09:13 AM
|
#346
|
Rivet Master
2006 22' Interstate
Port Angeles
, Washington
Join Date: Sep 2016
Posts: 940
|
Hog Lake
|
|
|
|
|
04-13-2023, 07:28 AM
|
#347
|
Rivet Master
2006 22' Interstate
Port Angeles
, Washington
Join Date: Sep 2016
Posts: 940
|
Update on Espar heater.
Recently used it a fair amount. It was in the 30s at night, so I ran it all night. At 40ºf plus is is VERY quiet, a bit louder when in the 30s. Also uses more electricity to power fan when colder and of course more fuel.
The thermostat in the rear bed area keeps the rear at a good temperature and the heater in the front distributes pretty well and keeps the noise farther away.
I am glad I kept the propane furnace, it is great for quick heat and more concentrated in the rear by couches/bed. But way too nosy to run all night, plus it uses more power and of course some rather limited propane. The combination of both is great.
Im glad I blew the money on the genuine Espar, rather than some of the VERY less money knock-offs. I have friends with those, while they do work- noise level is quite a bit more and temperature control is poor. I also didnt want a cheap burner inside my van.
So I am quite pleased with the addition over long term.
(Picture of Whalen Island, OR)
|
|
|
|
|
04-26-2023, 03:08 PM
|
#348
|
2 Rivet Member 
2006 22' Interstate
wilmington
, Delaware
Join Date: Oct 2017
Posts: 32
|
seaward princess model 2276 gas stove knobs for 2006 mid bath
PLEASE help....The knobs on my stove (2006 mid bath interstate 2500) continue to crack...Does anyone know of Metal stove knobs that will fit this model 2276 ( knob part number is 80421 ). The manufacturer really couldnt make them any cheaper 
THANKS for your help!
|
|
|
|
|
04-26-2023, 03:17 PM
|
#349
|
Rivet Master 
2007 Interstate
Normal
, Illinois
Join Date: Jan 2009
Posts: 18,082
|
I would take one off and into Home Depot, or whatever you have near you, and they may be able to match it up with something.
Good luck.
Maggie
__________________
🏡 🚐 Cherish and appreciate those you love. This moment could be your last.🌹🐚
|
|
|
|
|
04-26-2023, 05:30 PM
|
#350
|
Rivet Master
2006 22' Interstate
Port Angeles
, Washington
Join Date: Sep 2016
Posts: 940
|
Let me look at mine.
I could easily modify some others I would think.
|
|
|
|
|
07-06-2023, 03:53 PM
|
#351
|
Rivet Master
2006 22' Interstate
Port Angeles
, Washington
Join Date: Sep 2016
Posts: 940
|
Quote:
Originally Posted by weather command
PLEASE help....The knobs on my stove (2006 mid bath interstate 2500) continue to crack...Does anyone know of Metal stove knobs that will fit this model 2276 ( knob part number is 80421 ). The manufacturer really couldnt make them any cheaper
THANKS for your help! |
Do you still need some?
If the same as mine, I could design and 3D print some.
Let me know.
|
|
|
|
|
07-06-2023, 04:10 PM
|
#352
|
Rivet Master
2006 22' Interstate
Port Angeles
, Washington
Join Date: Sep 2016
Posts: 940
|
The refrigerator never was great in the van. If it was nice and level, not too hot and in the sun, well- it was just ok.
Last trip it would not self ignite when going to gas, I had to use a lighter.
Then I noticed green gunk around the heater ‘tube’. Finally last week it would not work at all.
So I decided to just replace it. Since I added solar and a separate lithium pack, I figured I could do ok with a compressor instead of absorption.
Seeing other posts, I found one that appeared it would fit- even found one ready to ship at the lowest price in the same state. So I ordered it and it arrived this morning.
I popped the old one out. I did not take off the bottom door hinge initially, so I could have saved some work if I just took it off right away. Not a lot of room to get it out and down the ‘hall’.
Once out, it was super easy to pop off one of the side trim, the the top one came out pretty easy too (bottom of microwave shelf.
I left the side rubber pieces in there- but took out the top one, since it was a pretty close fit. Plus air all around the unit is a good idea anyway. Since no propane burning I was not too concerned. Any gaps a bit of closed cell foam can fill.
Really the only difficult part was cutting down the top of the front trim/flange. If I had a ‘nibbler’ I think it would have been easy- but I don’t. But I got there in the end and it fit fine.
I could not find anything in the documentation about what the ‘prime’ power source was. So I just hooked it up to DC- popped an inductive Ammeter on it (that does very low current) and the fridge fired up. Then I plugged it into AC- it promptly switched over to run on that an zero draw on the DC side.
It just took a few hours total, with quite a few breaks, lunch etc.
Edit: looks like the ‘open door’ picture I did not have the other shelf or vegetable draws in place yet.
Vitrifrigo C115IBD4-F RV Electric Refrigerator Freezer - AC/DC - 4.2 CF
https://pantherrvproducts.com/vitrif...-ac-dc-4-2-cf/
|
|
|
|
|
07-07-2023, 04:50 AM
|
#353
|
Rivet Master
2007 Interstate
League City
, Texas
Join Date: Oct 2014
Posts: 6,139
|
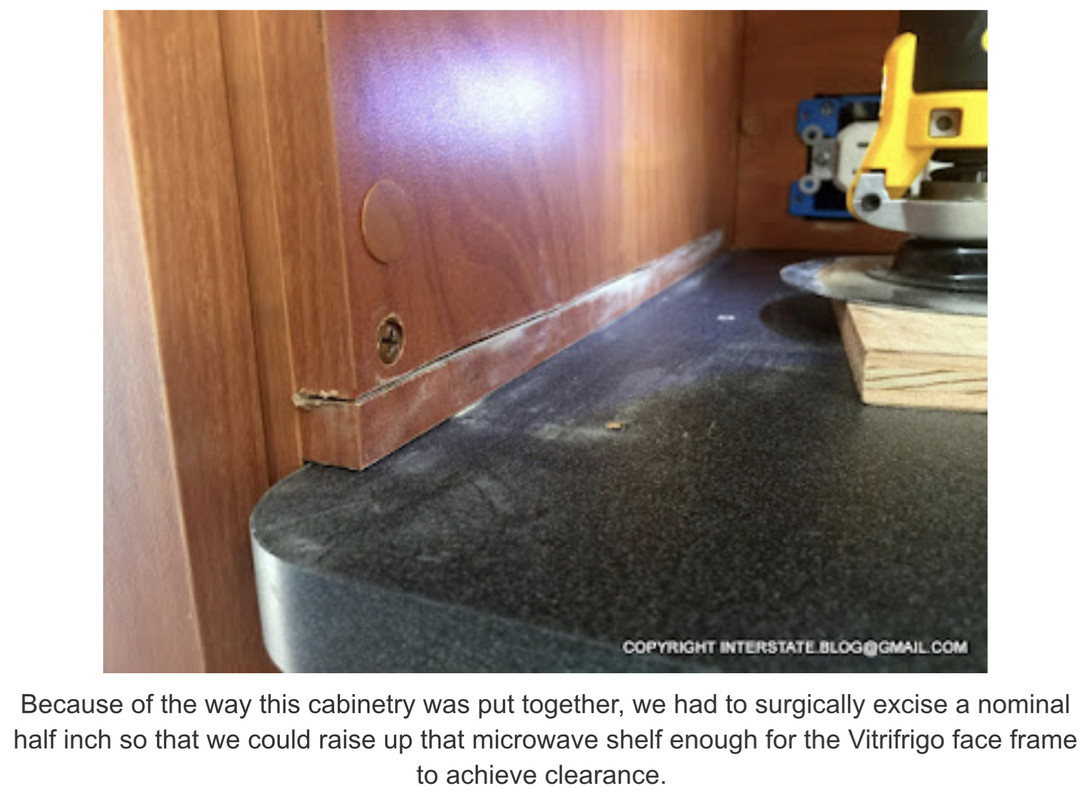
Vitrifrigo!! We have been so happy with ours! Congrats!
Did you NOT have to raise your microwave shelf? That was a real pain in the butt for us:
|
|
|
|
|
07-07-2023, 07:18 AM
|
#354
|
Rivet Master
2006 22' Interstate
Port Angeles
, Washington
Join Date: Sep 2016
Posts: 940
|
Quote:
Originally Posted by InterBlog
Vitrifrigo!! We have been so happy with ours! Congrats!
Did you NOT have to raise your microwave shelf? That was a real pain in the butt for us:
|
No, i just cut the face trim frame- fit easily
|
|
|
|
|
07-09-2023, 08:41 PM
|
#355
|
Rivet Master
2006 22' Interstate
Port Angeles
, Washington
Join Date: Sep 2016
Posts: 940
|
I got the latching relay in, so I can setup the new fridge to be run by either the house battery (100ah), or the Yeti 1000 (93ah) with a remote switch inside.
The ‘standby’ current draw is almost nothing for the latching relay- so that should work well.
When driving, if I have it run off the house battery, I don’t think it will affect the battery charging very much- so likely will generally do that. But it would be good to run off the Yeti as much as I can, since I don’t really need it except to run the microwave without turning on the generator. Although I also use it to charge devices etc.
I will post up some pics/details if it works out as I hope. I did test the unit on the bench today, worked just as advertised and two momentary switches can change from house to Yeti from inside. OR take off the outside refrigerator ‘door’ and push the buttons.
I will probably 3D print a cover for the unit, since that area is not sealed, although there is a cover on top for rain and the ‘door’.
So far the new refrigerator is working great. Works well even when van is not level at all and I have it turned most of the way down for 34ºf in the refer and 17ºf in freezer.
|
|
|
|
|
08-06-2023, 07:18 PM
|
#356
|
Rivet Master
2006 22' Interstate
Port Angeles
, Washington
Join Date: Sep 2016
Posts: 940
|
I have the latching relay installed and wiring. I need to tie-wrap everything, mount switches and do a final test.
So I can swap from house batter to my Goal Zero Yeti pressing buttons after opening outside refrigerator access (backside) OR pressing the buttons beside the Goal Zero. One button selects running on Yeti, other on House battery.
If the van is plugged into shore, it automatically selects 110ac.
So far, refrigerator is working great. With temperatures and amount of opening so far - it would run for many days on the goal zero. House battery also, which is connected to solar.
This gives me more options and worth the extra bit of hassle installing the wiring for me.
|
|
|
|
|
08-16-2023, 09:37 AM
|
#357
|
Rivet Master
2006 22' Interstate
Port Angeles
, Washington
Join Date: Sep 2016
Posts: 940
|
The Propane detector was old and due for replacement.
I found one, but of course completely different mounting.
So I 3D printed a mount. This silver was going to be just a test to see if I got the dimensions correct in my design, I was going to do in black. But I sort of like it.
I really notice in the picture how none of these are lined up. Since it is near the floor, I did not really notice when walking in. But while I could make a plate for all, modify holes and line up…it is not worth it for me. Other things to do.
The printer is coming in darn handy.
Next I am making a trim piece for above the new fridge. I did not have the tools to cut the very thin flange very well and I didn’t like it. I did put some rubber strip, but a printed plate in black will look a lot nicer I think.
After that, I ordered a MaxxAir deluxe fan. Buddy had one on his trailer and soo quiet.
I do not look forward to removing the calking.
|
|
|
|
|
08-17-2023, 10:01 AM
|
#358
|
Rivet Master
2006 22' Interstate
Port Angeles
, Washington
Join Date: Sep 2016
Posts: 940
|
I had a rubber foam strip on the top part of the new fridge, covering my poor quality cut of trim strip. It was ok, but I didn’t really like it.
So I drew up a trim strip and printed it. I had to do it in two pieces, since it was too big for my printer. I did make it with ‘tongue and grove’ to hold the middle. Also a strip of 3m high bond ‘strip’.
I suppose I could have made it to cover the cuttout in the factory setup so that the door hinge can be on the other side. But I didn’t really notice until I was done. Plus maybe I will swap sides. It may be more convienent oftentimes on the other side. Of course, not that big of a deal either way. Since I would need to slide it back out part way to change- I doubt I will ever do it now.
Next up will be the replacement roof vent setup. Too hot to do right now (well, for sissies like me from the NW corner of the NW). But it is cooling down. Plus I won’t get the new one for a week or more.
|
|
|
|
|
08-17-2023, 01:44 PM
|
#359
|
1 Rivet Member 
2007 Interstate
Point Pleasant
, New Jersey
Join Date: Dec 2021
Posts: 18
|
Congratulations on your new (to you) Interstate! We have a 2007 Interstate and love it! Safe and happy travels!
|
|
|
|
|
09-03-2023, 06:31 PM
|
#360
|
Rivet Master
2006 22' Interstate
Port Angeles
, Washington
Join Date: Sep 2016
Posts: 940
|
I decided to replace the original roof fan.
A few reasons; It is old, rather noisey, draws a fair amount of current, OUT only but mostly, the new one is shorter (since I have a fantastic fan cover) and I think will allow me to fit another solar panel just like the one I already have on top rack.
The weather was pretty nice, not too hot, so I took a look and scraped off some sealant. It all came off easily. So I kept going. I do not know what was used originally, but I like it. Still flexible, still sealed well (except one small corner) and not difficult to take off. I especially like how flexible it still was.
Airstream used wood strips for spacers, rather than cut/flatten the ridges (which I would have rather done). Since I could not really cut/flatten those ridges now with the hole the way it is…I designed some spacers and am 3D printing them. First test (only 1mm thick to check dimensions) showed I needed to adjust a bit- but now printing final 9.5mm thick ones. I think they will work well, but of course if I bomb out and have to do something else I will note that. If they work, I can share the STL files, or print them for any early AI owners.
Things were going well, then the rain started (what better way to bring rain than having a big hole in the roof?). It has been incredibly dry here this summer, so glad to see it- but timing could have been better for me personally. (A couple lightning fires in the Park right behind me (ONP) so this rain should help up there. Although I imagine they had to stop helicopter operations.
More with pictures when I get it done.
|
|
|
|
|
|
|
Currently Active Users Viewing This Thread: 1 (0 members and 1 guests)
|
|
|
 Posting Rules
|
You may not post new threads
You may not post replies
You may not post attachments
You may not edit your posts
HTML code is Off
|
|
|
|

 Recent Discussions
 |
|
|
|
|
|
|
|
|
|
|
|
|
|
|
|
|
|
|
|
|
|


 Linear Mode

