 |
|
 07-13-2019, 06:11 AM
|
#1
|
Rivet Master 
2007 Interstate
League City
, Texas
Join Date: Oct 2014
Posts: 6,139
|
Cab table ideas (Interstate van)
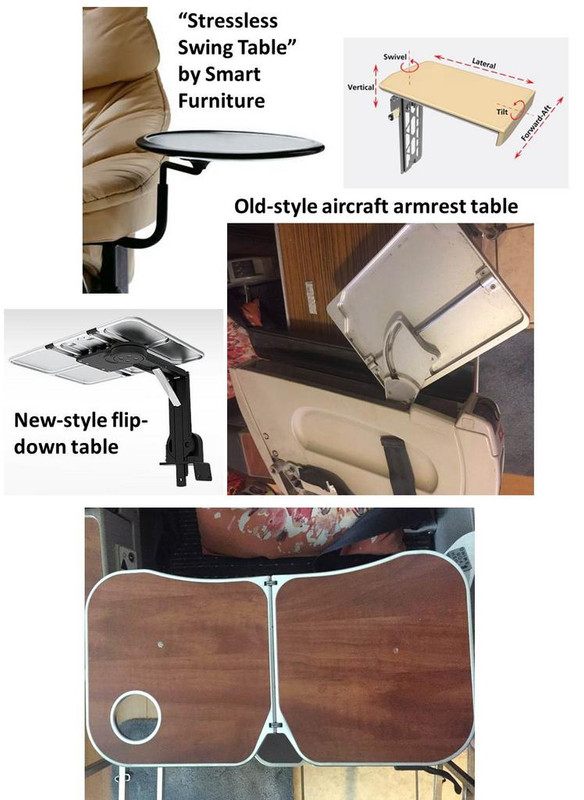
As I noted in this permalink here, we have numerous threads that discuss tables in Interstate vans - that information is inconveniently spread all over the place.
I'm earmarking this thread for tables and table-like structures intended for use in the cabs of vans (not trailers, not TVs).
So let me start by amalgamating a few of the previous front table resources here:
(1) Here is the Safari Condo version:

(2) Maybe Wachuko can re-post his version on this thread because IIRC, you made one, did you not? Or you were intending to.
(3) And here is a repost of the original video that touched off the previous "outdoor sideboard" thread tangent on front tables, and we can build this thread from here.
|

|

|


|
07-13-2019, 06:30 AM
|
#2
|
Rivet Master
2007 Interstate
League City
, Texas
Join Date: Oct 2014
Posts: 6,139
|
On that note, I'm thinking of a different approach for the T1N Sprinter.
The issue is, our dash sticks out further than that of the NCV3. It's basically impossible to put a table on the console in the manner of Safari Condo, and then deal with it logistically. It would need to be fully removed every time someone got out of a cab seat, if they wanted to access the rear.
Furthermore, my dog sits up front on a platform that we built to fit the area freed up by the passenger seat swiveling (and sometimes my husband sits up front). A table anchored to the dash would restrict her access to her bed.
OK, so what about something like this instead? Something like an aircraft armrest table that I could just flip down and out of the way whenever I needed to walk toward the rear. And the dog could walk right underneath it.
I'm just beginning to noodle on this, but it sure would be a sweet addition. Somewhere to put my popcorn and granola bars, even my whole burrito.
|
|
|
|
|
07-13-2019, 06:48 AM
|
#3
|
Rivet Master
2007 Interstate
League City
, Texas
Join Date: Oct 2014
Posts: 6,139
|
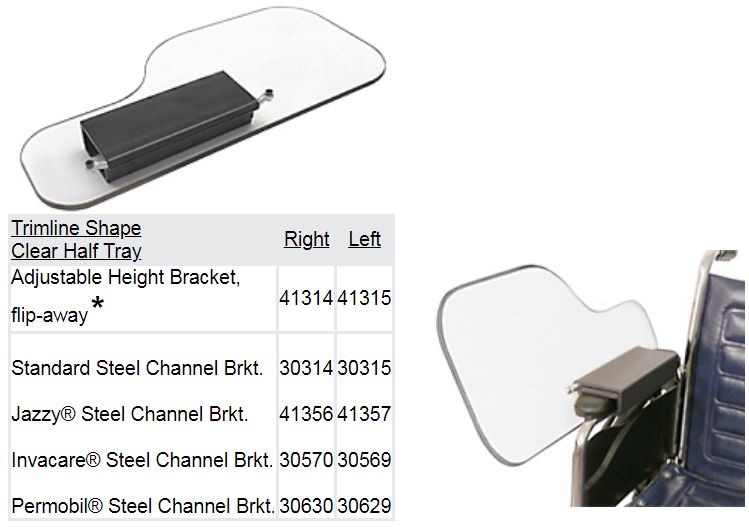
There are also many different types of flip-down tables sold for use with wheelchairs. Most of them would be unacceptable for this application because they extend in front of the user, which would interfere with the steering wheel and airbag.
But there are a few slim ones out there. If I could get hold of the mechanism, I could craft my own table top which did not impinge on the driver.
What I have working in my favor is that the T1N Sprinter arm rest is rectangular in cross section, not rounded. It might be possible to clamp a simple device onto it, or around it.
|
|
|
|
|
07-13-2019, 07:44 PM
|
#4
|
|
Prof. of Pending Projects
2018 Tommy Bahama Interstate
Orlando
, Florida
Join Date: Sep 2017
Posts: 2,658
|
I did. Made one following the plans from the guy in the video you posted (Greg Eiffert). Made a few changes, but pretty much what he made.
I will get photos of the finished product installed in the AI... the ones I have mounted are before I finished installing the laminate and applying the clear satin polyurethane on the uncovered areas...
We have been using it and so far it is working great. Here is an old photo... since then, the bottom insert has been covered in black felt and the support has been covered in laminate. The edge and bottom I just coated with clear satin polyurethane (photos attached)...

Held in place with the two green mounts you see in this photo...

Again, will share more tomorrow when I take it back to the AI...
|
|
|
|
|
07-14-2019, 04:55 AM
|
#5
|
Rivet Master
2007 Interstate
League City
, Texas
Join Date: Oct 2014
Posts: 6,139
|
Beautiful job. I'm coveting your flat-fronted dash.
|
|
|
|
|
07-14-2019, 01:07 PM
|
#6
|
Rivet Master
2007 Interstate
League City
, Texas
Join Date: Oct 2014
Posts: 6,139
|
Five years.
Fifty thousand miles (the majority driven by me, some by LB_3).
And never before today a place within reach of the driver to set down a bloody granola bar, drink, napkins, and some Canadian toll booth coins.
Prototype 1, shown below, before I finish the raw edges and polish the surface with another coat of my favorite Sherwin Williams enamel paint.
Taking advantage of that square arm rest, this simply straps on with Velcro. I can squeeze past it with the arm rest raised. Someone with a big belly sticking out would be challenged to do so.
I'll use this for a while, to see whether it meets the need, so that I can decide whether it's worth taking the project further and investing the time and energy to build one that articulates downward and out of the way like an aircraft seat tray.
Yet another case of less than ten bucks in hardware and a couple of hours of time, but we just never got to it with all the other priorities (and break-downs).
|
|
|
|
|
07-15-2019, 07:29 AM
|
#7
|
|
Prof. of Pending Projects
2018 Tommy Bahama Interstate
Orlando
, Florida
Join Date: Sep 2017
Posts: 2,658
|
Quote:
Originally Posted by InterBlog

Five years.
Fifty thousand miles (the majority driven by me, some by LB_3).
And never before today a place within reach of the driver to set down a bloody granola bar, drink, napkins, and some Canadian toll booth coins.
Prototype 1, shown below, before I finish the raw edges and polish the surface with another coat of my favorite Sherwin Williams enamel paint.
Taking advantage of that square arm rest, this simply straps on with Velcro. I can squeeze past it with the arm rest raised. Someone with a big belly sticking out would be challenged to do so.
I'll use this for a while, to see whether it meets the need, so that I can decide whether it's worth taking the project further and investing the time and energy to build one that articulates downward and out of the way like an aircraft seat tray.
Yet another case of less than ten bucks in hardware and a couple of hours of time, but we just never got to it with all the other priorities (and break-downs).
|
I have been looking at doing something similar. I was thinking of using the bottom screws that the arm rest have... to hold whatever I come up with for cup holders. Specially for the seat in the back, passenger side, that has no cup holder at all... at least the front have some in the side door pockets, dash, and center console... driver side passenger also has one in the insert that is in the wall... I was going to try to do something with the 3D printer.
A few more photos of the dash mounted table. Now done.
This is how it is stored. Folds flat and the support is held in place with a magnet.

This is how it attaches to the dash. Two green supports and one insert in that dash pocket hole... the insert is a piece of 2x4 covered in black felt with a cut out that has a magnet. The table support has another magnet and that leg goes in that slot... stays in place without issues:


In place:


I thought about making holes and installing cup holder inserts(like the one in your first photo), but decided to leave it alone like that... cleaner look.
|
|
|
|
|
07-15-2019, 07:46 AM
|
#8
|
Rivet Master
2007 Interstate
League City
, Texas
Join Date: Oct 2014
Posts: 6,139
|
That console design is best used while the vehicle is stopped. You could eat a three-course breakfast off that thing.

I am most interested in having something I can safely use while in motion, because I drive solo so much of the time (by safely I mean not a collision hazard). If my husband is with me, he can maybe jump up and get my freakin' granola bar. But typically that's not the case.
And I cannot store many food items near the floor, for instance in the fabric pocket that strapped to the seat base near the emergency brake, because I travel with a dog. It's a routine occurrence that I will go into a C-store to pay for diesel or pick something up, come back out to the van, and find my seat pocket emptied of snacks and plastic shredded all over the interior. If it's up on an armrest table instead, it will take her longer to surf for it, or I'll remember to move it to safety.
Something I forgot to mention above:
The key to that design's success is the "outrigger" that extends all the way back to the end of the arm rest. It allows for an additional Velcro strap that helps to stop the device from rotating under the force exerted by a heavy Yeti cup.
|
|
|
|
|
07-15-2019, 10:43 AM
|
#9
|
3 Rivet Member 
2014 Interstate Ext. Coach
fairfax station
, va
Join Date: Jan 2015
Posts: 187
|
Green anchors
Quote:
Originally Posted by wachuko
A few more photos of the dash mounted table. Now done.
This is how it attaches to the dash. Two green supports and one insert in that dash pocket hole... the insert is a piece of 2x4 covered in black felt with a cut out that has a magnet. The table support has another magnet and that leg goes in that slot... stays in place without issues:
|
I may have missed a previous post but what are the green insert buttons and clips? mfg/catalog
Thanks
|
|
|
|
|
07-15-2019, 11:46 AM
|
#10
|
|
Prof. of Pending Projects
2018 Tommy Bahama Interstate
Orlando
, Florida
Join Date: Sep 2017
Posts: 2,658
|
Quote:
Originally Posted by VAtom
I may have missed a previous post but what are the green insert buttons and clips? mfg/catalog
Thanks
|
Materials needed
1 - Wood paneling - 3/4" cut to size
1 - 12" piano hinge
2 - Sets of button-fix Type 2 mounts - https://button-fix.com/products/type-2
2 - Neodymium magnets the kind with holes in the middle to secure with a screw
1 - Flat metal plate. This one goes on the opposite side of where the magnet is to do their securing when folded flat...
Laminate of choice unless you want to finish it differently
|
|
|
|
|
07-15-2019, 12:01 PM
|
#11
|
Rivet Master
2007 Interstate
League City
, Texas
Join Date: Oct 2014
Posts: 6,139
|
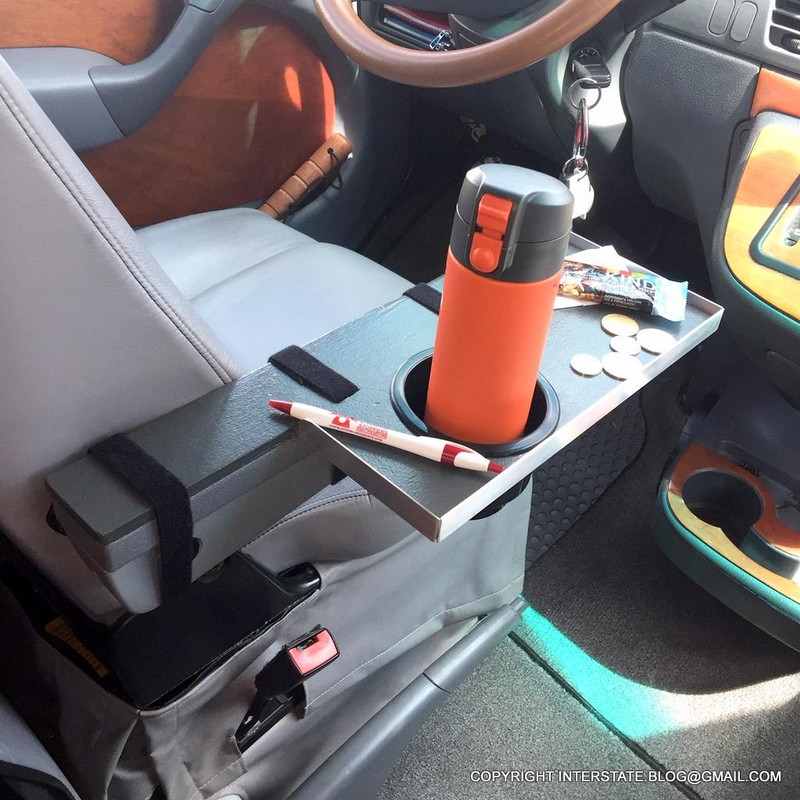
On the previous thread, Protag reminded me to put a "lip" on my cab table, if I want to use it on the road.
It's three-quarter-inch "aluminum goodness" (as Bugs calls it) angle stock on 3 sides. I want to be able to raise and lower the armrest without restriction, so I left the 4th side open. That's the side that faces me, and I'm going to see how it works in that configuration before worrying about it. Stuff sliding in my direction is either stopped by my forearm or maybe ends up in my lap.
|
|
|
|
|
07-15-2019, 12:17 PM
|
#12
|
|
Prof. of Pending Projects
2018 Tommy Bahama Interstate
Orlando
, Florida
Join Date: Sep 2017
Posts: 2,658
|
Quote:
Originally Posted by InterBlog
That console design is best used while the vehicle is stopped. You could eat a three-course breakfast off that thing.
|
And without the front table base and still no Lagun base installed in the front, that is what we are using it for...
I thought about making a second one that would use the same mounts but smaller so that I could completely rotate the seats. Right now I can't rotate the chairs to face the back... side of the backrest would hit the table. If I make it 4" narrower it would clear everything... I was thinking of leaving that for when I actually learn how to use the router and some of the woodworking tools we have at home... I want to get fancy and do something that looks like a table mount (but upside-down for my use) that I saw in a Vestibule Teardrop trailer... the mount with the holes that you see in the photo attached.
|
|
|
|
|
07-17-2019, 05:47 PM
|
#13
|
Rivet Master
2007 Interstate
League City
, Texas
Join Date: Oct 2014
Posts: 6,139
|
@WACHUKO, and anybody else who might try something similar to this:
Do NOT do what I did. I was going minimalist... until the moment when I decided that I was not going to go minimalist.
Sigh...
I wanted a slim, flat-storing armrest table. Great.
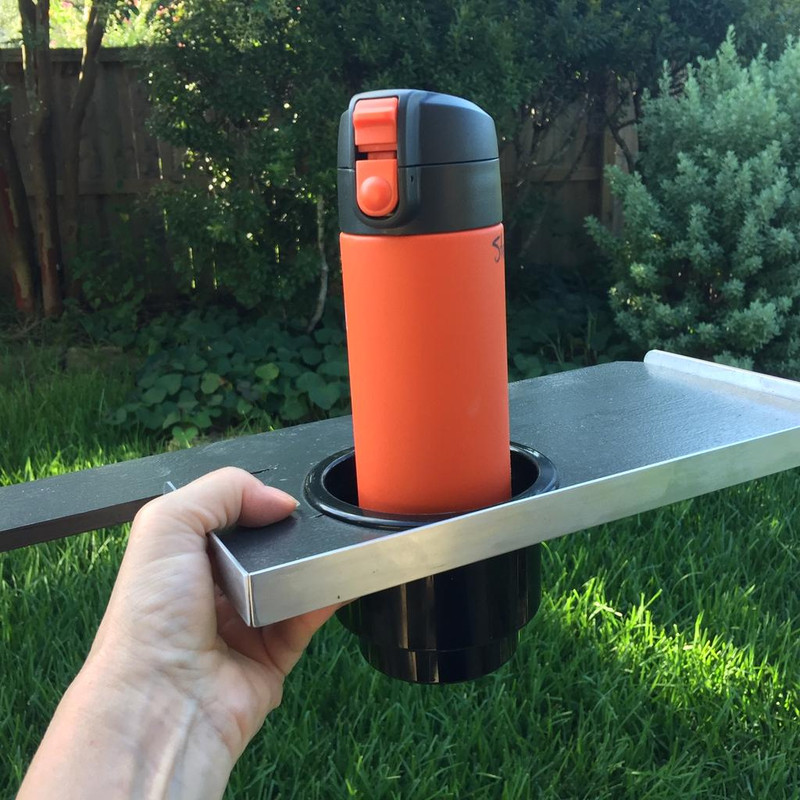
But then in order for it to fit BOTH my Yeti and my thermos, I needed to have something to keep the thermos (shown below) from falling through because it was a narrower diameter.
OK, I thought maybe I could put a soft mesh extension, which being fabric (of a sort), would still pack flat.
But then I found these inserts on Amazon. And they started looking pretty good to me. It's just friction-fit - I can pop it out if I wish to store the armrest table flat. Best of both worlds, right?
Except by that time, we had already committed to hole diameter, which only fit certain inserts, including this one. Which happens to fit neither the Yeti nor the tea thermos very well. Both will go into it, but they both wobble around in there. Which isn't a functional deal-breaker - just evidence of poor planning on my part.

So let's reverse my order of operations, shall we??
(1) Start first with the exact drink container(s) that you are married to.
(2) Then find an insert that fits those containers.
(3) Order it and get it in
(4) Then physically use it as a template to cut the exact hole in your own custom device.
IF you are going to include one of these inserts, is what I'm saying. If you only use one drinking container, you can probably remain minimalist if you wish.
|
|
|
|
|
07-18-2019, 07:53 AM
|
#14
|
3 Rivet Member
2014 Interstate Ext. Coach
fairfax station
, va
Join Date: Jan 2015
Posts: 187
|
button fix
Quote:
Originally Posted by wachuko
Materials needed
1 - Wood paneling - 3/4" cut to size
1 - 12" piano hinge
2 - Sets of button-fix Type 2 mounts - https://button-fix.com/products/type-2
2 - Neodymium magnets the kind with holes in the middle to secure with a screw
1 - Flat metal plate. This one goes on the opposite side of where the magnet is to do their securing when folded flat...
Laminate of choice unless you want to finish it differently |
Thanks. The button-fix seems to be mainly a UK product, but I bought them here.
https://www.homedecorhardware.com/se...hsubmit=Search
|
|
|
|
|
07-19-2019, 07:04 AM
|
#15
|
Rivet Master
2007 Interstate
League City
, Texas
Join Date: Oct 2014
Posts: 6,139
|
Completed and "installed". Much better with the edges finished. Blends into the cab more.
Ah, but I looked at it in this configuration, and had yet another idea. This weekend, maybe, if I find the time.
|
|
|
|
|
07-19-2019, 10:45 AM
|
#16
|
Rivet Master
1967 17' Caravel
Oak Creek
, Colorado
Join Date: Jul 2009
Posts: 1,560
|
Quote:
Originally Posted by wachuko
And without the front table base and still no Lagun base installed in the front, that is what we are using it for...
I thought about making a second one that would use the same mounts but smaller so that I could completely rotate the seats. Right now I can't rotate the chairs to face the back... side of the backrest would hit the table. If I make it 4" narrower it would clear everything... I was thinking of leaving that for when I actually learn how to use the router and some of the woodworking tools we have at home... I want to get fancy and do something that looks like a table mount (but upside-down for my use) that I saw in a Vestibule Teardrop trailer... the mount with the holes that you see in the photo attached.
|
I love the look of that.
|
|
|
|
|
07-19-2019, 11:04 AM
|
#17
|
Rivet Master
2006 22' Interstate
Mont Vernon
, New Hampshire
Join Date: Nov 2003
Posts: 537
|
Excellent job! I like that... Our pull out for the cigarette lighter was just modified (for more USB outlets), so the travel cup that I like to use won't fit (too tall). This is a great inspiration for a new cup holder!
Thanks!
Bugs
|
|
|
|
|
07-20-2019, 10:33 AM
|
#18
|
Rivet Master
2007 Interstate
League City
, Texas
Join Date: Oct 2014
Posts: 6,139
|
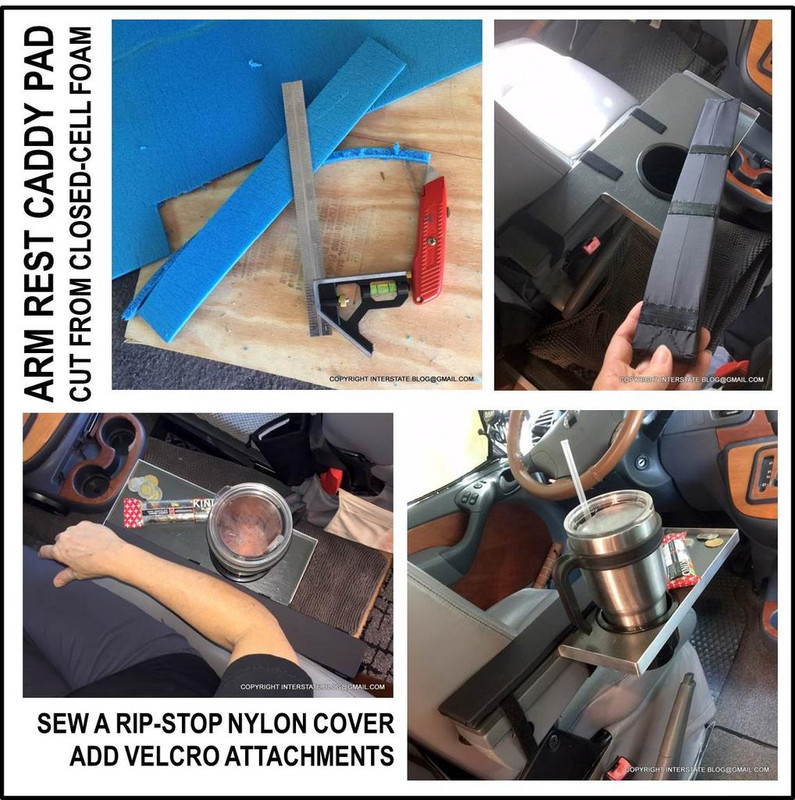
Here's the trim piece I hinted at.
No good deed goes unpunished. No good piece of exposed Velcro goes un-Velcro'd.
I noticed yesterday that I was bumping my elbow on that wooden edge and I didn't enjoy that very much. So I chopped up one of Walmart's closed-cell-foam camping pads (great resource for all kinds of projects), sewed a snug ripstop nylon sleeve for it, added Velcro attachment points, and fitted on this arm rest cushion. Much better.
|
|
|
|
|
09-04-2019, 05:50 PM
|
#19
|
|
Prof. of Pending Projects
2018 Tommy Bahama Interstate
Orlando
, Florida
Join Date: Sep 2017
Posts: 2,658
|
Another option that I found...
I saw this in the Sprinter Build Out International group in FB... There is a guy there, with another FB page (CaveVan - https://www.facebook.com/Cavevans/ ) selling these... thought I would shared in case anyone is looking for a similar solution.
Not related, no commission, blah blah blah just a cool idea in case someone needs it...
Photos attached for those that do not do FaceBook... and non-FB link...
https://cavevan.myshopify.com/produc...c1RGqq4feWLVUg
|
|
|
|
|
06-04-2020, 08:14 AM
|
#20
|
|
Rivets?

1992 29' Excella
2010 22' Interstate
Van By The River
, Georgia
Join Date: Feb 2002
Posts: 2,363
|
Steering Wheel Table for Interstate
I saw these pictures on Facebook and thought it would be helpful to add to the discussion here. Seems like this might be a workable idea for a portable table for the driver position when the vehicle is stopped, engine off, transmission in park and parking brake applied!
Our van is not readily available to check the geometry of the table idea but I'm really enamored with this concept. Anyone have time to check their van and make a carboard mockup or maybe a simple plywood prototype? The thickness of the steering wheel (plastic, leather-wrapped) would impact the width of the slot and the notches. But the tilt-wheel feature may be able to account for some variation.
There must be an Interstate owner that has a small CNC (hint) and could crank these out for $20 + S&H.
I originally created a separate thread for the subject of the steering wheel table and InterBlog subsequently pointed me to this thread regarding the more generic subject of Cab Tables. Seems like it doesn't hurt to have the information in both places.
__________________
Lucius and Danielle
1992 29' Excella Classic / 2010 Interstate
2005 Chevrolet Suburban K2500 8.1L
2018 GMC Sierra K1500 SLT, 6.2L, Max Trailering
Got a cooped-up feeling, gotta get out of town, got those Airstream campin' blues...
|
|
|
|
|
|
|
Currently Active Users Viewing This Thread: 1 (0 members and 1 guests)
|
|
|
 Posting Rules
|
You may not post new threads
You may not post replies
You may not post attachments
You may not edit your posts
HTML code is Off
|
|
|
|

 Recent Discussions
 |
|
|
|
|
|
|
|
|
|
|
|
|
|
|
|
|
|
|
|
|
|


 Linear Mode

