 |
|
 02-18-2022, 05:14 PM
|
#21
|
|
Airstream Driver
1994 30' Excella
1992 35' Airstream 350
Austin
, Texas
Join Date: Feb 2002
Posts: 5,224
|
Quote:
Originally Posted by Kvsterling

I dont think you are missing much here. Believe the rear axle is Dana 70 HD. The seal may be a remove and measure to replace. Cant remember which year they went to Dana 80.
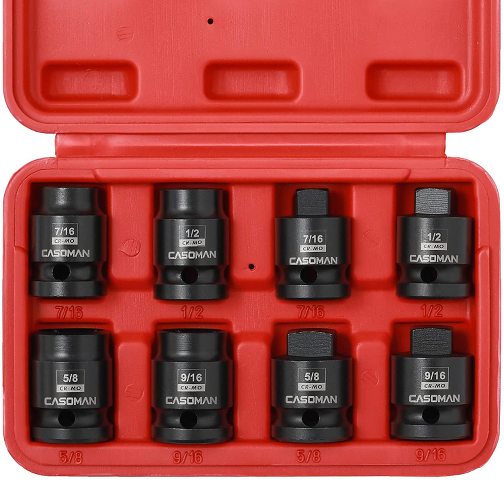
Also, may want the socket used to remove those lock nuts. Not that removal is so bad, but there is a specific process for torque while turning the hub to load the bearings. I wouldnt want to guess
|
Here are the specific 1992 torques and procedures for the rear bearing. And yes, you do need that socket. O'Reilly actually had one on the shelf
__________________
1994 30' Excella Front Kitchen Trailer
1990 25' Excella Travel trailer
1992 350LE Classic Touring Coach
AIR #13
|

|

|


|
02-19-2022, 06:04 AM
|
#22
|
Rivet Master 
1992 36' Land Yacht
Grayson
, Georgia
Join Date: Nov 2011
Posts: 1,724
|
Quote:
Originally Posted by PeterH-350LE
Here are the specific 1992 torques and procedures for the rear bearing. And yes, you do need that socket. O'Reilly actually had one on the shelf
|
Great information on the torques. Needed that.
Do you have the part number on the socket you picked up from O'Reilly's? The one listed in the pager you posted is a bit hard to find. I have one that should fit but I just want to make sure. The one I have is marked W1270, has 6 tangs and is 2 5/8" in diameter.
|
|
|
|
|
02-19-2022, 06:33 AM
|
#23
|
|
Airstream Driver
1994 30' Excella
1992 35' Airstream 350
Austin
, Texas
Join Date: Feb 2002
Posts: 5,224
|
Quote:
Originally Posted by 92landyacht
Great information on the torques. Needed that.
Do you have the part number on the socket you picked up from O'Reilly's? The one listed in the pager you posted is a bit hard to find. I have one that should fit but I just want to make sure. The one I have is marked W1270, has 6 tangs and is 2 5/8" in diameter.
|
Looks like you are good to go https://www.oreillyauto.com/search?q=PFMW1270
__________________
1994 30' Excella Front Kitchen Trailer
1990 25' Excella Travel trailer
1992 350LE Classic Touring Coach
AIR #13
|
|
|
|
|
02-19-2022, 06:43 AM
|
#24
|
|
Airstream Driver
1994 30' Excella
1992 35' Airstream 350
Austin
, Texas
Join Date: Feb 2002
Posts: 5,224
|
Quote:
Originally Posted by 92landyacht
I think I know why I couldn't find the part number you posted. It's not 40235, it's 40285. That part does cross over to a Spicer/Dana 80 1992 model. I'll pick one of those up as well.
Edit:
For what it's worth, National P/N 6358 crosses over as an alternate part for 40285. So, I guess, we were both right. Oddly, the 40285 part is not listed for use in a 1992 P30. Most parts stores show its usage for a 98+ GM P30 while the 6358 is used before then. Not sure why since both have virtually identical inner and outer dimensions.
|
6358 is what I used
__________________
1994 30' Excella Front Kitchen Trailer
1990 25' Excella Travel trailer
1992 350LE Classic Touring Coach
AIR #13
|
|
|
|
|
02-19-2022, 09:37 AM
|
#25
|
Rivet Master
1992 36' Land Yacht
Grayson
, Georgia
Join Date: Nov 2011
Posts: 1,724
|
Quote:
Originally Posted by PeterH-350LE
|
Quote:
Originally Posted by PeterH-350LE
6358 is what I used
|
Thanks for the heads-up, Pete. This is one of those projects that I've put off for a couple of years and am now ready to get it over with. I did the fronts when I first picked up the MH and replaced the rear rubber lines and pads at the same time. Just never got around to pulling the axle and replacing the rotors, lug bolts, seals and calipers.
Any tips on the best way to bleed the brake lines once I replace the calipers? In the past I've just let gravity do its job. Not such a big deal when replacing calipers since there's no line between the caliper and free air, but now I'm looking at replacing the rear center rubber line as a preventive measure, but there are long lines between there and free air at the calipers. I've used a Mighty-Vac hand pump in the past to pull a vacuum on the line as well.
Just looking for a little assurance that I'm on the right track.
|
|
|
|
|
02-19-2022, 11:08 AM
|
#26
|
|
Airstream Driver
1994 30' Excella
1992 35' Airstream 350
Austin
, Texas
Join Date: Feb 2002
Posts: 5,224
|
Quote:
Originally Posted by 92landyacht
Thanks for the heads-up, Pete. This is one of those projects that I've put off for a couple of years and am now ready to get it over with. I did the fronts when I first picked up the MH and replaced the rear rubber lines and pads at the same time. Just never got around to pulling the axle and replacing the rotors, lug bolts, seals and calipers.
Any tips on the best way to bleed the brake lines once I replace the calipers? In the past I've just let gravity do its job. Not such a big deal when replacing calipers since there's no line between the caliper and free air, but now I'm looking at replacing the rear center rubber line as a preventive measure, but there are long lines between there and free air at the calipers. I've used a Mighty-Vac hand pump in the past to pull a vacuum on the line as well.
Just looking for a little assurance that I'm on the right track.
|
Gravity with a clear hose always has worked for me. I like to finish it off with a couple of brake pedal strokes, closing the valve with the pedal down.
Interesting note on the rotor bolts. I have a 220 PSI compressor and was not able to undo them at 180 PSI with my air Wrench, when we did Robs (Magnet18) rear brakes. They were rusted frozen. He pulled out his cordless impact driver and it took them out in no time. I have since bought a cordless Dewalt and it is a beast
__________________
1994 30' Excella Front Kitchen Trailer
1990 25' Excella Travel trailer
1992 350LE Classic Touring Coach
AIR #13
|
|
|
|
|
02-19-2022, 12:18 PM
|
#27
|
Rivet Master
1992 36' Land Yacht
Grayson
, Georgia
Join Date: Nov 2011
Posts: 1,724
|
Quote:
Originally Posted by PeterH-350LE
Gravity with a clear hose always has worked for me. I like to finish it off with a couple of brake pedal strokes, closing the valve with the pedal down.
Interesting note on the rotor bolts. I have a 220 PSI compressor and was not able to undo them at 180 PSI with my air Wrench, when we did Robs (Magnet18) rear brakes. They were rusted frozen. He pulled out his cordless impact driver and it took them out in no time. I have since bought a cordless Dewalt and it is a beast
|
OK, so gravity it is and then have the wife do the peddle while I do the bleeder screw at the end. I always use a clear hose to see any remaining bubbles. When using a Vacuum bleeder, I aways coated the threads of the bleeder screw with thread sealer to keep air from entering through the threads. It's the only way I could stop any bubbles from entering there and giving false air indications. It's one of the reasons I changed to gravity bleeding for the most part.
I've had my wheels off a number of times so I'm not that worried about whether I can get the lugs off or not. I also have a pretty high torque Ingersoll Rand air impact wrench with over 500ft/lbs. of torque @ 90psi. Usually drive it at 130psi.
I'm more concerned on getting the bolts out of the rotor/hub in order to separate them. Planning to use a 3lb hammer to knock them out. Just don't want to damage the hub. Extra lugs I have but only one hub assembly. 
Maybe I'm just over thinking this, but I'd rather be ready for anything than surprised with a problem.
|
|
|
|
|
02-19-2022, 01:14 PM
|
#28
|
|
Airstream Driver
1994 30' Excella
1992 35' Airstream 350
Austin
, Texas
Join Date: Feb 2002
Posts: 5,224
|
Quote:
Originally Posted by 92landyacht
OK, so gravity it is and then have the wife do the peddle while I do the bleeder screw at the end. I always use a clear hose to see any remaining bubbles. When using a Vacuum bleeder, I aways coated the threads of the bleeder screw with thread sealer to keep air from entering through the threads. It's the only way I could stop any bubbles from entering there and giving false air indications. It's one of the reasons I changed to gravity bleeding for the most part.
I've had my wheels off a number of times so I'm not that worried about whether I can get the lugs off or not. I also have a pretty high torque Ingersoll Rand air impact wrench with over 500ft/lbs. of torque @ 90psi. Usually drive it at 130psi.
I'm more concerned on getting the bolts out of the rotor/hub in order to separate them. Planning to use a 3lb hammer to knock them out. Just don't want to damage the hub. Extra lugs I have but only one hub assembly.
Maybe I'm just over thinking this, but I'd rather be ready for anything than surprised with a problem. |
I was talking about the rotor/hub assembly bolts. 130 psi will not cut it. On Magnets rig 180 didn't do, but mine came out at ~180
__________________
1994 30' Excella Front Kitchen Trailer
1990 25' Excella Travel trailer
1992 350LE Classic Touring Coach
AIR #13
|
|
|
|
|
02-19-2022, 02:08 PM
|
#29
|
Rivet Master
1992 36' Land Yacht
Grayson
, Georgia
Join Date: Nov 2011
Posts: 1,724
|
Quote:
Originally Posted by PeterH-350LE
I was talking about the rotor/hub assembly bolts. 130 psi will not cut it. On Magnets rig 180 didn't do, but mine came out at ~180
|
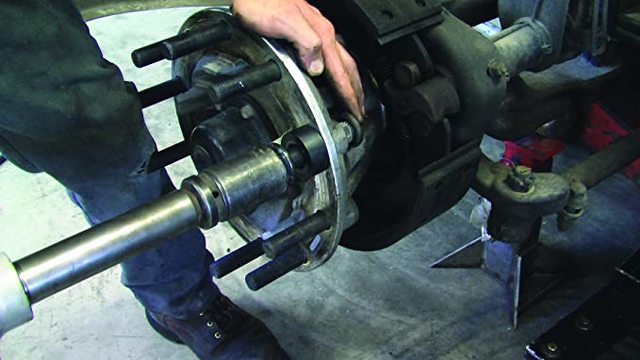
If you look at the second video I posted, it shows the assembly being separated at position 6:47 in the video. Looks like he just hammers out the lug bolts and the complete assembly comes apart.
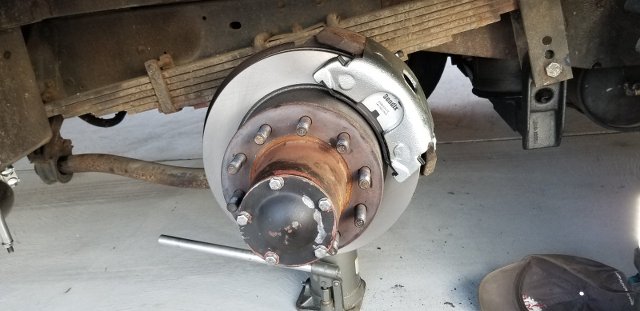
Only doing the rears this go around. Front rotors were done a few years ago. The rears don't have those bolts behind the hub. The lug studs are what hold the rotor to the hub on the rears. At least that's what all the diagrams and the video I posted says. If you look at the picture that cmadmaxman posted, it shows the rear rotor with the hub sandwiched between the rotor and the wheel using the wheel studs as the securing mechanism.
Impact drivers are not dependent on air pressure alone, but also how efficient they are. The commercial versions of the IR drivers are very efficient and have a much higher torque at lower air pressures. The one I have is the same type used in most commercial repair centers. Rated at 500 ft/lbs of torque at just 90 psi. Never had a nut I couldn't break loose at 130psi. I've snapped a few but never just sat there without something turning.
|
|
|
|
|
02-19-2022, 02:57 PM
|
#30
|
|
Airstream Driver
1994 30' Excella
1992 35' Airstream 350
Austin
, Texas
Join Date: Feb 2002
Posts: 5,224
|
Quote:
Originally Posted by 92landyacht
If you look at the second video I posted, it shows the assembly being separated at position 6:47 in the video. Looks like he just hammers out the lug bolts and the complete assembly comes apart.
Only doing the rears this go around. Front rotors were done a few years ago. The rears don't have those bolts behind the hub. The lug studs are what hold the rotor to the hub on the rears. At least that's what all the diagrams and the video I posted says. If you look at the picture that cmadmaxman posted, it shows the rear rotor with the hub sandwiched between the rotor and the wheel using the wheel studs as the securing mechanism.
Impact drivers are not dependent on air pressure alone, but also how efficient they are. The commercial versions of the IR drivers are very efficient and have a much higher torque at lower air pressures. The one I have is the same type used in most commercial repair centers. Rated at 500 ft/lbs of torque at just 90 psi. Never had a nut I couldn't break loose at 130psi. I've snapped a few but never just sat there without something turning. |
Oh, you are right, its the fronts that have the bolts. Besides the point they guy is making about stretching the bolt, if its not driven all the way back in, its very disheartening if you push one of those back in when you install the wheel... You have to disassemble everything
__________________
1994 30' Excella Front Kitchen Trailer
1990 25' Excella Travel trailer
1992 350LE Classic Touring Coach
AIR #13
|
|
|
|
|
02-19-2022, 03:45 PM
|
#31
|
Rivet Master
1992 36' Land Yacht
Grayson
, Georgia
Join Date: Nov 2011
Posts: 1,724
|
Quote:
Originally Posted by PeterH-350LE
Oh, you are right, its the fronts that have the bolts. Besides the point they guy is making about stretching the bolt, if its not driven all the way back in, its very disheartening if you push one of those back in when you install the wheel... You have to disassemble everything
|
No sweat, you can bet that I'll make darn sure that those lugs are fully seated before I ever begin to reinstall the hub. I'll verify that all of the studs are extended the same amount on the front side.
As stated before, this is one job I only want to do once. Well, actually twice since I'll have to do it all over again on the other side.  
Will probably same the same thing when I begin on the front suspension.
|
|
|
|
|
03-01-2022, 03:15 PM
|
#32
|
Rivet Master
1992 36' Land Yacht
Grayson
, Georgia
Join Date: Nov 2011
Posts: 1,724
|
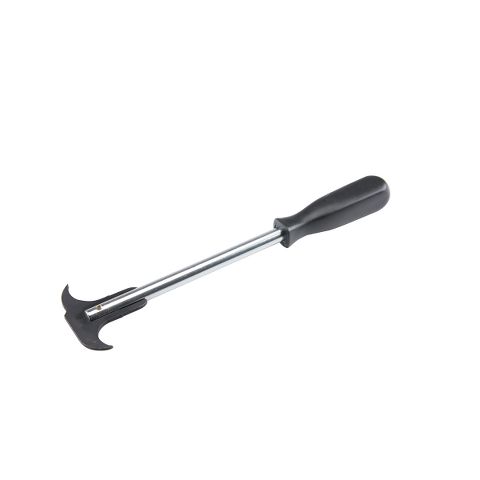
Any recommendations on what seal puller I should use? Finished the roadside today. Biggest pains in the butts were getting the lug bolts to seat completely and getting that darn rear wheel seal out. Beyond that it went pretty well. Plan to do the curbside in the next few days but would really like a better way to get the old seal out.
|
|
|
|
|
03-01-2022, 05:46 PM
|
#33
|
Rivet Master 
1991 35' Airstream 350
Columbia
, Tennessee
Join Date: Apr 2006
Posts: 927
|
I like using a slide hammer puller. I have a home made unit that I use with a big washer welded to a bolt. Pops em right out!
__________________
Chris & Brenda....................cMADMAXman 
AIR Member 12654
1991 350LE "Zephyr"
1982 310 MoHo (Sold! New home, NYC.)
Many Years ago, 1972 Argosy 24' trailer
Toad, 2001 Chevy Tracker 4x4
|
|
|
|
|
03-02-2022, 07:06 AM
|
#34
|
Rivet Master
1992 36' Land Yacht
Grayson
, Georgia
Join Date: Nov 2011
Posts: 1,724
|
The other issue I ran into was I couldn't get the lug bolts to seat absolutely flush with the rotor. I used a 3lb sledgehammer and a 1-foot long 1/2-inch steel dowel to press them in. They seemed to seat solid, but it still left the rotor with a very slight amount of movement. Not sure if this is by design or not. No matter how much I hammered on the bolts or how hard I hammered, they simply wouldn't seat any deeper. I tried the original lug bolts and some new Wagner bolts. Neither one would seat deeper. The strange thing was I even tried to use the original rotor and the original bolts with the same result.
|
|
|
|
|
03-02-2022, 03:06 PM
|
#35
|
Rivet Master
1992 36' Land Yacht
Grayson
, Georgia
Join Date: Nov 2011
Posts: 1,724
|
Wondering if an air hammer with a hammer chisel would drive the lug bolts in better than pounding them down with a manual hammer and steel dowel?
|
|
|
|
|
03-02-2022, 06:33 PM
|
#36
|
Rivet Master
1991 35' Airstream 350
Columbia
, Tennessee
Join Date: Apr 2006
Posts: 927
|
Have not tried that! Might be worth a try!
The first ones I did on a 2001, that was a Dana 80, I used the lug nut to pull the stud in.
On the 350, I just pounded them in with a 2 pound hammer with no problem.
If you use the stud nut, lube it up good!
__________________
Chris & Brenda....................cMADMAXman
AIR Member 12654
1991 350LE "Zephyr"
1982 310 MoHo (Sold! New home, NYC.)
Many Years ago, 1972 Argosy 24' trailer
Toad, 2001 Chevy Tracker 4x4
|
|
|
|
|
03-14-2022, 08:56 AM
|
#37
|
Rivet Master
1992 36' Land Yacht
Grayson
, Georgia
Join Date: Nov 2011
Posts: 1,724
|
OK, decided to redo the rotor I just installed using a better method of installing the lug studs and replacing the rear seal. Several tools were purchased to facilitate this.
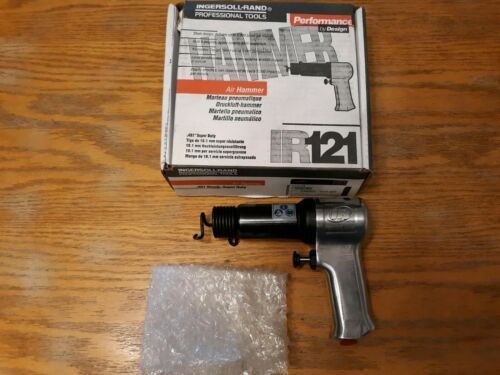
1st, I picked up a new pneumatic air hammer. It's an Ingersoll Rand 121 Supper duty.
I also picked up a hammer chisel set for the air hammer.

and just in case I can't get them in this way, I decided to pick up a Lisle 28950 Truck Wheel Stud Installer tool to help pull them in using the lug nut.

Not messing around this time. Using a hammer and punch did not work to seat them flush. Worst case scenario, I'll take the hub over to a local shop and have them press in the lugs. I'd pick up a 12 or 20 ton press but I just don't have the room for it. As you can see, I like collecting tools.
In order to remove the old rear seal, I picked up this tool to help pull it out.
I plan to use a piece of scrap 2x4 to tap in the new seal.
I figure the easiest way to manage this is to mount the hub to one of the wheels first. This way I have the hub stable and it should make pulling the seal much easier. I think I'll do the same when putting in the studs. If I have the hub mounted to the wheel with the lugs hammered in lightly, I'll be able to drive in the lug bolts with the air hammer and not put as much stress on the hub flange and rotor. I'll also lube the lugs up with some oil and coat the threads with anti seize lubricant before I start.
I also picked up a special socket set to help remove the gear oil fill plug.
Plan to use 75w140 synthetic gear oil.
Once I do one side I'll do the other and take pics of the process. First have to make sure the method works before I document it.
|
|
|
|
|
03-14-2022, 11:56 AM
|
#38
|
Rivet Master
Currently Looking...
_
, _
Join Date: Mar 2008
Posts: 2,385
|
You are definitely setup now with the right tools for the job. I used to sell a lot of the wheel stud installers. Its a great tool. Better then multiple washers and nuts! You should try both the air hammer and the stud installer on different studs and let us know which worked the best. Just in case you haven't used an air hammer before, do your best to not "dry fire" the hammer, meaning don't fire the hammer without the attachment against the stud. Dry firing can damage the hammer and the collar on the attachment.
|
|
|
|
|
03-14-2022, 01:40 PM
|
#39
|
Rivet Master
1992 36' Land Yacht
Grayson
, Georgia
Join Date: Nov 2011
Posts: 1,724
|
Quote:
Originally Posted by dadstoy
You are definitely setup now with the right tools for the job. I used to sell a lot of the wheel stud installers. Its a great tool. Better then multiple washers and nuts! You should try both the air hammer and the stud installer on different studs and let us know which worked the best. Just in case you haven't used an air hammer before, do your best to not "dry fire" the hammer, meaning don't fire the hammer without the attachment against the stud. Dry firing can damage the hammer and the collar on the attachment.
|
Thanks for the heads up. Will report back as soon as I know how it's working.
|
|
|
|
|
03-15-2022, 05:13 AM
|
#40
|
|
Airstream Driver
1994 30' Excella
1992 35' Airstream 350
Austin
, Texas
Join Date: Feb 2002
Posts: 5,224
|
Julius, I am curious, did you observe the amount of stud thread showing with the lug nuts installed, prior to taking it all apart to compare after assembly?
I may be wrong, but I am not buying into the mention in the video, that you will stretch the studs when trying to torque them down not fully seated. I just tapped mine into place, so they would not push out during installation and then let the torque wrench do the rest. 150 foot/pound is a lot of torque and there must have been some engineering considerations for this scenario?
BTW, I have used the same oil sealer puller for many years on many different size seals. I also use a hard 4x4 wood section for installation.
__________________
1994 30' Excella Front Kitchen Trailer
1990 25' Excella Travel trailer
1992 350LE Classic Touring Coach
AIR #13
|
|
|
|
|
|
|
Currently Active Users Viewing This Thread: 1 (0 members and 1 guests)
|
|
|
 Posting Rules
|
You may not post new threads
You may not post replies
You may not post attachments
You may not edit your posts
HTML code is Off
|
|
|
|

 Recent Discussions
 |
|
|
|
|
|
|
|
|
|
|
|
|
|
|
|
|
|
|
|
|
|


 Linear Mode

