 |
|
 12-30-2009, 05:23 PM
|
#221
|
|
Master of Universe
2008 25' Safari FB SE
Grand Junction
, Colorado
Join Date: Sep 2007
Posts: 12,711
|
Rodney, if you fix up that trailer too much, I won't recognize it when I see it. I hope you don't change trucks too.
Gene
|

|

|


|
12-30-2009, 05:53 PM
|
#222
|
|
Naysayer

1968 24' Tradewind
Russellville
, earth
Join Date: Jun 2005
Posts: 4,970
|
Quote:
Originally Posted by CrawfordGene

Rodney, if you fix up that trailer too much, I won't recognize it when I see it. I hope you don't change trucks too.
Gene
|
Well, with the re-polishing, new name plates front and back, and refurbishing the curbside name plate, there will be a fair amount of cosmetic change. And I have to admit that the new low profile AC is looking pretty good to me up there. The bumper cut down and moving the grey tank are the big structural changes. Its going to be a great relief to get that finished! I was going to order one of the steel bumpers from VTS, but $500 + shipping is just to much for me right now. Hopefully, the one on there can be bent back some....
Of course, thats ignoring that I havent gotten around to putting the linoleum in the bath, and the furnace framing, and ordering the centomatics.... oh crap.
|

|
|
|
01-03-2010, 11:32 AM
|
#223
|
|
Naysayer
1968 24' Tradewind
Russellville
, earth
Join Date: Jun 2005
Posts: 4,970
|
 Heat strip
I have been testing out the heat strip in the new AC the past week or so in order to get a feel for what it can do. The weather has ranged from the 40's to 15 when I checked this morning. On the whole, I have been pretty impressed with the heat strip. It brings the temp up about 25 degrees over the outside temps. This morning with the outside temp at 15 around sunrise the inside temp was 42. That is far better performance than I had expected. Glad I spent the money to get the strip, I was really up in the air over that before ordering.
|
|
|
|
|
01-03-2010, 11:50 AM
|
#224
|
Rivet Master  Airstream Dealer
Corona
, California
Join Date: Feb 2002
Posts: 16,497
|
Quote:
Originally Posted by Gen Disarray
The bumper cut down and moving the grey tank are the big structural changes. Its going to be a great relief to get that finished! I was going to order one of the steel bumpers from VTS, but $500 + shipping is just to much for me right now. Hopefully, the one on there can be bent back some....
|
You can easily make a new bumper, but without the curls, by using 3 or 4 inch steel channel. Cut a notch in it where you want it to curve back to the shell, clean it up, paint it and "WOW" not bad, not bad at all. 
Quote:
|
Of course, thats ignoring that I havent gotten around to putting the linoleum in the bath, and the furnace framing, and ordering the centomatics.... oh crap.
|
But, in the meantime, look at all the fun your having. 
Andy
|
|
|
|
|
01-03-2010, 12:24 PM
|
#225
|
|
Naysayer
1968 24' Tradewind
Russellville
, earth
Join Date: Jun 2005
Posts: 4,970
|
Quote:
Originally Posted by Inland RV Center, In
You can easily make a new bumper, but without the curls, by using 3 or 4 inch steel channel. Cut a notch in it where you want it to curve back to the shell, clean it up, paint it and "WOW" not bad, not bad at all.
But, in the meantime, look at all the fun your having.
Andy |
Now, I have to admit, that is a good idea.
|
|
|
|
|
01-03-2010, 12:30 PM
|
#226
|
Rivet Master Airstream Dealer
Corona
, California
Join Date: Feb 2002
Posts: 16,497
|
Quote:
Originally Posted by Gen Disarray
Now, I have to admit, that is a good idea.
|
By the way, you bought the 68 some 4 1/2 years ago.
I know Canada has some cold weather, but 4 1/2 years, and still working on it??
Well, at least your wife knows where your at while your having fun. 
I think I will make a small project out of that simplified bumper this week, with a drawing and dimensions, and of course instructions, too. 
Andy
|
|
|
|
|
01-15-2010, 04:28 PM
|
#227
|
|
Naysayer
1968 24' Tradewind
Russellville
, earth
Join Date: Jun 2005
Posts: 4,970
|
Modest progress
Quote:
Originally Posted by Inland RV Center, In
By the way, you bought the 68 some 4 1/2 years ago.
I know Canada has some cold weather, but 4 1/2 years, and still working on it??
Well, at least your wife knows where your at while your having fun.
I think I will make a small project out of that simplified bumper this week, with a drawing and dimensions, and of course instructions, too.
Andy |
Well, I'm at least half done......
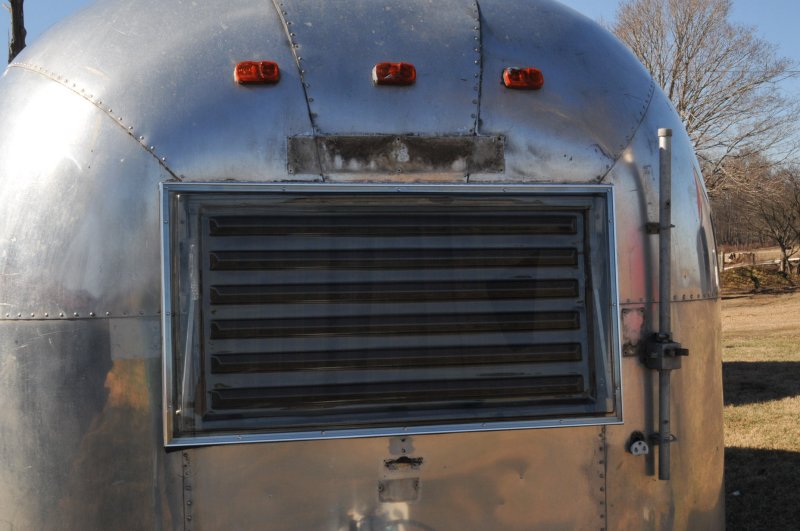
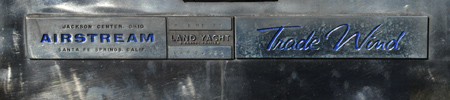
Made some progress today, polished for a couple hours, repainted part of the name tag and test hung the new rock guard from Vintage Trailer Supply. I am going to polish around the window before I permanently attach the guard. It looks like its going to work great though. I pulled off the front name plate too, I have a new one to put there. Man there was a mess behind that plate.
I got a start on painting the name plate as well. Not sure how to go about painting the really small text and the middle recessed area. But I do like the look of what I have done so far.
|
|
|
|
|
01-15-2010, 05:24 PM
|
#228
|
Rivet Master Airstream Dealer
Corona
, California
Join Date: Feb 2002
Posts: 16,497
|
Rodney.
Good start, keep going.
Andy
|
|
|
|
|
01-15-2010, 06:04 PM
|
#229
|
|
Naysayer
1968 24' Tradewind
Russellville
, earth
Join Date: Jun 2005
Posts: 4,970
|
Reflector question
Are these reflectors on the side attached by adhesive or is there something more tricky involved? I'm thinking I want to take them off to polish and replace with ones that haven't faded. Can they be safely pulled off or do I need to try and get some solvent in behind there?

|
|
|
|
|
01-15-2010, 06:27 PM
|
#230
|
Rivet Master
1969 23' Safari
New Orleans
, Louisiana
Join Date: Aug 2007
Posts: 699
|
re: painting small text on nameplate
with oil-based enamel you should be able to apply paint with small 00 brush, let it slop outside the letter, then wipe off the excess
|
|
|
|
|
01-16-2010, 11:15 AM
|
#231
|
Rivet Master
1967 26' Overlander
Huntsville
, Alabama
Join Date: Dec 2003
Posts: 3,018
|
Why look! Its Indiana Rodney & the Temple of Aluum...
Nice pic.
I think you can safely pry the reflector off if you use nothing but plastic tools. While solvents might make the job easier, I doubt they would penetrate very far.
Tom
|
|
|
|
|
01-16-2010, 11:24 AM
|
#232
|
Rivet Master
1966 24' Tradewind
Chicago
, Illinois
Join Date: Nov 2008
Posts: 530
|
Name Plate Pic
Now you've got me thinkin I should do something to my name plate too!
|
|
|
|
|
01-17-2010, 12:40 PM
|
#233
|
|
Naysayer
1968 24' Tradewind
Russellville
, earth
Join Date: Jun 2005
Posts: 4,970
|
Quote:
Originally Posted by Gen Disarray
Are these reflectors on the side attached by adhesive or is there something more tricky involved? I'm thinking I want to take them off to polish and replace with ones that haven't faded. Can they be safely pulled off or do I need to try and get some solvent in behind there?
|
Of the four, one moves. The one that will moves tightens some but will not screw off. I am suspecting there is some sort of between the skins clip action going on. I don't see any way short of destroying the reflector to get it off. I really would like to replace these since they are showing their age, but I am afraid of what I may be getting into here.
|
|
|
|
|
01-17-2010, 01:00 PM
|
#234
|
Rivet Master Airstream Dealer
Corona
, California
Join Date: Feb 2002
Posts: 16,497
|
Quote:
Originally Posted by Gen Disarray
Of the four, one moves. The one that will moves tightens some but will not screw off. I am suspecting there is some sort of between the skins clip action going on. I don't see any way short of destroying the reflector to get it off. I really would like to replace these since they are showing their age, but I am afraid of what I may be getting into here.
|
Rodney.
That reflector is held on with a "pop" rivet.
You can fold over the soft aluminum ring that surrounds the reflector, or just pull it off.
A new reflector would be attached with double sided tape, so you don't really need the metal ring.
Andy
|
|
|
|
|
01-17-2010, 01:55 PM
|
#235
|
|
Naysayer
1968 24' Tradewind
Russellville
, earth
Join Date: Jun 2005
Posts: 4,970
|
Quote:
Originally Posted by Inland RV Center, In
That reflector is held on with a "pop" rivet.
Andy
|
Thanks, that explains a lot.
|
|
|
|
|
01-18-2010, 06:09 PM
|
#236
|
|
Naysayer
1968 24' Tradewind
Russellville
, earth
Join Date: Jun 2005
Posts: 4,970
|
Time runs short
Lost a bunch of work days to the cold. Days left in dry dock are running low before I head out.
So far I have:
1. Rehabbed the nameplate beside the entry door.
2. Rehabbed the gas safety plate by the propane tanks.
3. Repainted the propane tanks AS blue.
4. Replaced the entry door striker plate that was wearing the door bolt.
5. Rough polished the front of the Trade Wind using Jestco this time, not sure that I am sold on Jestco over Neuvite. It is a cleaner process, but I'm not convinced that it is any faster. I wont come near getting done before leaving dry dock, but I wanted to get the areas around the front done before installing the rock guard and AS name plate.
6. Removed the old AC and replaced it with a new 13.5 low profile with heat strip from Carrier.
Left to do over the next week and a half:
1. Finish installing the front rock guard.
2. Attach new AS name plates.
3. Install new gray tank (BIG shout out to Uwe for his help).
4. Cut down the rear end extension to original length
5. Bumper replacement.
6. Installation of the new electric connection
7. Installation of the new backup lights.
The maybe list
1. Centromatics
2. Bal stabilizers.
|
|
|
|
|
01-19-2010, 12:29 PM
|
#237
|
|
Naysayer
1968 24' Tradewind
Russellville
, earth
Join Date: Jun 2005
Posts: 4,970
|
This mornings fruits
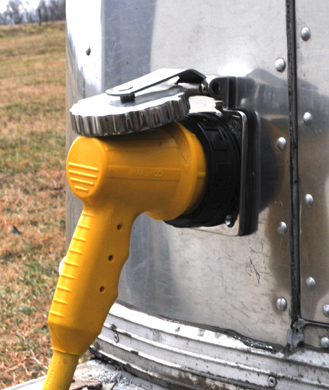
Finally got the new power connection installed, that was a hoot. It is one of those fancy marine type inlets, pricey but hopefully worth the extra money.
Attached the new Airstream plate to the front of the rig, I'm not 100% satisfied with it, but its fine for the moment. I left the rivet pins sticking out as I am afraid to do much in the way of trimming today.
Finally, I almost have the new window rock guard installed, broke down and came in for lunch.... Pictures later.
|
|
|
|
|
01-19-2010, 12:48 PM
|
#238
|
Rivet Master
1967 24' Tradewind
Greenville
, South Carolina
Join Date: Jan 2009
Posts: 1,107
|
"a hoot" you talking to me? Looking forward to the pics, you're workin' and I'm recovering a bug....
|
|
|
|
|
01-19-2010, 03:24 PM
|
#239
|
|
Naysayer
1968 24' Tradewind
Russellville
, earth
Join Date: Jun 2005
Posts: 4,970
|
 Oh crap!
I got under the belly today (for those of you afraid to get under the belly pan, you have good reason) to start work on the gray tank installation. There is some spray on foam that a PO sprayed on. It varies between 3-5 inches thick, not a bad idea really. I pulled off a bunch and this is what I found:
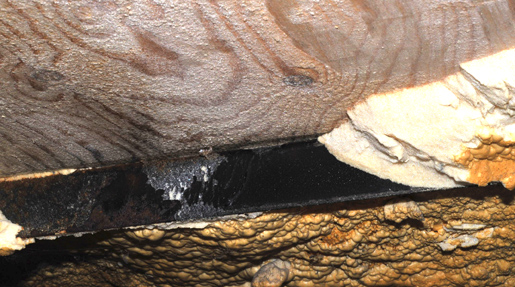
I was not expecting to find the metal bar. It runs right down the middle of the camper front to back. Does that belong there? It sure as heck is going to keep the new tank from fitting in the space. OK team, help me out here, what makes sense to do?
On a more positive note, the fancy pants marine power connector is done
As is the rock guard for the front window

notice the airstream tag has been replaced and the propane tanks painted
I also managed to refurbish the LP warning plate and reinstall it.

|
|
|
|
|
01-19-2010, 04:03 PM
|
#240
|
|
Master of Universe
2008 25' Safari FB SE
Grand Junction
, Colorado
Join Date: Sep 2007
Posts: 12,711
|
Nice work Rodney, bummer about the metal support. Solution (?): two smaller tanks linked together.
Gene
|
|
|
|
|
|
|
Currently Active Users Viewing This Thread: 1 (0 members and 1 guests)
|
|
|
 Posting Rules
|
You may not post new threads
You may not post replies
You may not post attachments
You may not edit your posts
HTML code is Off
|
|
|
|

 Recent Discussions
 |
|
|
|
|
|
|
|
|
|
|
|
|
|
|
|
|
|
|
|
|
|


 Linear Mode

