 |
|
 11-05-2019, 10:52 PM
|
#1
|
2 Rivet Member 
Arvada
, Colorado
Join Date: May 2009
Posts: 42
|
1964 Tradewind Double Renewal Advice?
We bought a 1964 Tradwind with a Double floor-plan. We bought it because the outer skin was in great shape and the interior seemed to be mostly original.
It turns out we have some rear end separation and the expert helping us with that pointed out quite a few things that aren't original, so our plan changed from a minor restoration to a renewal. This is what we are starting with:


The previous owner was pretty clueless about RVs in general and explained his workarounds for not using the RV's systems, which made us think nothing worked
However, I've gone through all the major systems and:
- The fridge lights and cools down to 40 degrees in about an hour, then the temp rises to 45-50 degrees and stays flat.
- The stove appears to work perfectly, but I haven't tested the temp regulation in the oven.
- The furnace appears to been replaced with a 12V only custom ducted furnace. The expert helping us suggested it might be undersized. It appears to work perfectly.
- The fresh water system works, but is a mess. Who uses radiator hoses for fresh water filling?
- The air conditioner works, but the expert suggested that it was too heavy and not supported correctly based on the number on interior panel rivets that have popped.
- The 12V/19V electrical system doesn't seem to make sense, but seems to work most of the time. Sometimes lights won't turn on, then they suddenly work normally.
- The 120V system works, but I could see some insulation degradation when I was trying to figure out why the furnace wasn't working in the 120V switch mode.
- There is a HUGE leak somewhere between the bathroom sink and tub.
- The water heater lights and runs, but it is finicky. The pilot light blows out when it starts to heat and makes some good explosions occasionally.
- I do not know how to test the toilet and black water tank without making a mess I don't want to clean up. The expert mentioned that the original toilet is heavy and we may want to replace it with a composting toilet.
- The Zolatone appears to be original and is in great shape where visible. However, any hidden wall (closets, etc.) has been painted with primer and/or white paint.
- The wood appears to be in good condition for its age. But it is butt ugly.
- The kitchen appears to have been completely reconfigured and all countertops were replaced along with the sink.
- The floor appears to be pretty solid expect some sponginess at the entrance.
- The original tile has been covered with ugly carpet.
- The fiberglass wall covers (Wiring in bedroom, flue for fridge) are cracked where they connect to the wall.
- It appears to have the original axle.
We do NOT want to do a frame-off restoration. Our current plan includes these steps as a minimum:
- Remove everything in and under the bathroom so the expert can fix the rear end separation.
- Put the bathroom back together with new plumbing
- Replace the toilet and black water tank
- Patch the floor at the entrance.
- Replace the fridge
- Replace the counter tops
- Clean and refinish the wood
- Replace the 12/19V electrical system sources and relocate over an axle.
- Replace the fresh water system, plumbing, and add a small grey water tank beside the fresh water tank.
- Replace the air conditioner
- Add a Zip Dee Awning because a regular awning is a pain in the butt
- Try and replace the flooring
- Replace the front gaucho with a two-person dinette
- Replace the axle
We are thinking of making some of the following upgrades:
- Remove everything in the trailer so we can patch the floor and replace the caret and tile in one go instead of trying to cut around the layout.
- Remove the existing floor and repair any frame issues from the inside, paint the frame with POR-15, replace the insulation, replace the floor. (The expert doesn't seem keen on this idea.)
- Replace all the plywood on the interior with new plywood to replace the butt-ugly wood and make it easier to match old to new.
- Replace the fiberglass drawers with proper drawers.
- Replace the oven with a cooktop because no one ever uses the over and we can get more storage and cover the cooktop with a counter when not in use.
- Change the layout to two twins with a more open floorplan like the Safari.
- Replace all doors with rolltop trabour material like a 70's airstream
- Run new 120V wiring through the floor and fish it up through the walls to the plugs?
- Spray new Zolatone over the existing wall covering
Any comments, advice, or suggestions are appreciated. I'm slowly reading through the forums, but my big questions are:
- Is it possible/practical to replace the floor with the body on. I did glance at some posts that seemed to suggest it was possible, but a little complicated.
- Are there any paid/free material to help me build booth-style seats with springs like the ones found in a diner. or 60's car
- Should we replace the water heater. The expert wasn't keen on the idea if it works.
Thanks in advance for any help that you can provide. This is our first Airstream. The renewal on our Great Dale House car was mostly mechanical and cosmetic.
Finally, Does anyone need any of the parts we may not be using after the renewal. The expert suggested we have quite a bit of unobtanium here and there.
|

|

|


|
11-05-2019, 11:38 PM
|
#2
|
4 Rivet Member 
1980 24' Caravelle
vallejo
, California
Join Date: May 2016
Posts: 285
|
welcome and congrats on yourAS. i had a 64 overlander that had most of the same fittings. your kitchen seems original as the wood, fittins and counter is the same as the overlander. your 12 volt set-up is a non-regulated power conveter; replace with a modern one. your bowen water heater and funace are too old- replace for safety sake. you can do floor repair wih- out a sheii -off option. the toilet is a great model, but is attatched to the tank. it sits in a tube that has rotted out. keep us posted on your progress. kurt
|
|
|
|
|
11-05-2019, 11:59 PM
|
#3
|
Rivet Master 
1962 22' Safari
2016 30' Classic
Southeast
, Michigan
Join Date: Mar 2004
Posts: 2,987
|
I agree with the previous poster. Almost everything in the trailer, including the kitchen cabinets and counter appears original. The radiator hose on the water fill is probably original - I found the same in my 1962 Safari. I can't see the furnace, so cannot comment on that.
The main things I see that are not original are the wallpaper border and floor coverings.
You have now joined the majority of vintage Airstream owners that discover their "project" is much larger than planned after getting it home. If it seems too big, flip it now before you gut things. If you are up for it, good luck!
__________________
Joe
Wally Byam Caravan Club International Historian
Vintage Airstream Club Historian
WBCCI/VAC #702 & #6768
|
|
|
|
|
11-06-2019, 09:06 AM
|
#4
|
Rivet Master
1966 24' Tradewind
Kansas City
, Missouri
Join Date: Mar 2015
Posts: 638
|
Nice shell. So it was with our '66 Tradwind, which is what attracted us to it in the Spring of 2015. After having initial thoughts much like yours, my alter ego, Slats, completely ignoring his meager store of skills, rushed in where angels fear to tread. For a tale of his slow saga, see
http://www.airforums.com/forums/f116...nd-135579.html
But as challenging as it has been, Slats says he has thoroughly enjoyed learning on the job and would do it all over, if only for the the fun of getting to know some fairly bright, skilled and helpful fellow sufferers of aluminitis. In fact, he may well find himself doing the present project over. Hopefully, that last sentence belongs in the just-kidding column.
|
|
|
|
|
11-06-2019, 09:39 AM
|
#5
|
Rivet Master
1973 21' Globetrotter
Houston
, Texas
Join Date: Sep 2009
Posts: 3,322
|
Welcome to the adventure of a complete rebuild!
These projects are prone to scope creep. It is easy to say "as long as I'm here, I might as well do X also..."
When I read your description of tasks you want to tackle, and the strategy you have, it seems like you are trying to do a shell-off rebuild, but take some short-cuts. Like most short-cuts, the things you have in mind aren't going to save you any time, and will, in fact, be the harder way to go about it.
Yes, you can do a complete subfloor replacement with the shell on (but it is the hard way to do it). You need to determine whether the entire subfloor really needs to be replaced or not (and how much frame damage you have). If only the rear most sheet needs to come out, and a patch here and there, then you can save yourself a lot of time and grief by doing a partial replacement. If you are keen to replace the entire floor, then I suggest building the gantries like so many others have done, and lifting the shell off. This makes repair of the frame, replacement of the axle, reinstallation of the belly skin, and reinsulation of the underside, all 100% easier.
Replacing the floor will require you to remove all of the lower interior skins so that you can get at the tops of the bolts running through the C-channel and through the floor. When you expose the insulation in the walls, you will likely find a critter infestation that will make you want to go ahead and remove the upper skins as well. At this point, you have exposed all of the wiring, so repair what needs attention, or replace it all in the way it was originally wired. If you go under the floor, you are going to run into issues of having to install the wiring in conduit or armored sheathing, and you will have to drill access holes through the already thin and flimsy main fram rails.
As far as the composting vs conventional toilet decision, you need to do some research and understand the pros and cons of each. There are several threads on these Forums discussing the relative merits.
Your refrigerator might be just suffering from a rusty chimney (on the back of the fridge) or a dirty burner. Both of these can be cleaned up. Does it run on electricity as well? If so, does it perform better? These refrigerators have to be pretty level in order to perform their best, and sometimes take as much as 24 hrs to get all the way cold. Again, several threads about troubleshooting refrigerators.
Fiberglass parts like the refrigerator exhaust cowling cannot be purchased new, so you might have to develop some fiberglass repair skills to fix those up. Be very careful disassembling those plastic and fiberglass bathroom components. Anything you break, you will either have to fix or fabricate something completely new.
Your AC looks like a conventional unit. There aren't many options for getting a smaller or lighter unit without going to a split unit or something quite unconventional like that. It could be that the roof isn't braced adequately for the AC, but this should be obvious if you get up on a ladder and have a look at the roof. If the AC is deforming the surface of the roof, then there is a lack of bracing. Popped interior rivets are more likely to be caused by the ancient suspension you are riding on, too heavy a tow vihicle, over sized weight distribution bars, etc...
Good luck!
|
|
|
|
|
11-09-2019, 10:17 AM
|
#6
|
2 Rivet Member
Arvada
, Colorado
Join Date: May 2009
Posts: 42
|
Thanks for all your suggestions
Thanks to everyone with their suggestions.
I've backed off the floor replacement for now. We'll see what's under the carpet once we get everything. After looking at the wood on its way out of the trailer, the plywood is definitely getting replaced.
We're still "debating" the final floor plan, but Lina might be changing her mind about the front gaucho. Has anyone made a clever hideaway table for a gaucho?
Here's the progress after day one of demolition.


|
|
|
|
|
11-09-2019, 10:19 AM
|
#7
|
2 Rivet Member
Arvada
, Colorado
Join Date: May 2009
Posts: 42
|
Quote:
Originally Posted by Belegedhel

Welcome to the adventure of a complete rebuild!
Your refrigerator might be just suffering from a rusty chimney (on the back of the fridge) or a dirty burner. Both of these can be cleaned up. Does it run on electricity as well? If so, does it perform better? These refrigerators have to be pretty level in order to perform their best, and sometimes take as much as 24 hrs to get all the way cold. Again, several threads about troubleshooting refrigerators.
Good luck!
|
It is gas only, which is one reason we'll replace it. The door interior has quite a few cracks. Would anyone want it or the parts?
|
|
|
|
|
11-10-2019, 05:20 PM
|
#8
|
2 Rivet Member
Arvada
, Colorado
Join Date: May 2009
Posts: 42
|
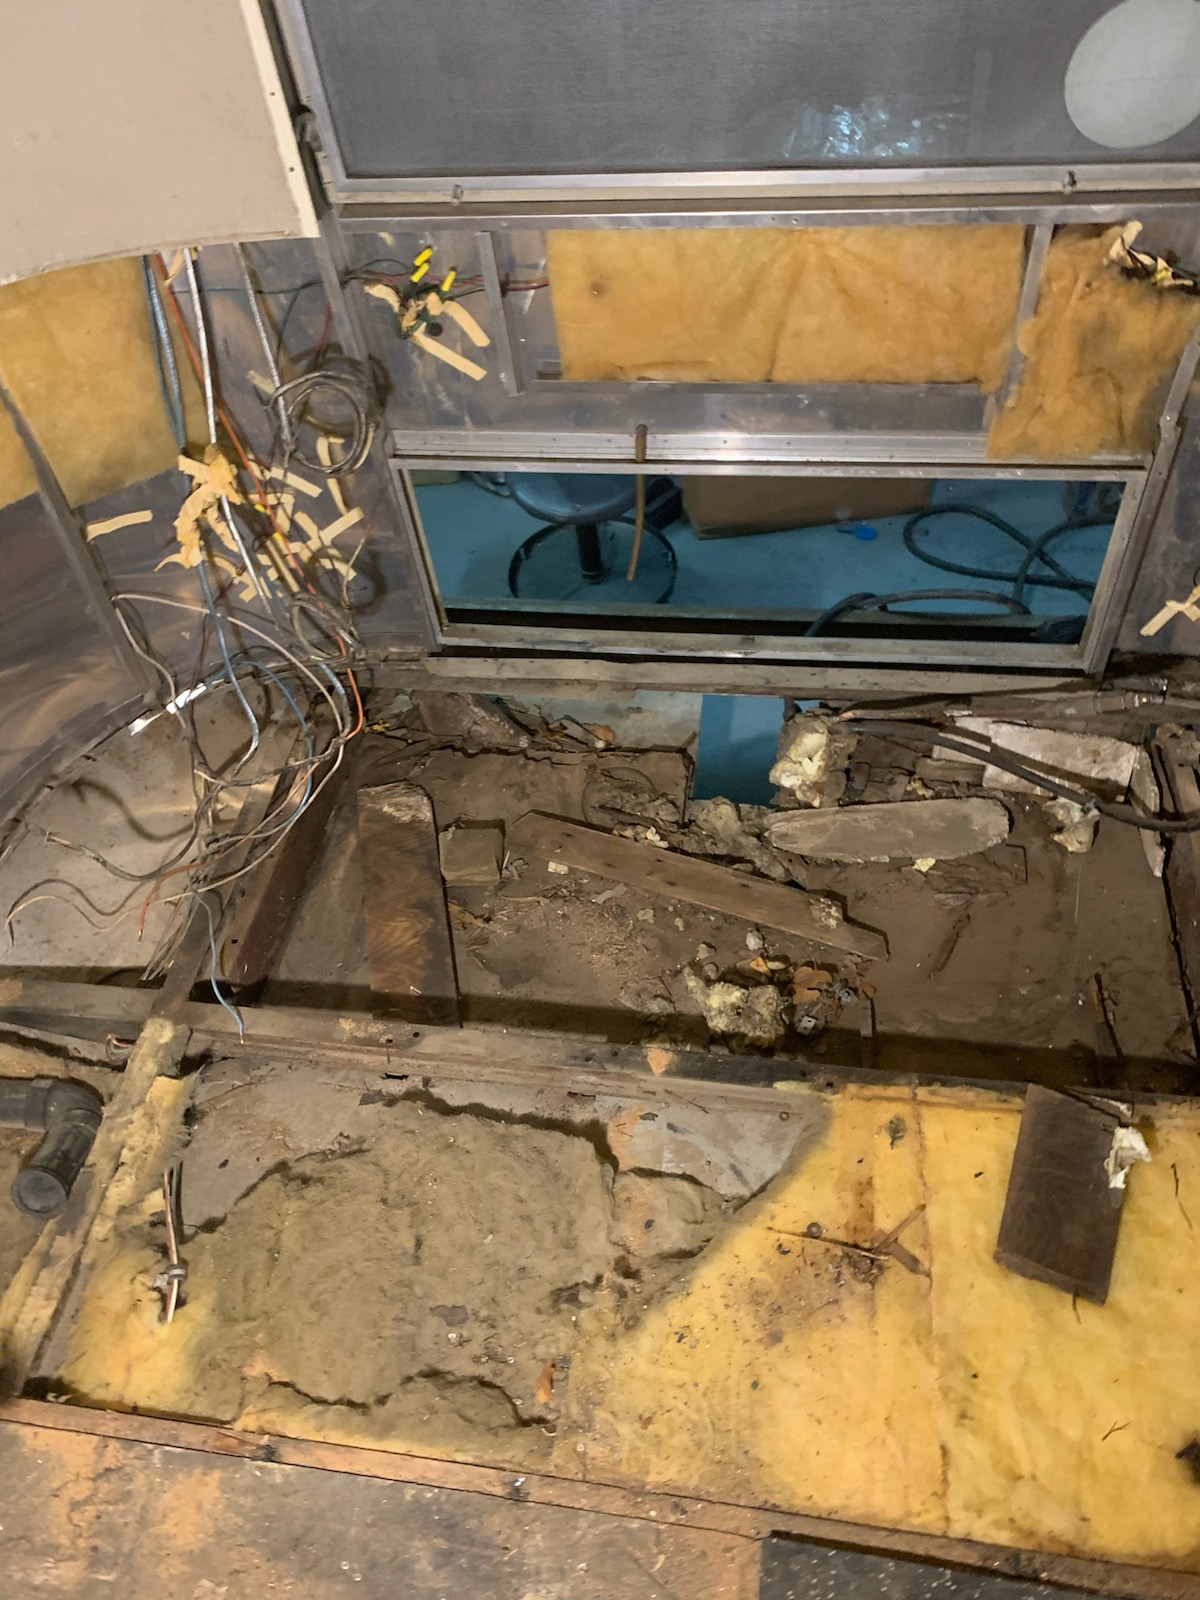
Day 2 Demolition
I only had to wreck one cabinet to get everything out because the rivets were behind a vent pipe and some plumbing ran through the cabinet. I was quite surprised.


That water heater is a monster and will be replaced. Is it something that someone wants. It does light and heat, but it blows its pilot light out when it starts.
|
|
|
|
|
01-13-2020, 04:58 PM
|
#9
|
|
New Member
1964 24' Tradewind
St. Paul
, Minnesota
Join Date: Jan 2020
Posts: 4
|
Congrats on your Tradewind. We have been pulling the exact same model and year around for a little over a decade. We love it. I miss our first one, a '59, but our '64 was more intact.
I'm impressed with your renovation. We've been happy with how things work in ours and slowly fixing/upgrading as we go. New fresh water tank this year. I can confirm your kitchen counter, stove, and prob frig are original.
I'm happy to share any insights that I've gained but it depends on what you reinstall. I'd like to hear more about the rear end separation. Never heard of that.
I'm interested in a number of items if you still have things.
|
|
|
|
|
01-13-2020, 05:32 PM
|
#10
|
Rivet Master 
1969 25' Tradewind
Shasta Lake
, California
Join Date: Sep 2012
Posts: 1,041
|
Congrats , Yep take the interior completely apart then rebuild from the floor up.
Take a look at my build . Click the link below .
|
|
|
|
|
01-13-2020, 05:51 PM
|
#11
|
2 Rivet Member
Arvada
, Colorado
Join Date: May 2009
Posts: 42
|
2020 Update
The trailer is with the expert and is torn apart. Turns out we really do have rear end separation and there have been 4 unsuccessful attempts to repair it.

There was a giant leak in the bathroom above the worst damage. And the area under the entry door also needed some work. Otherwise, the floor looks good everywhere else.
Part of the problem was the rear panel door. It seems that they kept losing panel doors because a previous owner started writing their name and contact information on the back of the panels. I realized something was wrong when I was tearing it all apart and saw that the panel door had a 1969 sticker on it. It seems it was a random panel from a random trailer that never fit right.
As it was explained to me by the expert: Airstreams already have a rear moisture problem because the airflow around the trailer as you are driving sucks up all the water and spills it onto the rear bumper of the trailer. The trailer was never sealed properly in that area, so it just becomes saturated. The incorrect rear door seal just made an already existing problem worse.
The rear lights aren't original and the back of the trailer was patched and reconfigured for the new panel. Therefore, we're going to replace the previous patch and eliminate the problem by just making a solid rear panel with no access hatches with period correct lights. We'll also be replacing the hot water outside panel at the same time and relocating all the utilities to the side. The fresh water and black water drains were moving anyway because the original locations were disgusting.
We also removed the rear support jacks that were welded on the rear bumper because that seems like an excellent way to create rear end separation.
The rear frame is being reconfigured for a small black and small grey water tank that will drain from the drivers side.
|
|
|
|
|
01-13-2020, 06:05 PM
|
#12
|
2 Rivet Member
Arvada
, Colorado
Join Date: May 2009
Posts: 42
|
Advice for Next Steps
Lina wants Marmoleum sheet flooring, which isn't quite wide enough for the trailer at the front. We're thinking of making some kind of alternate entry flooring at the entry, which will be the only place the width matters.
Does anyone have a recommended option for the entry?
Can anyone recommend a supplier and installer in Denver?
The old water heater is definitely not going back in and I like the idea of keeping the side wall smooth. Does anyone have experience with this system
https://www.truma.net/heating-systems/truma-combi-eco
Alternatively; Does anyone have any experience with this tank-less water heater. From what I've read, people love or hate their tank-less water heater. We'll have very small tanks, so military showers will be mandatory when we boondock (which is rare)
https://precisiontemp.com/products/rv-550-nsp/
The expert is quoting $800 to replace the axle (labor only). Is this reasonable?
Thanks for your help.
|
|
|
|
|
01-14-2020, 07:53 AM
|
#13
|
Rivet Master
1966 24' Tradewind
Kansas City
, Missouri
Join Date: Mar 2015
Posts: 638
|
I've installed a Truma Comfort Plus in my '66 Tradewind, but still have to install a new fresh water tank, so have not tested it yet, other than making sure the propane connection is bubble-free. I thought about a Combi, but my Dickenson Marine propane fireplace is keeping me warm and cozy as I work away in my nephew's unheated metal barn in the Kansas City winter. Well, actually in Pleasant Hill, some 30 miles distant from KC.
|
|
|
|
|
01-14-2020, 07:54 AM
|
#14
|
Rivet Master
1966 24' Tradewind
Kansas City
, Missouri
Join Date: Mar 2015
Posts: 638
|
P.S.
Croft trailer supply in Lee's Summit, MO, a Dexter dealer, installed my dual axles for $150.
|
|
|
|
|
01-14-2020, 10:21 AM
|
#15
|
Rivet Master
1958 26' Overlander
Battle Ground
, Washington
Join Date: Jun 2013
Posts: 871
|
You might want to consider Marmoleum Click as an alternative to their sheet product. It is easy to install and the seams are quite tight. It gives you the option of creating a pattern.
 

We used the 30X30 and 30X90 (cm) tiles.
|
|
|
|
|
01-14-2020, 10:30 AM
|
#16
|
Rivet Master
1958 26' Overlander
Battle Ground
, Washington
Join Date: Jun 2013
Posts: 871
|
You might want to consider Marmoleum Click as an alternative to their sheet product. It is easy to install and the seams are quite tight. It gives you the option of creating a pattern. It is a floating tile. We installed throughout and under the cabinets. We secured our cabinets to the walls primarily, with a few screws into the floor. No problems after 3 years.
Attachment 359154 Attachment 359153
Attachment 359155
We used the 30X30 and 30X90 (cm) tiles.
We went with a tankless water heater as I wanted to minimize propane, without going to electric. The only down side is the beginning bit of cold water when you first turn it on. I resolved that be running a return line from the tub (farthest line from heater) back to the front with a shut off valve. I can redirect back to the heater or the fresh water tank. (Gives me the an alternative to refill the fresh water tanks.) See page 4 of our thread for more detail.
Good luck with your project and enjoy the process.
|
|
|
|
|
01-14-2020, 03:31 PM
|
#17
|
|
New Member
1964 24' Tradewind
St. Paul
, Minnesota
Join Date: Jan 2020
Posts: 4
|
I put a Domestic RM 2500 (automatic ignition) in our '64. Runs on 120 and gas.
It fits perfectly in the old footprint. Height was good, too, with the exhaust.
|
|
|
|
|
01-14-2020, 08:14 PM
|
#18
|
2 Rivet Member
Arvada
, Colorado
Join Date: May 2009
Posts: 42
|
Where did you get the Truma
Where did you get your Truma? They finally got back to me after multiple messages and told me that they only sell to OEM manufacturers and that was the end of the call.
Quote:
Originally Posted by Slats
I've installed a Truma Comfort Plus in my '66 Tradewind, but still have to install a new fresh water tank, so have not tested it yet, other than making sure the propane connection is bubble-free. I thought about a Combi, but my Dickenson Marine propane fireplace is keeping me warm and cozy as I work away in my nephew's unheated metal barn in the Kansas City winter. Well, actually in Pleasant Hill, some 30 miles distant from KC.
|
|
|
|
|
|
08-25-2020, 08:14 AM
|
#19
|
2 Rivet Member
Arvada
, Colorado
Join Date: May 2009
Posts: 42
|
2020 Update
The expert finally finished repairing the rear end separation and we're waiting for the Marmoleum sheet floor to be installed.
You can get the whole story here: https://airstream.greatdalehousecar....nd-seperation/

He also repaired/replaced/added: - the sagging step and water damage at the entry door
- New interior and exterior skin where the water heater used to be
- New interior and exterior skin where the furnace used to be (Turned out to be incorrectly replaced in the past)
- New black AND grey tanks (most Airstreams of this vintage dont have grey tanks)
- All the little useless knick-knacks applied to the exterior were removed
- New LED tail and running lights that everyone who sees them is impressed by.
- TV antenna removed
- One vent removed
- Tub plumbing added
|
|
|
|
|
08-25-2020, 08:18 AM
|
#20
|
2 Rivet Member
Arvada
, Colorado
Join Date: May 2009
Posts: 42
|
New Axle
We also had a new 5,000# Dexter's Nev-R-Lube axle installed from Iron Bear Trailer here in Denver.
They also ran new wire from the front to the brakes, added new chains, and installed a emergency brake battery system.
The whole thing cost around $1,800 for those who are thinking of going down the same route.
|
|
|
|
|
|
|
Currently Active Users Viewing This Thread: 1 (0 members and 1 guests)
|
|
|
 Posting Rules
|
You may not post new threads
You may not post replies
You may not post attachments
You may not edit your posts
HTML code is Off
|
|
|
|

 Recent Discussions
 |
|
|
|
|
|
|
|
|
|
|
|
|
|
|
|
|
|
|
|
|
|


 Linear Mode

