 |
|
 06-03-2009, 07:37 PM
|
#621
|
Rivet Master 
1963 26' Overlander
Austin
, Texas
Join Date: Feb 2008
Posts: 2,640
|
Jim, I can't wait either, but unfortunately we will both have to, at least for a while longer. I'm still trying to finish up some cosmetic details that need to be completed before the tall wardrobes go in. You know the drill-- I really want to do Thing A, but before that I need to finish Thing X, which requires completion of Thing Y, which can't be started until I've finished Thing Z.
Believe it or not, I originally started off this project with a Gantt Chart that I felt covered everything and included all contingencies and milestones, but I abandoned it after a couple of months, when I realized I didn't know enough about what I was doing to even create a realistic Gantt chart.
It should go much smoother on the NEXT Airstream renovation, right? 
|

|

|


|
06-03-2009, 07:44 PM
|
#622
|
Rivet Master
1963 26' Overlander
Austin
, Texas
Join Date: Feb 2008
Posts: 2,640
|
Ain't It Funny How Time Slips Away
I just looked back over my blog and thread from the past few months, with some surprise. I realized that I only posted one actual update in the entire month of May, and May is perhaps the month where I've actually made the most progress. But the problem is that I now have a bunch of half-complete projects, and I just don't want to blog and post pictures with half-done stuff. I was working so hard to get things ready for our annual BFN campout in mid-May, that I skipped through a few major projects just to get the Airstream road-ready.
So now here I am, trying to go back and pick up where I left off. Unfortunately I did not manage to get the gray water and fresh water all plumbed in before the trip as I had hoped. I did get the black tank installed and the new Valterra valve assembly put on it, but because I didn't have any freshwater for flushing, the toilet was for #1 only. Not a big deal because the campground has full facilities, and the ability to wake and at least go #1 in the middle of the night without leaving the trailer was still pretty nice.
I also did not manage to get the tall wardrobes or beds installed as I had hoped. There are a few cosmetic details that really need to be completed before the wardrobes go in, so those are the things I am working on right now. About the last thing I did before buttoning everything up for the road, was to spray in some low-expansion urethane foam to support the tub from underneath. This is what the factory did originally, and it's what I decided to do as well. So first I laid down some plastic sheeting over the floor, so that the foam would not become one with the floor if I ever need to pull it again. Then I installed the tub drain assembly. Next I riveted the tub into place along the wall, and then put some weight in the tub to prevent it from rising on top of the foam. Then I just sprayed in the foam (Great Stuff Door & Window) as far back as I could, all the way around.
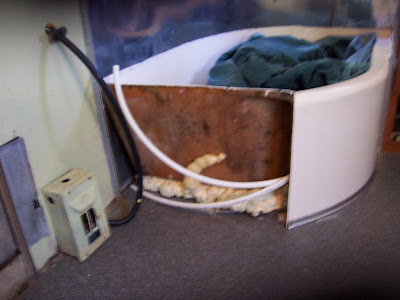
That sure was a lot of exposition for just one simple picture, wasn't it? That's how all of these projects seem to be going right now...
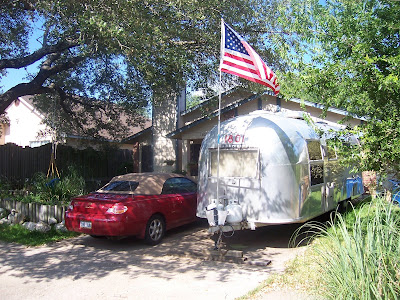
With the tub completely installed, I then installed the black tank and vanity, cleaned up my monumental mess, and went camping.
Where, of course, it rained all day Saturday. That's okay-- a canopy, some dice, and beers, were all we needed.
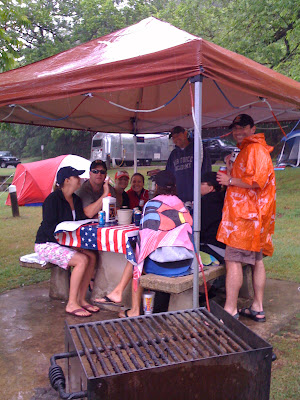
But the Airstream still looked great:


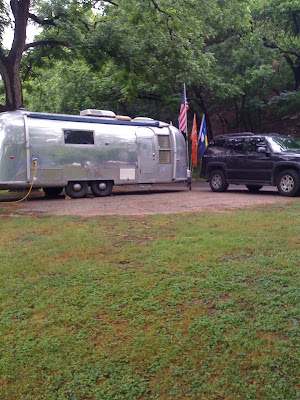
We still had a great time, as we always do. Many thanks to Dave and BG for taking care of all of the campsite details!
After spending so many hours preparing the trailer for the campout, I had quite a backlog of other chores and duties, so for the past couple of weeks I haven't done much at all. But this week I decided I needed to get back to it, and one thing had been bothering me for some time. I just didn't like the way this bathroom light had turned out:
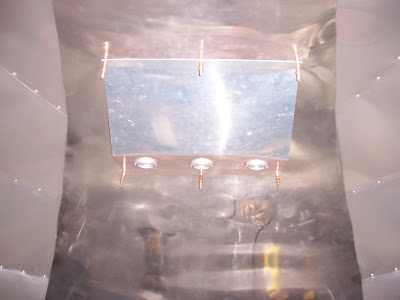
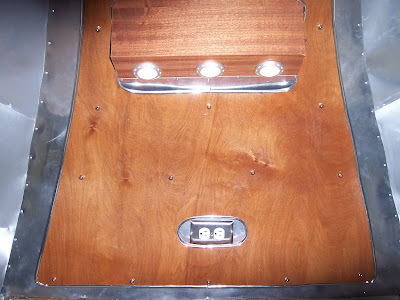
I don't have a metal brake, so all of the bending was done with a makeshift brake I fashioned from a vice, some clamps, and a couple of pieces of wood. It wasn't horrible, but I just couldn't live with it. So, I took it down, started over, and this is what I came up with:
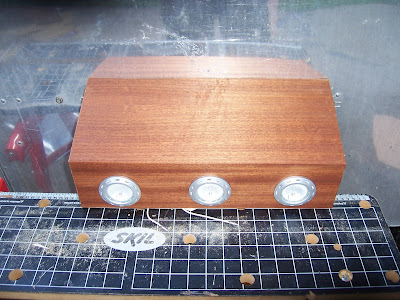
I think it looks much nicer in ribbon-striped African mahogany. I also installed an aluminum side plate and mounted the switch there.
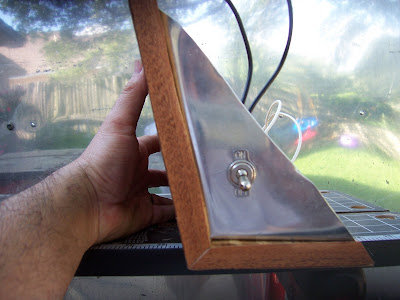 I know these aren't very good pictures, but once it's installed I'll take some better ones and it will make more sense in the overall design.
Okay, now back to work.
|
|
|
|
|
06-03-2009, 07:54 PM
|
#623
|
|
Retired.
Currently Looking...
.
, At Large
Join Date: Jun 2003
Posts: 21,276
|
Quote:
|
Originally Posted by utee94
It should go much smoother on the NEXT Airstream renovation, right?
|
...Right..... ")
|
|
|
|
|
06-03-2009, 10:32 PM
|
#624
|
Rivet Master
Currently Looking...
Florissant
, USA
Join Date: Oct 2006
Posts: 5,083
|
Quote:
|
Originally Posted by utee94
....smoother on the next Airstream renovation
|
Goodness Marcus...take some time to finish and enjoy this one before you start off on another one. You think you are Rob Baker or something!!!!! 
Steve
|
|
|
|
|
06-04-2009, 07:48 AM
|
#625
|
4 Rivet Member 
1955 22' Flying Cloud
Polk City
, Iowa
Join Date: Jul 2008
Posts: 353
|
Very nice work as always Marcus!
|
|
|
|
|
06-04-2009, 08:15 AM
|
#626
|
Rivet Master
1963 26' Overlander
Austin
, Texas
Join Date: Feb 2008
Posts: 2,640
|
Steve-- Okay, okay... I'll hold off on getting my '56 Caravanner for a few more years. But haven't you heard, Rob Baker is down to only ONE Airstream.
Barry-- Thanks for the compliment. Hope you're having a good beginning to your summer. How's your 62 coming along?
-Marcus
|
|
|
|
|
06-05-2009, 12:14 PM
|
#627
|
|
Master of Universe
2008 25' Safari FB SE
Grand Junction
, Colorado
Join Date: Sep 2007
Posts: 12,711
|
The foam under the bathtub also acts as an insulator so the water stays hotter. When I've installed new tubs at 2 houses, I place fiberglass in bags around the tub to insulate, but never thought of foam for leveling. It's a good idea and if I do another bathtub, I'll use that too.
Gene
|
|
|
|
|
06-17-2009, 10:01 PM
|
#628
|
Rivet Master
1963 26' Overlander
Austin
, Texas
Join Date: Feb 2008
Posts: 2,640
|
Some may remember that I mentioned some more twists I had planned-- well now the time has come to reveal one of them.
I've heard from a couple of people that the all-metal bathroom seemed a bit cold and sterile. I thought so too, but I always had a plan to warm it up a bit. The wood of the vanity helped, but there was one more piece I wanted to install to help it out. I really liked the way that Carlos Ferguson's metal heat shield looked against his wooden walls, and thought that the reverse might look cool as well. Of course, his was functional, while mine is purely decoration.
After making this piece from bendy birch, in my mind I began calling it "the sail" which I suppose is only appropriate for a Land Yacht.
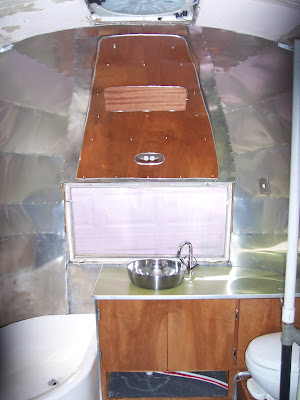
There's still a little trimming and fitting to do, but it's almost there. The piece is made from 1/8" bendy birch, edged with automotive door trim molding, and then held onto the ceiling with 19 standoffs. The standoffs are made up of 1/4" bolts that were installed through the aluminum panel before it was riveted to the interior endcap.
Over the bolts, are 1"-long sections of 1/2" PVC and fender washers on the backside, and then the sail, which was topped with nut caps on the front side. It sits a little over an inch off the ceiling.
I shouldn't say the sail is entirely decorative, it does have some function, as it hides a 12' section of rope lights that sits behind it.
 The rope light provides a nice, soft back-lighting behind the sail.
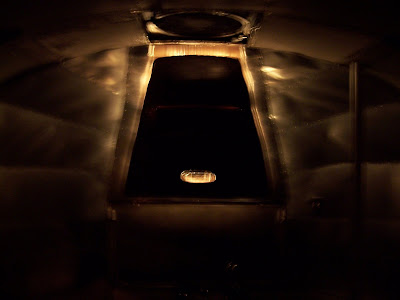
And the fixture I built from the African mahogany provides the direct down-lighting in the bathroom.
Overall, I think it's a really nice effect, warming up all of that metal.
|
|
|
|
|
06-17-2009, 10:27 PM
|
#629
|
Rivet Master
1957 22' Caravanner
Port Hadlock
, Washington
Join Date: Dec 2008
Posts: 864
|
That is a nice looking twist, Marcus.
I really like that contrast between the cool aluminum and the warm birch. Easy to get carried away by too much shiny metal and I think you've got a good balance on it.
Congrats on getting the trailer out and actually using it too. 
cheers,
steve
|
|
|
|
|
06-18-2009, 12:24 PM
|
#630
|
|
Remember, Safety Third

1973 27' Overlander
Catfish Corners
, Georgia
Join Date: Oct 2004
Posts: 5,720
|
Quote:
Originally Posted by utee94

.......Overall, I think it's a really nice effect, warming up all of that metal.
|
"Really nice effect" my hind foot, that's just plain dang cool! 
Jim
|
|
|
|
|
06-22-2009, 01:27 PM
|
#631
|
Rivet Master
1963 26' Overlander
Austin
, Texas
Join Date: Feb 2008
Posts: 2,640
|
Thanks guys, it took me a number of hours to get it to this point, and there's still some work to do, but since it's purely cosmetic, I'm going to move on to more functional work for the time being. There will be plenty of time to trim it to exact fit after I get the back half put together and go camping!
|
|
|
|
|
07-04-2009, 06:32 AM
|
#632
|
Rivet Master
1963 26' Overlander
Austin
, Texas
Join Date: Feb 2008
Posts: 2,640
|
Happy 4th!
Happy Fourth of July!
Wishing everyone a happy and safe Fourth of July. I hope everyone has a great day, and I also hope everyone takes a few moments to remember what this holiday means to our country, to remember those who have fought and died so that we can live with the Freedoms and Liberties that we now enjoy. I'd like to say a special thank-you to all of you who currently serve, or have served, in our nation's armed forces.
So, what have I been doing on the Airstream you might wonder? Well, I've been working on a new front door step, the old one seemed a bit small:
 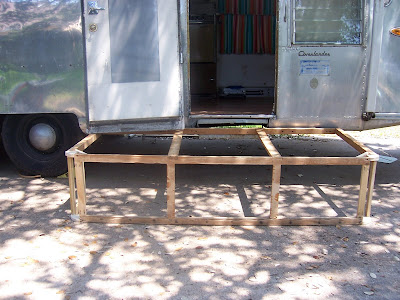
Ha! No, that's not really a door step. It's the frame for the street-side twin bed. The existing frame was in decent condition, so I just repaired one small weakness that had developed over the years, and then I cut out the front corners-- the ones that intrude into and define the walkway through the bedroom area-- and made them rounded. I was inspired to do this by the amazing work done by JP here on the AirForums.
After the frame was built out, I wrapped the bendy birch around the frame with lots of glue and some staples where you won't see them. Then a coat of stain to match the woodwork of the vanity and Sail in the bathroom.
Next I'll put on a few coats of poly, and move on to the street-side twin. That one will be much more difficult, since it has all of the drawers in it.
Again, hope everyone has a great Fourth!
|
|
|
|
|
07-04-2009, 06:53 AM
|
#633
|
Rivet Master
1960 33' Custom
Athens
, Georgia
Join Date: Jun 2005
Posts: 1,373
|
Looking good. (I thought that was a "King of Beers" for a moment).
Have a great day!
__________________
1960 Sovereign 33' Pacific Railroad Custom
|
|
|
|
|
07-04-2009, 09:58 AM
|
#634
|
|
Restorations done right
Commercial Member
1962 26' Overlander
1961 26' Overlander
Vintage Kin Owner
Currently Looking...
Baltimore
, Maryland
Join Date: Aug 2007
Posts: 5,545
|
are you going to clip the corners of your mattresses too?
|
|
|
|
|
07-04-2009, 10:25 AM
|
#635
|
Rivet Master
1963 26' Overlander
Austin
, Texas
Join Date: Feb 2008
Posts: 2,640
|
yes
|
|
|
|
|
07-05-2009, 06:24 AM
|
#636
|
Rivet Master
1963 26' Overlander
Austin
, Texas
Join Date: Feb 2008
Posts: 2,640
|
Sorry Frank, was walking out the door when I responded.
The mattress corners have already been clipped to match the new bed contour, and the new covers have also been trimmed along the same profile. In fact, my seamstress (aka Mom) is probably sewing the new mattress covers as I type this.
|
|
|
|
|
07-06-2009, 05:54 AM
|
#637
|
4 Rivet Member
1955 22' Flying Cloud
Polk City
, Iowa
Join Date: Jul 2008
Posts: 353
|
Nice work!
|
|
|
|
|
07-07-2009, 01:11 PM
|
#638
|
Rivet Master
1956 22' Safari
2015 27' Flying Cloud
Vintage Kin Owner
Conifer/Evergreen
, Colorado
Join Date: Feb 2002
Posts: 12,702
|
WOW Marcus! Where have I been the last year!!!! I knew you got a trailer some time ago, but for some reason I didn't notice that it was Terry & Marie's Goliath or that you had been documenting your restoration in this thread! Shame on me... 
Looks like you are making some tremendous progress..and doing a fine job at that! Looks great - love the interior whale tail, pretty cool!
Now that I've found this I'll be following along...atta' boy! Job well done!!!
Shari 
|
|
|
|
|
07-08-2009, 09:48 AM
|
#639
|
Rivet Master
1963 26' Overlander
Austin
, Texas
Join Date: Feb 2008
Posts: 2,640
|
Thanks for the kind words, Shari and Barry.
I'm having a lot of fun with this part of the renovation. I should be getting quite a bit of work done over the next week, and I'll do my best to keep the updates coming.
-Marcus
|
|
|
|
|
07-11-2009, 08:11 AM
|
#640
|
Rivet Master
1963 26' Overlander
Austin
, Texas
Join Date: Feb 2008
Posts: 2,640
|
And Now For Something Completely Different
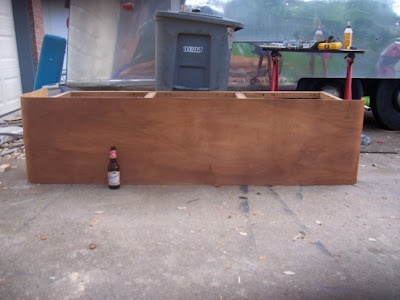
For those who don't know, my wife and I are expecting our second child in early September. This means the office becomes the nursery, and we had to make room for a small office in our living room. None of the desk/storage solutions on the market worked for our space and storage needs, so that means I had to custom-build a desk.
I decided that I could use this opportunity to practice for the Airstream furniture build-out and use the same construction techniques I intended to use on the twin beds (and, eventually, the galley furniture). I actually built the desk carcasses before the beds, but posted in reverse order since I didn't take any construction photos of the desk. But, here are some pictures of the finished product:
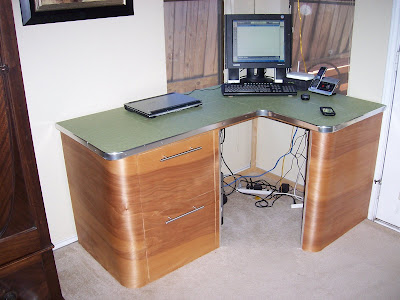 I think it turned out pretty nicely.

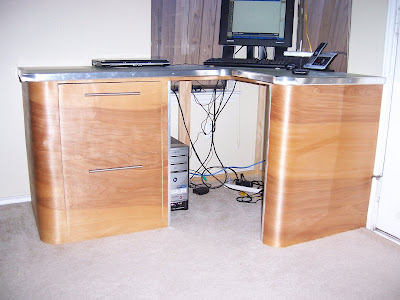
The desk top is made from Armstrong VCT tiles over 3/4" plywood, the kind of vinyl tiles you find in schools and hospitals and major industrial sites (same stuff I used for the top-flooring in the Airstream, just in a different color). This will be a great surface since it is nearly indestructible, and I have no doubt my near-two-year-old will have all sorts of ideas of how to treat it harshly.
The edge trim is fashioned from inexpensive aluminum commercial flooring "saddle" pieces. The pulls were leftover from another project, purchased at Ikea.
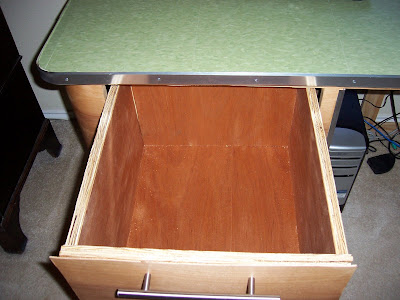
There is still some final trim work to do to cover up a few raw plywood edges with edge banding, but the functional parts are all complete, so now we can start clearing out the office and moving itin to this desk. The bottom drawer is a pull-out shelf for the printer/scanner.
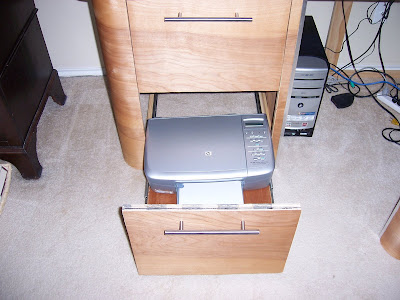
I didn't have time to trim the raw plywood edges, but I did take the time to line the shelf and drawer with mahogany veneer.
The top drawer is just a very deep drawer. I could set it up for file-folders, or use some organizing inserts so that it can hold paper, envelopes, stamps, pens, etc.
 I enjoyed the work, and it really helped me prep for the AS projects that came afterward.
-Marcus
|
|
|
|
|
|
|
Currently Active Users Viewing This Thread: 1 (0 members and 1 guests)
|
|
|
 Posting Rules
|
You may not post new threads
You may not post replies
You may not post attachments
You may not edit your posts
HTML code is Off
|
|
|
|

 Recent Discussions
 |
|
|
|
|
|
|
|
|
|
|
|
|
|
|
|
|
|
|
|
|
|


 Linear Mode

