 |
|
 03-17-2009, 09:19 AM
|
#541
|
Rivet Master 
1963 26' Overlander
Austin
, Texas
Join Date: Feb 2008
Posts: 2,640
|
My existing bumper locker lid is pretty beat up and discolored from usage and time, so I've started a discussion to find alternatives here for anyone who is interested:
http://www.airforums.com/forums/f381...ker-49329.html
-Marcus
|

|

|


|
03-29-2009, 10:23 PM
|
#542
|
Rivet Master
1963 26' Overlander
Austin
, Texas
Join Date: Feb 2008
Posts: 2,640
|
Heavy Metal Poisoning
So I continue on with my sheet metal work. I knew this was going to be tough, since this is the area where I had absolutely no experience. I must say that I enjoy riveting quite a bit, but this work is still very time-consuming.
I was able to get the curbside banana wrap drilled and clecoed in on my own, but then I needed a bucking partner to help with the riveting. Thank goodness my brother was able to stop by and help.
First we had to practice on a sheet of scrap:

We figured one pilot rivet was good enough, and moved on to the real thing. I ran the rivet gun on the outside:

While my brother operated the bucking bar on the inside:
 And we got about half of the curbside wrap done before we had to call it quits and eat some barbeque.
Later, with the help of my daughter, I was able to finish:

No, not really. That's her helping me with some quick polishing to take the gold off the rivets, and check to see if some of the worst corrosion on the exterior skin would come off. It will, but it will take a ton of work. Oh well, that's for another time.
In reality, my wife helped me buck in the rest of the curbside rivets for the banana wrap.
 
Now I just need to pin up the bottom of the wrap by riveting to the frame, and this side will be done.
On the streetside, I need to replace the old patch around the water heater with a buck-riveted one, since I have access to the backside for now. Sadly, I can't find a true "before" picture of this area, but here it is with water heater and old patch removed:

I cleaned up the old sealant by using a heat gun and a combination of MEK and gasoline. Well, I didn't actually combine the MEK and gasoline, nor did I apply the heat gun to either one, because who knows what kind of reaction THAT might set off. But at different times, I used some MEK, and then some gasoline, and then the heat gun, to remove as much of the old sealant as possible. Then I measured and cut a new patch out of .032 2024 T3 Alclad aluminum, and drilled and clecoed into place.

Then, once again, my wife helped me buck rivets into place.

And, the weekend was over. Where does the time go?
I'm getting close to completing this heavy metal work, and then it will finally be time to move inside for furniture bulding, plumbing, a little bit of electrical, and finishing work. It's about to get really exciting!
-Marcus
|
|
|
|
|
03-30-2009, 03:54 AM
|
#543
|
|
Site Team
1974 31' Sovereign
Ottawa
, ON
Join Date: May 2008
Posts: 11,219
|
Great photos, Marcus, especially of the little one. Thanks for sharing.
Aage
__________________
Courage is being scared to death, but saddling up anyway. ...John Wayne...........................
|
|
|
|
|
03-30-2009, 07:02 AM
|
#544
|
Rivet Master
1963 26' Overlander
Austin
, Texas
Join Date: Feb 2008
Posts: 2,640
|
Thanks Aage, the little one is my primary motivator to wrap up this back-half renovation. I desperately want to take her camping at the beach this Summer! 
-Marcus
|
|
|
|
|
03-30-2009, 10:16 AM
|
#545
|
|
Remember, Safety Third

1973 27' Overlander
Catfish Corners
, Georgia
Join Date: Oct 2004
Posts: 5,720
|
I have a question. What kind of BBQ goes best with Shiner? Oh, and the Airstream looks great. 
Jim
|
|
|
|
|
03-30-2009, 11:22 AM
|
#546
|
Rivet Master
1963 26' Overlander
Austin
, Texas
Join Date: Feb 2008
Posts: 2,640
|
Quote:
Originally Posted by Jim & Susan

I have a question. What kind of BBQ goes best with Shiner? Oh, and the Airstream looks great.
Jim |
Ha! I don't think there's a kind of BBQ that does NOT go well with Shiner. But, my personal favorite is of course brisket. For those who read my blog in addition to this thread, there is actually an EXTRA post that specifically talks about BBQ in great detail. Maybe I should copy it over here...
|
|
|
|
|
03-30-2009, 11:37 AM
|
#547
|
Rivet Master
1957 22' Caravanner
Port Hadlock
, Washington
Join Date: Dec 2008
Posts: 864
|
I love where I live now, but man do I miss BBQ from where you live, Marcus.
That was some great looking BBQ on your blog post.
cheers,
steve
|
|
|
|
|
03-30-2009, 12:05 PM
|
#548
|
Rivet Master
1963 26' Overlander
Austin
, Texas
Join Date: Feb 2008
Posts: 2,640
|
Thanks Steve, appreciate the kind words.
All you need to do is get yourself a pit, and find a butcher who will listen to you and cut the meat the way you tell him, and then you can have all you want, even in Washington State! 
My father-in-law used to run a side business selling BBQ pits, both backyard and trailer models. I was lucky enough that he gave me one along about the time I married his daughter, and to this day I refer to that pit as "The Dowry." 
If you liked that post on my blog, you should check out the thread I created about a year ago:
http://www.airforums.com/forums/f161...nty-41889.html
-Marcus
|
|
|
|
|
03-31-2009, 06:56 AM
|
#549
|
Rivet Master
1963 26' Overlander
Austin
, Texas
Join Date: Feb 2008
Posts: 2,640
|
Oh Hail! and BBQ Too!
I decided to go ahead and post my other blog post, for any who are interested:
This post will bring you a montage of images. I've gotten a fair amount of work done on the trailer over the past couple of weeks, but haven't had much time to update the blog. I've also been busy with some other things, like the BBQ I made for our families last weekend.
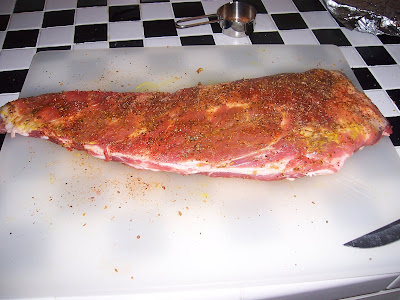
I decided to smoke a brisket, 3 racks of pork spare ribs, a couple of chickens, a couple of pork tenderloins, and a mess of sausage last Sunday. And when I say "I decided" what I mean is that my pregnant wife wanted it, so I made it.
Here is the brisket before going on the fire. Dry rub only, consisting of about 1 part black pepper, 1 part paprika, and 2 parts salt.

Start the fire with charcoal, then a few split oak logs, until the temperature stabilizes around 225:

Here's the brisket after a couple hours of smoke:

Then I prep the ribs, they'll go on the smoke for 3 hours, get pulled off the pit and go into the oven for 2 hours, and then back on the smoke for another 30 minutes up to an hour-- aka the 3-2-1 method.

These are pork spare ribs. I cut the top "steak" part off, and I cut the back flap off, and remove the membrane as well. Then I put a thin glaze of mustard on them, and top off with a dry rub that is 1/2 Montreal Steak Seasoning, and 1/2 Bolner's Fiesta Pork Rub.

Then they look like this:
After being in the smoke fore a couple of hours, they look like this, alongside the brisket of course:

You know they're getting there when the meat pulls back from the bone like that. They come off the fire, and it's time to prep the chickens. They get a similar treatment as the brisket, dry rub with salt, black pepper, and paprika:
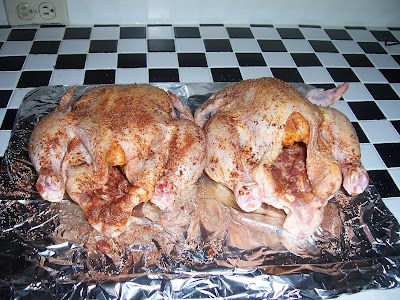
They'll spend a couple hours on the pit at 225, as I do not like my chicken medium rare.
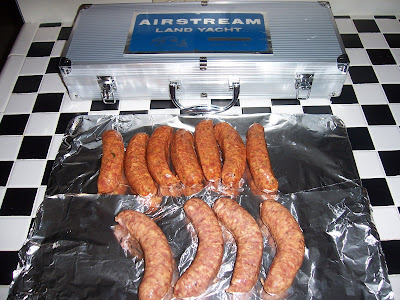
For about the last hour or so, I'll throw the sausage on the pit to warm up. It has already been cooked, but still it will pick up some of the smoke flavor from the pit. I'm also testing out the new grilling utensils I picked up at Christmas, they are all stainless steel and they come in a riveted aluminum case, reminds me of something else I think....

Okay, so here is some bad news-- although the food was delicious, I didn't have any time to take pictures after the slicing, since our families arrived and I had to feed them all. I know this was a tease, sorry about that, next time I promise I will deliver on the "after" pictures.
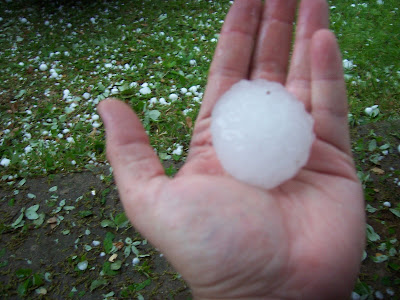
That is some bad news for you, but you can be assured that karma paid me back, because we had some bad news of our own on Wednesday evening. For those who don't know, Central Texas is pretty well-known for some crazy severe weather, especially in the Spring. Severe thunderstorms, impressive and terrifying electrical storms, extreme flash flooding, the occasional tornado, and... HAIL!
I think a sudden hail storm is high on the list of fears for just about every Airstreamer, and knowing the weather here in my hometown, I figured it was just a matter of time before I experienced it first-hand. So, 9 months into my Airstream ownership, I got to see it up close and personal. The storm hit areas of west and then north Austin around rush hour on Wednesday, and caused a lot of damage to mororists who were in route to their home after work, as well as cars already parked. I made it home just before the hailstorm, but did not get a chance to protect my Tahoe, or make any provisions for the Airstream either. Luckily, my wife who was in the convertible, was able to get off the highway and under some shelter, so no harm occurred to her or the car.
But the Tahoe got some pretty good dings on the hood, and the Airstream suffered dent damage to the upper aluminum skins on the street-side. The hail was golfball-sized and some even bigger, and it was coming in sideways at 30-45 mph, so I'm astonished that no windows were broken. The Fantastic Fan's cover was cracked, and the front streetside amber marker light was shattered. The dents in the skin are noticeable, but really not that horrible, so I count myself lucky. A couple of other friends' RVs lost all their skylights, one lost his AC, and they endured some major roof damage. So I feel for them, and feel blessed that the damage to mine was not worse.
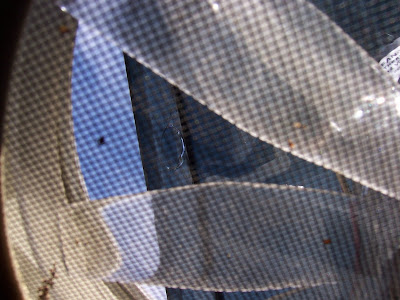
Oh, Hail! :
Look close, you can see the crack, through the screen, on the vent cover:
Dents in aluminum:

Shattered marker light:

All in all though, it could have been much worse, and I'm grateful that we got off as easily as we did.
|
|
|
|
|
04-01-2009, 07:24 AM
|
#550
|
4 Rivet Member 
1955 22' Flying Cloud
Polk City
, Iowa
Join Date: Jul 2008
Posts: 353
|
Wow! Living in Iowa, I am used to crazy weather too. We have hail, thunderstorms, tornadoes, you name it! I'm glad that the damage wasn't too bad for your beauty. This makes me want to jack my 20 x 30 back garage up 2.5 feet, and lay a couple of rows of concrete block so it can be inside.
|
|
|
|
|
04-16-2009, 08:19 PM
|
#551
|
Rivet Master
1963 26' Overlander
Austin
, Texas
Join Date: Feb 2008
Posts: 2,640
|
Haven't had much time to update this thread, sorry.
But that doesn't mean I haven't gotten some work done. After he found out that my Airstream had suffered some damage in a recent hail storm here in Austin, my buddy Frank sent me a lens cover for a marker light that was shattered by the hail. This is all that was left:
And then the package arrived from Frank's Trailer Works:
 And, installed:

Thanks Frank!
But then I just noticed this one is busted too, not sure how I missed it:

And also, the refrigerator vent cover has a couple of holes in it. I was so worried about the A/C and astradome, that I didn't notice these other issues. Oh well, there will always be more repairs and modifications to make.
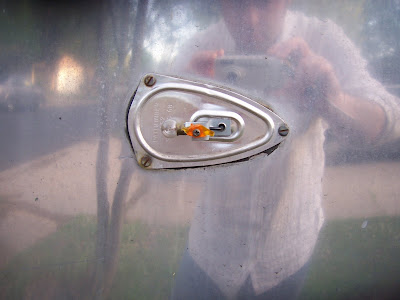
For my next modification, I decided to ditch the old hard-wired 110VAC 30A power cord and its associated gnarly, beat-up storage hatch door, and install a stainless steel Marinco power inlet instead.

I test-drilled a piece of scrap aluminum to see how my hole saw handled it, and to make sure it was the right size for the power inlet:


And then I had to do the most terrifying thing I have yet attempted during this long renovation-- I had to cut a gaping 2 3/8" hole through the exterior skin of my trailer!
First I polished the surface a bit since it will be more difficult to polish around when the inlet is installed. Then I drilled a small pilot hole from the outside and checked to make sure I liked the placement on the inside.

Then it was time to do the deed!

(I just realized how funny that picture looks!)
Then I drilled the 4 screw holes and attached the inlet:


And finally, with the last of the exterior skin work complete, it was time to move inside. I have been itching to get the insulation in, and the interior panels installed.

I salvaged as much of the old insulation as I could, and then I used the pink stuff to replace the old insulation that was too dirty and smelly to keep. I know a lot of folks use the Reflectix or other systems, but this was cheap and quick and easy for me, if a bit messy and scratchy...
Clecoed in place:

Then riveted:

And then the same process for the final, center panel:


And, Voila! The interior skins are back in, the shell is put together, and the trailer is finally truly roadworthy for the first time in about 4.5 months. I can't express how fantastic it feels finally to be putting things back into the trailer that have been out for so many months.
Frank says this is the point where so many restorers give up and try to sell their projects. I can certainly understand why.
Anybody want to buy an Airstream....
....ahhh, NO WAY! It's just now getting interesting!
-Marcus
|
|
|
|
|
04-16-2009, 08:28 PM
|
#552
|
|
Retired.
Currently Looking...
.
, At Large
Join Date: Jun 2003
Posts: 21,276
|
Okay, I guess, I'll put that amber lens back in my box 'o' stuff, and see if I have a red one. I don't think I do, but you never know.
Marcus, Fantastic has upgraded their screens, the new ones just snap in place, versus the multiple screws holding the one on in Goliath. You may be able to sweet talk them into sending you an upgrade when you call for a new cover.
__________________
Meddle not in the affairs of dragons, for you are crunchy, and taste good with ketchup.
Terry
|
|
|
|
|
04-16-2009, 08:33 PM
|
#553
|
Rivet Master
1963 26' Overlander
Austin
, Texas
Join Date: Feb 2008
Posts: 2,640
|
Heh... thanks Terry!
|
|
|
|
|
04-16-2009, 09:34 PM
|
#554
|
Rivet Master
1975 Argosy 26
1963 24' Tradewind
Seattle
, Washington
Join Date: Aug 2002
Posts: 2,341
|
Hey Marcus - p.m. me your address... I might have a newer (non -vintage) red one for ya!
Marc
|
|
|
|
|
04-17-2009, 08:29 AM
|
#555
|
Rivet Master
1963 26' Overlander
Austin
, Texas
Join Date: Feb 2008
Posts: 2,640
|
Thanks Marc, PM has been sent.
More hail on the way, shouldn't be as bad as the last time, I have my fingers crossed.
|
|
|
|
|
04-17-2009, 09:09 AM
|
#556
|
3 Rivet Member 
1958 26' Overlander
1991 29' Excella
auburn
, Alabama
Join Date: Jun 2008
Posts: 120
|
Moving along
I think how much I have to do to get Eugene to the point you are at. Congratulations and very nice work. ")
|
|
|
|
|
04-17-2009, 09:43 AM
|
#557
|
Rivet Master Airstream Dealer
1955 22' Flying Cloud
2021 27' Globetrotter
Gulfport
, Mississippi
Join Date: Mar 2006
Posts: 825
|
Quote:
Originally Posted by utee94
More hail on the way, shouldn't be as bad as the last time, I have my fingers crossed.
|
Hey Marcus, great progress! As you may remember, I puchased my Overlander from someone who lived in the Austin area. It has hail damage on the curb side only. I plan on doing a restoration starting next winter. The guys that do the dent removals here at the dealership where I work said they can remove the hail dents permanently (even when I polish again) if they can get to back of the dent. So, the plan is to remove the interior walls & give it a try. I don't know if it would be easier to replace the outer skins. We'll see...............
BTW, there is a specialty beer store about 3 blocks from my house. I've been giving them alot more business on the weekends since your thread started.
|
|
|
|
|
04-17-2009, 10:54 AM
|
#558
|
Rivet Master
1963 26' Overlander
Austin
, Texas
Join Date: Feb 2008
Posts: 2,640
|
Quote:
Originally Posted by navyeod
I think how much I have to do to get Eugene to the point you are at. Congratulations and very nice work. |
Ah yes, but the good news for you is that you have ANOTHER trailer to camp in now, while you spend quality time restoring the '58. So, when do you expect to pick up your third?
Rick,
I don't know if I'm up for the removal of the entire SS furniture plus all of the SS upper panels. Maybe in another few years. It does make me want to ensure that everything I put back into it is as modular as possible, with few or zero hidden fasteners, so that I can remove the things I need to, at whatever time I like.
The dents aren't that bad really, though I'm sure they'll become more noticeable once polished. Oh well, it is what it is!
-Marcus
|
|
|
|
|
04-17-2009, 11:00 AM
|
#559
|
|
Retired.
Currently Looking...
.
, At Large
Join Date: Jun 2003
Posts: 21,276
|
Quote:
Originally Posted by utee94
The dents aren't that bad really, though I'm sure they'll become more noticeable once polished. Oh well, it is what it is!
-Marcus |
I would leave the dents alone for now. I managed to get a pretty good dent in one of the end segments of our '74 during our trip out here. I left it alone, and let the sun heat it. The dent is now gone like it was never there, and it was a good-sized one.
__________________
Meddle not in the affairs of dragons, for you are crunchy, and taste good with ketchup.
Terry
|
|
|
|
|
04-17-2009, 11:13 AM
|
#560
|
Rivet Master Airstream Dealer
1955 22' Flying Cloud
2021 27' Globetrotter
Gulfport
, Mississippi
Join Date: Mar 2006
Posts: 825
|
Quote:
Originally Posted by utee94
Rick,
I don't know if I'm up for the removal of the entire SS furniture plus all of the SS upper panels. Maybe in another few years. It does make me want to ensure that everything I put back into it is as modular as possible, with few or zero hidden fasteners, so that I can remove the things I need to, at whatever time I like.
The dents aren't that bad really, though I'm sure they'll become more noticeable once polished. Oh well, it is what it is!
-Marcus |
I understand. At some point I'm sure you would like to go camping. If/when I do my Overlander, I would like to put in all new wire, both 110v & 12v, and new wood-the delanination is bad, and new Zolatone. Here's a picture of polished hail dents.
|
|
|
|
|
|
|
Currently Active Users Viewing This Thread: 1 (0 members and 1 guests)
|
|
|
| Thread Tools |
Search this Thread |
|
|
|
| Display Modes |
 Linear Mode Linear Mode
|
 Posting Rules
|
You may not post new threads
You may not post replies
You may not post attachments
You may not edit your posts
HTML code is Off
|
|
|
|

 Recent Discussions
 |
|
|
|
|
|
|
|
|
|
|
|
|
|
|
|
|
|
|
|
|
|


 TAC #MS-5 AIR #11800


