 |
|
 06-23-2013, 05:05 PM
|
#361
|
|
Site Team

1963 26' Overlander
Hollis
, New Hampshire
Join Date: Oct 2009
Posts: 2,647
|
Deb,
Yes I have heard that most installers won't do the glue down marmoleum to a coated floor. I have not heard they use luan, I'm pretty sure that when Colin's flooring people do it , they level the floor with Ardex and install right on top.
I believe it was Sheri (InsideOut) who alerted us to the problem with a coated floor.
On the other hand, I know Top here on the forums successfully laid a marmoleum floor over the West System.
You can still do the floating tiles, in cork or linoleum that do not require luan subfloor.
Thanks for the compliments! 
__________________
Shelly : TAC NH-6 | AIR 41359
Visit my blog!
Parts needed : Braund Antenna front tube fold down model!
|

|

|


|
06-23-2013, 05:14 PM
|
#362
|
|
Site Team
1963 26' Overlander
Hollis
, New Hampshire
Join Date: Oct 2009
Posts: 2,647
|
This was a stupid idea.....
These gutters were only used for a year or two, then Airstream smartened up and made the gutter longer so it didn't dump all the rain right on the edge of the window. Talk about a leak factory!  No wonder all my leaks are at the windows. There is a ton of sealant on all the window seams on this trailer.
I'm in a quandary, I really wanted to keep the outside of this trailer as original as possible but these are proving to be a nightmare. I'm actually considering replacing them with the earlier eyebrows. The eyebrow style was discontinued in 1963, so theoretically my trailer would have had them if it had been built earlier in the year. Okay, I'm justifying the decision a little.... ")
But the thought of removing them all and replacing with the ones VTS carries is daunting. Especially when I hear the white paint they come with is nearly impossible to remove. Is there a way to modify the original gutters? I have the tools but.....
What say you?
__________________
Shelly : TAC NH-6 | AIR 41359
Visit my blog!
Parts needed : Braund Antenna front tube fold down model!
|
|
|
|
|
06-23-2013, 08:26 PM
|
#363
|
Rivet Master 
2020 27' Globetrotter
1999 25' Safari
Somewhere
, Ohio
Join Date: Jul 2010
Posts: 861
|
Do you have a friend who does sheet metal work? I don't think it would be too hard if you had a sheet metal break. You'd probably have to make up a tool to make the sharply rounded front.
Having said that, I'd like to say that I really like the eyebrows, and you could probably make those yourself without a break. We're talking about fabricating a new one for over the door of our Bubble.
Deb
|
|
|
|
|
06-25-2013, 07:17 PM
|
#364
|
Rivet Master
1991 34' Excella
1963 26' Overlander
1961 26' Overlander
Central
, Mississippi
Join Date: Nov 2006
Posts: 5,919
|
Quote:
Originally Posted by reinergirl

These gutters were only used for a year or two, then Airstream smartened up and made the gutter longer so it didn't dump all the rain right on the edge of the window. Talk about a leak factory! No wonder all my leaks are at the windows. There is a ton of sealant on all the window seams on this trailer.
I'm in a quandary, I really wanted to keep the outside of this trailer as original as possible but these are proving to be a nightmare. I'm actually considering replacing them with the earlier eyebrows. The eyebrow style was discontinued in 1963, so theoretically my trailer would have had them if it had been built earlier in the year. Okay, I'm justifying the decision a little....
But the thought of removing them all and replacing with the ones VTS carries is daunting. Especially when I hear the white paint they come with is nearly impossible to remove. Is there a way to modify the original gutters? I have the tools but.....
What say you? |
How about a really long gutter made by ZipDee?
|
|
|
|
|
06-25-2013, 07:50 PM
|
#365
|
|
Always learning
1972 29' Ambassador
1962 19' Globetrotter
1951 21' Flying Cloud
Central
, Texas
Join Date: Oct 2010
Posts: 2,881
|
Quote:
Originally Posted by HiHoAgRV
How about a really long gutter made by ZipDee?
|
That's what I was thinking 
__________________
Lance
Work is never done, so take time to play!
|
|
|
|
|
06-25-2013, 08:57 PM
|
#366
|
|
Site Team
1963 26' Overlander
Hollis
, New Hampshire
Join Date: Oct 2009
Posts: 2,647
|
That's so not vintage friendly guys!!  Seriously, I'm sticking with the gutters and accepting the annual maintenance. Just want progress, which is difficult at 95 degrees and 90% humidity....and a severed polisher cord, but that's another story 
__________________
Shelly : TAC NH-6 | AIR 41359
Visit my blog!
Parts needed : Braund Antenna front tube fold down model!
|
|
|
|
|
06-25-2013, 09:07 PM
|
#367
|
|
Site Team
1963 26' Overlander
Hollis
, New Hampshire
Join Date: Oct 2009
Posts: 2,647
|
Any tips for a window set screw that won't budge! I've hit it with PBblaster numerous times , used every screwdriver I own, vice grips, even tried welding on a nut with JB weld. Tomorrow, I'm going to dremel a slot but I've had bad luck in the past with the screw fracturing, cross your fingers for me..... Chanting .... This window will not defeat me.....this window will not defeat me. 
__________________
Shelly : TAC NH-6 | AIR 41359
Visit my blog!
Parts needed : Braund Antenna front tube fold down model!
|
|
|
|
|
06-26-2013, 03:51 AM
|
#368
|
|
Restorations done right
Commercial Member
1962 26' Overlander
1961 26' Overlander
Vintage Kin Owner
Currently Looking...
Baltimore
, Maryland
Join Date: Aug 2007
Posts: 5,545
|
You are already planning to do my suggestion...
|
|
|
|
|
07-01-2013, 12:31 PM
|
#369
|
Rivet Master
1962 22' Safari
1957 22' Custom
1963 16' Bambi
Vacationland
, Maine
Join Date: Apr 2006
Posts: 956
|
Hi Shelly
Any luck with that window set screw? I am curious to know what worked.
Were you serious about giving up on stopping leaks? (floor looks fantastic by the way) Are you using the black tar like sealer used by Airstream ? I think I remember Frank Y. mentioning using this product. If not, what are you re-applying to the interior walls?
Thanks
Gary
__________________
wbcci #3363
VAC - Region 1 vintage Club rep
New England unit
|
|
|
|
|
07-01-2013, 09:21 PM
|
#370
|
Rivet Master
1991 34' Excella
1963 26' Overlander
1961 26' Overlander
Central
, Mississippi
Join Date: Nov 2006
Posts: 5,919
|
Quote:
Originally Posted by reinergirl
That's so not vintage friendly guys!! Seriously, I'm sticking with the gutters and accepting the annual maintenance... |
Oh dear, I'm completely torn up now. My awnings were installed 41 years ago and they don't qualify as Vintage? What to do, what to do...? The trailer was only 9 years old at the time...2014 and back up 9= 2005, that qualifies as new?
Sobbing into a disturbed sleep...;0)
|
|
|
|
|
07-02-2013, 10:58 AM
|
#371
|
Rivet Master
1963 22' Safari
2020 27' Globetrotter
State of
, Washington
Join Date: Jul 2007
Posts: 2,512
|
That miserable window hinge set screw. Mine were one with the casting, so here is what I did. I took a small flat blade screw driver, set it next to the head of the screw, tapped it sideways a couple times with a hammer (not hard) and then to the other side the opposite direction. That motion moved things around just enough that the screw came loose. I did replace the screw with a new stainless screw and they've held just fine.
__________________
Scott & Megan
VAC LIBRARIAN WBCCI 8671
1963 Safari from the 1963-64 Around the World Caravan
|
|
|
|
|
07-02-2013, 01:28 PM
|
#372
|
|
Site Team
1963 26' Overlander
Hollis
, New Hampshire
Join Date: Oct 2009
Posts: 2,647
|
Quote:
Originally Posted by goransons
That miserable window hinge set screw. Mine were one with the casting, so here is what I did. I took a small flat blade screw driver, set it next to the head of the screw, tapped it sideways a couple times with a hammer (not hard) and then to the other side the opposite direction. That motion moved things around just enough that the screw came loose. I did replace the screw with a new stainless screw and they've held just fine.
|
Scott!
THANK YOU THANK YOU, You made my day! No ....my week and maybe my month! See how easy I am to please?
IT WORKED! like magic  I didn't have a metal dremel wheel to cut a slot and I kept putting off going to one, plus we've had rain straight for like a week. I saw your post and the sun just briefly came out so I ran outside to try and it was like 30 seconds worth of work! This just awesome!
__________________
Shelly : TAC NH-6 | AIR 41359
Visit my blog!
Parts needed : Braund Antenna front tube fold down model!
|
|
|
|
|
07-02-2013, 01:38 PM
|
#373
|
|
Site Team
1963 26' Overlander
Hollis
, New Hampshire
Join Date: Oct 2009
Posts: 2,647
|
Quote:
Originally Posted by safari62
Hi Shelly
Any luck with that window set screw? I am curious to know what worked.
Were you serious about giving up on stopping leaks? (floor looks fantastic by the way) Are you using the black tar like sealer used by Airstream ? I think I remember Frank Y. mentioning using this product. If not, what are you re-applying to the interior walls?
Thanks
Gary
|
See post above!
I'm not giving up! I have sealed 90% of the interior , the seams and the rivet heads with blobs of Trempro 635 or 3m 540 . Still have some left to do and then I'm going to pull apart all the windows one by one til they are leakproof. That's where most of the leaks are. I'm currently working on all the compartment doors that I've removed, taken apart, re insulated, cleaned up and will be riveting them back on as soon as the monsoons stop
Franks black stuff I am using where I can't get the caulking tube in , like at the narrow spots next to the windows, the vertical sides mostly.
__________________
Shelly : TAC NH-6 | AIR 41359
Visit my blog!
Parts needed : Braund Antenna front tube fold down model!
|
|
|
|
|
07-02-2013, 01:46 PM
|
#374
|
|
Site Team
1963 26' Overlander
Hollis
, New Hampshire
Join Date: Oct 2009
Posts: 2,647
|
Quote:
Originally Posted by HiHoAgRV
Oh dear, I'm completely torn up now. My awnings were installed 41 years ago and they don't qualify as Vintage? What to do, what to do...? The trailer was only 9 years old at the time...2014 and back up 9= 2005, that qualifies as new?
Sobbing into a disturbed sleep...;0)
|
Seriously, I had no idea they made those back then! Sorry about the lost sleep .
All joking aside, I love the look of vintage rope and pulley system and properly set up they can withstand rain and wind much better. I've seen serious damage to horse trailers done by freak winds and pull out awnings. Even seen then come apart while traveling 
Maybe I can use the awning rail to slide in a big gutter? 
__________________
Shelly : TAC NH-6 | AIR 41359
Visit my blog!
Parts needed : Braund Antenna front tube fold down model!
|
|
|
|
|
07-02-2013, 09:22 PM
|
#375
|
Rivet Master
1991 34' Excella
1963 26' Overlander
1961 26' Overlander
Central
, Mississippi
Join Date: Nov 2006
Posts: 5,919
|
Quote:
Originally Posted by reinergirl
Seriously, I had no idea they made those back then! Sorry about the lost sleep .
All joking aside, I love the look of vintage rope and pulley system and properly set up they can withstand rain and wind much better. I've seen serious damage to horse trailers done by freak winds and pull out awnings. Even seen then come apart while traveling
Maybe I can use the awning rail to slide in a big gutter? |
I plan on a rope and pole for the main awning...it seems the one installed in1972 became airborne when the PO towed with out locking it down, imagine that. The street an rear will get new canvas...they don't flop in the wind.
Now I can get some sleep...
|
|
|
|
|
07-08-2013, 02:39 PM
|
#376
|
|
Site Team
1963 26' Overlander
Hollis
, New Hampshire
Join Date: Oct 2009
Posts: 2,647
|
Fast question for u all! I had pulled one of my compartment doors to clean it up and re insulate, I am about to reinstall it .....pulled out the VTS riveting kit, and all of the rivets are too big. They were supposed to send 1/8 and 5/32 but all I got was 5/32.
Am I supposed to redrill all the holes to be 5/32? I thought that since this is non structural I would just use 1/8 inch buck rivets with my hand puller (yoke is big enough)
Any strong feelings one way or the other...do I redrill and make them bigger or go buy some 1/8 inch rivets at Fastenal? First time buck riveting and I'm over thinking it probably
__________________
Shelly : TAC NH-6 | AIR 41359
Visit my blog!
Parts needed : Braund Antenna front tube fold down model!
|
|
|
|
|
07-08-2013, 03:04 PM
|
#377
|
Rivet Master
1959 26' Overlander
Western
, Massachusetts
Join Date: Sep 2005
Posts: 1,468
|
Unless my math is wrong, you're only drilling the hole 0.03" larger to use the 5/32.
If it were me, I wouldn't waste the gas going to Fastenal. Have some fun riveting instead!
|
|
|
|
|
07-08-2013, 05:05 PM
|
#378
|
|
Site Team
1963 26' Overlander
Hollis
, New Hampshire
Join Date: Oct 2009
Posts: 2,647
|
Thanks John! Told you I was over thinking it!
__________________
Shelly : TAC NH-6 | AIR 41359
Visit my blog!
Parts needed : Braund Antenna front tube fold down model!
|
|
|
|
|
08-08-2013, 06:52 PM
|
#379
|
|
Site Team
1963 26' Overlander
Hollis
, New Hampshire
Join Date: Oct 2009
Posts: 2,647
|
New life for the compartment doors
My compartment doors all leaked, big surprise.  So I decided while I have the skins out to remove them from the trailer and clean them up.
And there was plenty of cleaning to do on the frame, I used both Citrastrip and mineral spirits (no - not at the same time!) to clean off the gunk. It took a while. That is an understatement. I used a lot of good old fashioned hand work.

I drilled out the pop rivets on the sides of the door and revealed the interior, thankfully minus any skeletons. There was a surprising bit of corrosion, due to water intrusion I'm assuming. I did some fairly serious grinding with a dremel to get rid of it. I contemplated getting a glass bead blaster like this but didn't know if it would work. Anyone use one of these?

Re-insulated with Prodex using strips of Prodex to maintain an airspace. I just used Tremco 635 as an adhesive, my intention was to use 3m 4200 adhesive but it runs $30 a caulking tube and has to be used up within a day or so. Still planning on using it for the rest of the insulation but not worth it for this application.

Two layers of Prodex because I am an avid admirer of overkill!
Test fitting
Instead of Tremco 635 or butyl tape I decided to use Eternabond to attach the compartment frame to the airstream skin. I figured in tape form it would be cleanup friendly, and it's praised highly in other RV forums. Plus if it doesn't work out it's one of the few areas I could uninstall and install without removing the interior skins again!
Clean frame, ready to go with Eternabond already applied and holes punched with a bamboo skewer. This stuff is STICKY.
I butt cut the corner seams horizontally as a vertical seam is more likely to leak.
Ready to rivet, actually I discovered I didn't have 1/8 inch rivets so I drilled them all out to 5/32 and replaced the gold clecos with the black ones. Thank goodness I actually test fit this before adding the Eternabond!
Did I mention this Eternabond stuff is sticky and that it never really hardens or forms a skin like Tremco?
I cut away any "squeeze out" with my plastic razor blades the remaining Eternabond would stick to itself (reminds me of the postertack that you use on your walls to hang posters without damage) so I used little balls of it to clean off the residue.
With some work I was able to get a good clean edge. I have my suspicions that it's going to catch and hold dirt, but it was leak proof in the last few down pours!
We'll see - I'll report back later on how well it's doing. I intend to use it to install my fantastic fans, but in that application it will be covered by 4 inch wide aluminum Eternabond tape so "squeeze out" removal won't be an issue. I liked it well enough that I'll use it for the rest of the compartment doors
I used this hand squeezer for buck rivets from VTS to buck rivet the compartment door in. You'll need to buy both squeezer dies here and here. Don't be like me and buy only one die, the shipping on the second little piece is a killer!

As usual, it comes with no instructions but I assure you the dies do fit into the holes on the "c" of the puller, it's just a tight fit! Here they are just barely pushed in. The cupped piece goes on the tip of the "c" while the flush piece goes closest to the handle. Put a piece of blue tape on the cupped end, it won't slip off the head as easily and won't transfer any marks on the die to the pulled rivet. You'll have to replace the tape frequently.

The pull can be adjusted by turning the bottom piece (that the flush die sits into) like a screw. This makes all your pulls the same distance. When my squeezer came that piece was really stuck, I had to clamp the squeezer into a vise, lubricate it and use pliers to get it moving. Some instructions would have really helped, especially since I didn't realize it was adjustable... I thought you just pulled it until you were happy with the tail ....thank god for youtube.
Anyway, with a little help from my daughter I got the compartment frame buck riveted on. It was a little tricky because the aluminum extrusion got in the way of the rivets expanding but it seems to be on firmly, definitely was a two person job. She put the squeezer die on the head and held it there while I squeezed. It was also tricky to get into position, tight fit. Once you have it on you leave the squeezer in place and just slide it over to the next rivet. Hope that makes sense, it will once you realize how hard it is to get the squeezer into a position where it can squeeze. That's gonna take the cake for the most incomprehensible sentence I've written since I started this blog!
One last little note, the rivets that hold the compartment door hinge on are something different. They are tubular rivets DF11-*-ST rivets. I did manage to track down a replacement, for anyone who is a purist you can find them at Hanson Rivet and Supply Company. The"*" is the length in 32nds. I just ended up replacing them with pop rivets because I didn't want to buy another set of dies for the rivet squeezers.
Incidentally, these rivets make a good replacement for the tubular steel rivets on the arms of the jalousie windows. If I ever do pull that window apart, (which if you know me, you know I will! ) I probably will use them there. The steel ones are an rusty eyesore (even if you hit them with aluminum paint like the PO did, ).
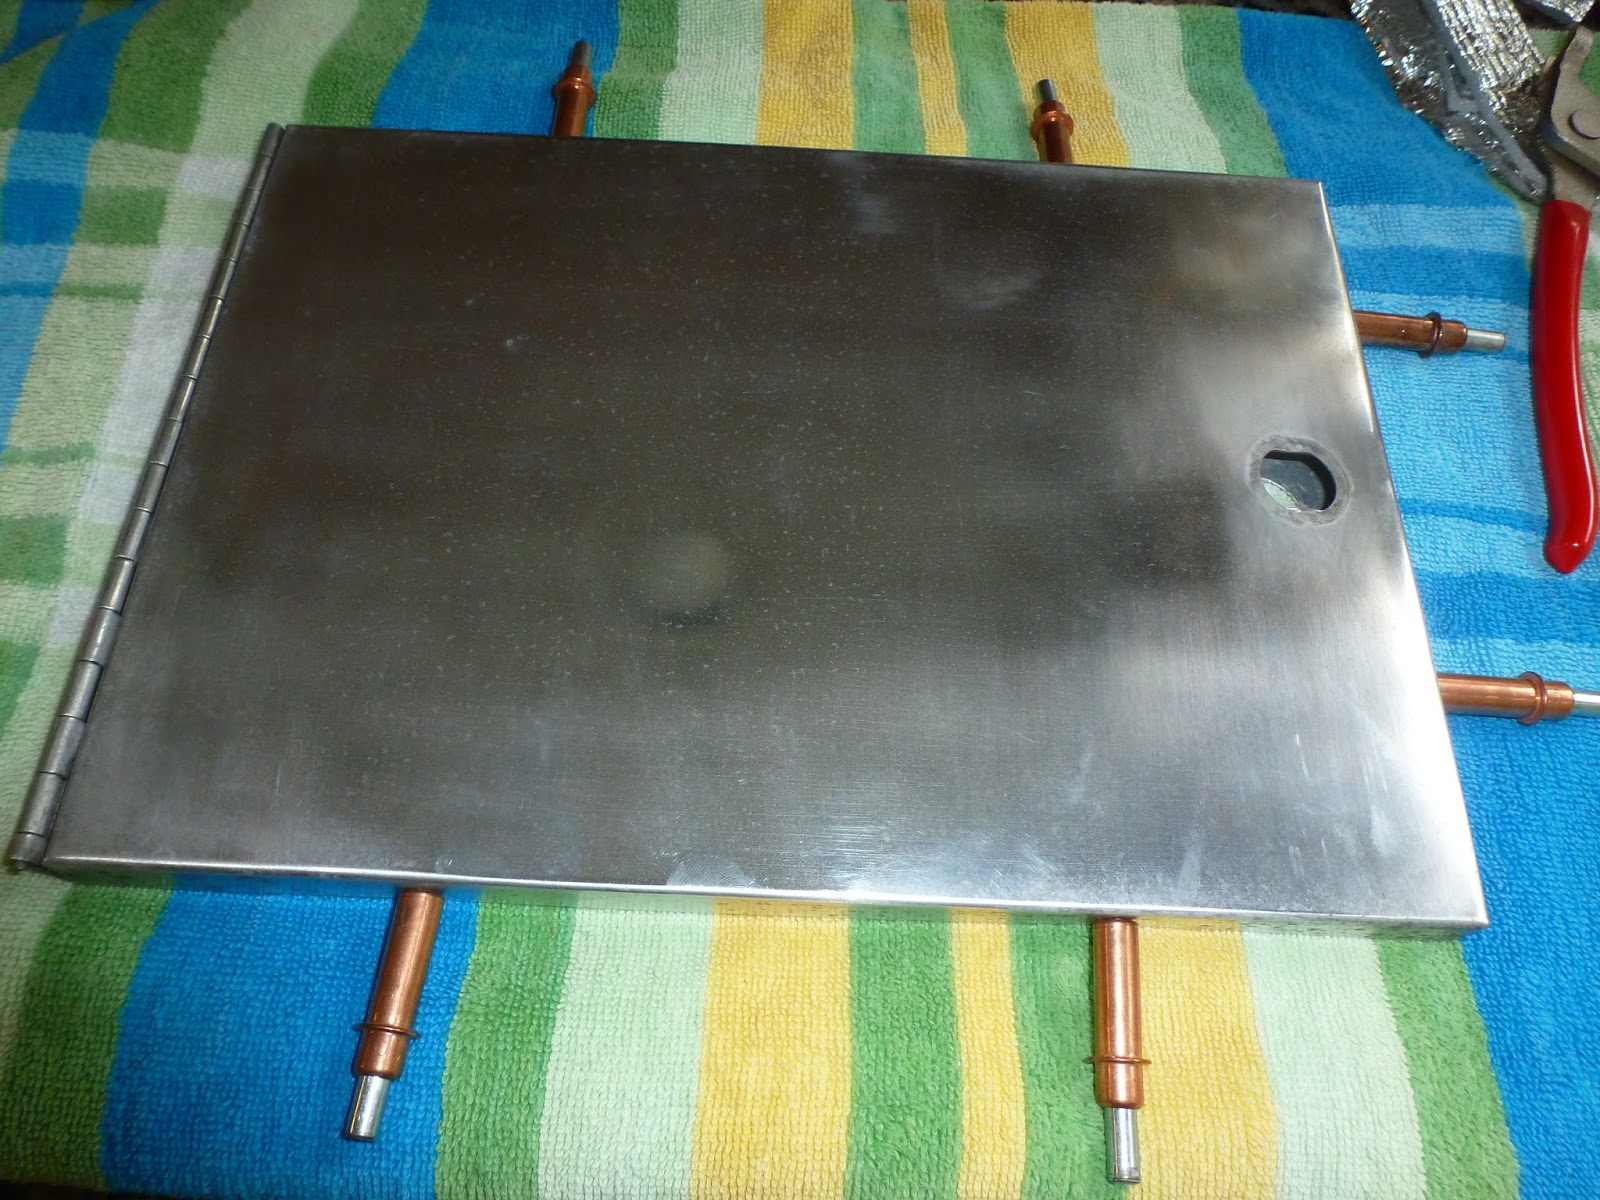
The one on the bottom right is the tubular rivet, I wish I had thought to take a picture of the other side. The post is hollow and the die rolls back the edges. I'll add a picture when I pull the next compartment.
Here's the final picture, note the lock because that's my next post! I still have the final polishing to be done and the aluminum gutter..... baby steps, people.
__________________
Shelly : TAC NH-6 | AIR 41359
Visit my blog!
Parts needed : Braund Antenna front tube fold down model!
|
|
|
|
|
08-09-2013, 09:55 AM
|
#380
|
Rivet Master
1971 21' Globetrotter
Currently Looking...
Currently Looking...
Currently Looking...
Arvada
, Colorado
Join Date: May 2006
Posts: 3,530
|
Well done. Sand blasting corrosion from aluminum works quite well, better then sanding because it gets the small pits. I have never used that type of siphon feed blaster as I have a pressure pot style. I do have a small siphon feed that looks like a paint gun and it works well for small areas though. Be aware that you need a large air compressor to support a sand blaster.
You can also get a pneumatic version of your hand squeeze but they are quite expensive. I brought one to one of the resto rallies once to show people what was available if you had an unlimited tooling fund.
|
|
|
|
|
|
|
Currently Active Users Viewing This Thread: 1 (0 members and 1 guests)
|
|
|
 Posting Rules
|
You may not post new threads
You may not post replies
You may not post attachments
You may not edit your posts
HTML code is Off
|
|
|
|

 Recent Discussions
 |
|
|
|
|
|
|
|
|
|
|
|
|
|
|
|
|
|
|
|
|
|


 Linear Mode

