 |
|
 04-16-2007, 08:06 AM
|
#81
|
Rivet Master 
1973 27' Overlander
Currently Looking...
Jupiter
, Florida
Join Date: Apr 2006
Posts: 2,062
|
I didn't mean to change focus of your post, I am provisioning for batteries, inverter, generator inputs etc.. now also..
I went with used AGM-Gels (hybrid) tele-comm batteries that are 99 pounds & 118AH rated at 8-hour discharge. I plan on providing room for four with a pair just inboard of each wheel well - but to begin it will be one on each side. The new axles are a 500 pound increase each over originals and the batteries weight will be centered between axles. I am fabricating a weight spreader from mild-iron angle stock that will keep battery weight on frame rails and the spars - I am hesitant to allow long term weight on any wooden framework & hope you re-examine the battery location, I almost want to build a tray under the floor, welded cross-braces between frame rails with flooring cut away allowing batteries to be split-level..
Attachment is herding batteries into root-celler window at -20F. Whatever battery you chose remember it will have to be handled more often than we could hope for and the 8D size will be a challenge even with two people..
I have a Univolt 80A charger that w/o the charge wizard provides near-perfect float voltage for these batteries, even using the gel-charge-wizard on these would be out of spec since the GCW only lowers the lead-acid profile by 4/10ths of a volt. The inverter I have is also a charger which I plan to use for the maintenance charging only, a slightly higher voltage charge that helps keep sulphation down. These batteries can accept a C/4 charge rate so 80A divided by two is spot on...
__________________
The days are short and the night is long and the stars go tumbling by.. . ~Airstream~
|

|

|


|
04-16-2007, 03:36 PM
|
#82
|
3 Rivet Member 
1964 26' Overlander
Alameda
, California
Join Date: Sep 2006
Posts: 161
|
Oh, I'm working on the electrical too, just wanted to post a paint update too.
You definitely have me thinking about the battery again. You're right about having to handle it, and about putting that much weight on wooden construction. Trouble is, there isn't much unused floorspace in front of the axles in my layout - the fridge is there on one side, and I just put the water heater on the other side.
Perhaps a smaller battery mounted at the front under the gaucho, right on the A-frame would be a better idea. The only problem there is cabling, but I could still put the inverter next to the battery under there too. And there's additional hitch weight, but I think that's manageable. The one place I know it won't be is the original battery location, right at the back.
What's the final word on venting for AGM batteries? I know that gel-cels were originally allowed without venting in passenger compartments but after some bad experiences were then required to be vented. But so far as I can tell, AGMs are allowed in passenger compartments without venting, which would definitely be convenient.
|
|
|
|
|
04-16-2007, 06:12 PM
|
#83
|
Rivet Master
1973 27' Overlander
Currently Looking...
Jupiter
, Florida
Join Date: Apr 2006
Posts: 2,062
|
I seem to have written a book - I'm not lecturing, really, but presenting what little I know 
Good point about venting - as far as I know code demands all storage batteries to be provided with X sq inch vent. When I explained Hydrogen and Sulphuric mists from deep-cycle batteries the woman in my life said find another way so I went with AGM-gells. But some provision has to be designed in for cooling, heat is an enemy to sealed batteries..
Look at the Mazda Miata battery installation for example - battery in sealed box inside trunk with flexible rubber hose as vent. But they have a smart charger designed for a custom made battery, a charger that will not allow the battery a chance to heat up from charging makes it last.
With sealed lead acid, AGM, Gels... there are known voltage-temperature threshold at/above produces hydrogen; the batteries pictured have internal catalysts which claims 93% or somesuch water recycling yet ANY charging when battery temperature is >107F has gas production with probable venting. Vent a SLA and water gets lost so it "is* to avoid.
I want to stay in the no-gassing zone with these batteries of mine - attention to details like temperature compensated charging or automatic overtemperature shutdown could make these AGMs ~almost~ vent-free;
I've seen huge banks of storage batteries where I worked vented by a small 24/7 squirrel cage fan, just maintain positive air pressure and vent from highest point of area - hydrogen zooms up through the air like gold plummets down through water...
In short I haven't figured it out all the way yet.
Tube through wheel well wall, or a flex tube that chases up beside sewer vent stack, or a dangling one exiting belly skins like a water drain. This may be the point where exiting shell similar to furnace exhaust is needed, use a marine deck fitting.
Your thoughts?
__________________
The days are short and the night is long and the stars go tumbling by.. . ~Airstream~
|
|
|
|
|
05-01-2007, 09:03 PM
|
#84
|
3 Rivet Member
1964 26' Overlander
Alameda
, California
Join Date: Sep 2006
Posts: 161
|
On the electrical front I was looking at the 4D AGMs at West Marine thoughtfully, still haven't bought any battery yet though. But I might wind up with a group 27 or 31 battery.
I think for venting I'll get a plastic battery box and attach my own vent tube that goes to the outside which should work fine. Having read around it seems true that even AGMs should be vented just in case, although the chance of hydrogen production is much much smaller than with a flooded or gel battery. The kind of vent I used for the fresh water tank would probably serve for the battery too - it's a chrome fuel-line vent from West Marine. (Obviously, a separate vent!)
I went on a bit of a shopping spree last night and bought a WFCO 9800 55A converter, which seems to have a good output for an AGM battery and unlike the Intellipower chargers does not automatically equalize, just has a constant float voltage, which I think is better for AGM batteries.
Also bought new propane regulator & hoses, a new toilet, a new water pump & strainer, and a water pressure regulator. Once I have the parts in hand I'll make an order for the fittings and PEX tubing for the plumbing system, I think I'm going to use Flair-it.
I think I'm going to do most of the plumbing before I buy water tanks, because custom tanks are going to be quite expensive. I can test running the system from (and into) buckets of water until then (very high-tech).
I also need to get on with the propane plumbing, which thankfully will be a bit simpler than the original - with the new layout, there are no propane appliances behind the axles - everything is up front: water heater, stove, cooker, fridge, lamp.
Also on my to-buy list is a Blue Sea AC/DC distribution panel (10x the cost of a fuse panel... but very shiny).
I started looking at cheaper inverters. The Xantrex RS400 is a 400W (800W peak) true-sine-wave inverter that's only about $200-250, and I could easily wire it into a specific set of outlets. That'd leave more money for a good propane-fuelled Yamaha generator while still letting me run a good set of electronics off the batteries when no high-power loads are needed. Well, I'm still thinking about that, but it's an appealing alternative to a much more expensive inverter/charger.
I'm moving soon, to a new house in San Leandro close to where I'm currently storing the trailer, but the good part is that it has a driveway I could get the Airstream into (unlike my current apartment's driveway) and a garage - and a landlord who doesn't mind this idea at all. So, since I'm mostly done with very noisy tasks (with the possible exception of replacing the belly skin and putting in new tanks... and making cabinets... and probably some other things my new neighbours won't like) I'm probably going to be out of the warehouse pretty soon. As soon as I do that I'll have to check for leaks and make any final patches that need doing on the outside - there's one large patch that definitely needs to go on, where the old water heater was.
I'm also debating the awning again. It's a Carefree awning, and the back and street-side awning supports are really ugly, so I doubt I'll put them back on. But the curb-side awning is just mildly ugly, and that mostly because it's anodized. And it sure would be nice to have some shade, and awnings are pretty expensive. This one needs new fabric of course.
I'm wondering if I could polish off that anodized finish (to then begin the instant oxidation of the underlying metal, no doubt) and like it better. But I feel like I'd better decide that soon, as re-attaching the awning will be pretty noisy & intrusive.
In terms of actual work, having primed the interior I then painted it, although it may need one or two more coats. I was originally intending to use Devflex DTM primer, but the ICI paint stores in my area were out of stock or closed, and time ticking onward, I wound up using Glidden Gripper primer which seems to have worked pretty well. For a topcoat I'm using Glidden Evermore Satin Exterior, which was highly-rated by Consumer Reports. It's very sticky though, a little difficult to apply smoothly, and coverage in the saturated colour I chose for the walls wasn't very good over white primer, but putting on 3-4 coats seems to have worked well.
For whatever reason or combination of reasons, even on flat aluminium this combination has a very slight texture to it, a little coarser than what I'd describe as "eggshell" but significantly smoother than Zolatone. I have yet to really examine any of the surfaces that I didn't sand (the ones that will be inside cabinets) although since the colour I chose is quite, um, bold, as one of my friends helping me said, "I think it'll take quite a while before anyone notices anything other than the colour". Well, true, but I think I'm still glad I sanded since I'd notice the texture.
The wall colour is quite alarming. Restoration purists may wish to avert their eyes. Now, we all know of course that most of the wall colour will be behind cabinets so I hope this isn't too terrifying. The ceiling colour is a very pale green which isn't very apparent except in person. I have a few photos but they're from Saturday, before the 2nd/3rd/4th (in places) coats of the saturated colour, I hope to get some better photos when I stop by tonight. Also, in these photos the line between the ceiling and wall colour is not masked (I was still painting the ceiling at this point), it'll be a sharp line along the panel seam, not a fuzzy line.
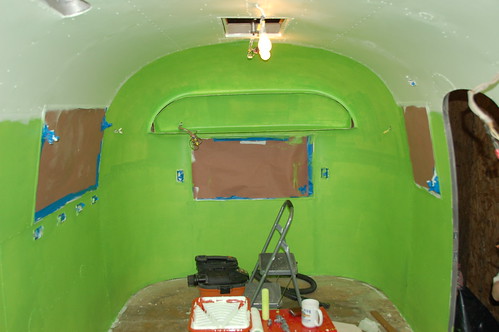   
Scary! Hey, I like bold colours, what can I say.
The colour rendition in these photos isn't perfect either (as you would expect the camera has a little trouble with white balance when EVERYTHING IS GREEN). I should have more/better photos of it with better paint coverage tonight.
|
|
|
|
|
05-08-2007, 10:15 AM
|
#85
|
3 Rivet Member
1964 26' Overlander
Alameda
, California
Join Date: Sep 2006
Posts: 161
|
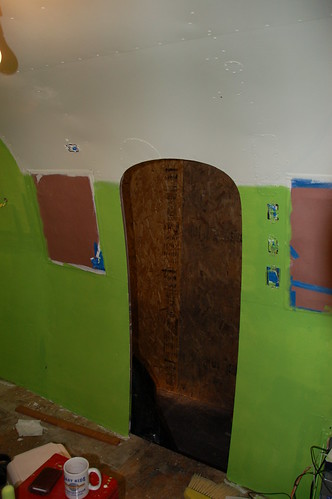
OK, some better photos after the 2nd/3rd/4th coats and removal of the masking:
     
I need to do some touching up and scraping around the window frames still - if I was smart, I'd have removed the window surrounds while I was replacing the rivets in them, and stripped them off the window, then painted, then replaced them - but I'm not.
I'm really happy about the replacement of all visible rivets with Olympic rivets before painting though. The difference is very noticeable in those few places (which will be under cabinets) where I used conventional pop rivets with the hole in the head.
I'm also happy about having decided to route cables under the skin rather than in channel on top, even though that meant adding a lot of little patches. The patches look very natural and don't really catch your eye the way the channel would have, even painted. If you look at the 2nd-to-last photo there of the ceiling, you can see probably half a dozen patches but they don't really pop out at you.
I'll have to see how it looks with the cabinets back, but so far I really like the two-tone colour scheme too. I didn't really think of this when I picked the colours, but it's actually quite a 50s/60s style, e.g. on this (model) 1959 car:

Probably it would have been more original to do the roof in cream for that effect, though.
I'm trying to figure out what to do with the bathroom now; originally I was planning on painting the bathtub and the wall around it (which is part of the shower) with Whitecote, but now I'm thinking that the contrast between the very-pale-green ceiling and bright white paint would be unpleasant. So plan B may be still to paint the bathtub in white, but to paint the wall in a dark green or dark yellow, probably with the POR-15 Hardnose paint (which seems to be the same thing as Whitecote, just tinted). That could be a little dark when you're in the shower, but I was thinking that some waterproof LED lighting would help with that.
|
|
|
|
|
05-08-2007, 11:04 AM
|
#86
|
Rivet Master
1967 24' Tradewind
Alameda
, California
Join Date: Feb 2004
Posts: 1,570
|
nice
Nice smoooooth finish. All that prep was worth it.
__________________
"Let's look Death in the face and say, 'Whatever man.'"
~ Hurley
ingrid
1967 24' Tradewind #19104 ~ Forums #4449
|
|
|
|
|
05-08-2007, 11:53 AM
|
#87
|
Rivet Master
1973 27' Overlander
Currently Looking...
Jupiter
, Florida
Join Date: Apr 2006
Posts: 2,062
|
Browsed back to this to for second look, and yup, reminds me of a DC3 cargo plane interior, no stretch of the imagination since zinc-chromate primer pistachio neon green is such a close match!
__________________
The days are short and the night is long and the stars go tumbling by.. . ~Airstream~
|
|
|
|
|
05-08-2007, 12:31 PM
|
#88
|
3 Rivet Member
1964 26' Overlander
Alameda
, California
Join Date: Sep 2006
Posts: 161
|
Well that's obviously the exact look I was going for! I think I've only seen that finish on the outside of unpainted aircraft...
A friend said it was like an upside-down, inside-out caterpillar, which I thought was a nice image.
As for the surface prep, I didn't take a very close look yesterday at the difference between the areas where I painted over Zolatone and where I painted bare metal or sanded Zolatone, but I suspect that the difference isn't going to be very noticeable in the final equation. Something in either the primer or the surface coat or the rollers I used or some combination of these things gave the surface a sort of very-slightly-bumpy eggshell finish. Still, I do like the way it looks, but it's not the perfectly smooth finish I was expecting in places where I'd sanded or over new flat aluminium.
I'll try taking some close-up photos of the areas where I sanded and where I painted over Zolatone for comparison, but I wouldn't be surprised if there's no visible difference.
|
|
|
|
|
05-08-2007, 01:43 PM
|
#89
|
Rivet Master
1973 27' Overlander
Currently Looking...
Jupiter
, Florida
Join Date: Apr 2006
Posts: 2,062
|
oh yes - reminds me of something off the LOST TV show, "lookit what we found in jungle, an upside-down, inside-out caterpillar thats gonna get us off the Island..." Good job JD !
No knocks - this is for next time.... For smoother finishes wetting the roller to slightly damp core before paint touches it helps, as does small amount of thinner mixed into paint, whether water of mineral spirits etc - also important to keep container closed and just dispense it as needed to keep it from thickening in can from exposure, and cleaning roller tray & starting over when edges get beyond gummy towards dry since that large surface area really wicks away solvent... In Minnesota winters the air is so dry you can glue the brush to trimwork indoors if you're not carefull, the paint never has a chance to level... All tricks I used on frame painting - I could not believe how far a quart of PO-15 stretched with 3% POR-15 thinner added (2 tblspns, one per jar decanted half-qts into)
__________________
The days are short and the night is long and the stars go tumbling by.. . ~Airstream~
|
|
|
|
|
06-03-2007, 01:08 AM
|
#90
|
3 Rivet Member
1964 26' Overlander
Alameda
, California
Join Date: Sep 2006
Posts: 161
|
Advice I will take to heart on the frame painting, which is one the next tasks, and informed advice is always welcome!
Today I moved the trailer from the warehouse it's been living in to my house - the warehouse has finished building out their storage space, and wanted to up my rent from $300 to $500 and move me into a different space. I said no thanks, since I just moved to a new house where I can put it in the driveway for free, and since most of the really noisy work is done (and it's the summer - it was nice to be indoors during the rainy winter to do the exterior work).
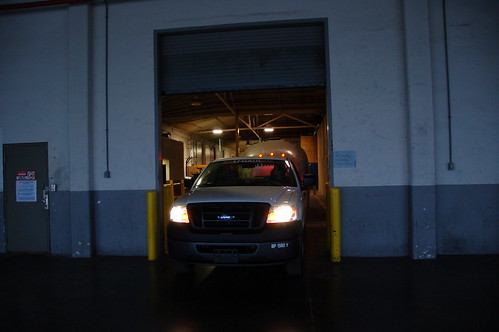
This time I rented an F150 pickup instead of a moving truck which turned out to be much easier - no brake controller so no electric brakes, but the truck was easily able to stop the mostly-stripped trailer. And now I want a new (well, 2004-) F150 as well, but that's going to wait until the trailer is ready to take somewhere. No point making payments on a truck just so it can sit in my driveway and depreciate. But if I could have done the long drive from Lubbock with an F150 instead of a moving truck it would've been a lot easier.
To prepare for the road I riveted the sides of the belly skin back up onto the frame - most of the belly skin is cut out between the frame rails for floor & frame repairs - reattached all the window latches, and screwed the fridge to the floor.
Getting hooked up was easy enough, I had to fabricate a 4-pin to 7-pin adapter on the spot because I forgot to buy one, and the towball happened to be at the exact perfect height. Out of the warehouse was close, but drama-free:
The F150 seemed like the perfect size for this trailer:
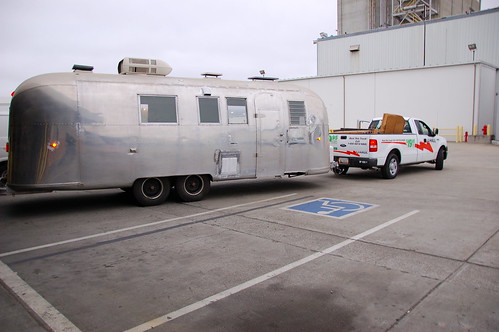
After an epic journey of two and a half miles to my house from the warehouse, I had no trouble getting it into the driveway with the aid of a couple of spotters, starting from reversing from parallel to the opposite curb, cut across to rotate it to align with the driveway, put the truck up onto the opposite curb to straighten it up, and then backed straight in. Now, it is true that to do this I had to drive the wrong way down the one-way street I live on, but it's pretty quiet so I think it's fairly safe The nice thing about this maneuver is that I think next time I could do it alone or very quickly with one spotter, and that in order to do it I only need to block off one parking space on the street in advance, so despite my street being narrow I should be able to get in and out at will.
Good to have it home, tomorrow I think I'll wash it - being inside, it's accumulated a thick layer of dust and dirt that I haven't been able to wash off.
Pretty strange seeing it out on the road under natural light after so long in a dark warehouse, and also to look at the outside photos and think, "Well, it looks pretty much the same." Which is true - but no awnings falling off it, lots of patches applied, and of course lots of wall & floor repairs, electrical work, and other things invisible from the outside.
I still need to patch a large (2 foot square) hole where the previous water heater was and put on the vent stack covers I just got from VTS, and the bulb seal in the front window, but then it should be rainproof at least for storage (no belly skin means I wouldn't want to tow it in the rain though).
|
|
|
|
|
06-03-2007, 09:29 AM
|
#91
|
Rivet Master
1973 27' Overlander
Currently Looking...
Jupiter
, Florida
Join Date: Apr 2006
Posts: 2,062
|
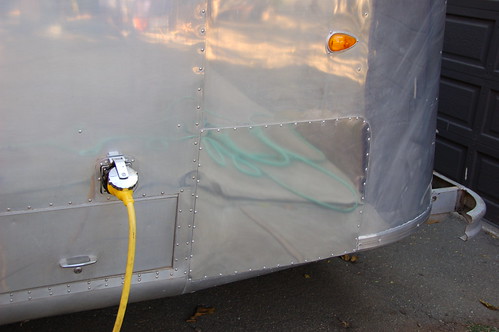
Look at lower shot and you can see the mirror-like mini-skirt - on mine I knew the belly would be open a long time so I wanted to have a drip-edge of some sort to shed water past floor level, seal open pop-rivet holes against moisture intrusion, seal the F/R frame shell intersections... so I went with aluminum foil duct tape.
Yes, the removal of the tape can be a small hassle from adhesive lingering after it peels off but I can vouch for its staying power. The only seep I saw make it through the tape was at the rear frame corner shown, another strip of tape overlapping the first to get to clean sheet metal would have prevented it.
A very handsome trailer you have - feel free to reference the Siberian winter images anytime you catch yourself procrastinating
__________________
The days are short and the night is long and the stars go tumbling by.. . ~Airstream~
|
|
|
|
|
06-04-2007, 12:48 AM
|
#92
|
3 Rivet Member
1964 26' Overlander
Alameda
, California
Join Date: Sep 2006
Posts: 161
|
An excellent encouragement! No snow here but plenty of rain and it gets colder than I like to be out in come the winter so it'd be good to have all the outside done by then - at least with the interior I can bring out an electric heater.
I have plenty of foil tape around and I may take your advice - better than leaks, anyway, if it comes down to that.
Having spent some time taking an all-around look to it with an eye to water sealing, "handsome" isn't the word that comes to mind - "full of holes" and "badly in need of a wash and polish" is more like it...
|
|
|
|
|
06-24-2007, 11:33 PM
|
#93
|
3 Rivet Member
1964 26' Overlander
Alameda
, California
Join Date: Sep 2006
Posts: 161
|
Been doing nothing worth posting about lately, just some scraping of silicone sealant, replacement of a few loose roof rivets, and I put on replacement caps for the vent stacks at the back - part of project "waterproof by winter" - although only above floor level since the belly skin isn't going back on for quite a while yet.
This weekend I did patch the huge hole at the street-side back where the original water heater was - here's before and after:
 
I haven't even trimmed the rivets there, nor cleaned up any of the excess sealant.
Still, it looks okay - had to extend a little below the C-channel and overlapping the belly skin because the banana wrap was long-missing there (maybe never installed at the factory since I think the original water heater was there). Some wrestling & re-setting of rivets was required to get it to lay flat, but it's good now. Not the best piece of work ever, but not bad, and once the rivets are shaved, sealant cleaned off, and it's polished, it should look just fine. The alternative, after all, would be to replace the entire panel and the banana wrap. Sounds a lot like work to me.
Now, I just have to put new sealant around all the hatches, across a few of the windows, put rivets in a couple more screw holes in the roof from where the TV antenna was, get the bulb seal in the front window, replace the door drip rail, and replace the door seals, and it'll be waterproof above the floor line - in theory.
I guess I did a couple of other things inside - put in three ceiling lights, dome lights from Ikea, with 12V CF bulbs:

They're not incredibly bright, but good enough for general lighting since I'm going to have lights under most of the cabinets too.
Stripped the original reading lights at the front and replaced them:

Here's a before and after:
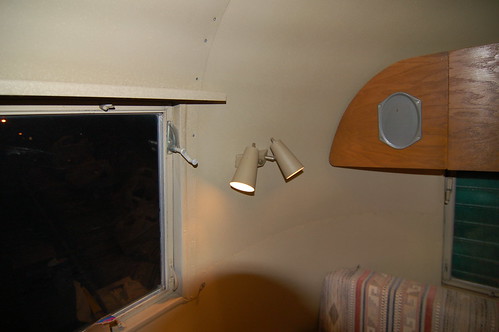 
I like it - opinions may vary.
|
|
|
|
|
06-26-2007, 05:59 PM
|
#94
|
Rivet Master 
1973 23' Safari
1977 23' Safari
2018 25' Flying Cloud
Palmer Lake
, Colorado
Join Date: Oct 2005
Posts: 4,092
|
Quote:
|
Originally Posted by Jacob D.
...
I guess I did a couple of other things inside - put in three ceiling lights, dome lights from Ikea, with 12V CF bulbs.
They're not incredibly bright, but good enough for general lighting since I'm going to have lights under most of the cabinets too.
... |
I've looked all over for 12V CF bulbs. I assume these have their own ballast/hi voltage unit, like the new 110V CFs? If so, where do you find them? I heard that WalMart was carrying them, but can't find them.
Zep
|
|
|
|
|
07-03-2007, 04:33 PM
|
#96
|
3 Rivet Member
1964 26' Overlander
Alameda
, California
Join Date: Sep 2006
Posts: 161
|
My local trailer supply place stocks them, but I bought these from some mail-order retailer a while back (I don't remember who now).
They work about as well as 110v CFL lamps. I was having trouble with a whining sound earlier on, but I think that was just my junky old converter - no noise from the new converter. They take a little while to warm up, which some of the newer 110V CFLs don't, but they provide a decent amount of light at night, especially for the wattage of course.
Not done anything too exciting lately, and no new photos - I cleaned up the large patch (acetone works great on Vulkem), and shaved the rivets, and it looks pretty good (and watertight). I masked off a few of the window frames where I had removed some decaying silicone sealant, and applied some Alcoa Gutterseal. Good stuff, if a bit smelly, and it really does seem to want to get into spaces rather than just sticking on the outside (like Vulkem or silicone, which seem to work better when compressed between two surfaces). It was still sticky a day or two later, so I haven't removed the tape or any excess yet - it had a bit of a tendency to pull off altogether with the tape, I think I'll need to razor close to the edge of the window frame.
Also took off part of the banana wrap at the back and front. At the front I think I'll need to take it all off, apply Vulkem inside it, and replace; it seems to have no sealant under it there, and in fact to mainly serve to channel water coming down the skin into the belly skin via the floor. Great piece of design there...
So, the sealing project is coming along pretty well, but it's not very exciting. The Flair-It parts for the PEX plumbing replacement have arrived, but I haven't done any work on that yet (forgot to order a wrench and the clips for holding the pipe down (and the check valves), truth be told, so I need to get onto ordering that).
I'm looking at the termination of the electrical system - currently a free-floating affair of wirenuts, with no circuit breakers in the trailer (it's on a 15A GFCI at my house for now, so it's fairly safe). I was planning to buy a Blue Seas combination 12V/110V circuit breaker panel, but they're easily $500. They sure are nice, but I'm wondering if I care that much, and if a cheap domestic breaker box and a plain 12V fuse box might not serve for now.
I also have to design the new drain plumbing, which shouldn't be too hard. The main change is that the drain destination is just behind the wheel well on the curb side, instead of being right at the back. I also removed the front vent stack which was venting the kitchen sink trap, figuring to replace it with an air-admittance valve. I need to draw that up too, and attach at least the drain lines from the bathroom sink and the bathtub before fixing that back in place in the corner. And the bathroom sink needs a new faucet first... nothing is ever simple, is it?
|
|
|
|
|
07-04-2007, 08:19 AM
|
#97
|
4 Rivet Member 
1977 23' Safari
Hillsboro
, Oregon
Join Date: Aug 2003
Posts: 348
|
Great thread Jacob. Look forward to seeing the end product.
__________________
Van
2009 F-350 FX4 Crewcab 4x4 6.4l
former '78 Argosy 20' Minuet owner
former '77 23' Safari owner
former 25' Fun Finder X-250BHS SOB owner
current 26' Komfort Trailblazer 262BSLE SOB owner
|
|
|
|
|
08-17-2007, 11:10 PM
|
#98
|
|
New Member
1964 26' Overlander
Willits
, California
Join Date: Aug 2007
Posts: 3
|
62 overlander
I have a trailer like yours and do not have the time to restore
it myself. any ideas (what about Iowa boys in so cal.)
any input would be appreciated
joerigg
|
|
|
|
|
07-02-2008, 12:40 PM
|
#99
|
3 Rivet Member
1964 26' Overlander
Alameda
, California
Join Date: Sep 2006
Posts: 161
|
Hmm, I've been very neglectful of this thread, probably out of shame at my incredibly slow progress. Actually I spent a lot of the last year driving to LA all the time and then rearranging our house after my girlfriend moved up from LA, so I have some excuse for my lackadaisical attitude. I've been working on it again lately although full weekends have been hard to come by...
But let's see: I patched the big hole left where I removed the original water heater:
Not a bad job if I do say so myself. Getting it all to stay flat and sealed was a bit of a chore but I got it there in the end.
I replaced the door drip rail finally after patching the big crack in the skin over the door:
The patch also wound up needing a couple of fake rivets because I drilled the holes too close to the door frame. You can see them here:

They're glued in place. Worked fine, nobody will ever know (except you all - oh well!), and the patch is quite firmly secured by all the other rivets. You can see there that I had to grind off one rivet that wound up being in the path of the drip rail, too.
I also (rather messily but effectively) replaced the door seal with the one from V.T.S., which needed a bit of squashing & trimming to get it to close, and needed weatherstrip adhesive because the original self-adhesive backing wasn't up to the job, but has sealed admirably well once it got into shape - closing the door requires a bit of a slam, but I can accept that if I get a good seal out of the deal.
I covered a few things I hadn't finished patching with aluminum tape and I was pleased to find no leaks at all during the winter, when we did have quite a bit of rain. I may have found one since then, but I have yet to pin down where it is - I suspect it's from a loose rivet in the roof somewhere, and when I get up there I'll look around for it.
I still haven't finished fixing the front cabinet frame but here was a test fit when I was trying to see how it'll all look in the end:

Ah, nobody likes my taste in green, but that's okay, I like it and if some future owner doesn't, they know where to buy their own paint...
One of my cats visited briefly;

He was not impressed but then, he's a cat, what does he know?
I bought two Fantastic Fans to replace the (original) roof vents, after visiting a few other trailers at Burning Man in 2007 and finding that the only one that wasn't stiflingly hot inside was the one with a Fantastic Fan installed. Haven't put mine in yet though and time is ticking away, but I'm sure it won't take too long... I'll also have two working original fans if anyone wants them.
I did some plumbing - this is the water heater, water pump, and kitchen faucet:

This is the city water inlet, pressure regulator, water filter, and tank fill area:

And here's the area under the bathtub and the bathroom sink:

I did a leak test - yep, it leaks - and still need to fix the one or two places where I found leaks, but most of the joints were fine including everything around the water heater and pump.
Still no tanks though! For Burning Man this year I will probably use a water barrel connected to the water pump and a portable grey tank, or a big container with a sump pump to dump it into our shared grey-water barrel. I'd like to have onboard tanks, but I have a lot of other things to do too...
And I'm working on the kitchen. I decided in the end to use cut-up Ikea kitchen cabinets for this, even though they're heavy because they use a lot of 3/4" particleboard. However, the weight is reduced a lot by cutting them up to fit, and given my fine-finish cabinetmaking skills - that is, my total lack of them - I thought it was the best approach given my constraints of time, money, and skills...
Here's an overview - not quite up to date, but the most recent photo I have on hand:

You can see here how the cabinets that go over the water heater and water pump are cut down:
  
The vertical piece in front of the heater is fixed, but the valves are still accessible; the shelf is removable. When I have the time, all the particleboard shelves will be replaced with lighter plywood, and there are various other weight-saving changes, but for now it's fine.
The cabinets are not nearly as heavy as you might think - somewhat heavier than the originals, but not all that much. I think it's going to be fine.
It's perhaps not clear from the earlier photos just how much water damage there was to the original cabinets. Virtually everything made of plywood in the interior was unusable because it was falling apart, warped, stained, or some combination of the above. It looked okay as long as you didn't look too close. Some of the hardwood frames are going to be re-usable - for instance for the overhead cabinets - but most of the panels need replacing, and for the kitchen cabinets there was pretty much nothing left that was usable.
I've done more since those photos, and in fact most of the kitchen is ready to be permanently installed as soon as the bathtub is fixed in place. There's a floor-to-ceiling cabinet I need to cut down for next to the bathtub - replacing the original wardrobe cabinet - which is a tricky job, but I have the patterns copied from the original cabinet side panels and so I should be able to get it to work.
Then I have drain plumbing which I'm also working on, but again that's fairly straightforward...
One of the jobs I've been putting off because I hate working with smelly chemicals was using the penetrating floor sealer on the places where there was some floor rot but not bad enough to actually replace it. It seemed to work pretty well, especially in the places where I was basically pouring it onto the floor in a thick layer to soak in - it does seem to have penetrated somewhat, and if nothing else it'll serve to keep water out from above and to hold the floor together structurally. Worth the effort, I think.
I painted the corner wall section above the bathtub with orange two-part POR-15 waterproof paint - I rather like it, but of course, millions wouldn't. The bathtub and kitchen sink I think I am going to have professionally refinished in white to match the toilet - and hopefully I can have all that stuff done in the next two months.
I put in a new circuit breaker box with all combination AFCI/GFCI breakers:

That will of course be inside a cabinet.
And I'm getting ready to do the propane plumbing. My plan so far is to use the pre-assembled, pre-tested propane hoses sold by West Marine for boats - after the regulator, one short hose will go to a manifold and set of shutoff valves near the front of the trailer, and then each appliance will have its own long hose running underneath the trailer and up through the floor. This way there is no copper plumbing or flaring needed. The other alternative I looked at was coated stainless steel flex, but I would need a professional to install it and the West Marine hoses ought to be just as good for this application.
The cost will be higher than copper pipe, but not unreasonable - under $300 for the hoses, manifold, and valves for three appliances - the water heater, cooker, and fridge. I'm pretty eager to test the fridge on propane before committing to installing it - I'd rather not have to buy a $1,000 replacement, even though the old one is pretty worn...
I have a plan for the floor - I'm going to use Marmoleum Click planks (in marbled black, the only colour that didn't clash horribly) which I think is appropriate (since the original had vinyl tiles) and will be fairly waterproof and very resilient. But that's going to happen after the cabinets are fixed, since I won't be installing it underneath them.
Anyway, things are coming along albeit somewhat slowly, and I'm sure some (or most!) of this offends the restoration purists out there, but like I say the original interior was really pretty trashed even though it superficially looked okay.
Oh, and most all of the cheap-looking birch-effect melamine at least outside the cabiets will be covered with thin panels of a nicer plywood, probably red oak to match the original woodwork. The countertop is a beech butcherblock again from Ikea, quite inexpensive, although I'll have to join two sections of it together to make the full countertop run.
I will have a few cabinets and maybe other parts that will be surplus after this, and will try to post a list and some photos.
|
|
|
|
|
07-02-2008, 01:04 PM
|
#100
|
Rivet Master
1963 26' Overlander
Austin
, Texas
Join Date: Feb 2008
Posts: 2,640
|
Thanks for the detailed update, Jacob. I read your entire thread a couple of months ago, and when the updates stopped I wondered what had become of you and your restoration. Life does get in the way, doesn't it?
I don't know how far along you are with the installation of your Ikea cabinetry back in the trailer, but if you're looking for further ways to decrease weight, you could check out Sergei's thread for the "contemporization" of his Argosy. He, too, installed Ikea cabinets, and took some extensive measures to reduce their weight:
The main thread is here:
http://www.airforums.com/forums/f227...ase-18448.html
And the posts that relate to the Ikea cabinetry begin here around post# 93:
http://www.airforums.com/forums/f227...e-18448-7.html
Thanks again for posting the updates, your progress looks great, and please keep us updated!
-Marcus
|
|
|
|
|
|
|
Currently Active Users Viewing This Thread: 1 (0 members and 1 guests)
|
|
|
 Posting Rules
|
You may not post new threads
You may not post replies
You may not post attachments
You may not edit your posts
HTML code is Off
|
|
|
|

 Recent Discussions
 |
|
|
|
|
|
|
|
|
|
|
|
|
|
|
|
|
|
|
|
|
|


 Linear Mode

