 |
|
 01-23-2007, 03:26 PM
|
#41
|
3 Rivet Member 
1964 26' Overlander
Alameda
, California
Join Date: Sep 2006
Posts: 161
|
So maybe a valve arrangement so that the city water is normally connected (with a check valve) to the output side of the pump (i.e. the pressurized side), but can be switched to the input side for drawing antifreeze through the hose inlet (with a check valve again to protect the tank from city water). Or perhaps it would be simpler to put a valve & hose inlet teed onto the fresh-water tank line inside for winterizing.
|

|

|


|
01-24-2007, 01:05 AM
|
#42
|
3 Rivet Member
1964 26' Overlander
Alameda
, California
Join Date: Sep 2006
Posts: 161
|
Here's a modified version of the 1964 floorplan for my trailer, reflecting some of the changes I'll be making or have made. Obviously some important things are missing from this still (i.e. a toilet, heater, and currently the big space at the back is unallocated). The table at the front was installed in the factory and I'll be keeping it - it folds down, and has two extension leaves that make it pretty large & solid. I just need to get some folding chairs to go with it.
Sorry for the size of the image but at lower resolutions it's hard to read the labels:
This diagram doesn't show any of the overhead cabinets, but those will all be replaced as they were originally. I'm thinking one of those nice marine propane stoves would be nice, probably attached to the side of the kitchen cabinet by the door, facing the gaucho at the front; I'd also like a real desk, and once I have the cabinets in I'll be looking to see if my 32" LCD TV on a mouting arm will fit anywhere. I have a feeling I might need to use a smaller TV though.
I don't have to do this for a while, but I'm also thinking about the LP gas lines. The original was black iron with copper connections to the regulator and to each appliance, but it seems like most people now use copper throughout, with a rubber hose to the regulator. I know that type K or L copper tubing is required. So I'm thinking a 3/8" line running the length of the trailer with 3/8" branches for appliances, each with an individual shutoff valve and no joints above the belly skin, and one 1/4" branch for the gas lamp, using brass flare fittings and double flares. The connection to the regulator can be a rubber hose, and the pigtails from the regulator to the tanks can also be rubber hoses (the tanks have Acme/QCC connectors).
I'd rather use braided stainless hoses for the regulator & pigtails just for looks, but I can't seem to find out if that's acceptable by US code (seems to be okay in the UK & Australia), and if so, where to get them (they'd be Acme to 1/4" (inverted?) flare for the pigtails, and 3/8" flare at each end on the regulator hose).
I still have the catalytic heater mentioned much earlier, which was originally installed using a mutant combination of the original furnace propane line and (inside the kitchen cabinet) a flexible corrugated metal gas hose like you'd use for a cooker, a shutoff valve, and finally a rubber hose to the heater because the heater was mounted on hinges. I may still re-use that catalytic heater but move it to the back of the trailer, although from what I've read about those marine propane stoves they put out plenty of heat.
|
|
|
|
|
01-26-2007, 02:18 PM
|
#43
|
3 Rivet Member
1964 26' Overlander
Alameda
, California
Join Date: Sep 2006
Posts: 161
|
More electrical outlets at the back, street-side:

That's a stainless-steel bowl from Ikea used as a protective cover for the back of the electrical inlet down there. Most likely that whole area will be inside a cabinet or under a desk anyway. There's an access hatch down there and I may build a box around it so that I can have an externally-accessible space separated from the interior.
Furnace-hole patches:
  
You can see they are blending in well with the filthy floor everywhere else there... still need filling & sanding too, and a couple of screws were so stripped I couldn't get them out, so they need to get cut off on the other side. But the patches are solid.
This weekend the rest of the belly skin comes out, final decisions about tank size get made and crossmembers removed as appropriate; electrical cables get re-routed, and the rest of the gas piping comes off. Hopefully I should be able to put the new refrigerator vent cover on too, replace the repainted cooker vent cover, and perhaps clean up more of the damage from where the awning rails were.
Once measured, I can order the tanks so that should be done by the end of February.
I ordered a Precision Temp RV500, flush mount, so when that arrives I have some work to do to fit it in the space at the back where the old water heater was, then reinsulate the wall and replace the inside panel.
I got some 12V compact-fluorescent bulbs - results are mixed. One 23W bulb works fine; one 13W bulb works fine; the other two make an extremely loud buzz and one of them even though marked as 4000K is obviously a warm-white bulb. Although actually I may prefer the warm-white bulb anyway, so maybe I have to just return all of them. But they are pretty small - the 13W bulb is very small - and fit easily in household light fixtures.
It's still really cold here, so I think painting is going to wait for warmer weather. Hopefully I can keep busy with plumbing & electrical until then.
I have another project which is building boxes to cover the wheel wells. Originally they had flexible plastic covers with fiberglass insulation underneath:

but they were broken and not too solid either. They were also attached to the inside skin. So what I want to do is build square boxes probably out of OSB & 1x2s to cover them. Underneath I'll insulate the galvanized metal with FBF. I'll probably glue 1x2s to the wheel well directly rather than attach to the skin - while the galvanized metal isn't all that thick, it's less brittle than the aluminium skin is after 40 years. And I'll use glue because I don't want to penetrate the wheel well. Around the outside the box can be screwed to the floor.
The idea is that they'll then be solid enough to attach cabinets to, rather than having to rely entirely on connecting to the wall over the wheel wells, and for example a battery could sit on one of them (at the ends) and be fully supported. Or under the cooktop, I could use one to support a drawer-dishwasher.
This'll be heavier than the original and lose a little space because they're square and the wood will be thicker than plastic, but I think the solidity makes up for it.
|
|
|
|
|
01-27-2007, 04:21 AM
|
#44
|
3 Rivet Member
1964 26' Overlander
Alameda
, California
Join Date: Sep 2006
Posts: 161
|
The rest of the PCB LED lights arrived from SuperbrightLEDs.com today, so I went down and replaced all the teardrop bulbs with LEDs. I like the way it looks a lot, and they won't draw much battery power when I have them turned on with the tow vehicle disconnected.
 
I wrote up a little how-to with photos on Flickr if anyone's interested.
|
|
|
|
|
01-29-2007, 04:36 PM
|
#45
|
3 Rivet Member
1964 26' Overlander
Alameda
, California
Join Date: Sep 2006
Posts: 161
|
Busy weekend, didn't quite get everything done I wanted though, but I'm getting closer.
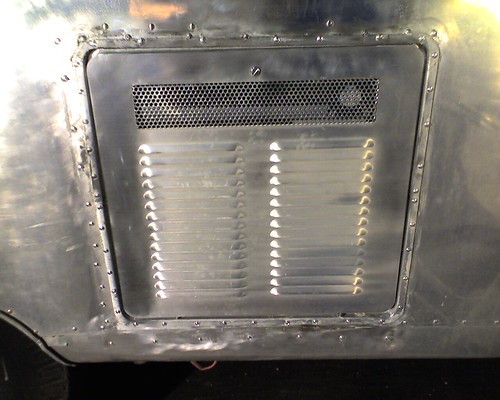
I'm working on getting the exterior rainproof again, if not towable yet (no belly skin), so I put on the new fridge vent cover (courtesy InlandRV):

Unfortunately in that photo the flash has illuminated the chimney under the vent and shown that it's covered in Vulkem. In normal light conditions, you can't see that. I may clean up the lower side of the chimney a bit more, but overall it looks very nice. I didn't reduce the length of the vent cover, so it's about 4" longer than the original. I don't think it shows, particularly, or that any harm is done by this.
You can also see in that photo the dirt from where the street-side awning rail was. I need to get up there with some citrus cleaner and clean it off - thankfully it's mostly not sealant, just regular old dirt. But I did finish shaving all the rivets along that line.
I resprayed and replaced the cooker vent cover too:

Less happy with this. I'd really rather it was aluminium, but for now it'll do.
A little experimental polishing of a patch I made for a hole in the front:

I think I need to start with a coarser polish to remove some scratches and work back up, but I already love the way it looks. It's sort of like old, well-worn silver. I'd be happy if this was as good as it got, but I think I can get it to mirror-finished still.
In places where there was no damage, it polishes to a mirror finish immediately:

I'm not really going to work too much on polishing just as yet, especially as dirt constantly falls from the warehouse roof onto the trailer. But I wanted to confirm that I hadn't killed the finish with overzealous cleaning in some places, and I think it's going to be fine.
The main work I did was underneath, of which I have no photos. I removed the rest of the belly skin under the back except for the curved sections at the sides, ready to install the tanks & sewer plumbing under there. At the front I removed one section and just dropped another section for access. I had to take off the black iron gas line and the rest of the copper propane lines, and I cut them up for scrap - best to start from new, I think. I removed all the fiberglass and the enormous amount of dried mud that was in the belly cavity, found what I think was a mouse nest in the fiberglass in the back, but didn't yet cut out any crossmembers or supports. Taking out the fiberglass and cleaning up the dirt is really hard work, with a dust mask & full-face guard on and lying flat on your back.
But, that's probably the worst & dirtiest work I'll have to do all along, and now it's done. I can order the tanks once I take some measurements now. I think I'm going to go for large at the cost of some ground clearance, the way the new ones are; I'm not really your off-roading type... it shouldn't reduce the departure angle, anyway, just reduce clearance between the axles, and not to less than something like 6" anyway. My car has much less clearance than that.
Me & a friend also worked on the windows some more - she put the bulb seal into a frame (in the shell) I had already cleaned with a Dremel & wirebrush, I cleaned another one (roughly 1 Dremel wirebrush = 1 windowframe cleaned of corrosion & adhesive), and she also valiantly put the window stripping into one of the windows. That is hard, hard work, even using a hot lamp to soften the silicone and with the window on a table in front of you. But it does look really nice now that it's done - the grey silicone blends nicely with the aluminium shell. Only seven more to go!
Minor things: replaced almost all of the pop-rivets on the inside of the door with Olympic rivets and shaved them. I think I'm going to strip and polish the door rather than paint it to match the rest of the interior; that way when it's latched open it'll match the shell better. I did some minor electrical re-routing, and filled but didn't sand the floor.
This week's plan: measure for the tanks & order them; install the RV500 heater whenever it arrives; measure, design, and build the boxes for the wheel wells and possibly boxes on the inside for the two access doors at the back.
At some point I have to clean & repaint the frame. I really may have to jack the trailer for that, something I've been avoiding doing because it really precludes working on the inside, but it's so hard working underneath without jacking...
|
|
|
|
|
01-29-2007, 07:48 PM
|
#46
|
|
a.k.a. Ambassador Tim
1960 28' Ambassador
Northern
, California
Join Date: Jun 2003
Posts: 1,921
|
Looking good! I'm following with great interest.
Keep it up.
I finally put a couple of 2x6's under each wheel on my trailer to gain some more ground clearance. That helped a lot. I've been underneath installing my gray tank and plumbing as well.
At least I know why they call it a belly pan. As I scoot around under there on my back, my belly rubs the bottom of the trailer! 
|
|
|
|
|
01-30-2007, 04:26 PM
|
#47
|
3 Rivet Member
1964 26' Overlander
Alameda
, California
Join Date: Sep 2006
Posts: 161
|
The 2x6s are an excellent idea. I have to move the trailer in the warehouse this week, which means renting a truck, so it'd be a good time to do that too. I'll report back. 4-5" of additional clearance under there would be extremely useful...
|
|
|
|
|
02-01-2007, 03:06 PM
|
#48
|
Rivet Master 
1967 24' Tradewind
Alameda
, California
Join Date: Feb 2004
Posts: 1,570
|
Some thoughts
Hi Jacob D.,
A couple of thoughts: To get the frame up off the ground to work on from underneath, we built our jacks like the picture shown. You probably have a good idea how to do this already but I have a picture I drew for someone else so I thought I'd share it.
Also, you may think tasks like changing those bulbs are insignificant but there are plenty of folks on here (like me) who are starting from scratch and will get a lot of use out of them. Keep it up!
__________________
"Let's look Death in the face and say, 'Whatever man.'"
~ Hurley
ingrid
1967 24' Tradewind #19104 ~ Forums #4449
|
|
|
|
|
02-01-2007, 09:44 PM
|
#49
|
3 Rivet Member
1964 26' Overlander
Alameda
, California
Join Date: Sep 2006
Posts: 161
|
That's just about exactly what I did today - well, I used three 2x8 boards stacked & nailed together, 5' at the bottom, then 4'6", then 4'. I didn't put an end stop on because I have these chocks that go between the wheels. It's crude but it doesn't have to be all that pretty for me.
Had to move the trailer in the warehouse anyway, so it was pretty easy to back it onto the ramps with a little help from a friend. Even the 5" or so of extra ground clearance seems like it'll help a lot though, I may even be able to crouch under there rather than having to lie flat on my back.
I liked having the trailer hooked up, even to a U-haul truck and not going anywhere (well, about 50 feet). I want to take it out on a trip! But it's a few months from that point still. I did get to check that the turn signals worked, at least, and practice my backing-up skills - still pretty good.
|
|
|
|
|
02-01-2007, 09:46 PM
|
#50
|
|
Aluminut
2004 25' Safari
.
, Illinois
Join Date: Feb 2003
Posts: 10,477
|
Don't know if I said this yet, but nice find and great work so far! 
|
|
|
|
|
02-05-2007, 01:36 AM
|
#51
|
3 Rivet Member
1964 26' Overlander
Alameda
, California
Join Date: Sep 2006
Posts: 161
|
Here's the ramps under the wheels:

The extra space definitely helps.
Yesterday I mostly worked on windows, with a friend again. I wirebrushed the rear window frame and she got the window stripping on. So that's two windows nearly done, 6 more to go... The bulb seal is easy, it's the stripping that is a pain. It's made worse in my case because the new (tempered) glass I bought is about 1/16th-1/8th of an inch smaller than the original. But, it's doable, just needs a lot of work and usually some silicone lubricant and heating the silicone stripping in front of a work lamp for a few minutes. I wish there was an alternative but this does work, but I don't recommend it to anyone whose original stripping is still intact.
I also took measurements of all the spaces under the floor for tanks and I should be able to draw some diagrams for that and order the tanks this week, finally. It looks to me like I have no reduction in approach or departure angles even with tanks extending 4+ inches below the frame, although I haven't decided about the size yet. I'll post those when I have them organized, and the sizes of the tank I'll order.
Today I did one useful thing and one useless thing; the useful one was installing the city water inlet, the tank fill inlet, and the tank vent on the outside:

They're all boat parts from West Marine. There's nothing hooked up on the inside yet, but they come in just in front of the axle on the street-side, just behind the fridge, which seems good for access to the fresh-water tank under the floor there.
The useless one was stripping the paint from the inside of the door and doing a quick polish on it to see how it looks:
 
I can now conclusively say that people who strip the entire interior of Airstreams are insane, and that I will be very very happy to repaint the rest of the interior of mine. But I love the way the door looks now, and I think it'll be just about the right amount of shiny on the inside.
Stripping took forever, perhaps a different chemical stripper would have worked better. I found that a stiff nylon brush worked the best for removing the paint once it was bubbling up, better than a scraper for most of it and especially for getting around the rivets. But I had to repeatedly re-apply the stripper, and around the edges where there was significant pitting under the paint, it took 5 or 6 applications to get every last flake of paint off, brushing each time. But it was very satisfying once the very last flakes came off and I could wash the door down, and apart from a few scratches and a little corrosion, the Alclad underneath was much better than the exterior. No scribe lines or anything like that.
I'll need to come back and use a coarser polish to get the pitting out, but even a very quick polish using Nuvite grade A and a wool bonnet, followed by a hand buffing with a microfiber towel, gave a really great mirror finish. I know that the Cyclo is ideal, but just using the microfiber towel (and a lot of effort) afterwards made most of the swirls from the wool bonnet go away. It's making me look forward to polishing the exterior, although there's a ways to go before that'll be a sensible next step.
|
|
|
|
|
02-12-2007, 01:57 PM
|
#52
|
3 Rivet Member
1964 26' Overlander
Alameda
, California
Join Date: Sep 2006
Posts: 161
|
Built one of the wheel well boxes this weekend. Here's the starting point (actually this is the other one, but still):
Firstly I attached lengths of 1x2 as blocks to the top & sides of the wheel wells:

They're glued with polyurethane glue, in the end I did end up using sheet metal screws to hold them down while the glue set. The left wheel well was pretty dented, I think there must have been a blowout at some point, so contact was not continuous along the length, although the screws pulled more of it in contact.
These blocks had a couple of purposes: to spread any load on the box that isn't taken by the end supports to more than just a couple of sheet metal screws, to space the box away from the metal so I can get insulation between, and to provide a level surface to attach the top of the box to. But the wheel well itself isn't really taking any weight.
After that I added two layers of foil-bubble-foil insulation. The first one was glued directly to the wheel well - I used gorilla glue again, but now that I think about it, spray adhesive would probably have worked better. The second layer was just placed on top of that, and then held down with foil tape:

In that photo the tape is overlapping the blocks too much. I had to cut it back later when attaching the box sides & top so that I could glue wood to wood.
After that I built a very simple box out of 5/8 OSB and blocks of 2x2, screwed & glued:

The blocks at the bottom are on the outside because otherwise the box would have to be about 2" bigger in all dimensions - the sides of the box are right on the edge of where the wooden floor ends.

As you can see, I am a master carpenter.
And then with the top on:

It's pretty crude, but it's going to be inside cabinets (and painted first) so it doesn't matter too much. It's overbuilt, no doubt, but it doesn't weigh all that much (maybe 30-40lbs) and it's very, very solid. I plan on putting a very large AGM battery on one end of this particular box, and attaching various other stuff directly to the box, and so this is really about as solid as the floor.
I pity the person who has to get it out, as they'll probably have to use a Sawzall or something. Hopefully, though, that won't be for another 45 years.
Next weekend I'll build the other one, which should be a lot faster since the OSB is already cut for the side & top and I know how to do it now. Once they're painted, I'll probably trim the edges along the wall, but they're good for now. I also probably want to build boxes for a couple of access doors at the back and side, and maybe for where I want to put the generator too. Those won't be glued to the floor the way these ones are though, so they'll be removable.
The new water heater should arrive this week, and at some point I really should get on with diagrams for those water tanks and get them ordered.
|
|
|
|
|
02-12-2007, 04:18 PM
|
#53
|
|
a.k.a. Ambassador Tim
1960 28' Ambassador
Northern
, California
Join Date: Jun 2003
Posts: 1,921
|
Looking good! It's nice to be moving forward on a project. Mine just took several steps back :-(
Do you have a link for the water filler and vent you used. I need to locate them also and like the ones you picked.
Thanks
|
|
|
|
|
02-12-2007, 05:11 PM
|
#54
|
3 Rivet Member
1964 26' Overlander
Alameda
, California
Join Date: Sep 2006
Posts: 161
|
They came from West Marine, I believe the water inlet is this one from Perko. I don't know the vent brand though.
The pressurized city water inlet is a Seadog part I bought on ebay.
And yeah, it's nice to build something significant & permanent even if it's not fine craftsmanship.
|
|
|
|
|
02-22-2007, 12:01 AM
|
#55
|
3 Rivet Member
1964 26' Overlander
Alameda
, California
Join Date: Sep 2006
Posts: 161
|
My RV500 arrived last week - I ordered from a place called Globaltowne, but it was actually drop-shipped from Precision Temp, so I doubt it makes any difference where you order it from. This weekend I did most of the work of installing it. Apologies in advance for the crummy image quality, I had to use my phone as I forgot my good camera today.
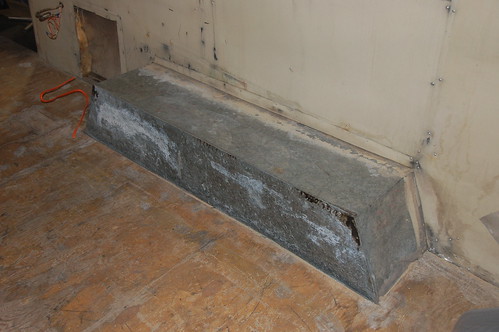
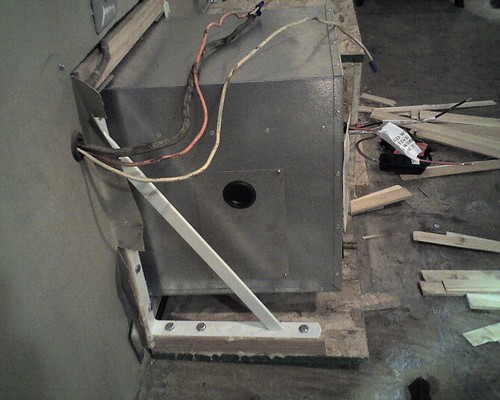
The water heater that was in it when I got it was a 6-gallon heater mounted at the back on the street-side, under the bathroom cabinet. You can see it here:

I ordered the RV500 with the flush-mount kit, which means you have a door frame about 18.5" square to mount in the skin. Well, no amount of twisting could get it to sit flat in the skin at the back, and though I could probably have got it to work with some big, ugly patches, I decided to look for a different location. Of course, I first cut out a few inches more skin in the existing hole trying to make it fit - oh well, I can cover it all with a 2'x3' Alclad patch, I think it'll be okay.
The main criteria for a different location was that it be reasonably flat and not already obstructed inside, which really only left three places: in the wardrobe (so, curb-side at the back), under the sink where there was already a large patch (curb-side at the front), or over one of the wheel wells (right smack in the middle of the wall on either side). The problem with under the sink was that the door closes against it, but there's still about 5-6" clearance and it's only partially covered, and it was the least obtrusive spot to put it. It's also nice and close to the kitchen sink and not too far from the shower.
Like I say, there was already a large patch there, presumably from the original furnace - the hole was about 12" square, but the patch was about 22" square, and scored into the skin was an 18" square under that. So I pretty much just had to cut out a few inches on each side from the existing hole. I cut from just above the C-channel at the bottom to just under a horizontal rib. You can see here how the frame for the door fit the space:
You can see here that it's pretty much flush with the skin:

The finish is brushed-aluminium, but I plan to sand/polish that down flat and then polish it as much as I can. Even brushed, it blends in pretty well.
Finding the right hole was the easy part. There were several more hard parts. Firstly, the flush-mount kit is designed to mount into a flat, solid wall, probably made of wood,because you're expected to cut back 1/2" into it to mount the frame. The frame will be held in place by pressure between the wall and the front-plate of the heater which compresses against it.
It is not designed to mount into a very thin piece of (curved) aluminium with nothing behind it. So, in order to get the frame to hold in place, I drilled holes in it and riveted it to the skin all around (with a bead of sealant too, obviously). Without the heater to hold it stiff, it still wants to bend to match the slight curve of the wall, but that's okay.
Now, that's not going to hold a heavy water heater in place of course. What the heater needs is a hole about 14" square with about 2" width of wood around the outside, solidly held vertically and crucially, 1/2" back from the skin, which makes it very tricky to do anything that's actually connected to the wall or ribs.
So I constructed this monstrosity:
To decode that picture, what you have there is a piece of OSB about 18" square used as a baseplate. Attached to that, flat, on either side are a couple of approximately 14" lengths of 2x2. Those form the horizontal surface that two heavy-duty shelf supports are attached to (the white pieces there). Each of those shelf supports has a vertical 2x2 attached to them forming the vertical part of the mount for the heater. Between them, attached with angle brackets, are two horizontal 2x2 sections, one at the top and one at the bottom. The object is to form a solid vertical face that the heater can be screwed into that is securely mounted to the floor.
An excellent design having only one small flaw, which is that the skin of the Airstream is not vertical there. It is curved out, and it amounts to about 5-10 degrees of tilt from vertical. This can be fixed by angling the baseplate with a block underneath, it's not a fatal problem. Still, it makes the whole exercise slightly less perfect. If I was starting again, I might try with wood inside the wall cavity first (maybe a 1/2" board for the setback on top of a 3/4" board for the 14" hole, with 2x2s mounted on the back to screw into).
On the other hand, once that baseplate is bolted to the floor, that water heater is not going anywhere. Here's another view:
I also built the wheel-well box for the curb-side:

Not the world's finest craftsmanship, but it sure is solid.
I'm glad I got the water heater mostly done though, as it's the largest through-skin item that goes in the trailer, and especially as my planned location wouldn't have worked out. Now I have to adjust my plans and see if I can reclaim some of that space in the bathroom cabinet that was given up to the water heater.
I still need to go back and take out the heater again, mount the baseboard to the floor, and then remount the heater with appropriate sealant for a final fit, and finish cleaning up the hole edges on the inside while I'm at it.
|
|
|
|
|
02-27-2007, 05:14 PM
|
#56
|
3 Rivet Member
1964 26' Overlander
Alameda
, California
Join Date: Sep 2006
Posts: 161
|
I finished work on the water heater over the weekend - well, everything except actually testing that it works, that is. I had to tweak the vertical placement a little to get the door to sit square, and I found out a bit too late what the four L-plates in the package were for - they were supposed to sit between the heater flange and the adapter plate for the flush-mount opening. Not mentioned in the instructions though, and I can't quite see why they didn't just made the adapter plate cover the area they'd be in. (Not very clear without a photo.) Anyway, the seals around the heater seem good, lots of Vulkem, but it's going to be behind a door I'll rarely open so I don't care too much.
Speaking of the heater door, I took more of a look at removing the brushed (mill?) finish on the outside. I think the first step will be a medium or fine emery cloth to get rid of the deepest scratches, and then 320 and then 600 grit wet & dry to get it smooth, and then polish. Worthwhile for a uniform shiny outside, but I'm not starting on it now...
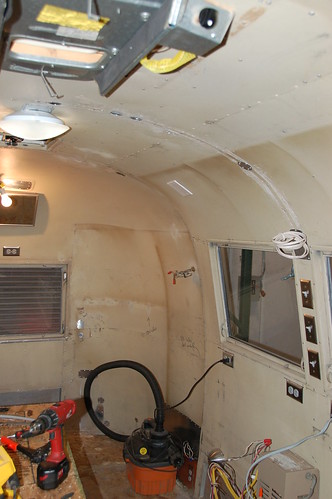
Here's a photo of the water heater installed from the inside:

I used some patches around the outside to trim the gap between the edge of the inside wall and the wooden frame around the heater, mostly for insulation & tidiness. All of this is going to be inside a kitchen cabinet anyway, under the sink. I lose some cabinet space here, but I'm hoping I can make it up at the back in the bathroom cabinet, where the water heater & pump were before.
I used carriage bolts through the floor to hold the L-structure that holds the vertical frame in place, two of the bolts also going through an outrigger, so that whole thing is exceptionally strong and the heater is very firmly mounted.
Now I need to get a battery so I can test it - they're very firm about not using it with converter power, and I found that I had 5V AC on my "DC" power coming from the converter. (The battery the trailer came with is dead.) Oh, and I need to hook up a pump and gas supply too - just temporary for now, so I can check it works.
So, both of the wheel-well boxes are built:

I still need to trim some more of the uneven edges with the jigsaw and cut off the heads of a few more stripped screws, fill & sand a little more, and then cut aluminium sheet to make a flexible trim piece between the wood & the walls. Then I can paint them when I paint the walls.
At the back, since I'm not using the hole in the skin where the water heater was, I need to make patches. I did the inside skin here, before replacing it on the wall so as to avoid drilling into cables in the wall (most of the 110V & 12V cables pass under this panel):

Lots of little patches and one big one, as this was originally where all the electrical stuff terminated. That's now all extended to the street-side wheel well, so the electrical panel and battery can be more towards the middle of the trailer.
I need to get some Alclad to do the outside patch still. Once I've done that, it'll be one little step closer to being really watertight out there.
Not much else to show right now, but here's a square-on shot of the door interior after polishing:

Still haven't done anything about ordering the new tanks, which I really should. I'm thinking for the plumbing I may just use whatever the push-fit PEX system West Marine stocks is - probably more expensive than mail-ordering, but I know where West Marine is and so I won't be waiting around for parts to arrive.
I think I'm going to move the water pump to under the kitchen sink too, to reduce the length of plumbing runs. That puts the city water inlet on the opposite side of the trailer though, so I think I'll run it under the floor. It'll need a pipe heater like the tanks will need heaters too though, for freezing conditions.
The interior is getting very close to paintable - nearly all the holes are patched and all the visible pop-rivets replaced with Olympic rivets, just about a dozen more to go. I'd like to sand before I paint, to remove the Zolatone texture, but that's going to be unpleasant.
Externally, when the old water heater hole is patched, there won't be any more gaping holes - a couple of places where the curbside awning hardware was will need some small patches, but in general it's done.
Let's see, here's a previous checklist, I dropped most of the interior items from it though:
# Finish replacing bulbs in exterior teardrop lights with LEDs. - Done
# Replace the refrigerator vent & the new cover. - Done
# POR-15 the frame. - Still too lazy so far
# Replace the cooker vent cover. - Done
# Replace the door seals. - Waiting for patching the crack on the outside
# Replace all the window screens. - Not done, tried 2, did both wrong in different ways, but I think I have the trick now.
# Possibly build an enclosure for a generator, depending on how I feel about the strength of the frame & my likely budget at that point. - Decided not to even try using a built-in generator
# Replace the interior light fixtures. - Patched the holes, but still don't have fixtures...
# Get a new battery, circuit breaker panel, and an inverter/charger. - Need to get on with this.
I'd add:
# Sand floor.
# Underfloor heating (potentially).
# New flooring.
# New water tanks and support frames.
# New water pump & plumbing.
# Sand walls & ceiling.
# Build fridge enclosure & scoop.
# Paint the interior.
# Window seals (still not finished!)
# Window hardware (some needs replacing).
# Patch the crack in the skin above the door.
Still, I'm working through the list, if slowly...
|
|
|
|
|
03-06-2007, 04:30 PM
|
#57
|
3 Rivet Member
1964 26' Overlander
Alameda
, California
Join Date: Sep 2006
Posts: 161
|
The window stripping is now in all the windows except the non-opening window behind the door (which has a slightly different type of frame):

One of my friends did most of this work, I think made easier by using a 250W halogen work light to warm up the silicone stripping. Anyway, it looks rather nice and I just have to put a little Vulkem on the corners to finish up.
Most of the bulb seal is done too, just a few windows remaining, and four of the windows are completely back together, with newly-greased cranks. Nice to have windows that open again!
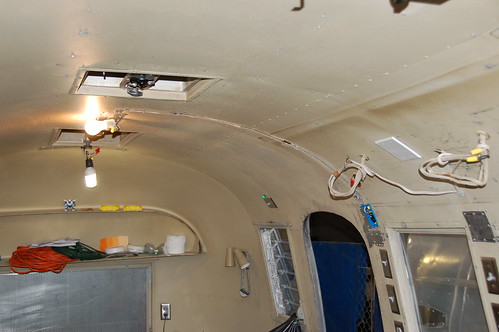
Here's a slighter better photo of the inside of the RV500 water heater installation:

You can see the slightly-angled baseplate held to the floor with carriage bolts, the shelf supports used to hold the vertical frame in place, and the aluminium sheet edging around it.
I need to get the plumbing done too, but I've been working towards getting the interior ready to paint. I decided that the surface-mounted conduit for the light switches was too ugly, and that some small patches over holes needed to fish the cables would look nicer. So I did that with a little hole-saw and a lot of swearing:
Now I need to clean up that filler and patch those new holes, preferably without drilling right through the cables I just fished... I need to find my drill-stops or get some new ones so I can avoid that. Still, once painted the same as everything else, I think the circular patches will look just fine.
I replaced the last interior panel at the back, street-side, adding a large patch where the old water heater was. Insulation again was two layers of FBF. Still needs patching on the outside, but for the first time in a while there are no gaping holes in the trailer on the interior.
So, just need to make those few patches, remove all the switch plates again, sand as much as I can stand to, clean, mask off the windows, and get to work painting. Well, I need to choose the colours too. Probably a pale green for at least the higher parts of the walls and the ceiling, possibly with the lower wall panels in a different colour.
I patched the cracks in the skin by the door - I can't find a "before" photo in the thread - with a slightly-more-than-semi-circular patch about 10" in diameter. That's a link to a not-that-great photo of it, I didn't take a good one. It went pretty well except that I drilled a couple of holes in the patch that turned out to be too close to the edge of the door frame, so I couldn't get rivets through them. So I might have to make another patch and try again, with the holes slightly further from the edge.
On my need-to-buy-soon list:
- Alclad sheet for large exterior patch.
- 6061 sheet for belly skin.
- Water tanks: black, grey, fresh.
- Water pump/strainer.
- PEX line & fittings.
- Toilet.
- Inverter/charger.
- AGM battery (may cheap out for now and just use a slightly worn-out car battery).
|
|
|
|
|
03-06-2007, 05:07 PM
|
#58
|
|
a.k.a. Ambassador Tim
1960 28' Ambassador
Northern
, California
Join Date: Jun 2003
Posts: 1,921
|
Looking good!
For a free drill stop, you can strip off enough #12 solid wire that you probably have laying around and wrap it tightly around your drill bit like a big coil or spring. Wind enough around leaving only the tip of the bit free to the depth you want.
Keep it up!
|
|
|
|
|
03-06-2007, 07:21 PM
|
#59
|
|
Addicted to Aluminum
1959 18' "Footer"
1964 24' Tradewind
1954 29' Liner
Woodstock
, Georgia
Join Date: Jun 2005
Posts: 2,015
|
hey jacob. just read through your thread so far. great job! i'm documenting 2 of mine as well. i like the little circle patch you did. i just finished a third one like that on my 62 trotter today, in fact. also, i really like the front rock guard. very nice! can you see through it when hooked up? i've been thinking about getting rid of the fiberglass on my trade wind with something.... that aluminum looks like the trick!
great work!
jp
__________________
8576
there's always room for one more!
|
|
|
|
|
03-06-2007, 11:04 PM
|
#60
|
3 Rivet Member
1964 26' Overlander
Alameda
, California
Join Date: Sep 2006
Posts: 161
|
You can see through pretty well - I should take some photos. It's maybe 50-75% blocked, but you can definitely see. Now, as to how well it'll work as a rock guard, that I can't say yet.
|
|
|
|
|
|
|
Currently Active Users Viewing This Thread: 1 (0 members and 1 guests)
|
|
|
 Posting Rules
|
You may not post new threads
You may not post replies
You may not post attachments
You may not edit your posts
HTML code is Off
|
|
|
|

 Recent Discussions
 |
|
|
|
|
|
|
|
|
|
|
|
|
|
|
|
|
|
|
|
|
|


 Linear Mode

