 |
|
 11-04-2009, 12:32 PM
|
#221
|
3 Rivet Member 
1951 21' Flying Cloud
Western
, Kentucky
Join Date: Aug 2005
Posts: 228
|
If you have access to a drill press you could drill a line of holes and then clean it up with a metal file.
I have started making some of the small pieces i need for my trailer. While they don't look as good as the original at least I have something. You are right, finding some parts is impossible.
__________________
Greg Jones
|

|

|


|
11-04-2009, 02:52 PM
|
#222
|
4 Rivet Member 
1962 28' Ambassador
1962 30' Sovereign
Currently Looking...
Webster Groves
, Missouri
Join Date: Jul 2009
Posts: 309
|
Quote:
Originally Posted by soldiermedic

There were no standards of assembly back in 53 I have discovered, and I have had to rescreen a few times because I assembled the window the same as another only to realize that it wouldn't work after cutting a hole in the screen.
My biggest issue right now is that I do not have the aluminum grommets that hold the screen against the back channel. All of mine broke in removal, and nobody sells them. It's a piece of aluminum with a straight slit punched through it for the operator arm. If anyone has extras, has an idea ot bypass this, or can make some...let me know. Here is a picture.

Bob and I got two more windows and caps installed yesterday, and would have had a thrid if the aforementioned issue with the non standardized layouts have occurred.
Steve |
Steve,
I think we can make these ... I have a dremel tool and almost know how to use it! (The slots would be oval.)
Bob
|
|
|
|
|
11-04-2009, 02:57 PM
|
#223
|
Rivet Master 
Currently Looking...
Florissant
, USA
Join Date: Oct 2006
Posts: 5,083
|
Well Bob...if you can bring that there dremel over next time we can give it a shot. The old ones broke upon removal. I think the oval shape would be okay as long as the operator has a bottom edge to rest on.
Steve
|
|
|
|
|
11-04-2009, 05:32 PM
|
#224
|
Rivet Master
1958 22' Flying Cloud
1956 30' Sovereign of the Road
1963 16' Bambi
Southeastern Area
, Tennessee
Join Date: Jul 2006
Posts: 2,116
|
Just dawned on me . . .
You know, I didn't realize until looking at yours, then looking at my '56s pics, that the screen is sandwiched between the vertical frame bars and the operators. 
I think our operators are different (didn't they change in '56 to the crank?) but same basic window design. I can see how rebuild is so time-intensive. This means rescreening if necessary in the future will be a royal PITA, doesn't it?
Looks like you're moving along, Steve. So next time you and Amy come to Chattanooga you'll be parking the Cloud in Mom's yard? 
|
|
|
|
|
11-04-2009, 07:29 PM
|
#225
|
4 Rivet Member
1962 28' Ambassador
1962 30' Sovereign
Currently Looking...
Webster Groves
, Missouri
Join Date: Jul 2009
Posts: 309
|
Quote:
Originally Posted by Sugarfoot
You know, I didn't realize until looking at yours, then looking at my '56s pics, that the screen is sandwiched between the vertical frame bars and the operators.
I think our operators are different (didn't they change in '56 to the crank?) but same basic window design. I can see how rebuild is so time-intensive. This means rescreening if necessary in the future will be a royal PITA, doesn't it?
Looks like you're moving along, Steve. So next time you and Amy come to Chattanooga you'll be parking the Cloud in Mom's yard? |
Not bad for a thread killing statement ...
Bob
|
|
|
|
|
11-04-2009, 07:41 PM
|
#226
|
Rivet Master
1958 22' Flying Cloud
1956 30' Sovereign of the Road
1963 16' Bambi
Southeastern Area
, Tennessee
Join Date: Jul 2006
Posts: 2,116
|
Old Flying Clouds don't die . . .
No thread killing intended. 
|
|
|
|
|
11-04-2009, 07:48 PM
|
#227
|
4 Rivet Member
1962 28' Ambassador
1962 30' Sovereign
Currently Looking...
Webster Groves
, Missouri
Join Date: Jul 2009
Posts: 309
|
Quote:
Originally Posted by Sugarfoot
No thread killing intended. |
GOOD!
Bob
|
|
|
|
|
11-06-2009, 06:58 PM
|
#228
|
Rivet Master
Currently Looking...
Florissant
, USA
Join Date: Oct 2006
Posts: 5,083
|
Bob and I got a great deal of stuff done today. I don't have pictures since we finished at dark, but will get some tomorrow.
In short here is what we completed.
1. Finished riveting front panel in on all sides
2. Fabricated and installed panel forward of the door
3. Installed Hehr window forward of the door
4. Riveted side panel all the way back to the street side wheel well
It may not sound like alot, but the trailer is really coming together. The door will be a huge project as it will have to be rebuilt almost completely.
We need to focus on getting the rear belly pan completed, and rebuilding the last three windows. Then Insulate, wiring, and appliance work for the water heater and fridge.
Steve
|
|
|
|
|
11-06-2009, 07:16 PM
|
#229
|
Rivet Master
1956 22' Flying Cloud
1953 32' Liner
1955 22' Safari
Valley View
, Texas
Join Date: Jan 2006
Posts: 3,971
|
when your done
Send Bob down here when you Guys are done. Your rolling now.
|
|
|
|
|
11-06-2009, 07:23 PM
|
#230
|
4 Rivet Member
1962 28' Ambassador
1962 30' Sovereign
Currently Looking...
Webster Groves
, Missouri
Join Date: Jul 2009
Posts: 309
|
Quote:
Originally Posted by soldiermedic
We need to focus on getting the rear belly pan completed, and rebuilding the last three windows. Then Insulate, wiring, and appliance work for the water heater and fridge.
Steve
|
What do you mean "WE" white man?
(OLD Mad Magazine referance ...)
|
|
|
|
|
11-06-2009, 07:25 PM
|
#231
|
Rivet Master
Currently Looking...
Florissant
, USA
Join Date: Oct 2006
Posts: 5,083
|
Me and the OOmpa Loompa's that have been working to get this done. THAT'S WHO!!!!
|
|
|
|
|
11-06-2009, 07:26 PM
|
#232
|
4 Rivet Member
1962 28' Ambassador
1962 30' Sovereign
Currently Looking...
Webster Groves
, Missouri
Join Date: Jul 2009
Posts: 309
|
Quote:
Originally Posted by Melody Ranch
Send Bob down here when you Guys are done. Your rolling now.
|
My EX was from Texas ... loved the SA river walk, Enchanted Rock, Colorado river, the hill country, the planes, east texas ...
Bob
|
|
|
|
|
11-08-2009, 05:34 PM
|
#233
|
Rivet Master
Currently Looking...
Florissant
, USA
Join Date: Oct 2006
Posts: 5,083
|
Here is the new panel that Bob and I installed forward of the door a few days ago. I decided to keep the original VIN plate even though VTS makes some nice new and shiny ones. Today I installed the amber beehive marker light on the panel, and finished it off with stainless steel screws.
I also finished the window forward of the door, and we bucked it into place. All of the rebuilt windows are now installed, and the other two that have been removed are almost finished (Waiting on parts from VTS).
|
|
|
|
|
11-08-2009, 05:35 PM
|
#234
|
Rivet Master
Currently Looking...
Florissant
, USA
Join Date: Oct 2006
Posts: 5,083
|
I am now turning to the issue of entry door. I am starting a new thread on the forums to hopefully draw more people than just the people reading here. In the picture below, you can see the original knob and lock that the trailer came with. The door within a door had to be trimmed to fit this setup. My door's current lock specifications are 1.5" thick, 2 1/8" backset, and 2 3/8" escutcheon. The two locks that VTS sells work for my door thickness and the escutcheon size, but the backset is required to be 2 3/8" or 2 3/4".
The metal piece that the door knob and deadbolt are attached to will be replaced due to the door opening in transit sometime in its' lifetime, and is damaged along with the door frame. It is conceivable that I could move my backset to the required 2 3/8" or 2 3/4" backset, but that would push me further into the door within a door. Anyone have ideas other than using one of the two vintage knobs? What about using on of the 60's knob sets?


|
|
|
|
|
11-08-2009, 06:56 PM
|
#235
|
Rivet Master
1963 22' Safari
2020 27' Globetrotter
State of
, Washington
Join Date: Jul 2007
Posts: 2,512
|
I see in the other thread Andy suggested the L-100. Windows look great Steve, on the door, is the fork original? what's its purpose?
__________________
Scott & Megan
VAC LIBRARIAN WBCCI 8671
1963 Safari from the 1963-64 Around the World Caravan
|
|
|
|
|
11-08-2009, 07:37 PM
|
#236
|
Rivet Master
Currently Looking...
Florissant
, USA
Join Date: Oct 2006
Posts: 5,083
|
Scott,
The fork was original when I brought it home. The fork is actually holding the door within a door together. The fasteners for my door within a door are not the same as all of the others out there. You can see where the fork attaches right? There was originally a spinning latch that turned and fastened the door through that part where the fork is. I am missing all the other parts other than where the fork is, and I plan to rebuild the whole thing using the fasteners that are from VTS, and are more common for the door within a door.
|
|
|
|
|
11-10-2009, 03:55 PM
|
#237
|
Rivet Master
Currently Looking...
Florissant
, USA
Join Date: Oct 2006
Posts: 5,083
|
Not alot going on here lately while I wait for a shipment from VTS. New stainless steel hinges, more hehr gasket, and a new rivet on door gasket are on the way.
I did however stop by the etrailer.com HQ and picked up some Pollak 7 pin connectors for the umbilical. I like the look more than letting the cable snake out of the frame or a hole in the belly pan. It took awhile to get everything done, but I am happy with the way it looks. The wire coming out of the receptacle will go directly into my junction box.
Steve
|
|
|
|
|
11-16-2009, 06:01 PM
|
#238
|
|
Addicted to Aluminum
1959 18' "Footer"
1964 24' Tradewind
1954 29' Liner
Woodstock
, Georgia
Join Date: Jun 2005
Posts: 2,015
|
Quote:
Originally Posted by soldiermedic
I am now turning to the issue of entry door....
|
I dunno if you saw this, but my door is the same as yours. The smaller door is coved out to make room for the knob. it even has a small piece of aluminum trim that curves around the door knob, too. I'm keeping mine the same way. You could always have the small door fabbed up without the curve if you move the knob outwards. I'm going to have to so a fair amount of metal work on 2 doors sometime over the winter... fun fun fun!
JP
__________________
8576
there's always room for one more!
|
|
|
|
|
11-17-2009, 06:03 PM
|
#239
|
Rivet Master
Currently Looking...
Florissant
, USA
Join Date: Oct 2006
Posts: 5,083
|
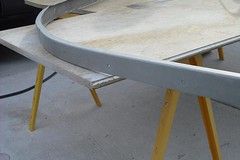
For months I have been looking for a local company that does soda blasting, but have had little luck. The lone prospect wanted $100 per hour, $50 a bag of blasting soda, and $0.58 cents a mile to my house for gas. I was born at night, but not last night!
So last Friday I was perusing the website of everybody's favorite place to hate on. The place where cheap and poorly made Chinese tools live...Harbor Freight. They had a portable soda blaster that held 10 pounds of media on sale for $79.00. I figured at this price it was worth it even if I had to bring the tool back. I picked up the blaster, set of funnels, and a 50 pound bag of blasting soda for $145.00.

Harbor Freight's 10 lb soda blasting rig
Assembly at home took 10 minutes, and was pretty straight forward. I took it outside and set my sights on cleaning off my front and rear trim caps. The caps were covered in paint and bondo from a previous panel accident. It took a few minutes to get the adjustments right, but the blaster worked incredibly well. Last week I had applied paint stripper and took several coats of paint off, but most of it wouldn't budge. The results of soda blasting are quite amazing.

56 years of paint and bondo

After a couple minutes of blasting with medium grit blast media
 Clean with minimal effort

Soda blasting causes no damage to the metal surface
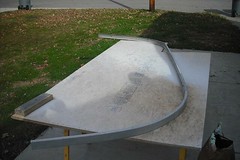
Completely done stripping the paint and bondo.
With the trim cap completely stripped, we installed it using round headed stainless steel screws. The cap doesn't fit perfectly, and I suppose it never fit perfectly on the original skin either. Strategically placed sealant will clean the edge up where the cap doesn't fully mesh against the front panel.
|
|
|
|
|
11-17-2009, 07:37 PM
|
#240
|
Rivet Master
1963 26' Overlander
Austin
, Texas
Join Date: Feb 2008
Posts: 2,640
|
Looks great Steve!
Do you have any more blasting to do? I'm interested in how well the tool holds up over time. If it lasts through several jobs then I'd say it is well worth the money and effort.
Keep up the good work!
-Marcus
|
|
|
|
|
|
|
Currently Active Users Viewing This Thread: 1 (0 members and 1 guests)
|
|
|
 Posting Rules
|
You may not post new threads
You may not post replies
You may not post attachments
You may not edit your posts
HTML code is Off
|
|
|
|

 Recent Discussions
 |
|
|
|
|
|
|
|
|
|
|
|
|
|
|
|
|
|
|
|
|
|


 Linear Mode

