 |
|
 03-29-2015, 11:11 AM
|
#81
|
4 Rivet Member 
2009 25' FB Flying Cloud
1973 31' Sovereign
Mount Angel
, Oregon
Join Date: Mar 2014
Posts: 259
|
No, we haven't stripped it, nor do we plan to---at this time. We are OK with the unique coloring, which doesn't really show in the photo. It is an unusual bronze-gold-green, depending upon the lighting and which part of the trailer body you are looking at. Once there is failure of the clear-coat throughout, we will strip.
The extreme discoloration was surface lying and would have really looked freaky with exposure to rain / wind. So that was removed.
Now the custom warpage----hmm, that will remain, as well. All scars leave a story to tell. 
|

|

|


|
03-29-2015, 08:55 PM
|
#82
|
Rivet Master 
2012 25' FB Eddie Bauer
Vintage Kin Owner
Virginia Beach
, Virginia
Join Date: Sep 2004
Posts: 7,801
|
Elegantly waving your hand at the exterior of Phoenix, genteely opine, "This, like the patina of a Tiffany Lamp must never be removed or it will lose 90% of it's value, my dear."
Say it with like you're pimping Gray Poupon! Then wink.
The inside cleaning job is almost more impressive than the outside work. I'd have had at least 2 or 3 crying jags by now, just imagining what remains. Do the contents of the refrigerator help that much?
Woof.
__________________
Today is a gift, that's why they call it the present.
|
|
|
|
|
03-30-2015, 02:49 PM
|
#83
|
Rivet Master
2012 25' FB Eddie Bauer
Vintage Kin Owner
Virginia Beach
, Virginia
Join Date: Sep 2004
Posts: 7,801
|
Same fire?
TWO in the same state!
look at this, your Phoenix wants a friend!
Phoenix and Firebird!
http://www.airforums.com/forums/f44/...ml#post1600375
see post 23
__________________
Today is a gift, that's why they call it the present.
|
|
|
|
|
03-30-2015, 03:43 PM
|
#84
|
Rivet Master
2000 19' Bambi
mt. Prospect
, Illinois
Join Date: Oct 2006
Posts: 829
|
Wow - I am in awe at your determination. The results are speaking for themselves - nice job! Thank you for taking time to share your experience. You'll have great stories and memories to share, and every time you go go camping you are bound to spend a lot of time recounting them.
Hope to meet you on the road somewhere.
|
|
|
|
|
03-30-2015, 11:09 PM
|
#85
|
4 Rivet Member
2009 25' FB Flying Cloud
1973 31' Sovereign
Mt Angel
, Oregon
Join Date: Jul 2010
Posts: 362
|
Maybe more than two in the same state!!
The same insurance salvage lot where we bought the Phoenix also had a crispy Marathon Motorhome. Here's a news report on the fire:
Fire Damages RV & Boat Storage Facility | KEZI
__________________
Best, Burnside
"To err is human, to air is devine."
|
|
|
|
|
04-05-2015, 11:31 AM
|
#86
|
4 Rivet Member
2009 25' FB Flying Cloud
1973 31' Sovereign
Mount Angel
, Oregon
Join Date: Mar 2014
Posts: 259
|
Contact previous owner??
I want to contact the previous owner (whom I've "cyber-stalked" and find he is a nice guy: retired professional, assistant Pastor in his church) to let him know the fate of his AS. What do you-all think of this? Invasive? Opening a can of worms?  I would be curious to know if my injured AS was trashed or treasured.
He did have some belongings in the cupboards..no worry-some items. It was as though he went to the AS store and bought everything that he thought that he may need, but then never used! It was like opening a treasure box. Nothing of any great personal value, but all those items (leveling blocks, heavy duty ext cord, etc.) do add up.
Hmm, I wonder what happened to the TV?
Susan
|
|
|
|
|
04-05-2015, 12:03 PM
|
#87
|
4 Rivet Member
2009 25' FB Flying Cloud
1973 31' Sovereign
Mt Angel
, Oregon
Join Date: Jul 2010
Posts: 362
|
Roof Cleaning the Phoenix
More Phoenix Progress
*
I’ve been working on the roof. In doing so, we’ve found some problems that will require addressing.
*
Roof Progress:
*
*
 [/url]
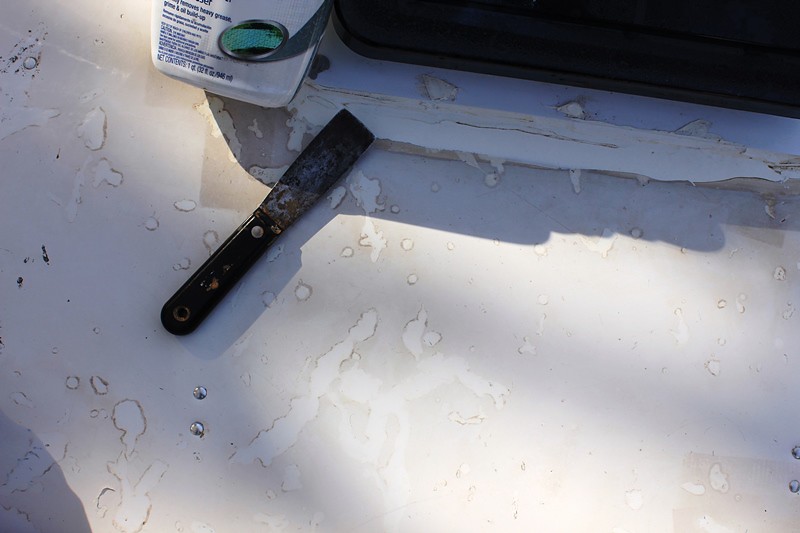
The PPG clear coat did “pop off” in two areas. The gold color is clearly in the clear coat as the aluminum is bright and shiny everywhere the clear coat came off.
*
The largest spot in the photo is about ¼” x ¼”. Our plan is to cover these spots with a brush on automotive clear coat repair product like “Scratch Fix”, but we would like to hear your successful fixes for this problem. (Have also heard of clear fingernail polish being used for this).
*
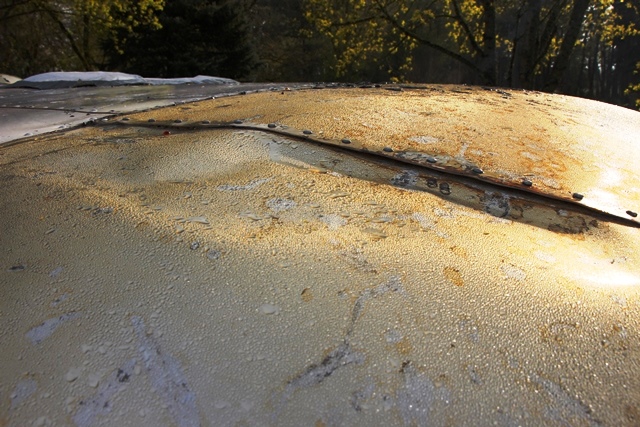
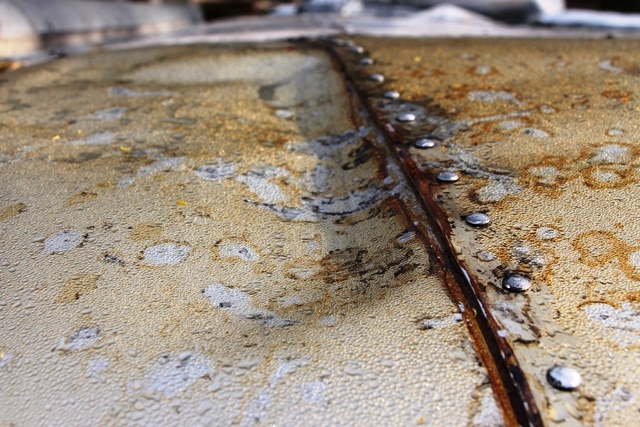
Some of the seams show signs of heating. The Trempro 636 sealant seemed to expand and push its way out from under the Acryl-R top coat. This happened on both panel and window seals as shown below. Our plan is to reseal with Acryl-R on the panel seams and to reseal windows with a base layer of TremPro 636 and top layer of Acryl-R. But we are open to suggestions if you’ve a better way.
* 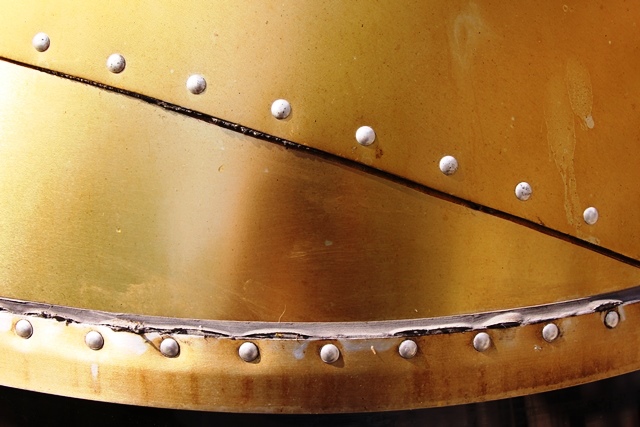 *
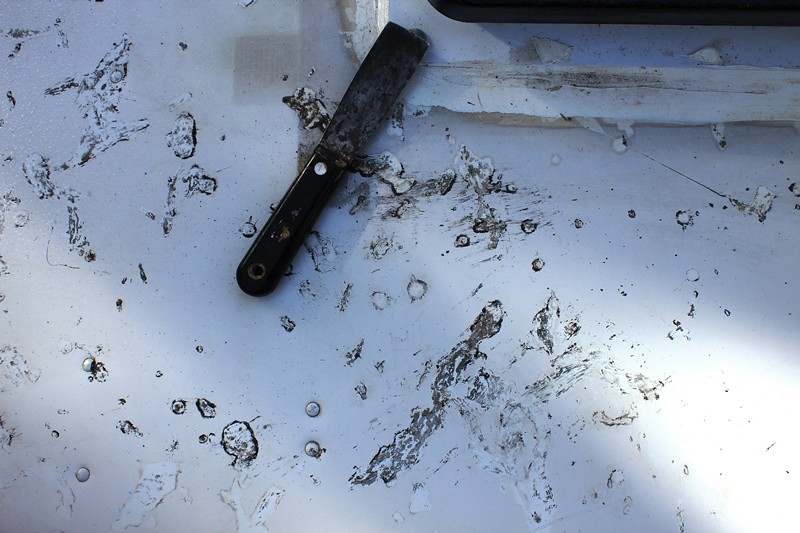
And now that the roof is pretty well cleaned, we found the Phoenix has had one, possibly two, encounters of a too close kind. Notice in the second photo that the rivits are Olympic rivits, not original bucked rivits.
*
*
So I’ve been wondering if there wasn’t a first too close encounter, followed by an Olympic rivet repair, followed by a second too-close encounter repaired with a caulk that didn’t resist the fire's heat too well.
*
The Olympic rivits are loose, and the spherical panel is pulled so far out of the overlap joint that I’m guessing the spherical panel is free of some of the rivets. Our plan is to remove the interior panel, address the dents, reseal the overlap, and rerivet, preferably with bucked rivits.
*
Of course, I don’t have any buck riveting tools. So what would you all do? Have the local airstream shop rerivit, or buy the appropriate tooling and do it yourself? I’ve been looking at the aircraft tooling which prompts a question: Any farm boys out there who have used sickle bar riveting tools to rivet their Airstreams? There is a world of difference on pricing—sky high versus down to earth—although clearances could be an issue.
*
Well, that’s it. We’ve got most the repair parts ordered, as well as a Porter Cable DA buffer/polisher. Need to finish up that exterior so we can start replacing that melty stuff.
__________________
Best, Burnside
"To err is human, to air is devine."
|
|
|
|
|
04-05-2015, 01:42 PM
|
#88
|
|
New Member
west palm beach
, Florida
Join Date: Apr 2015
Posts: 1
|
Shower pan
1983 excella shower pan. What is best to fix a crack
|
|
|
|
|
04-05-2015, 07:27 PM
|
#89
|
|
Remember, Safety Third

1973 27' Overlander
Catfish Corners
, Georgia
Join Date: Oct 2004
Posts: 5,720
|
Quote:
Originally Posted by duncans

I want to contact the previous owner (whom I've "cyber-stalked" and find he is a nice guy: retired professional, assistant Pastor in his church) to let him know the fate of his AS. What do you-all think of this? Invasive? Opening a can of worms? I would be curious to know if my injured AS was trashed or treasured.......
Susan |
Hey Susan, if I were in this situation, I would would make two, very humble, attempts to contact him. If he doesn't respond, then I'd leave it be. You never know what happened between him, the insurance company and the storage facility. He may have not been "made whole" in the process, or he may have been "taken care of" in the best sense of the word. One would hope that as a Pastor, he would be very receptive, but one can never tell.
For all we know, they bought him a new one (hopefully). Or, much worse things could have happened. Bottom line is that I'd give it a shot, but not push it. After all, you did find him after a reasonable Internet search. But some folks think that's way past creepy (sorry for the obvious Google analogy).
Jim
|
|
|
|
|
04-07-2015, 09:15 AM
|
#90
|
Rivet Master
2000 19' Bambi
mt. Prospect
, Illinois
Join Date: Oct 2006
Posts: 829
|
Buck riveting
I've buck riveted rub strips and logos on Vespas using two hand held sledge hammers, holding one on the back while hitting the front. It's really cool how after a few hits the rivet heats up and just settles into place. Of course, you'll need a partner to hold the inside hammer in this case, but I believe no fancy tools are needed. Try it out on some scrap to get a feel for it, and you'll find it's pretty easy.
|
|
|
|
|
04-07-2015, 12:13 PM
|
#91
|
Rivet Master Commercial Member
1957 30' Sovereign of the Road
1959 28' Ambassador
1949 24' Limited
Peru
, New York
Join Date: Sep 2004
Posts: 745
|
Quote:
Originally Posted by Burnside Bob
More Phoenix Progress
*
Ive been working on the roof. In doing so, weve found some problems that will require addressing.
*
Roof Progress:
*
*
[/url]
The PPG clear coat did pop off in two areas. The gold color is clearly in the clear coat as the aluminum is bright and shiny everywhere the clear coat came off.
*
The largest spot in the photo is about ¼ x ¼. Our plan is to cover these spots with a brush on automotive clear coat repair product like Scratch Fix, but we would like to hear your successful fixes for this problem. (Have also heard of clear fingernail polish being used for this).
*
Some of the seams show signs of heating. The Trempro 636 sealant seemed to expand and push its way out from under the Acryl-R top coat. This happened on both panel and window seals as shown below. Our plan is to reseal with Acryl-R on the panel seams and to reseal windows with a base layer of TremPro 636 and top layer of Acryl-R. But we are open to suggestions if youve a better way.
* *
And now that the roof is pretty well cleaned, we found the Phoenix has had one, possibly two, encounters of a too close kind. Notice in the second photo that the rivits are Olympic rivits, not original bucked rivits.
*
*
So Ive been wondering if there wasnt a first too close encounter, followed by an Olympic rivet repair, followed by a second too-close encounter repaired with a caulk that didnt resist the fire's heat too well.
*
The Olympic rivits are loose, and the spherical panel is pulled so far out of the overlap joint that Im guessing the spherical panel is free of some of the rivets. Our plan is to remove the interior panel, address the dents, reseal the overlap, and rerivet, preferably with bucked rivits.
*
Of course, I dont have any buck riveting tools. So what would you all do? Have the local airstream shop rerivit, or buy the appropriate tooling and do it yourself? Ive been looking at the aircraft tooling which prompts a question: Any farm boys out there who have used sickle bar riveting tools to rivet their Airstreams? There is a world of difference on pricingsky high versus down to earthalthough clearances could be an issue.
*
Well, thats it. Weve got most the repair parts ordered, as well as a Porter Cable DA buffer/polisher. Need to finish up that exterior so we can start replacing that melty stuff. |
Vintage Trailer Supply has all the buck riveting tools at reasonable prices.
Colin
|
|
|
|
|
04-07-2015, 12:21 PM
|
#92
|
Rivet Master Commercial Member
1957 30' Sovereign of the Road
1959 28' Ambassador
1949 24' Limited
Peru
, New York
Join Date: Sep 2004
Posts: 745
|
Quote:
Originally Posted by duncans
Colin,
I see from your site that you have a lot of experience and have done some beautiful work. However, I am, at this point, a tired 60 yo Trauma ICU nurse, still working full time and can't get myself excited to strip this trailer just yet. I did strip an entire (exterior)Victorian Farmhouse (abt 2500 sq ft, 38 ft tall) using methylene chloride, then sanded the entire thing. It took me 5 months between work days and lots of vaca hours. There was not a single knot in that entire house. Gorgeous shiplap a full inch thick. I think I;ll hod off on that until I am retired. I actually just want a bit of fun in my life! My husband has worked hard on removing the big piles of gunk, but I doubt that he would ever consider touching Methylene Chloride. Nasty stuff, but it works wonderfully!
Susan
|
Vintage Trailer Supply has some quasi eco friendly stripper that we use stripping trailers. Just apply it with a big paint roller with an extension handle, then pressure wash off. Wait for the residue to dry on the ground overnight, then sweep up & put in the trash. This can be done in about a half a day. It'll look a lot better than looking like a recreation of Wally's gold trailer.
Colin
|
|
|
|
|
04-27-2015, 06:02 PM
|
#93
|
4 Rivet Member
2009 25' FB Flying Cloud
1973 31' Sovereign
Mount Angel
, Oregon
Join Date: Mar 2014
Posts: 259
|
Colin,
If we did choose to strip the clear coat, or rather when we choose to strip the clear coat, does your recommended stripper affect the sealants? Does all of the window caulking have to be pulled out and redone?
Thanks for the info!
Susan
I don't care for he WB Gold, either
We haven't made much progress, other than resealing windows. We are waiting for parts to show up.
|
|
|
|
|
04-27-2015, 06:27 PM
|
#94
|
Rivet Master Commercial Member
1957 30' Sovereign of the Road
1959 28' Ambassador
1949 24' Limited
Peru
, New York
Join Date: Sep 2004
Posts: 745
|
Quote:
Originally Posted by duncans
Colin,
If we did choose to strip the clear coat, or rather when we choose to strip the clear coat, does your recommended stripper affect the sealants? Does all of the window caulking have to be pulled out and redone?
Thanks for the info!
Susan
I don't care for he WB Gold, either
We haven't made much progress, other than resealing windows. We are waiting for parts to show up.
|
The stripper is much milder than Aircraft Stripper, so I don't think you'll have any issues, providing you don't leave it on the sealants too long.
On a separate topic, although your electrical appears to be working correctly, there may be some damage to the grommets & wire sheathing inside the walls due to the intense heat. Just a word of caution.
Colin
|
|
|
|
|
09-14-2015, 09:23 PM
|
#95
|
4 Rivet Member
2009 25' FB Flying Cloud
1973 31' Sovereign
Mount Angel
, Oregon
Join Date: Mar 2014
Posts: 259
|
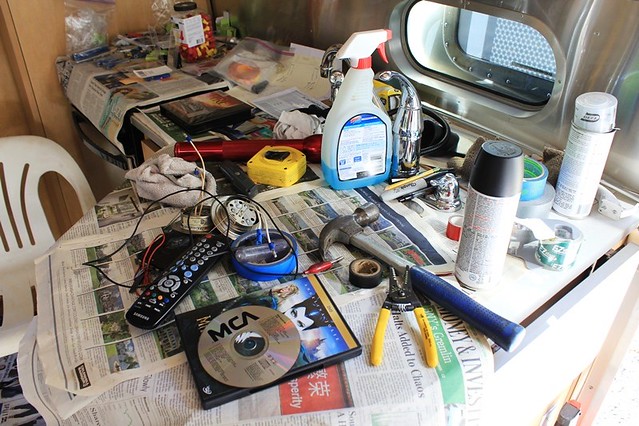
Update on our Fledging Phoenix
The progress is not exactly "on fire". We still haven't received all of our replacement parts--astounding! The dealers say the parts haven't yet shipped from the Mothership, backordered. However, that hasn't kept us from proceeding. Backpacking did that.
What's happening now: well, we listened to you, Colin, and checked out the wiring in the ceiling. Yikes!!! Things were cooking up there!. The electrical wire insulation got hot enough to bubble up, so down came the central ceiling panel, which of course, is connected to the bathroom wall, which is connected to the ...etc. So,insulation tossed, AC removed single-handedly, walls coming down, fixtures are stripped, relacquered, updated to LED. We have quite a way to go and will be needing to move to shelter soon before the Fall rains arrive. I am just hoping that when we put it all back together that we don't end up with a bucket of spare parts. (which happened with the tractor, but it ran quite well, and still does...!) This project really isn't my husband's "thing", but he has really been putting in a lot of effort this month.
The outside has, surprisingly, faded from that golden glow to silver. Well, perhaps I need to see the Phoenix next to another AS to renew my perception. Quite a few of the ripples have disappeared as well. The big ones remain.
I was tempted to place this under the September Labor of Love photocontest, but Dave has a different photo in mind. So here is tonight's entertainment:
|
|
|
|
|
09-14-2015, 10:22 PM
|
#96
|
Rivet Master
2012 25' FB Eddie Bauer
Vintage Kin Owner
Virginia Beach
, Virginia
Join Date: Sep 2004
Posts: 7,801
|
Thanks for keeping us updated. Even to me, it does look like it's fading back to silver. Bless the sun!
Paula
__________________
Today is a gift, that's why they call it the present.
|
|
|
|
|
10-18-2015, 11:16 AM
|
#97
|
4 Rivet Member
2009 25' FB Flying Cloud
1973 31' Sovereign
Mt Angel
, Oregon
Join Date: Jul 2010
Posts: 362
|
More Cleaning and Caulking
Where has Summer gone??
Duncans has given a brief update on our Phoenix projectthis gives some details.
Here is a photo of how things are looking now (Oct 15, 2015):

To work on the roof I piled up 2x8 and 2x6 lumber along the awning and, on the road side, 4x6s with a cleat to catch the awning rail. I can then place the 2x12 lumber seen at the far end of the trailer across these wood rails to access the entire roof without walking it. Im using the trailers frame as the scaffoldthe awning and awning rail are above the joints where the trailer roof C channel sockets into the trailer wall I beamthe strongest place.
But I digress. Lets back up to my last report, namely:

I finished getting all the gloppy stuff off the trailer. About this time we ordered all the stuff we thought we were going to needFantastic Fans, bath fans, AC, skylight, running lights, radio and TV antennae. And while waiting for the new stuff to arrive, I started recaulking everything.
The caulking project turned out to be extremely time consuming. Cleaning the old caulk and ruined two sided tape took forever and required extensive use of dental tools and solvents.
Both the mothership and the local Airstream dealer were sold on Adseal as the gold standard window seam caulker, but I found the Adseal difficult to work with. I just could not get a consistent bead, requiring smoothing with a plastic tool or finger and masking. I started using blue painters tape to mask, and found that by pleating the tape I could mask the cornersbut the pleats made my smoothing tool jump so I was not happy with the results.
Then, idea, why not mask with electricians vinyl tape? Worked excellent. On a warm day you can curve electricians tape around all the windows. The Adseal was still a pain, tho, and I was so frustrated at the slow progress that I didnt take any photos. Except the scare light. But somehow I deleted those photos. Thats what you get with amateurs. Anyhow, electricians tape is the bomb for masking corners.
I mentioned the warmth, right? Well it was getting to summer now, and with the sun tracking higher the trailer was no longer shaded. And it got hothottest summer ever in Western Oregon!!
We grow a lot of our own food, have berries, an orchard, too much lawn, and by the time I would finish the gotta-do-it-now weeding hoeing spraying mowing picking pruning irrigating the Phoenix was too hot to work on or in.
So progress slowed big timebut did not stop entirely. Most of the Phoenixs new stuff had arrived. So I popped off all the burned up stuff, leading up to:
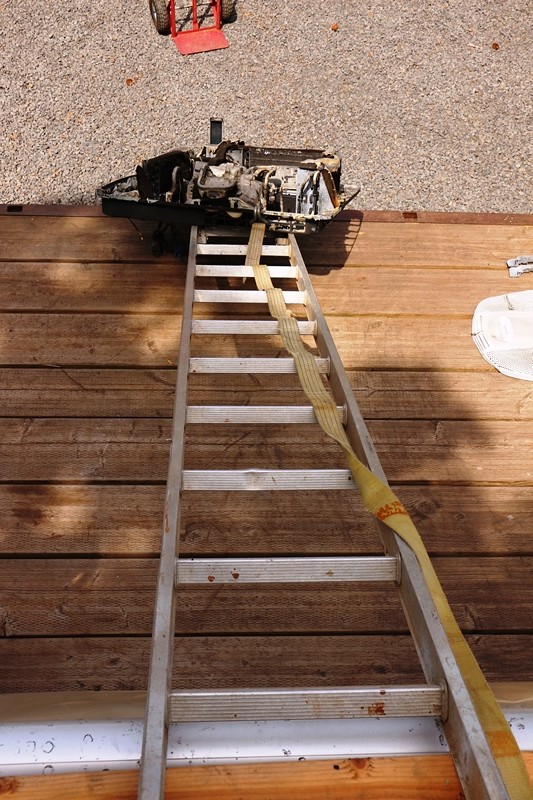
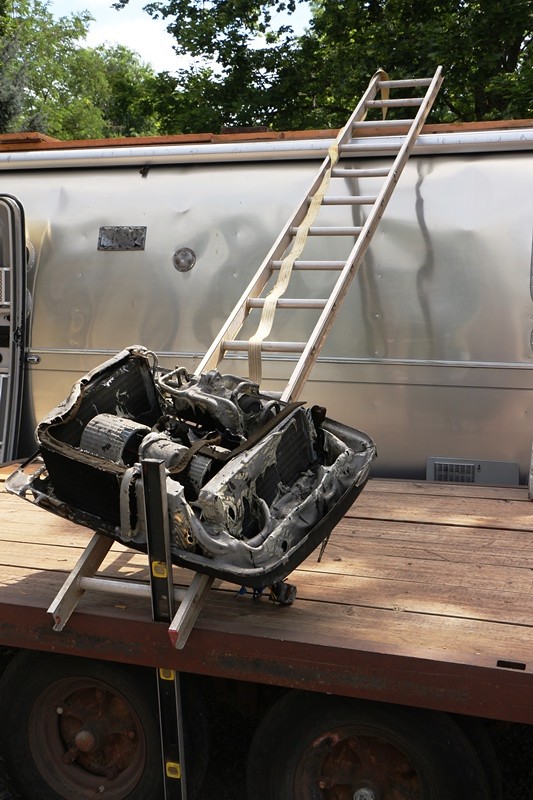
How to remove air conditioner by yourself:
Scaffold system in place per above.
Free AC from top of trailer.
Lift AC onto ramp.
Slide AC down ramp using a cargo strap to control speed.
Take photos of successful mission.
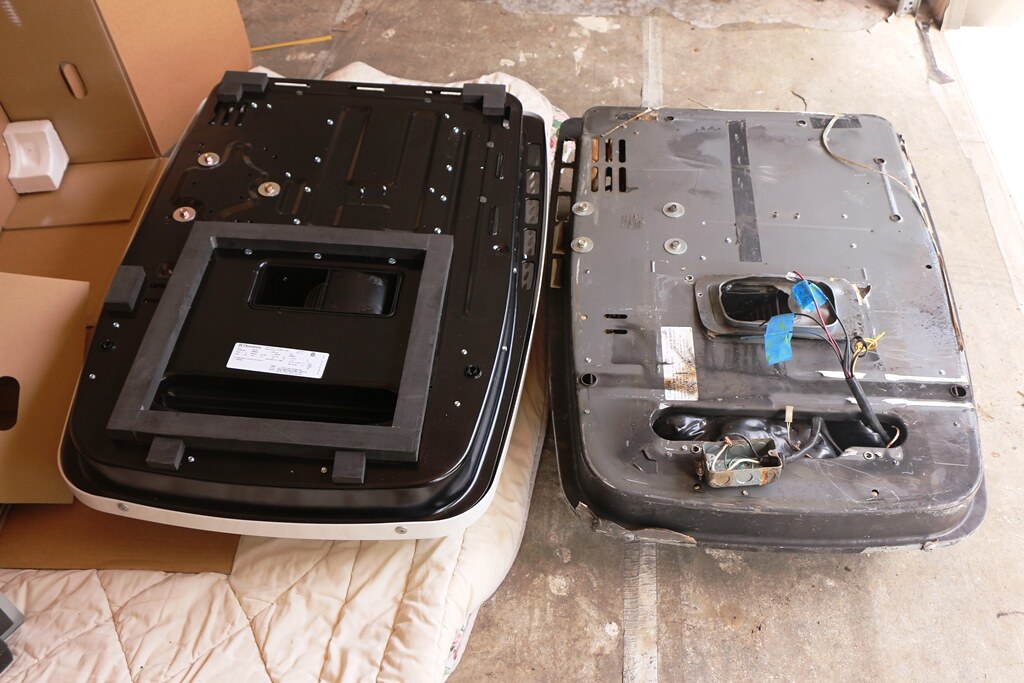
New AC vs oldlittle bit bigger both width and length, and uses a foam weather seal:
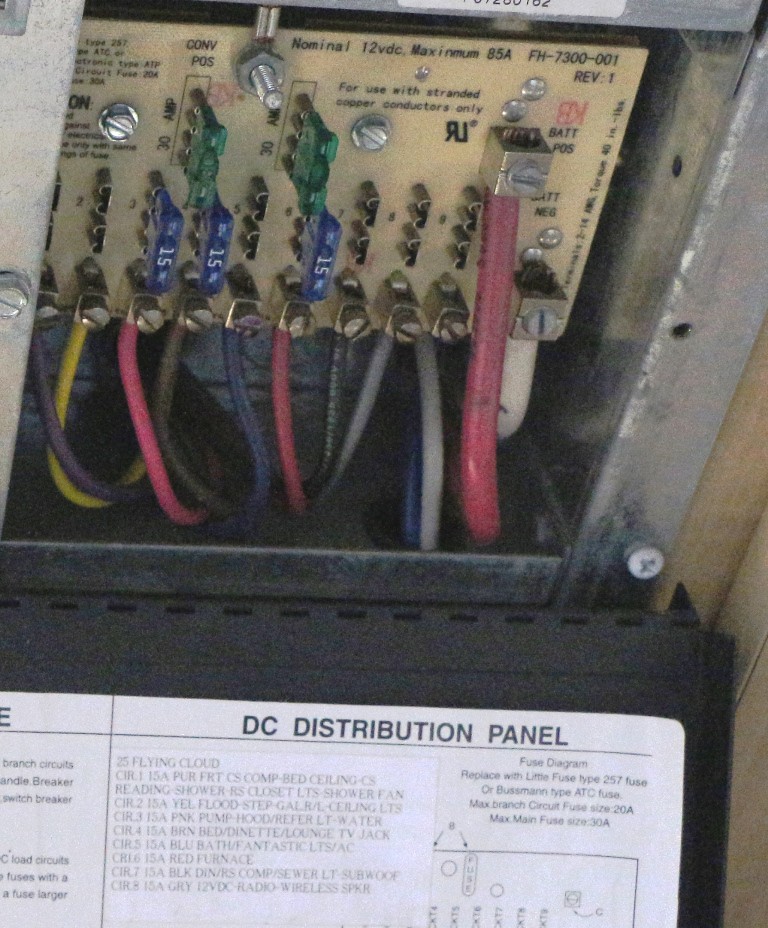
Having the new stuff begged the question, how to wire this stuff in, anyhow?? Colin was right, the wiring was not good. Remaining 15A fuses show the circuits that dont have a problem.
Which brings us to the next phase of operationsre wiring. That will be a new post.
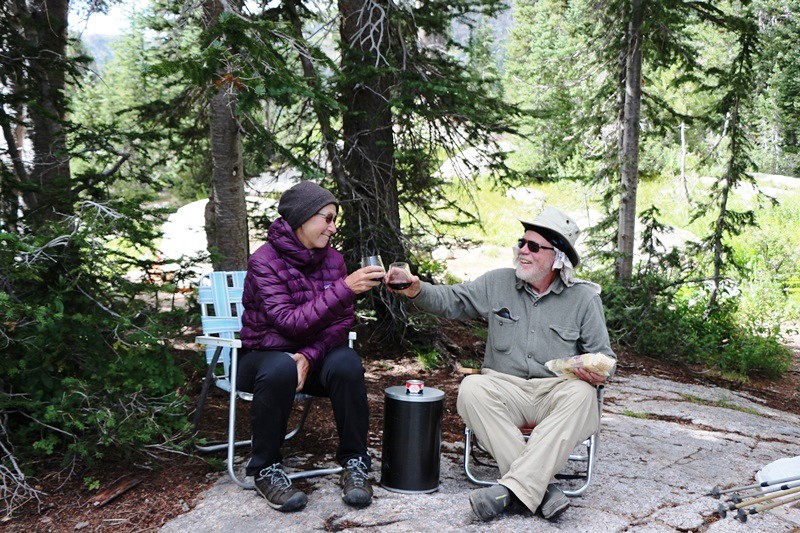
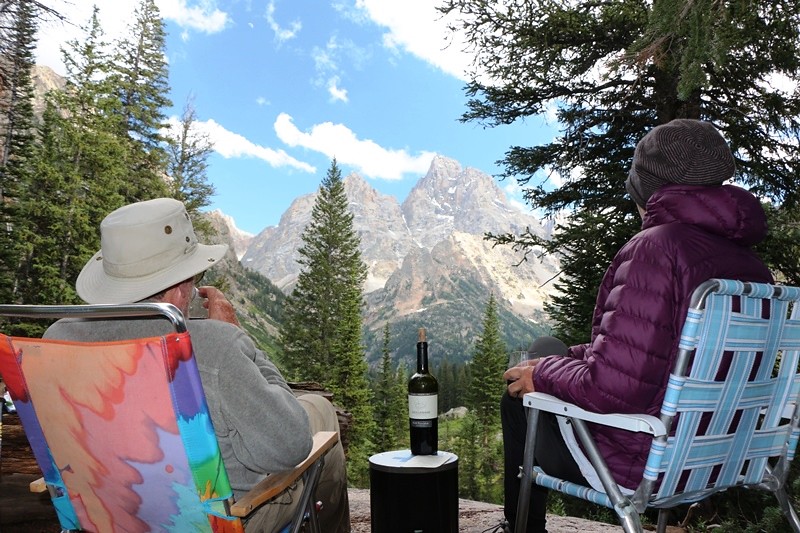
But Summer wasnt all work. Here we are celebrating duncanss 60th in the back country of Grand Teton National Park:
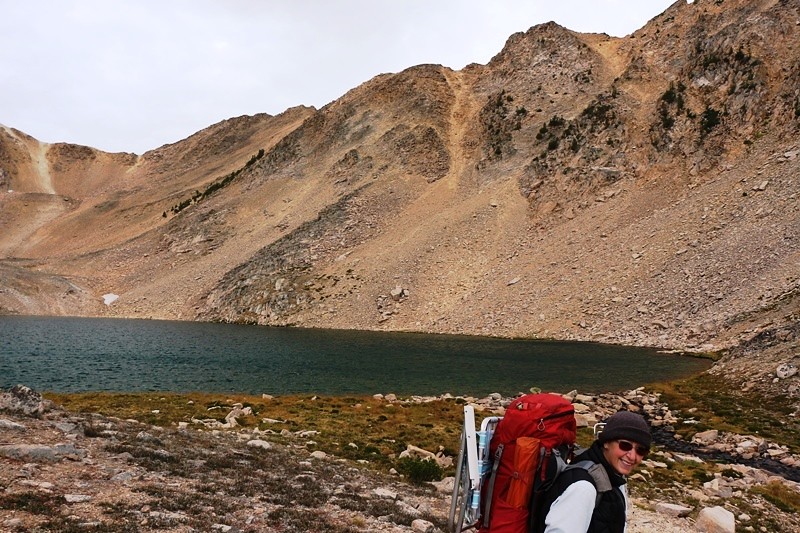
Lost in the White Clouds, Idaho:
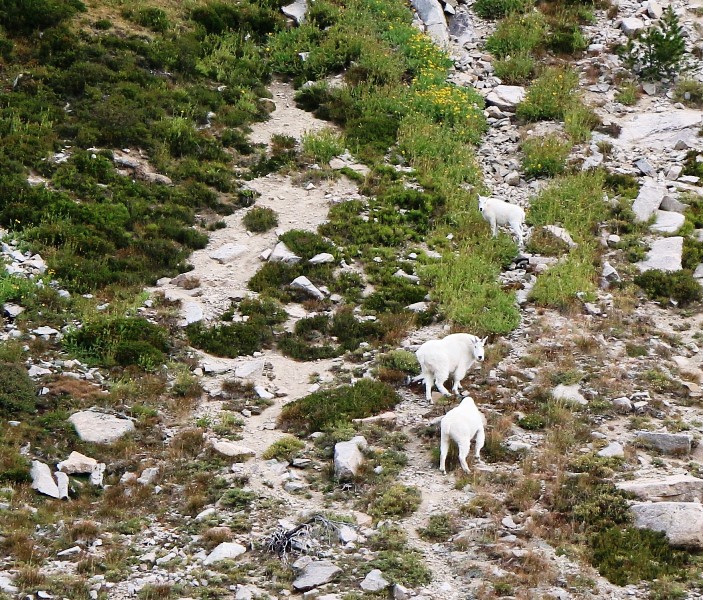
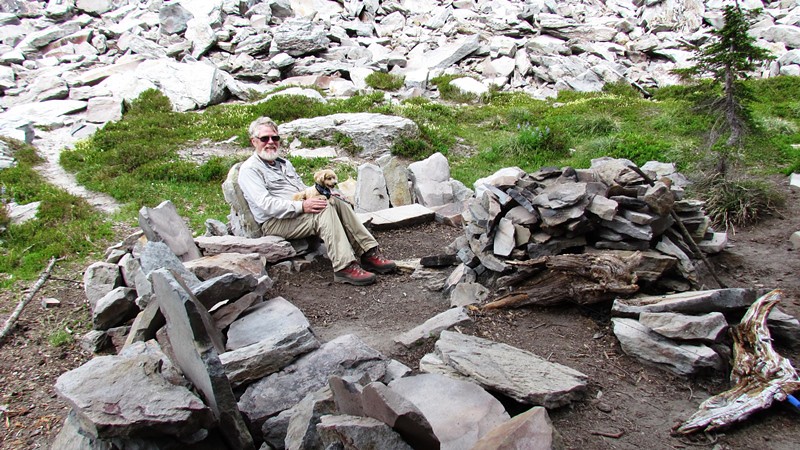
Washingtons Goat Rocksyeah, goats there too but they were shy:
Till next time!!
__________________
Best, Burnside
"To err is human, to air is devine."
|
|
|
|
|
10-25-2015, 12:23 PM
|
#98
|
4 Rivet Member
2009 25' FB Flying Cloud
1973 31' Sovereign
Mt Angel
, Oregon
Join Date: Jul 2010
Posts: 362
|
Rewiring Day--Kinda Like Independence Day
Rewiring Day
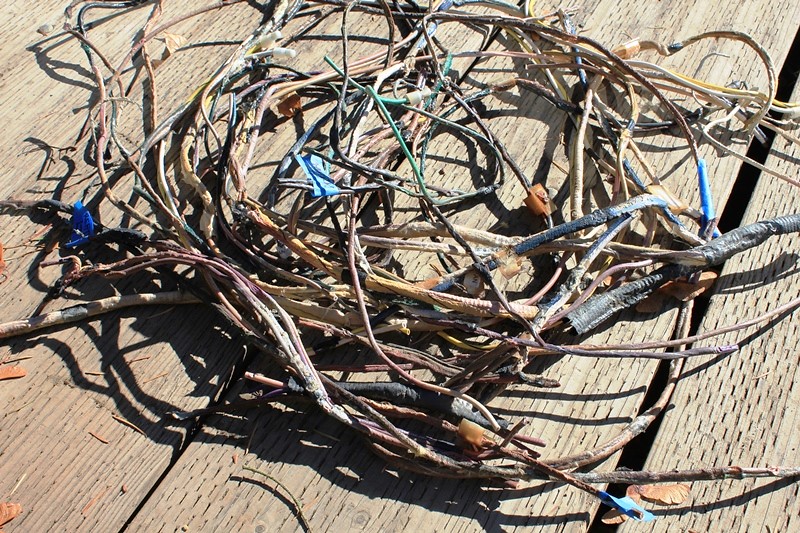
The 12V system had major issues. Of 8 circuits, only the three below the trailers midline were OKyep, 4 dead shorts plus the dark blue circuit, which feeds the fans, tested OK with the volt meter, but the insulation was all puffy and toasted. Kinda like a smore. So 5 bad circuits.
Fuse panel with circuit function explanation:
Airstream does not make wiring diagrams available for our 2009 Flying Cloud 25 FB, but underneath the bathroom sink I discovered an access panel to the space behind the galley Foldette door. Reaching in, I could feel wiringtwo 6 wire looms with connector plugs I could pull into the bathroom.
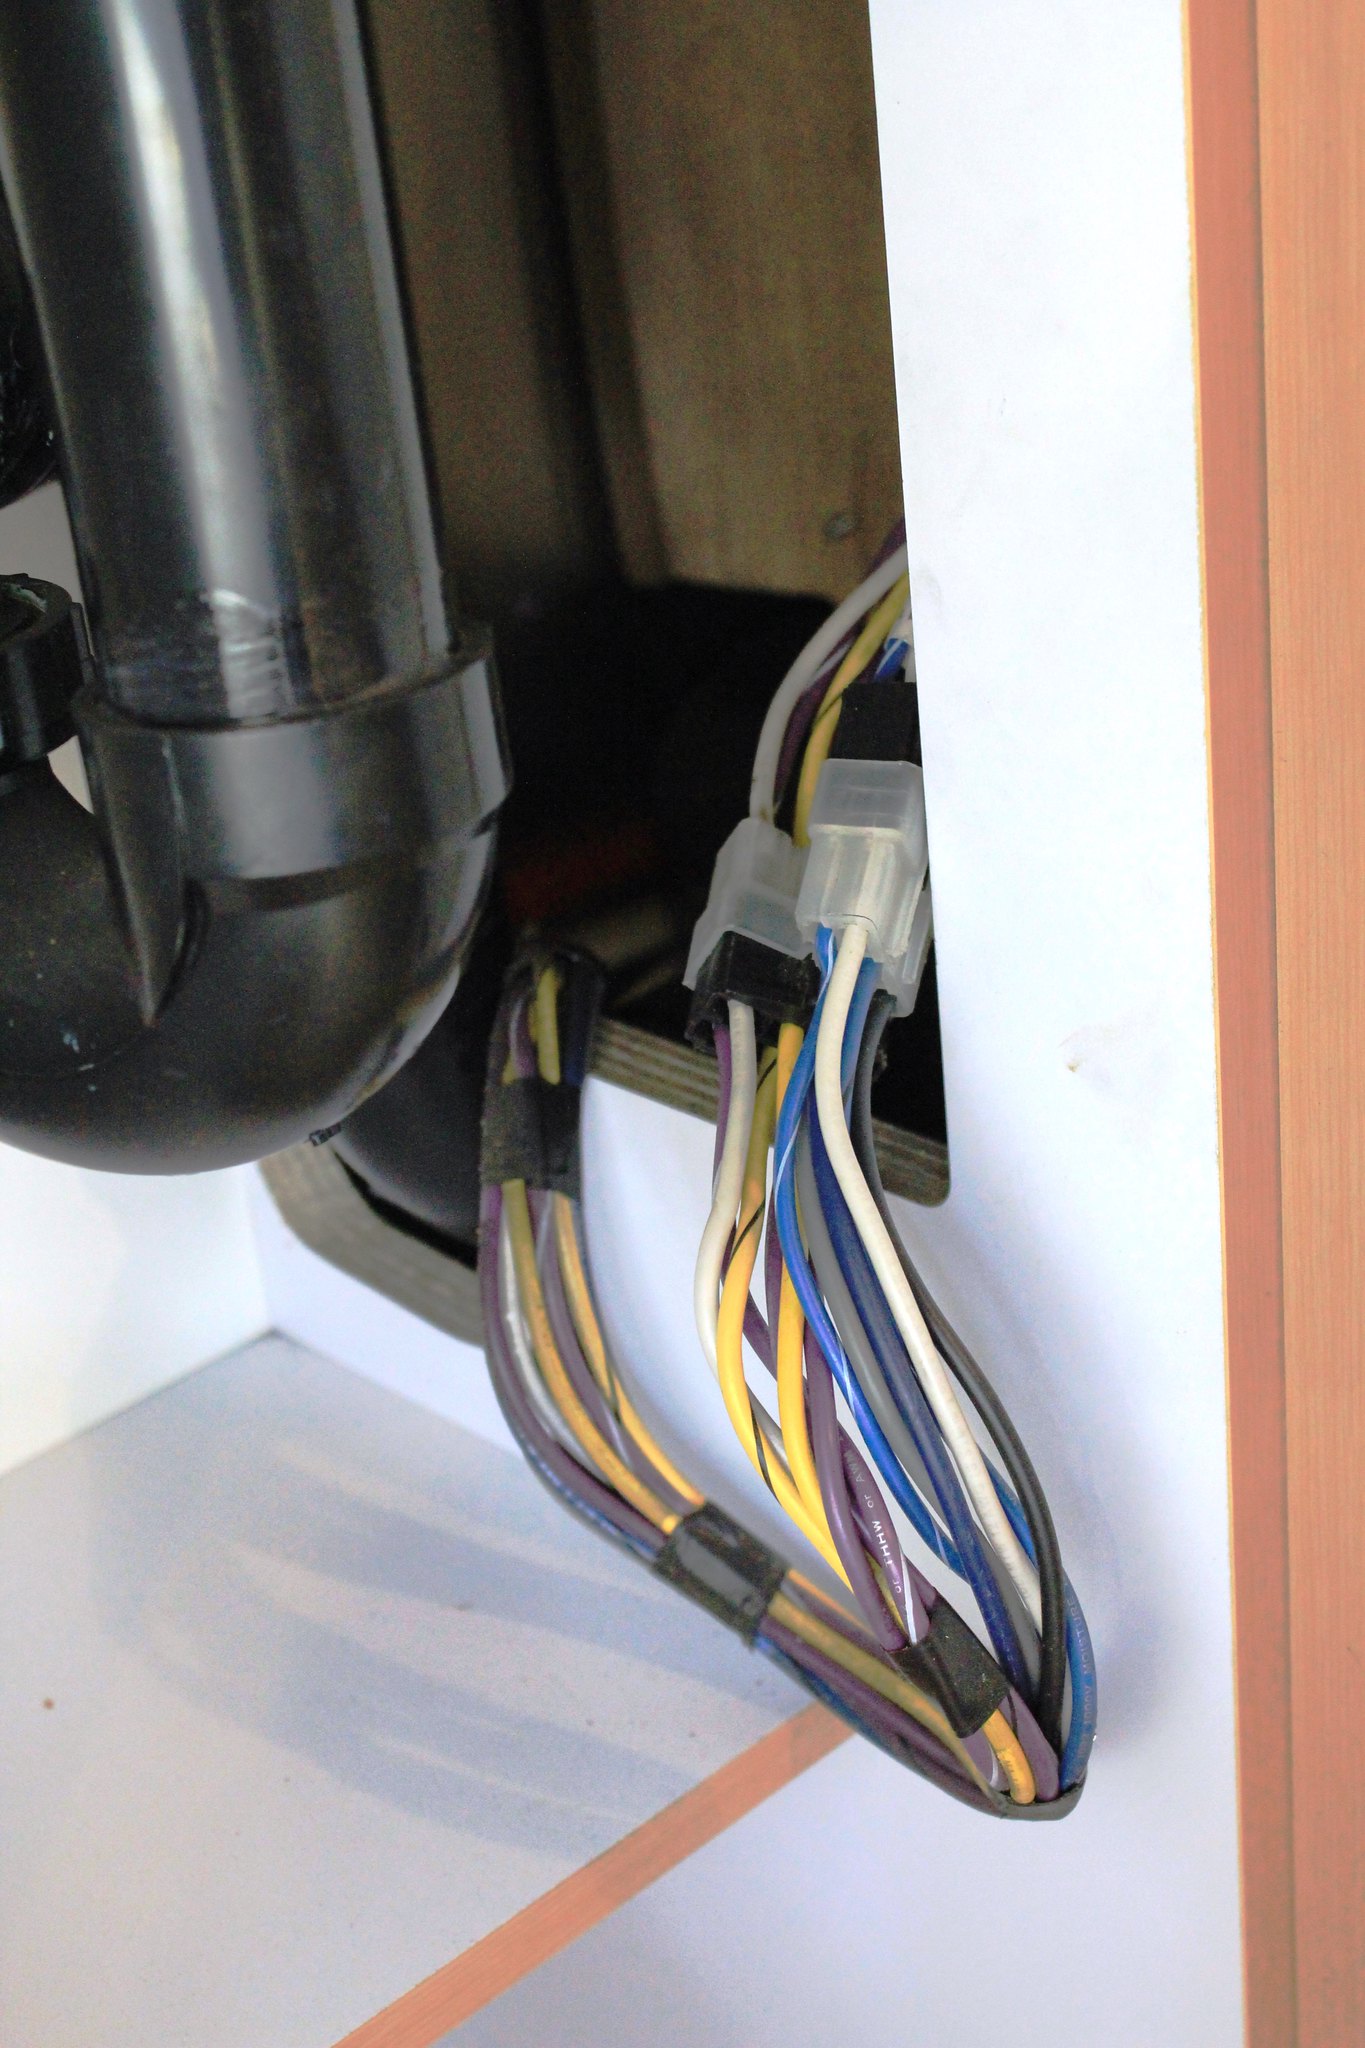
Disconnecting the plugs, my short circuits went away. Yeah, problems all isolated to the trailer above the beltline. Booo!! The center panel has to come out. And with this I knew what I had to dothe path forward was clear where most of summer I was unclear and stymied.
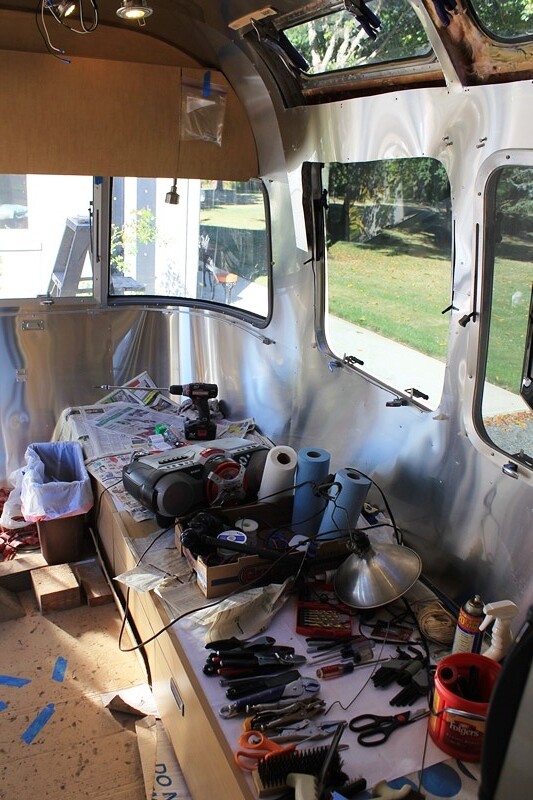
Taking advantage of a family get together, 5 of us dropped the center panel and snaked it out the door. Doing so required removing the bathroom door and the pilasters on either side of it. The black water tank vent pipe is hidden inside the forward pilaster, and had to be cut to get the panel out.
Having a little familiarity with mechanical chases in buildings, I expected to find the wiring looms behind the center panel. Nope. No looms in sight except one crossing the center aisle underneath the AC. To access the looms, I removed the rivets securing the remaining ceiling panels to the trailer frame ribs.
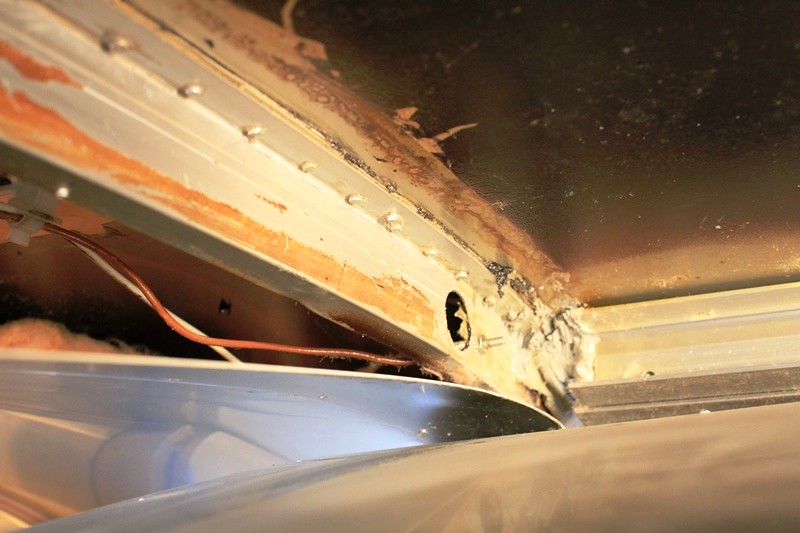
Pulling all the insulation, I could now see the looms. Where these had stayed in the C channel at the edge of the roof assembly they looked good. But where they had wiggled their way out of that protective metal shield, they were melted. The heat had changed the wiring colorsall were now a tannish color, so the only way to know what a wire did was to follow it to its termination. This led me to discover that not all devices are wired on the circuit Airstream indicates. The 12V plug in the entertainment equipment area is described as being on the brown circuitand it did have a brown wire stub to itbut was actually wired into the black circuit.
In following photo: Tan colored wire, originally whiteis tied to ground post. White wire is new. Grey matter is old caulk and marks transition where caulk wasnt thermally altered to greasy grime.
Airstream caulks the seams and rivits on the inside. The fires heat had altered this caulk to a greasy, slimy semi-fluid that adhered wonderfully to your hands and tools, and transferred readily to anything you or the tools touched. Contagion!! So my next step was to clean the transmogrified caulk.
Caulk around vista views, before and after cleaning, after new caulk. Vise grips are supporting unriveted panel so it doesnt crease at vista view cutouts:


Then, finally, out with the bad wires. Airstream does an excellent job securing the wires to the outer shell with plastic wire clamps, making it impossible to pull bad wire even in short runs. So wire removal took much longer than anticipated.
Out bad wires, Out!
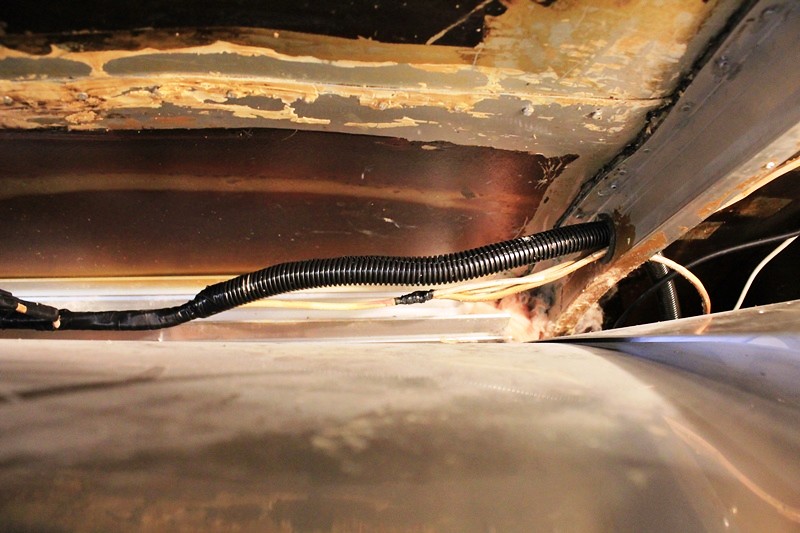
Following wire removal, I applied a spray-on sealer to seal off any burnt-odor producing materials. The brown material on the interior of outer skin is a spray on adhesive used to anchor the insulation.
And in with the new.
View to front of trailerceiling pucks and fantastic fan wired back in:
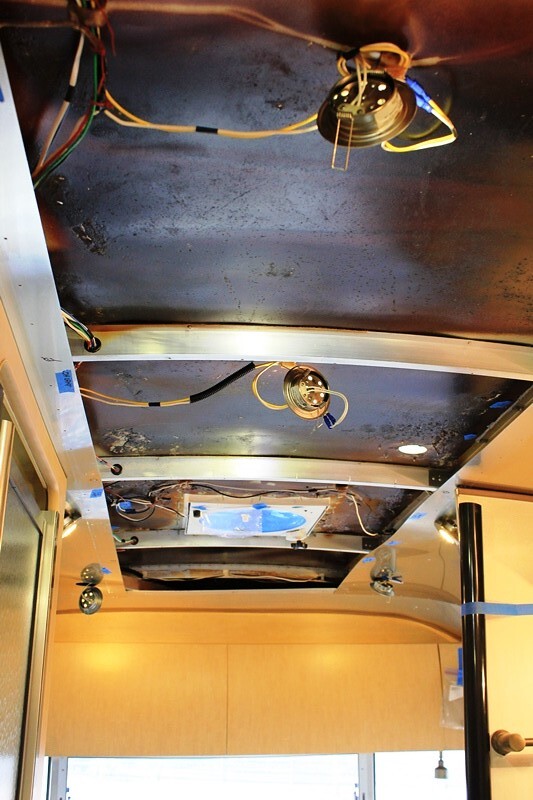
View to rear of trailerAC placed but not yet wired.

New wire loom connection to old. Could not remove old wiring into entertainment system. Roof seam visible in photo had a rubber-like caulk applied to inside which was then over-coated with the caulk that turned to greasy grime. Yuk to the max.
Working circuit by circuit, the trailers 12V functions came back on line. Finally, I finished the last circuitthe circuit that powers the entertainment system. I pushed in the fuseWhew, it held!! And, with a little pushing and prodding of the Sony, the FM came on:
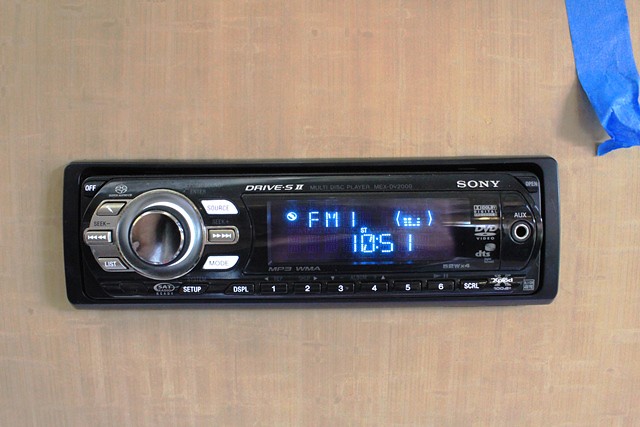
I put a DVD in. It played!!
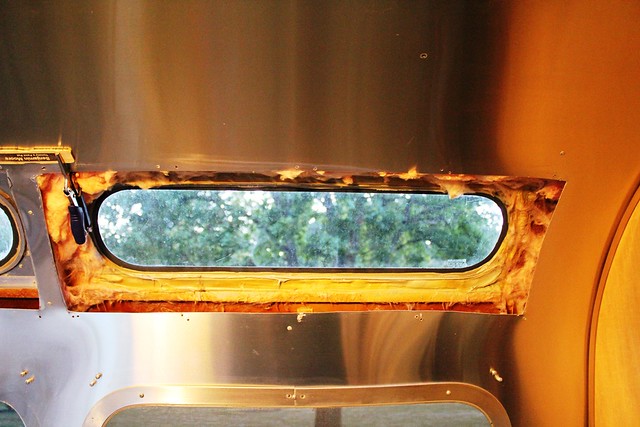
With new wiring stubs in place, I could install the new running lights, fantastic fans, bath and shower vents, antennae, etc. I cleaned all the old caulk off the trailer roof to find that the caulk had pretty much dissolved the baked on ceramic coating, leaving bare aluminum around each opening.

While the exposed aluminum did look like it had clear coat on it, I applied Airstreams acrylic clear coat on all exposed areas before installing the roof top goodies. I also used closed cell foam gaskets under everythingthe Fantastic Fans come with a sheet of gasket material, the off-fall from which is more than enough to make gaskets for the bath and shower fans and the tank vents.
And since the roof looked so much better where I had cleaned around the roof top goodies, I ended up going over the entire roof a second time with a putty knife and Zep 505 cleaner. Thanks Colin for suggesting the Zep. Before and after:

Airstream runs #12 wire to each running light. The connector they use is so large it cant be pulled thru the hole so you cant wire a new running light from outside the trailer. I had to take some rivits out of the end caps to access the running light wiring inside the trailer. Each running light had a huge glop of caulk applied on the inside which had transmogrified to s**t and was very messy to deal with.
Upgrades: we upgraded the puck lights to LEDs from LED4RV.com. Bathroom and scare lights were ruinedreplaced with LED versions. Rewired puck lights with bullet connectors so individual light fixtures are plug and play. I am going to run HDMI cables from the entertainment system to the lounge and bedroom television locations, allowing us to show stuff from our laptops on the TV and, if we spring for the $$, entertainment upgrade to digital and TV upgrades to hi res.
Adding accessories: Airstream prewires for installation of accessories. Each 6 wire loom into the top of the trailer had 5 wires at the plug. If you had the correct molex terminal, you could continue a supplied hot wire to an accessory. There were prewired drops behind the shower and at the relays where the 12V feed from the battery bank comes into the trailer.
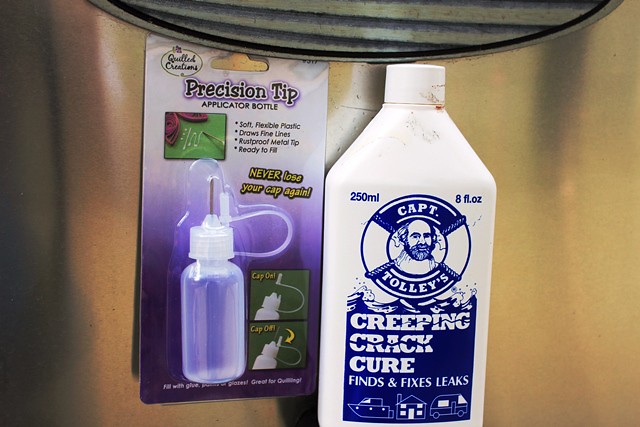
Yesterdays milestone (Oct 24)Completed Tolleyization of all exterior rivitssome done twice. I picked up the applicator in the craft section of our local pharmacyworked excellent. Good thing, raining today.
General chaos:
Will we ever get to use this trailer? Its been a long haul and the trailer has yet to move an inch!!
Will keep you posted!!
__________________
Best, Burnside
"To err is human, to air is devine."
|
|
|
|
|
10-25-2015, 12:45 PM
|
#99
|
Rivet Master
2008 25' Classic
Full Time
, Texas
Join Date: Nov 2012
Posts: 4,309
|
You sure have fortitude.
Kelvin
__________________
2008 Classic 25fb "Silver Mistress"
2015 Ram 2500 6.7L Cummins. Crew Cab, 4x4, Silver
|
|
|
|
|
05-14-2016, 09:30 AM
|
#100
|
4 Rivet Member
1972 31' Sovereign
Silverton
, Oregon
Join Date: Aug 2014
Posts: 354
|
They made it
__________________
"Daddy when's the trailer going to be finished?"
It's done. I mean mostly. It works anyway.
|
|
|
|
|
|
|
Currently Active Users Viewing This Thread: 1 (0 members and 1 guests)
|
|
|
 Posting Rules
|
You may not post new threads
You may not post replies
You may not post attachments
You may not edit your posts
HTML code is Off
|
|
|
|

 Recent Discussions
 |
|
|
|
|
|
|
|
|
|
|
|
|
|
|
|
|
|
|
|
|
|


 Linear Mode

