 |
 07-09-2017, 09:55 PM
|
#1
|
1 Rivet Member 
1974 Argosy 28
Euless
, Texas
Join Date: Jul 2017
Posts: 9
|
Soooo we bought a trailer... Now for the fun part!
Hi All, My better half and myself have purchased a "gutted" 1973 Argosy. We snagged it on a whim bc the deal seemed too good to pass up and we've always wanted one.
I've attached a couple of pictures of the trailer and hope that a couple of ya'll can tell me what I've gotten myself into! 
Any pointers on where to start? Causes for concern? Resources to read?
Thanks and I look forward to contributing as we refurb our new baby!
|

|

|
|
07-09-2017, 09:59 PM
|
#2
|
1 Rivet Member
1974 Argosy 28
Euless
, Texas
Join Date: Jul 2017
Posts: 9
|
Some Additional Pics of the Interior
Everything has been pulled except what looks like the electrical and some of the pipes to the old sink and bathroom fixtures.
|
|
|
|
|
07-10-2017, 05:27 AM
|
#3
|
Rivet Master 
1964 22' Safari
1968 26' Overlander
Beaver County
, Pennsylvania
Join Date: May 2008
Posts: 620
|
Cfuller,
Congratulations on your project and welcome to the forums. We think you're off to a great start, simply by being here on this forum. We've found folks to be very helpful and responsive to questions. When you get stuck, you'll find someone here has been where you are before and has solved the problem. Even better, they are willing to share their successes and often a few "what NOT to do experiences."
You've got a blank canvas to work with, but generally the advice will be, make it roadworthy and safe first, then focus on making it campworthy (many have used their rigs as aluminum tents while restoring), and finally make it yours with all your special features, decor, and options.
Given that someone started working on yours and then stopped, you'll need to figure out what's been done. Think in terms of the running gear; axles, bearings, brakes, wheels, tires, hitch, safety chains, etc. Did the previous owner replace or repair any and does it look sound. Getting to the frame for inspection is a bit challenging. If flooring has to be replaced, you'll get a glimpse of parts of the frame, if the belly pan is (partially or totally) removed you'll get a better view. The waste tanks are still in place, from the look of your photos. Do they hold water? That may influence how deeply you go into the project. As you get a feel for these types of things, you'll get to decide whether you can renovate with the shell on or whether it will need to come off. That's an important and significant decision. A shell off project will take significantly more time.
I've included a link to our most recent project, if your interested; https://www.airforums.com/forums/f39...er-155180.html . We believe the forums made a big difference in our end result, so we encourage you to keep reading and searching here as you progress. You'll soon know a lot more questions to ask and get a lot of opinions about the answers.
We hope you enjoy the project phase of Airstreaming as much as we're sure you'll enjoy the traveling and adventure in your Argosy.
Roy and Marie
|
|
|
|
|
07-10-2017, 07:32 AM
|
#4
|
1 Rivet Member
1974 Argosy 28
Euless
, Texas
Join Date: Jul 2017
Posts: 9
|
Quote:
Originally Posted by 64airstream

Cfuller,
Congratulations on your project and welcome to the forums. We think you're off to a great start, simply by being here on this forum. We've found folks to be very helpful and responsive to questions. When you get stuck, you'll find someone here has been where you are before and has solved the problem. Even better, they are willing to share their successes and often a few "what NOT to do experiences."
You've got a blank canvas to work with, but generally the advice will be, make it roadworthy and safe first, then focus on making it campworthy (many have used their rigs as aluminum tents while restoring), and finally make it yours with all your special features, decor, and options.
Given that someone started working on yours and then stopped, you'll need to figure out what's been done. Think in terms of the running gear; axles, bearings, brakes, wheels, tires, hitch, safety chains, etc. Did the previous owner replace or repair any and does it look sound. Getting to the frame for inspection is a bit challenging. If flooring has to be replaced, you'll get a glimpse of parts of the frame, if the belly pan is (partially or totally) removed you'll get a better view. The waste tanks are still in place, from the look of your photos. Do they hold water? That may influence how deeply you go into the project. As you get a feel for these types of things, you'll get to decide whether you can renovate with the shell on or whether it will need to come off. That's an important and significant decision. A shell off project will take significantly more time.
I've included a link to our most recent project, if your interested; https://www.airforums.com/forums/f39...er-155180.html . We believe the forums made a big difference in our end result, so we encourage you to keep reading and searching here as you progress. You'll soon know a lot more questions to ask and get a lot of opinions about the answers.
We hope you enjoy the project phase of Airstreaming as much as we're sure you'll enjoy the traveling and adventure in your Argosy.
Roy and Marie |
THanks for the warm welcome!
I'm definitely going to be using this forum as a primary resource. As of now I haven't been able to find any solid step by step guides outside of the boards for our first set of reno's (sub floor, electrical, and window seals).
As for the trailer's fitness for the road. We pulled it over 3 hours from Oklahoma back to Texas and through a heavy HEAVY rainstorm to boot this past weekend. Barely noticed it behind my F350 and it wasn't making any unusual noises. The bearings have caps and actually had a little bit of grease coming out of the injection valve. 
The electrical is NOT working at all right now, so we ran without turn signals, brake lights, etc. Luckily the storm scared most people off the road. One bonus is that all windows and the door seem to be water tight. The flooring was only a tad damp in a couple of areas due to a couple of holes in the aluminum underbelly. My truck was throwing some serious water so I consider this little bit of water a HUGE win.
Good advice on starting with the little things. I think we'll add a new jack this week and start looking for shorts in the running light electrical.
Will post pics as we progress!
|
|
|
|
|
07-10-2017, 02:22 PM
|
#5
|
Rivet Master
1964 26' Overlander
1974 31' Sovereign
Milton
, ON
Join Date: Oct 2002
Posts: 1,225
|
First on my list would be to check for floor rot. Most of the floor looks good in your photos, but the important part is where the floor goes under the wall. When an Airstream/Argosy leaks the water often goes between the inner and outer skins and pools at the bottom of the wall. From there is can seep through the bolt and screw holes into the plywood. The plywood floor is part of the structural connection between the shell and the frame, so it's important that it's sound. Go around the outside of the floor (where it goes under the wall) with something sharp to see if it's sound all the way around. If it's not, you'll need to repair it, either by patching if it's only a few places, or replacing the whole floor.
We replaced the whole floor on our '74 Sovereign and found that the frame needed a lot of repair as well. At least 2/3 of the outriggers needed to be replaced or repaired, as well as a couple of crossmembers. This isn't the fun part, but having a sound floor and frame will allow you to move forward with a good foundation and will avoid problems later. I recently saw a trailer for sale where the people created a beautiful interior, but admitted that the floor and frame needed work. That's a big waste of time and money because pretty much the entire interior needs to be removed to replace the floor and weld the frame.
We also removed the interior skins to re-insulate and rewire. Not everyone goes to that extent, but I feel better knowing that I don't have mouse nests in the old fibreglass or 40-year-old wiring problems that I can't see.
Looks like a great project!
|
|
|
|
|
07-10-2017, 03:11 PM
|
#6
|
1 Rivet Member
1974 Argosy 28
Euless
, Texas
Join Date: Jul 2017
Posts: 9
|
Thanks Davidson! There definitely a few spots that will need some patching. You answered a question that I've been pondering today about the floor....I'd rather not replace entire pieces and patch up the small stuff. Most of the rot spots are no bigger than 5 or 6 inches. Do you think I can just cut the affected area and patch with a well secured piece? (Thinking largest I'll try to patch is maybe 10x10 inches)
My plan is to drop the aluminum shield underneath and get a better look at the underside to determine the extent of the damage and get a good look at the trailer for rust. I'll definitely going to be sanding any metal and reapplying a rust proof paint. I'm feeling optimistic due to the pretty great condition of the topside, but who know what she's hiding underneath. lol
Can you confirm if I'll have a pretty good view of the subfloor if I drop the aluminum?
Also do you have any advice on removing the vinyl interior skin? I've seen some folks who say "don't do it not worth the trouble", and others gut to the metal without thinking twice.
Only been on this forum since last night and I'm loving it! Sooooo much great info available.
|
|
|
|
|
07-10-2017, 03:29 PM
|
#7
|
4 Rivet Member 
2017 30' International
Lincolnwood
, Illinois
Join Date: Apr 2016
Posts: 312
|
Quote:
Originally Posted by 64airstream
Cfuller,
Congratulations on your project and welcome to the forums. We think you're off to a great start, simply by being here on this forum. We've found folks to be very helpful and responsive to questions. When you get stuck, you'll find someone here has been where you are before and has solved the problem. Even better, they are willing to share their successes and often a few "what NOT to do experiences."
You've got a blank canvas to work with, but generally the advice will be, make it roadworthy and safe first, then focus on making it campworthy (many have used their rigs as aluminum tents while restoring), and finally make it yours with all your special features, decor, and options.
Given that someone started working on yours and then stopped, you'll need to figure out what's been done. Think in terms of the running gear; axles, bearings, brakes, wheels, tires, hitch, safety chains, etc. Did the previous owner replace or repair any and does it look sound. Getting to the frame for inspection is a bit challenging. If flooring has to be replaced, you'll get a glimpse of parts of the frame, if the belly pan is (partially or totally) removed you'll get a better view. The waste tanks are still in place, from the look of your photos. Do they hold water? That may influence how deeply you go into the project. As you get a feel for these types of things, you'll get to decide whether you can renovate with the shell on or whether it will need to come off. That's an important and significant decision. A shell off project will take significantly more time.
I've included a link to our most recent project, if your interested; https://www.airforums.com/forums/f39...er-155180.html . We believe the forums made a big difference in our end result, so we encourage you to keep reading and searching here as you progress. You'll soon know a lot more questions to ask and get a lot of opinions about the answers.
We hope you enjoy the project phase of Airstreaming as much as we're sure you'll enjoy the traveling and adventure in your Argosy.
Roy and Marie |
I agree whole heartedly that the forums provide a wealth of information and will probably be your best resource. You can ask specific questions of people.
Just keep in mind that most of us are just airsteamers and in most cases not professional airstream mechanics. Be picky about what info you choose, because all of it may not be correct.
One other word of caution.
Being part of this airstream community is HIGHLY ADDICTIVE !!!
I know because my wife tells me that I'm an ADDICT.
Afraid she's right !
|
|
|
|
|
07-10-2017, 03:38 PM
|
#8
|
|
Half a Rivet Short
2017 30' Classic
2022 Interstate 24X
Carlisle
, Pennsylvania
Join Date: May 2017
Posts: 15,740
|
Hi
Congratulations !!!!
One driver on playing with the "lovely vinyl" on the inner skin will be your plans. If you want to dig into things like electrical rewiring the electrical, that makes a difference. If part of the group *loves* the vinyl, that matters as well. I happen to *like* the look of the aluminum skin (you probably guessed that already). Others aren't as crazy about it.
In any case, figure out the floor, chassis and running gear first. Hopefully there are no big issues on any of that and you cruise on to the next stage.
Bob
|
|
|
|
|
07-10-2017, 05:37 PM
|
#9
|
Rivet Master
1964 26' Overlander
1974 31' Sovereign
Milton
, ON
Join Date: Oct 2002
Posts: 1,225
|
Quote:
Originally Posted by Cfullertx
Thanks Davidson! There definitely a few spots that will need some patching. You answered a question that I've been pondering today about the floor....I'd rather not replace entire pieces and patch up the small stuff. Most of the rot spots are no bigger than 5 or 6 inches. Do you think I can just cut the affected area and patch with a well secured piece? (Thinking largest I'll try to patch is maybe 10x10 inches)
My plan is to drop the aluminum shield underneath and get a better look at the underside to determine the extent of the damage and get a good look at the trailer for rust. I'll definitely going to be sanding any metal and reapplying a rust proof paint. I'm feeling optimistic due to the pretty great condition of the topside, but who know what she's hiding underneath. lol
Can you confirm if I'll have a pretty good view of the subfloor if I drop the aluminum?
Also do you have any advice on removing the vinyl interior skin? I've seen some folks who say "don't do it not worth the trouble", and others gut to the metal without thinking twice.
Only been on this forum since last night and I'm loving it! Sooooo much great info available.
|
There's nothing wrong with patching the subfloor if that seems like the best way to go. Just keep in mind that you need a good solid subfloor under the walls. You won't be able to see much more of the subfloor from underneath the trailer after removing the belly pan, but that will be necessary in order to be able to see (and repair if necessary) the frame. On ours the combination of the amount of welding required and the amount of floor that needed to be patched convinced me that a full floor replacement was the way to go.
The interior skins are pop riveted to the ribs. Removal involves looking carefully at the seems to see what order to remove them, a lot of drilling with a 1/8" drill, and careful labeling of the pieces so you know where they go back in. It is necessary to remove at least the lower interior panels to replace the floor, even if it's just a patch, because you need to get inside the wall in order to bolt the new piece down through the C-Channel and into the outriggers.
Here's a photo of ours part way through fixing the frame and replacing the floor. Later we removed the rest of the interior panels. If you look at this photo at full size in the lower right corner you'll see one of the rusty outriggers before repair. Some I replaced and some I just cut off the bottom where the worst of the rust was and welded on a new bottom. It would have been a pain to do the welding from underneath with the floor in place, so for me it was easier to replace the whole floor. I also coated the floor with epoxy to help repel water from future leaks. You can see on the rear piece where the epoxy is around the edges, but after the floor was all in I coated the entire upper surface.
On our Sovereign every other cross member was lower to allow for a strip of plywood to join the main floor pieces. I glued everything together with epoxy so the entire floor is almost like one giant piece of plywood.
Here's another photo a little farther into the process.


|
|
|
|
|
07-18-2017, 02:13 PM
|
#10
|
1 Rivet Member
1974 Argosy 28
Euless
, Texas
Join Date: Jul 2017
Posts: 9
|
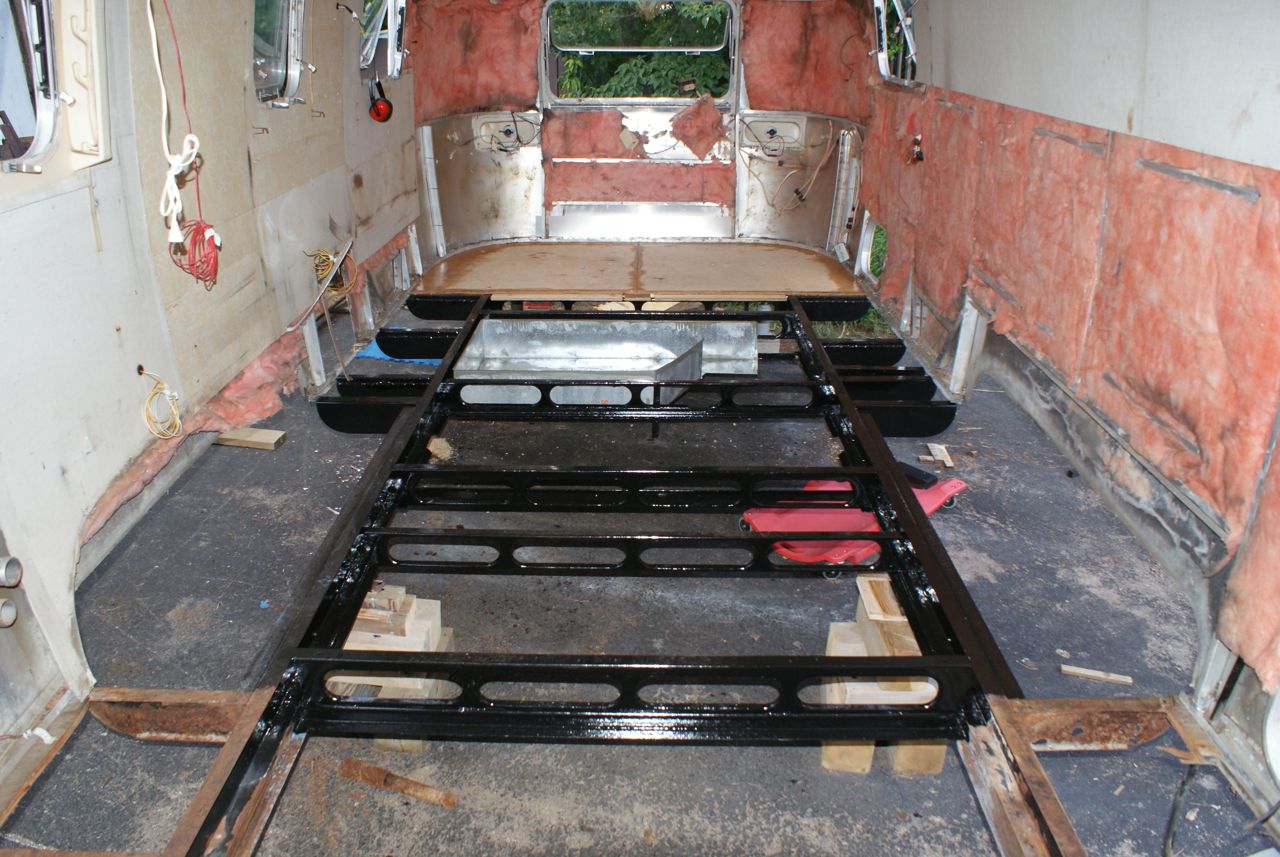
Update 07.18.2017
Thanks everyone for the words of encouragement and advice. Here are a couple of update photos.
The center panel was an absolute beast to remove. The rivets were underneath another panel and through the metal strip. I can't fathom how they even achieved this. Any insight?
|
|
|
|
|
07-18-2017, 02:19 PM
|
#11
|
2 Rivet Member 
1973 31' Excella 500
Calary
, Alberta
Join Date: Mar 2016
Posts: 37
|
Congratulations on your purchase. One day at a time and a good plan!!
|
|
|
|
|
07-18-2017, 02:30 PM
|
#12
|
Rivet Master
1999 34' Excella
Currently Looking...
Hillsboro
, Texas
Join Date: Feb 2013
Posts: 6,408
|
use a respirator/filter for this work. There can be bad things in the walls and floors...
Have you supported the whole frame by jacks and screw adjustable tripods? If not, as you remove the panels, etc, the frame can (quite possibly) will shift... these trailer designs are assembled fairly "un stressed".. no load provision.. they do not 'flex' the frame as when loaded... they just start adding things... then when they set the trailer on the tires, they 'tweak' things as necessary.. like the main door...
If this is a long term ownership deal, I would consider replacing the flooring. If not, have you checked for any signs of rot?
New axles should bd considered... they will not ride like new ones.. and you don't want the old axles to beat up all of your work.
__________________
Peace and Blessings..
Channing
WBCCI# 30676
|
|
|
|
|
07-18-2017, 03:39 PM
|
#13
|
1 Rivet Member
1974 Argosy 28
Euless
, Texas
Join Date: Jul 2017
Posts: 9
|
Shifting?
CWF. Can you elaborate? I have it leveled with the original levels and several auto jack stands. I was under the impression from reading the forums that I only really need to worry about shifting when removing the floor. Luckily the floor only has a couple of spots I'm concerned about. I'll be replacing these boards and of course leaving small placeholders so the shell doesn't drop while doing so.
Thanks again for the help!
|
|
|
|
|
07-21-2017, 10:16 PM
|
#14
|
Rivet Master
1999 34' Excella
Currently Looking...
Hillsboro
, Texas
Join Date: Feb 2013
Posts: 6,408
|
Sorry for delay...
I would ensure the longitudinal (bow to stern) frame tails are completely supported by cribbage... secure.... off the ground.... you can leave wheels and tires on...
"Logic"...  kneebone connected to the thigh one...etc
Frame design...
The frame is several parts making a unit..
Longitudinal rails (spine) connects to inner "rails".. they provide spacing of the rails, mounts for floor and subfloor parts (waste and fresh tanks, etc) and bellypan also supports the outriggers
Outriggers (outside of frame rails) supports the floor and the shell.
When built the shell is assembled THEN placed onto the C channel which is mounted to the floor and outriggers. (See Airstream assembly YouTube)
So, each shell is different. Rivet holes are all different ...so things "line up"differently... when complete, the trailer goes thru stress and maturing. That means some things won't be where they once were... like hole alignment. Frames and shells move...
So... if you raise the frame as level as you can, the stress on frame will relax.. removing rivets will leave aligned holes....as you go, if not it will be a problem come to reassembly.
With a stable frame and shell , things should remain aligning
The shell seams should be straight. When you drill out the rivets, there should be little movement of the shell. In other words,,, things work
GM
When you get the frame set you can see how it will rise bow and stern. This is a "prestressed" so block for that. Now this should be obvious.
__________________
Peace and Blessings..
Channing
WBCCI# 30676
|
|
|
|
|
08-16-2017, 05:22 AM
|
#15
|
|
Rivet Polisher
1973 31' Sovereign
Mt Pleasant
, North Carolina
Join Date: Oct 2013
Posts: 169
|
Looking good, you'll find that it's like quicksand, the more you do the more you'll sink deeper into the project!
We had a metric ton of mouse poo in the flooring and walls, so much so that we decided not to put the aluminum skin back on the belly.
After months of working on ours we finally took it out for its maiden voyage, that made all the headache and skinned knuckles worth it.
__________________
-Jim Pantas
1973 31 ft Sovereign
2009 Chevy Express 3500
|
|
|
|
|
08-16-2017, 11:30 PM
|
#16
|
1 Rivet Member
1974 Argosy 28
Euless
, Texas
Join Date: Jul 2017
Posts: 9
|
You're rolling around with no belly pan? I assume it's sealed similar to a pontoon. Any extra drag caused? Just curious if you've had any issues. I'm thinking of using a high grade plastic underneath to avoid corrosion and it's MUCH easier to work with.
|
|
|
|
|
08-17-2017, 05:20 AM
|
#17
|
Rivet Master
2008 22' Safari
Spicewood (W of Austin)
, Texas
Join Date: Mar 2015
Posts: 2,987
|
Quote:
Originally Posted by wildhorses
Looking good, you'll find that it's like quicksand, the more you do the more you'll sink deeper into the project!
We had a metric ton of mouse poo in the flooring and walls, so much so that we decided not to put the aluminum skin back on the belly.
After months of working on ours we finally took it out for its maiden voyage, that made all the headache and skinned knuckles worth it.
|
That belly-pan is actually intended to PREVENT rodents and vermin. YOur's may not have been properly sealed, however. I recommend you reinstall it and seal it up.
|
|
|
|
|
08-18-2017, 05:08 AM
|
#18
|
|
Rivet Polisher
1973 31' Sovereign
Mt Pleasant
, North Carolina
Join Date: Oct 2013
Posts: 169
|
Quote:
Originally Posted by Boxite
That belly-pan is actually intended to PREVENT rodents and vermin. YOur's may not have been properly sealed, however. I recommend you reinstall it and seal it up.
|
Sealed or not, persistent rodents and vermin will get in the smallest of holes or chew thru to make a hole, after finding the mess we did on the under belly we decided to leave it off.
__________________
-Jim Pantas
1973 31 ft Sovereign
2009 Chevy Express 3500
|
|
|
|
|
|
Currently Active Users Viewing This Thread: 1 (0 members and 1 guests)
|
|
|
 Posting Rules
|
You may not post new threads
You may not post replies
You may not post attachments
You may not edit your posts
HTML code is Off
|
|
|
|

 Recent Discussions
 |
|
|
|
|
|
|
|
|
|
|
|
|
|
|
|
|
|
|
|
|
|


 Linear Mode

