 |
 07-20-2011, 08:10 PM
|
#1
|
1 Rivet Member 
1971 25' Tradewind
Scio
, New York
Join Date: May 2011
Posts: 10
|
Tow Vehicle wiring - 2 days from first trip - please help!!
OK
Tested with a test light two areas I am having a problem.
TV is a 2009 GMC 2500 Duramax. I am having no voltage at the vehicle connector pin at the bumper for the charge line, and a blinking test light when I check the pin for the brakes..
Can anyone help me?
|

|

|
|
07-20-2011, 08:13 PM
|
#2
|
|
Site Team

2002 25' Safari
Dewey
, Arizona
Join Date: Mar 2005
Posts: 15,616
|
You may need to install a fuse for the charge line. Check the fuse block and see if there is one installed.
__________________
Richard
Wally Byam Airstream Club 7513
|
|
|
|
|
07-20-2011, 09:16 PM
|
#3
|
Rivet Master 
Currently Looking...
Sioux Falls
, South Dakota
Join Date: Jun 2010
Posts: 2,403
|
Buy a tester for your plug. They sell different ones.
Looks like this.
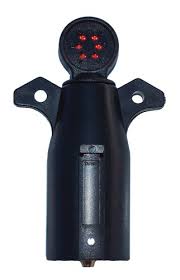
Check to see if there is a charging wire installed. If so, check fuse as azflycaster wrote. If there's no charging wire, just pull one and add a fuse.
Brake lights or the trailer brake connection should not blink if it's like mine.
|
|
|
|
|
07-20-2011, 11:47 PM
|
#4
|
Rivet Master Commercial Member
Currently Looking...
Denton
, North Carolina
Join Date: Jul 2006
Posts: 789
|
fuse or relay
Quote:
Originally Posted by ckbailey97

OK
Tested with a test light two areas I am having a problem.
TV is a 2009 GMC 2500 Duramax. I am having no voltage at the vehicle connector pin at the bumper for the charge line, and a blinking test light when I check the pin for the brakes..
Can anyone help me?
|
You are missing a large fuse or a relay. If you get the relay at the dealership it will be pricy. It is just a Heavy Duty 30amp 5 pin Relay.
That tester that Splitrock talked about is also very nice. EL15785 Very helpful when trouble shooting
__________________
Dan Brown Denton NC
|
|
|
|
|
07-21-2011, 03:46 AM
|
#5
|
1 Rivet Member
1971 25' Tradewind
Scio
, New York
Join Date: May 2011
Posts: 10
|
Got one of those Splitrock, and a tester light also.. It is an awesome tester, especially for the $10 it cost! That's why I figured it's a fuse. Checked my wife's 07 Suburban also and the 12V charge light on the tester doesn't go on with hers either. Figured it might be a factory deleted fuse or something.
Going to assume it MUST be a fuse. I did check the underhood fuse box, and it has a good 40 amp in what I have figured is the correct location, but may have to contact GMC to ask for more help to be sure that is the right spot, and that there is not another one missing or a relay like Dan mentions.
|
|
|
|
|
07-21-2011, 07:02 AM
|
#6
|
1 Rivet Member
2009 28' International
Columbia
, Illinois
Join Date: Jun 2008
Posts: 19
|
Nope it is not a fuse. GM does not connect the wire to the fuse block. If you look at the front of the fuse box you will find a bundle of wires all tucked neatly under the box. This is the wire that supplies 12v to the 7-pin connector. Need to check your wire diagram to find which post it should be mounted to. Next problem is that the wire may be broken. We had the same thing and GM was kind enough to run a new wire from the post to the 7-pin connector. So much for factory supplied 7-pin connector. ALOHA
|
|
|
|
|
07-21-2011, 07:05 AM
|
#7
|
|
"Cloudsplitter"
2003 25' Classic
Houstatlantavegas
, Malebolgia
Join Date: Jun 2007
Posts: 20,000
|
Have you towed with the these vehicles before? If not, the charge line may not be connected to the power distribution center. Usually if you have power for the blue brake line, that and the red battery line line were connected at the vehicle pre-delivery inspection, along with the fuse that has been mentioned.
Stud#2 is the connection for the trailer wiring, 30A, you will need to remove the PDC cover to access the wiring connection.
__________________
Im done with adulting
Lets go find Bigfoot.
|
|
|
|
|
07-21-2011, 07:07 AM
|
#8
|
Rivet Master
2007 30' Classic
Oswego
, Illinois
Join Date: Jul 2010
Posts: 13,669
|
Quote:
Originally Posted by OBPete
Nope it is not a fuse. GM does not connect the wire to the fuse block. If you look at the front of the fuse box you will find a bundle of wires all tucked neatly under the box. This is the wire that supplies 12v to the 7-pin connector. Need to check your wire diagram to find which post it should be mounted to. Next problem is that the wire may be broken. We had the same thing and GM was kind enough to run a new wire from the post to the 7-pin connector. So much for factory supplied 7-pin connector. ALOHA |
This is correct, please look in your owners' manual. It tells the location of the taped up wire. There may be two, if you are using an add on brake controller. Charge line is taped up between the UBEC and the inner fender. The brake controller power is located on the main harness near the steering shaft, aft of the UBEC and toward the center of the truck.
|
|
|
|
|
07-21-2011, 07:20 AM
|
#9
|
Rivet Master
2007 30' Classic
Oswego
, Illinois
Join Date: Jul 2010
Posts: 13,669
|
Sorry, pictures won't copy over. This is a bulletin which explains it pretty clearly.
Service Information
       2009 Chevrolet Silverado - 4WD
 | Sierra, Silverado VIN C/K Service Manual | Document ID: 2545352
#07-08-45-001F: Procedure for Installation of an Aftermarket Trailer Brake Controller - (Nov 9, 2010)
 Subject:Procedure for Installation of an Aftermarket Trailer Brake Controller
Models:2007-2011 Cadillac Escalade, Escalade ESV, Escalade EXT
2007-2011 Chevrolet Avalanche, Silverado, Suburban, Tahoe
2007-2011 GMC Sierra, Yukon, Yukon Denali, Yukon XL, Yukon Denali XL
2008-2010 HUMMER H2
with Integrated Trailer Brake Controller
This bulletin is being revised to combine information from bulletins 06-08-45-008D and 07-08-45-001E. Please discard Corporate Bulletin Numbers 07-08-45-001E and 06-08-45-008D (Section 08 - Body and Accessories).
Important: Installation of an electric brake controller and the wiring connections outlined in this bulletin are the responsibility of the dealership or customer. These repairs should never be charged to warranty. If you have any questions, please consult with your District Service Manager.
Some customers may request to have an aftermarket trailer brake controller added to their vehicle, OR in lieu of the factory integrated trailer brake controller (ITBC) (RPO JL1).
<A href="#ss1-2545352"> Installation Instructions
Starting with the new 2007 full-size utilities and pickups and 2008 HUMMER H2, there is no longer an electric trailer brake controller pigtail harness.
To install an aftermarket trailer brake controller, use the four blunt cut wires located near the data link connector.
The following steps should be used to complete the installation.
Four Blunt Cut Wires
Dark Blue
Circuit 47
Brake Signal to Trailer Connector
Red/Black
Circuit 242
Battery Power
Light Blue/White
Circuit 6311
Brake Switch Input
White
Circuit 22
Ground 

Important: Ensure that the ringlets are not interfering with the UBEC cover.
<LI type=1>Place the terminal on the larger of the two studs at the front of the electrical center and secure with an M8 nut. This is circuit #242 to stud #2, to power the aftermarket trailer brake controller. Important: The fuse is already present in the vehicle to power the electrical trailer brake controller system.
<LI type=1>ONLY For Vehicles Equipped with JL1 - Locate connector X126 or X115 (varies with vehicle build; refer to SI) near the underhood fuse block. Refer to SI Document ID# 1849049 - I/P Harness-Engine Compartment. Circuit 47 from the blunt cut wires near the data link connector will end at connector X126 terminal "G" or X115 terminal "B5." Obtain enough Dark Blue 12 gauge wire to run from X126/X115 to the 7-way trailer connector at the bumper. On one end of the Dark Blue wire attach terminal part number 15304732, located in Delphi Tray 8 and insert into X126 "G" or terminal part number 15304720 located in Delphi Tray 19 and insert into X115 "B5." Run the Dark Blue wire in its own conduit along the frame to the 7-way trailer connector at the bumper. Remove circuit 47 from the 7-way trailer connector terminal "C" and tape the bare terminal and attach to the harness. Attach terminal part number 12110853, located in Delphi Tray 4, to the other end of the Dark Blue wire and insert it into the 7-way trailer connector terminal "C." <LI type=1>ONLY For Vehicles Equipped with JL1 - The Red/Black wire, circuit 242, must be connected to stud #2 of the 30 Amp fuse of the underhood fuse block. This wire is located between the left fender and the underhood fuse block. Important: This procedure will not result in any trailer brake related display messages to be set. However, ITBC diagnostics will continue to function. If an ITBC fault is detected, a "Service Trailer Brake System" message will be displayed on the driver information center (DIC) and an appropriate DTC will be stored in the ITBC module. The operator will still be able to adjust gain and access the "Trailer Gain / Output" display page in the DIC. However, the factory installed ITBC system will not sense a trailer connection and will not provide output to the trailer.

<LI type=1>Locate the trailer brake control circuits that are looped and taped to the main harness under the instrument panel.

<LI type=1>Pull the trailering wire harness down.

<LI type=1>Match the vehicle harness label circuit functions to the trailer brake controller jumper harness functions. Important: The color or wires to be joined together may not match.
Dark Blue Wire: switched power from controller to trailer brakes
Red with Black Stripe: fused vehicle power to electrical brake controller
Light Blue with White Stripe: Brake switch input to power electric brake controller
White: ground
Orange: CHMSL (Center High Mounted Stop Lamp) -- not required with most systems

<LI type=1>After completing the under dash connections to the electric brake controller, open the hood and locate the red wire that is taped to the harness between the underhood electrical center and the driver side front fender. <LI type=1>Break the tape on the red/black wire and pull it toward the front of vehicle.- Remove the lid from the electrical center.
Auxiliary Power (Applies to All LD and 2007-2009 HD's Only) Without JL1

Circuit #742 for Auxiliary Power at the 7-way trailer connector is no longer connected by the GM Assembly Plant. If the customer desires auxiliary power at the trailer connector location (i.e. refrigeration, battery charger or interior light in the trailer), complete the following steps to connect circuit #742: - <LI type=1>Locate the red/black wire, looped and taped to the chassis harness, below the brake master cylinder. <LI type=1>Break the tape and route the wire to the front of the underhood electrical center.

Important: Ensure that the ringlets are not interfering with the UBEC cover.
<LI type=1>Place the terminal on the smaller of the two studs on the electrical center and secure with an M6 fastener. This is circuit #742 to stud #1 for auxiliary power to the 7-way trailer connector.
- ONLY for vehicles without RPO TP2 - Auxiliary Battery, install a 40 amp fuse to power the circuit. Important: For vehicles equipped with RPO TP2 -- Devices powered by this fuse will drain the vehicle battery if left connected with the vehicle not running.
<A href="#ss2-2545352"> Warranty Information
This installation procedure is to be performed at the customer's request and at their expense. It is not a warranty repair and a claim should not be submitted for reimbursement.
GM bulletins are intended for use by professional technicians, NOT a "do-it-yourselfer". They are written to inform these technicians of conditions that may occur on some vehicles, or to provide information that could assist in the proper service of a vehicle. Properly trained technicians have the equipment, tools, safety instructions, and know-how to do a job properly and safely. If a condition is described, DO NOT assume that the bulletin applies to your vehicle, or that your vehicle will have that condition. See your GM dealer for information on whether your vehicle may benefit from the information.
 WE SUPPORT VOLUNTARY TECHNICIAN CERTIFICATION
© 2011 General Motors. All rights reserved.
|
|
|
|
|
07-21-2011, 08:31 AM
|
#10
|
Rivet Master
1995 30' Excella
Bowie
, Maryland
Join Date: Apr 2005
Posts: 2,345
|
This may be a stupid, useless comment, but I'm pretty sure my F-250 doesn't power the +12 hot line when the ignition is off.
__________________
1995 Airstream Classic 30' Excella 1000
2014 Ram 2500 Crew Cab with Cummins 6.7L Diesel
Sold but not forgotten: 1991 Airstream B190
Sold: 2006 F-250 6.0L Powerstroke Supercab
|
|
|
|
|
07-21-2011, 09:21 AM
|
#11
|
Rivet Master
1961 24' Tradewind
1969 29' Ambassador
1970 21' Globetrotter
Jamestown
, Tennessee
Join Date: Jul 2008
Posts: 1,783
|
Ford does not power the charge line when key is off and also frequently does not have the fuse installed Chevrolet MAY be the same.
Test light blinking at rear connector may be normal as the light puts very little load on the circuit. Many brake controllers pulse that line to see if brakes are connected.
I would try connecting the trailer, and if need be jacking up a wheel to test the brakes by some one spinning it while you apply brakes. or at least have some body stand by the wheels and listen for the magnet clickiing. Assuming electric brakes , not hydraulic.
I have also heard of people holding a compass near the wheel and watching the needle swing as brakes are applied but I have not had much luck with that one.
Good luck and let us know what you find
__________________
Rick Davis 1602 K8DOC
61 tradewind, plus a few others
13 Ram 2500 TD
99 Dodge TD 577K miles
|
|
|
|
|
07-21-2011, 09:46 AM
|
#12
|
Rivet Master
Currently Looking...
Sioux Falls
, South Dakota
Join Date: Jun 2010
Posts: 2,403
|
The way I test my brake lights and the brake controller is with a custom length stick I keep in the cab. I start the truck and jamb the stick between the seat and the brake pedal.
|
|
|
|
|
07-21-2011, 01:01 PM
|
#13
|
1 Rivet Member
1971 25' Tradewind
Scio
, New York
Join Date: May 2011
Posts: 10
|
Thanks dznf0g
I was able to google the Doc ID, and get the PDF which I printed out. That will help. Hopefully get it straightened out tonight!
Makes sense now, I was wondering why the heck I didn't have any power to either of them !
|
|
|
|
|
08-18-2011, 05:38 AM
|
#14
|
2 Rivet Member 
1973 31' Sovereign
Maryville
, Tennessee
Join Date: Nov 2008
Posts: 50
|
Splitrock, i thought i was the only one!
|
|
|
|
|
08-18-2011, 08:58 AM
|
#15
|
Rivet Master
Currently Looking...
Sioux Falls
, South Dakota
Join Date: Jun 2010
Posts: 2,403
|
Quote:
Originally Posted by 86Scotty
Splitrock, i thought i was the only one!
|
:-)
|
|
|
|
|
09-17-2011, 03:50 PM
|
#16
|
2 Rivet Member
1972 27' Overlander
Weatherford
, 76086
Join Date: Jul 2011
Posts: 51
|
Nice picture. As a side note my neighbor is from SD. His name is Todd Suhn and is a steer wrestler ( very good) who makes his winter home here so as to attend all the big winter rodeos. A very nice guy.
|
|
|
|
|
09-17-2011, 05:27 PM
|
#17
|
Rivet Master
Currently Looking...
Sioux Falls
, South Dakota
Join Date: Jun 2010
Posts: 2,403
|
Yup, that's us . . . shoot the bull and wrestle the steer.
|
|
|
|
|
|
Currently Active Users Viewing This Thread: 1 (0 members and 1 guests)
|
|
|
 Posting Rules
|
You may not post new threads
You may not post replies
You may not post attachments
You may not edit your posts
HTML code is Off
|
|
|
|

 Recent Discussions
 |
|
|
|
|
|
|
|
|
|
|
|
|
|
|
|
|
|
|
|
|
|


 Linear Mode

