 |
|
 05-17-2007, 08:18 AM
|
#1
|
|
just jd.

2007 20' Safari SE
San Diego
, California
Join Date: Mar 2006
Posts: 298
|
New flush lavatory door latch
Thought I'd mention to a wider audience: there's some good information in another thread (pics in post #8, info starting around post #24) about the newer flush lavatory door latches, recently introduced from the factory during the 2007 calendar year. Pictures, prices, ordering details, installation details...
These replace the giant hook-style door handles that have a tendency to "grab" you when you come too near 
Bottom line: ordering through a dealer from the factory is literally twice what you'd pay by using the latch manufacturer's parts system.
Cheers,
-jd.
__________________
2007 20' Safari SE/LS // 12063 //CA-5// ("ex") 2916
|

|

|


|
05-17-2007, 08:31 AM
|
#2
|
Rivet Master 
2006 25' Safari FB SE
St. Cloud
, Minnesota
Join Date: Aug 2003
Posts: 13,280
|
jd -- I've been following that thread. Nobody has quite said it -- does the cutout in the door have to change much? I'll have my Safari in the drive later this morning and will post a pic of the old latch cutout.
|
|
|
|
|
05-17-2007, 10:58 AM
|
#3
|
|
just jd.
2007 20' Safari SE
San Diego
, California
Join Date: Mar 2006
Posts: 298
|
"Bob M" didn't indicate any problems with the existing cutout (in the linked thread) when he posted that he did the conversion. I think he only widened the stike plate hole slightly?
I plan to document my conversion with pics (latch shipped yesterday) in this thread...
Bob, I was a bit hesitant about starting this thread, by the way. On the one hand, the linked thread was getting hijacked a bit. On the other, I'd really like to have all the pertinent info in this thread -- but didn't want to duplicated postings. Do you suppose it'd be more helpful to just post specifics here, too?
Cheers,
-jd.
__________________
2007 20' Safari SE/LS // 12063 //CA-5// ("ex") 2916
|
|
|
|
|
05-17-2007, 08:54 PM
|
#4
|
Rivet Master
2007 25' Safari FB SE
Santa Cruz
, California
Join Date: Sep 2006
Posts: 928
|
Thanks for getting this "project specific" thread going 5cats. I hope the new handle will take the same bore as the lever. If not, I'm sure we'll find a way to make it work (royal "we" yet again...) and will post our before and after, with any necessary modifications.
And many thanks to Bob for the intallation details.
Janet
|
|
|
|
|
05-22-2007, 07:58 PM
|
#5
|
4 Rivet Member 
2006 19' Safari SE
Nawthin'
, Hemisphere
Join Date: Dec 2006
Posts: 325
|
jd -- I've been following that thread. Nobody has quite said it -- does the cutout in the door have to change much? I'll have my Safari in the drive later this morning and will post a pic of the old latch cutout.
__________________
Yeah Bob, ( and others listening ) from what I see, there is going to be a BIG change from the 2" round hole that is existing in your door now, but it will work.
A rectangular notch will have to be cut out of the door approx. 4.5" deep X 2.5" tall to accept the new hardware. Use the existing hole for your centerline layout and you should line up nicely with the receiver in the jamb when done.
A pencil, a measuring stick, a mitre square, a sharp finish handsaw, a dremel tool, a drill with some bits, a phillips head screwdriver, a rasp and maybe a new single edged razor blade will be about all it will take to put you on the right path.
From what I understand, the new hardware does not come with any fasteners, so a trip to the store may be in order for something nice if you don't have anything on hand.
Remember, it is a hollow door and since there is a hole cut out of it already, once you cut through the edge of the door and reach the existing hole, the sheets will lose some rigidity and want to walk around, so ya gotta be firm and decisive, but go slow and easy. If you tape your lines, you will reduce chipping the edge of the veneer when you saw.
If you save the door edge blocking that you cut out of the leading edge, you can glue the pieces inside the door at the back side of the new hole you just cut, to stregthen the door at the rear of the new hardware where the fasteners will be. They will be the correct thickness if you shave the plastc wood grain veneer and door skin from the blocks with the new razor.
Measure thrice, rethink your layout and cut once........ or twice if ya have to,
No shame in that !

Good Luck !
__________________
*** KEEP LOOKING UP ***
T & K

|
|
|
|
|
05-22-2007, 09:18 PM
|
#6
|
Rivet Master
2006 25' Safari FB SE
St. Cloud
, Minnesota
Join Date: Aug 2003
Posts: 13,280
|
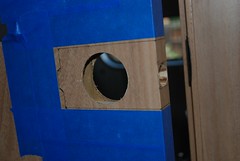
Here's a pic of the original Captain Hook latch cutout:

Any photo of the flush latch installation would be great. I'm in a stretch of being alternately home and away in about 3 day lumps -- I've got both these threads bookmarked and intend to get back to it. Good going so far!
|
|
|
|
|
05-23-2007, 08:27 AM
|
#7
|
|
just jd.
2007 20' Safari SE
San Diego
, California
Join Date: Mar 2006
Posts: 298
|
My Latch just arrived last evening. As suspected, no screws. I had expected some install instructions, but there are none.
Anyone have a link to the install instructions?  I plan to tackle this over Memorial Day weekend.
Cheers,
-jd.
__________________
2007 20' Safari SE/LS // 12063 //CA-5// ("ex") 2916
|
|
|
|
|
05-23-2007, 08:35 AM
|
#8
|
4 Rivet Member
2006 19' Safari SE
Nawthin'
, Hemisphere
Join Date: Dec 2006
Posts: 325
|
Bob, Pretty much all the door material behind the plate you are showing in your picture will have to be removed and then some.
4.5 " back from the edge of the door and another 1.25 " up and down from the center line of the existing 2" hole.
__________________
*** KEEP LOOKING UP ***
T & K
|
|
|
|
|
05-23-2007, 09:47 AM
|
#9
|
4 Rivet Member
2006 19' Safari SE
Nawthin'
, Hemisphere
Join Date: Dec 2006
Posts: 325
|
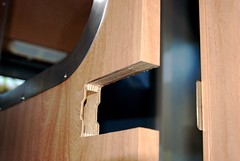
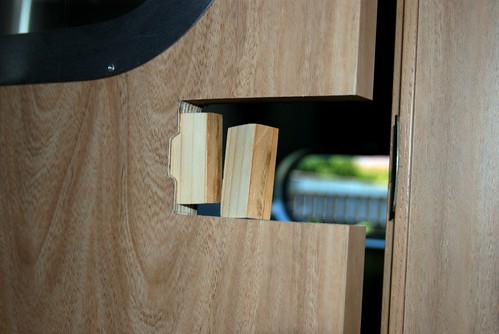
The BIG picture
The new latch is a slide mechanism and needs room to move.
here are a couple illustrations.....
__________________
*** KEEP LOOKING UP ***
T & K
|
|
|
|
|
05-23-2007, 11:48 PM
|
#10
|
|
just jd.
2007 20' Safari SE
San Diego
, California
Join Date: Mar 2006
Posts: 298
|
install tip/guide
I downloaded the install tip/guide from the manufacturer for the latch. There's not a lot of detail, but better than zero. This is for a family of latches; I think the third and fourth pages cover the latch we're talking about here.
MR.en.pdf
B4WEDI's pictures are a terrific help, thanks!
Q: Did the inside nylon bumpers need modification for the door to close properly?
Q: It looks like the leading edge of the door has an solid 1x interior -- that true?
Cheers,
-jd.
__________________
2007 20' Safari SE/LS // 12063 //CA-5// ("ex") 2916
|
|
|
|
|
05-24-2007, 08:40 AM
|
#11
|
4 Rivet Member
2006 19' Safari SE
Nawthin'
, Hemisphere
Join Date: Dec 2006
Posts: 325
|
B4WEDI's pictures are a terrific help, thanks!
Glad they helped........
Q: Did the inside nylon bumpers need modification for the door to close properly?
Yes, they adjust the amount of play between the door and the inside jamb and helps with the alignment of the catch and receiver in the jamb. They not only affect how much oomph you need to close the door, but will also reduce the amount of free play the door has to bounce back and forth as you travel down the road. A sharp razor will remove thin slices of the little rubber nibs till you get the desired amount of wiggle room.
Q: It looks like the leading edge of the door has an solid 1x interior -- that true?
Right again ! Good Luck !
__________________
*** KEEP LOOKING UP ***
T & K
|
|
|
|
|
05-24-2007, 01:48 PM
|
#12
|
4 Rivet Member
2006 19' Safari SE
Nawthin'
, Hemisphere
Join Date: Dec 2006
Posts: 325
|
As an alternative...... Attn: janetb
For those of us who are more concerned with function over form and can live without the "correctness" of this very expensive latch .......
There are a host of alternatives as close as your local harware store or of course online. Just look for Privacy Latches for Pocket Doors.
No carpentry skills needed. You will likely be able to use the same 2 1/8" hole that exists in your door now and spend no more than $ 20 bux for something nice yet functional.
Make sure the one you get fits the thickness of your door or can be adapted to it. As an added bonus, you will be able to put back "Captain Hook" if you so desire one day !
http://www.thehardwarehut.com/images...3pk1-thumb.jpg
__________________
*** KEEP LOOKING UP ***
T & K
|
|
|
|
|
05-25-2007, 11:49 AM
|
#13
|
|
just jd.
2007 20' Safari SE
San Diego
, California
Join Date: Mar 2006
Posts: 298
|
Reconsidered...still proceeding
Quote:
|
Originally Posted by B4WEDI
For those of us who are more concerned with function over form and can live without the "correctness" of this very expensive latch .......
There are a host of alternatives as close as your local harware store or of course online. Just look for Privacy Latches for Pocket Doors.
[*snipped* more excellent comments]
|
Thanks for that, and I agree.
This gave me great pause, and I took time to reconsider performing this mod. (I even had to stop listening to the new VAP podcast to write this...go Tim, Rob, and Colin!) - The new latch is pricey @ seventy bills.
- The new latch looks surprisingly oversized upon delivery.
- Substantial cutting is required.
- This mod is irreversible.
- Cheaper, easier, less invasive, reversible options are, in fact, available.
For me, at this point: - I have already paid for and received the new latch (so I had already decided the price was not a deal-breaker).
- Holding the new latch up against the door, I can see it looks fine (to my eye), without looking disproportionably large. This is considerably helped by the fact that my Safari has a huge mirror covering virtually the entire upper half of the door. A little bling right next to it is hardly noticed.
- I've already performed significant mods (redo wiring, battery monitor, fantastic fans, accumulater tank...) and this doesn't look too intimidating.
- Once installed, I don't plan on ever separating the door latch from the trailer, except possibly as a salvage operation (hope not!)
Had I not already obtained the new latch and considered other options, I'd go the other route. Having the new latch, I'm happy with it. And so I am proceeding with the install, and plan to tackle this project tomorrow
I'll be posting pictures, for sure.
Q: What's the optimal screw size? looks like it might be #10 x 3/8 SS flathead, or maybe #8?
Cheers,
-jd.
__________________
2007 20' Safari SE/LS // 12063 //CA-5// ("ex") 2916
|
|
|
|
|
05-25-2007, 02:26 PM
|
#14
|
4 Rivet Member
2006 19' Safari SE
Nawthin'
, Hemisphere
Join Date: Dec 2006
Posts: 325
|
5cats.....
I found SS # 6 's X 1" wood screws for the door edge worked fine and recessed more cleanly in the hardware. The heads of # 8's protruded some on the piece I worked on.
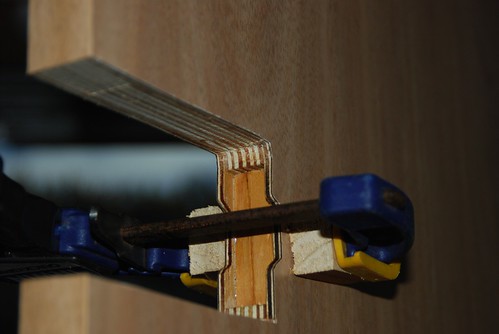
Because there is nothing much to screw into at the rear of the latch, I opted for a fastener like the one pictured below. As I said earlier, the piece of door edge that you removed from the front could be glued between the door skins at the rear to beef it up and have something to fasten to.
Honestly, It ain't that big a job and with your past experiences and skills, you'll have no problem. Good luck with your project and enjoy the Holiday !
__________________
*** KEEP LOOKING UP ***
T & K
|
|
|
|
|
05-28-2007, 11:50 PM
|
#15
|
|
just jd.
2007 20' Safari SE
San Diego
, California
Join Date: Mar 2006
Posts: 298
|
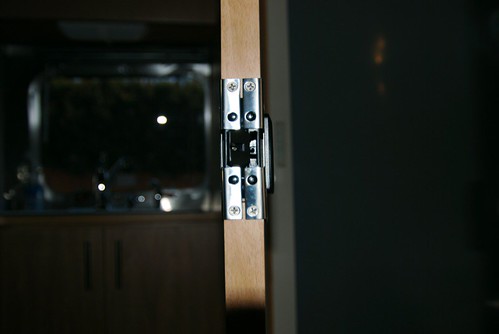
Done!
After a little diversion (built canopy for the Safari!), I put in the new latch. B4WEDI's pics in post #9 already do a great job showing the essential cuts and fitment.
Still, I promised pictures, so here are the highlights. I made a more detailed presentation on flickr...
Cutout
Transfer cutout tracing from inner latch part onto door. Do your best to match up the existing striker plate with new catch.
Notice the void at the back -- right where a screw goes, too...
Fill the void
1" x 3/4" blocks are glued in place. Take care to sand down the blocks so they fit easily to avoid popping the laminate skin.
screws
Punch and predrill for four #6 x 3/4" SS flathead screws (I think 1/2" would be fine here).

Punch and predrill for #6 x 1/2" SS flathead screws, one per side at the back of the latch.
I found that carefully flexing each side of the latch in the middle, toward the door, so the middles were slightly bowed toward the door surface, made them lay nice and flat when the final screws at the back are set. Before, they bowed outward leaving an unsightly gap.
Trim the bumpers a little at a time with a sharp blade. In this case it was a tight fit, so I shaved the inside bumpers almost completely off.
I removed the striker plate and took a file to it. Before reinstalling the striker, I had to remove some of the material behind it: the new catch protrudes pretty far, even adjusted for minimal depth.
I have much higher resolution pictures available, in addition to what's on flickr.
Cheers,
-jd.
__________________
2007 20' Safari SE/LS // 12063 //CA-5// ("ex") 2916
|
|
|
|
|
05-29-2007, 11:54 AM
|
#16
|
|
just jd.
2007 20' Safari SE
San Diego
, California
Join Date: Mar 2006
Posts: 298
|
clarification on screws
I should have been a bit more descriptive about the screws:
I used #6 x 3/4" SS flathead wood screws at the door edge, and #6 x 1/2" SS flathead wood screws at the back end of the latch:

(very) zoomed-in pic of various bagged screws from 'the depot' for a buck or two.
More pics and details on flickr...
Cheers,
-jd.
__________________
2007 20' Safari SE/LS // 12063 //CA-5// ("ex") 2916
|
|
|
|
|
05-29-2007, 09:50 PM
|
#17
|
|
just jd.
2007 20' Safari SE
San Diego
, California
Join Date: Mar 2006
Posts: 298
|
Quote:
|
Originally Posted by janetb
Thanks for getting this "project specific" thread going 5cats. I hope the new handle will take the same bore as the lever. If not, I'm sure we'll find a way to make it work (royal "we" yet again...) and will post our before and after, with any necessary modifications.
And many thanks to Bob for the intallation details.
Janet
|
Hi Janet, just wondering if you've undertaken the new latch install biz, and how it's going?
And same for anyone else doing this...questions? comments? Looks like we have a couple of experts here now...
Cheers,
-jd.
__________________
2007 20' Safari SE/LS // 12063 //CA-5// ("ex") 2916
|
|
|
|
|
06-04-2007, 09:15 AM
|
#18
|
4 Rivet Member
2006 19' Safari SE
Nawthin'
, Hemisphere
Join Date: Dec 2006
Posts: 325
|
Nice clean cuts jd....... no need to have gone to all that trouble though, I could have lent you my pet rat "Rudy", who I had gnaw the hole in the door for me ! 
I withheld his rations for a couple days and then smeared some peanut butter around the outline I wanted him cut out, sat back with a couple cold ones and let him go to work ! It took a few hours and I guess I must have nodded off.....I'm glad I came to when I did or I would have had to find even a BIGGER latch ! 
It's you engineering types that give us hacks a bad name ! ")
Nice work ! Enjoy your new found square footage !
__________________
*** KEEP LOOKING UP ***
T & K
|
|
|
|
|
06-04-2007, 01:07 PM
|
#19
|
|
just jd.
2007 20' Safari SE
San Diego
, California
Join Date: Mar 2006
Posts: 298
|
Quote:
|
Originally Posted by B4WEDI
Nice clean cuts jd....... no need to have gone to all that trouble though, I could have lent you my pet rat "Rudy", who I had gnaw the hole in the door for me ! |
You crack me up
Cheers,
-jd.
__________________
2007 20' Safari SE/LS // 12063 //CA-5// ("ex") 2916
|
|
|
|
|
06-19-2007, 01:09 PM
|
#20
|
|
Antiquepedaler
2010 25' FB Flying Cloud
Currently Looking...
Laramie
, Wyoming
Join Date: Sep 2002
Posts: 832
|
Latch bought
Thanks to all you good folks, I just ordered the bath door latch from Perlane for $69.95 They had 6, now 5 in stock.
I, too, balked at the $140 price quoted by Airstream. And when I asked the parts lady for the manufacturer, she stated it was against policy to give out manufacturer's names.
Funny, that's one of the first things I get when an appliance malfunctions.
__________________
Antique Pedaler
2021 Caravel 20 FB
|
|
|
|
|
|
|
Currently Active Users Viewing This Thread: 1 (0 members and 1 guests)
|
|
|
 Posting Rules
|
You may not post new threads
You may not post replies
You may not post attachments
You may not edit your posts
HTML code is Off
|
|
|
|

 Recent Discussions
 |
|
|
|
|
|
|
|
|
|
|
|
|
|
|
|
|
|
|
|
|
|


 Linear Mode

