 |
|
 10-05-2020, 04:49 PM
|
#201
|
3 Rivet Member 
2021 25' Globetrotter
Somewhere
, Texas
Join Date: Mar 2016
Posts: 247
|
Quote:
Originally Posted by youngpm

Did you ever find a solution? I'm currently in the same situation!
|
Totally did.
Didnt use the new board and just installed the main charger / converter using the old dc board.
|

|

|


|
10-14-2020, 03:38 PM
|
#202
|
|
New Member
2019 23' Flying Cloud
San Jose
, California
Join Date: Aug 2020
Posts: 2
|
Quote:
Originally Posted by chris_kelly
Totally did.
Didnt use the new board and just installed the main charger / converter using the old dc board.
|
I'm also in the same situation. I have a 2019 23CB. Step #5 in the PD4655 install manual states:
"Remove POS+ wire from the old DC board, and reconnect to the terminal labeled 'BATT POS+' on the new DC board."
This is fine, there is a red POS+ wire on the old DC board, but there is also a red BAT+ on the same old DC board. The instructions do not indicate what to do with the BAT+ wire. So is the only solution to reuse the old panel?
|
|
|
|
|
10-15-2020, 06:58 AM
|
#203
|
3 Rivet Member
2021 25' Globetrotter
Somewhere
, Texas
Join Date: Mar 2016
Posts: 247
|
Quote:
Originally Posted by GWNavigator
I'm also in the same situation. I have a 2019 23CB. Step #5 in the PD4655 install manual states:
"Remove POS+ wire from the old DC board, and reconnect to the terminal labeled 'BATT POS+' on the new DC board."
This is fine, there is a red POS+ wire on the old DC board, but there is also a red BAT+ on the same old DC board. The instructions do not indicate what to do with the BAT+ wire. So is the only solution to reuse the old panel?
|
Im sure theres a way to use the new board but from what I understand the only functionality the new board brings is the charge status light.
|
|
|
|
|
10-15-2020, 08:37 AM
|
#204
|
|
New Member
2020 22' Caravel
Denver
, Colorado
Join Date: Oct 2020
Posts: 4
|
Quote:
Originally Posted by GWNavigator
I'm also in the same situation. I have a 2019 23CB. Step #5 in the PD4655 install manual states:
"Remove POS+ wire from the old DC board, and reconnect to the terminal labeled 'BATT POS+' on the new DC board."
This is fine, there is a red POS+ wire on the old DC board, but there is also a red BAT+ on the same old DC board. The instructions do not indicate what to do with the BAT+ wire. So is the only solution to reuse the old panel?
|
I'd emailed the Progressive Dynamics folks about this, to which they said:
"Since you are going with lithium batteries, you can use the old DC fuse board and you will not be losing any function
If you were going to use lead acid batteries, then you would want the new fuse board so you can take advantage of the wizard button (disabled with lithium converters)"
The consensus was that the extra positive wire is related to the prewire for solar, although I didn't manage to verify that. I used the old board and my lithiums are charging now at the right voltage, so that all seems good to go!
|
|
|
|
|
10-15-2020, 09:19 AM
|
#205
|
|
New Member
2019 23' Flying Cloud
San Jose
, California
Join Date: Aug 2020
Posts: 2
|
Quote:
Originally Posted by youngpm
I'd emailed the Progressive Dynamics folks about this, to which they said:
"Since you are going with lithium batteries, you can use the old DC fuse board and you will not be losing any function
If you were going to use lead acid batteries, then you would want the new fuse board so you can take advantage of the wizard button (disabled with lithium converters)"
The consensus was that the extra positive wire is related to the prewire for solar, although I didn't manage to verify that. I used the old board and my lithiums are charging now at the right voltage, so that all seems good to go!
|
Ok, thanks @youngpm that settles it for me. Actually, this makes it even more simple than dirt-simple in that case. I wired it up and kept the old board and can confirm that it works as advertised. I'm officially lithium-powered now! 
|
|
|
|
|
08-15-2021, 09:23 AM
|
#206
|
Rivet Master 
2016 27' International
Sherwood Park
, Alberta
Join Date: Jul 2017
Posts: 1,031
|
Can not see photos
I know this is an old thread, but for some reason, I can not see any of the photos in Post 1. I am about to embark on the same swap and this may have been very helpful. Does anyone know why the photos are no longer visible?
|
|
|
|
|
08-15-2021, 10:10 AM
|
#207
|
Rivet Master
2015 25' Flying Cloud
Schaumburg
, Illinois
Join Date: Jun 2020
Posts: 635
|
I can see all the photos in post #1. Possibly an issue with your connection speed or your browser ??
|
|
|
|
|
08-15-2021, 10:12 AM
|
#208
|
2 Rivet Member 
2016 25' Flying Cloud
Vadnais Heights
, Minnesota
Join Date: Jun 2018
Posts: 64
|
You’re right, the pictures make it super easy!
I see 11 pages here on this thread . When I go to the first page and post #1, I still see the pictures …??
|
|
|
|
|
08-15-2021, 12:31 PM
|
#209
|
Rivet Master
2016 27' International
Sherwood Park
, Alberta
Join Date: Jul 2017
Posts: 1,031
|
Thanks for the replies. I am using Chrome and have a good connection but I still do not see them. I also tried with Edge, the same problem. Mmmm.
|
|
|
|
|
08-15-2021, 12:52 PM
|
#210
|
2 Rivet Member
2017 27' Flying Cloud
Box Elder
, SD
Join Date: Jun 2017
Posts: 77
|
I made a PDF of the instructions many moons ago. They were very helpful for me. You can get the pdf here.
https://www.dropbox.com/s/sx4lgk4bvf...orums.pdf?dl=0
f someone wants to take this pdf and put it in a more permanent place be my guest!
Larry
|
|
|
|
|
08-15-2021, 12:59 PM
|
#211
|
Rivet Master
2016 27' International
Sherwood Park
, Alberta
Join Date: Jul 2017
Posts: 1,031
|
Thanks very much!!
|
|
|
|
|
08-17-2021, 08:34 AM
|
#212
|
3 Rivet Member
2016 19' Flying Cloud
Portland
, Oregon
Join Date: Feb 2017
Posts: 155
|
Pics in thread #1 work for me. This converter is still working perfectly in our airstream.
|
|
|
|
|
08-17-2021, 09:43 AM
|
#213
|
Rivet Master
2016 27' International
Sherwood Park
, Alberta
Join Date: Jul 2017
Posts: 1,031
|
Excellent. Thanks again Snowy!
|
|
|
|
|
04-15-2022, 11:18 AM
|
#214
|
3 Rivet Member
2016 19' Flying Cloud
Portland
, Oregon
Join Date: Feb 2017
Posts: 155
|
Where did all my pictures go?
I see the image links and the images are still live, but no long show up in thread?
Quote:
Originally Posted by Snowy
Hi, I'm new to the forum and new to Airstream. We just purchased a used 2016 Flying Cloud 19' and I've been doing some upgrades on the electrical system. There are loads of threads on PD4655 Converter upgrade install, but not many pictures. I took pictures of my install so I hope this will help others with this easy upgrade.
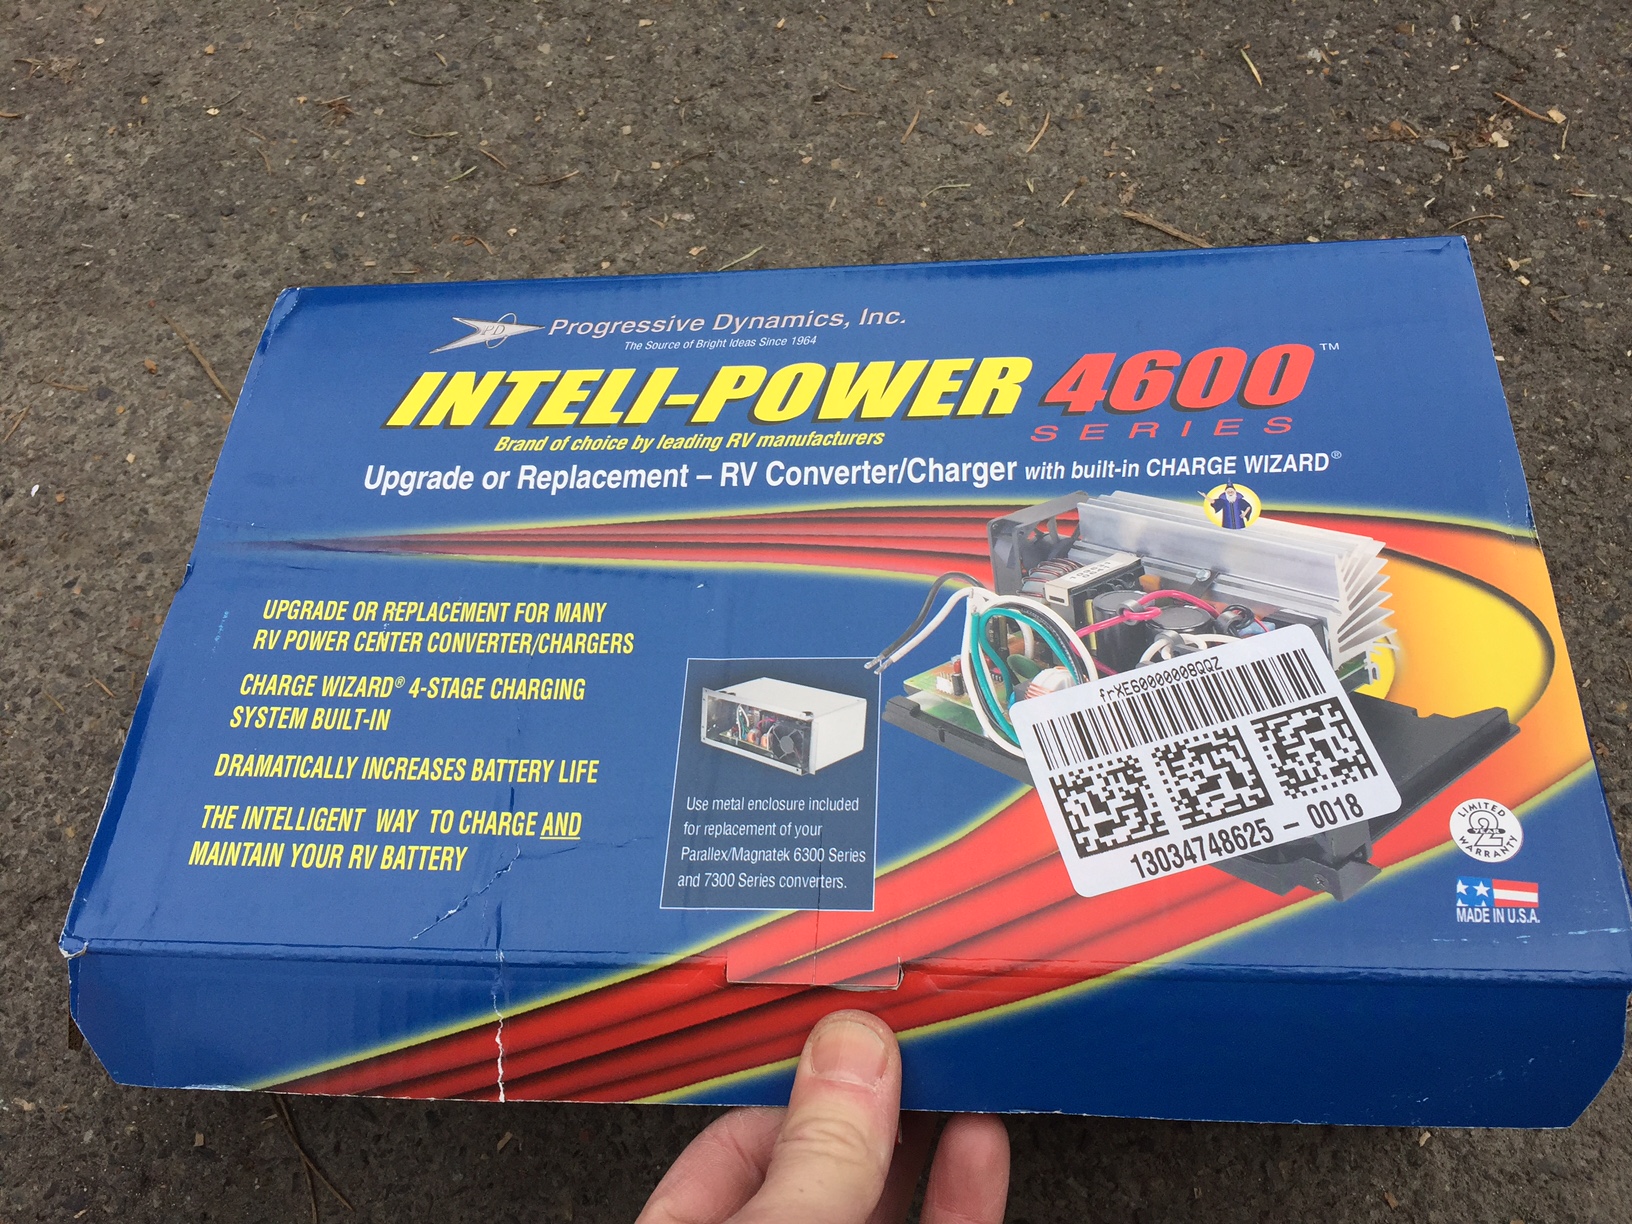
First the unit, Progressive Dynamics, Inc Inteli-Power 4655
 STOP Did you remember to turn off the power to the trailer? Unplug shore power, disconnect the batteries, double check that everything is off!!!
Remove the screws covering the converter and distribution center, I didnt take pictures of the screws but there are 4 on the main faceplate and a couple securing the converter in place itself. I took a couple of pictures at this point to remind myself which wire went with this fuse. Of course if you look they are all 15 amp so it does not really matter.
STOP Did you remember to turn off the power to the trailer? Unplug shore power, disconnect the batteries, double check that everything is off!!!
Remove the screws covering the converter and distribution center, I didnt take pictures of the screws but there are 4 on the main faceplate and a couple securing the converter in place itself. I took a couple of pictures at this point to remind myself which wire went with this fuse. Of course if you look they are all 15 amp so it does not really matter.
 You need to remove all the wires connecting the old converter, firstly the blue and white 12v wires. These require an allen wrench, you can see that poking out of the picture.
 Next onto disconnecting the 110v feed wires. At least on my year of Airstream, the black wire is connected via a wire nut. Disconnect the black wire leading to the converter.
 Next onto the 110v white wire. This one is screwed into a distribution bus bar block
 Amazingly thats it. With these wires disconnected and the screws holding the old converter in place removed, the old converter will slide out.
 Put the new converter in place and pull the wires through the holes.
 Notice that the PD4655 has a black and white 12v wires, not the blue and white as you removed. This is fine, the black wire on the new converter is the same as the blue wire on the old one.
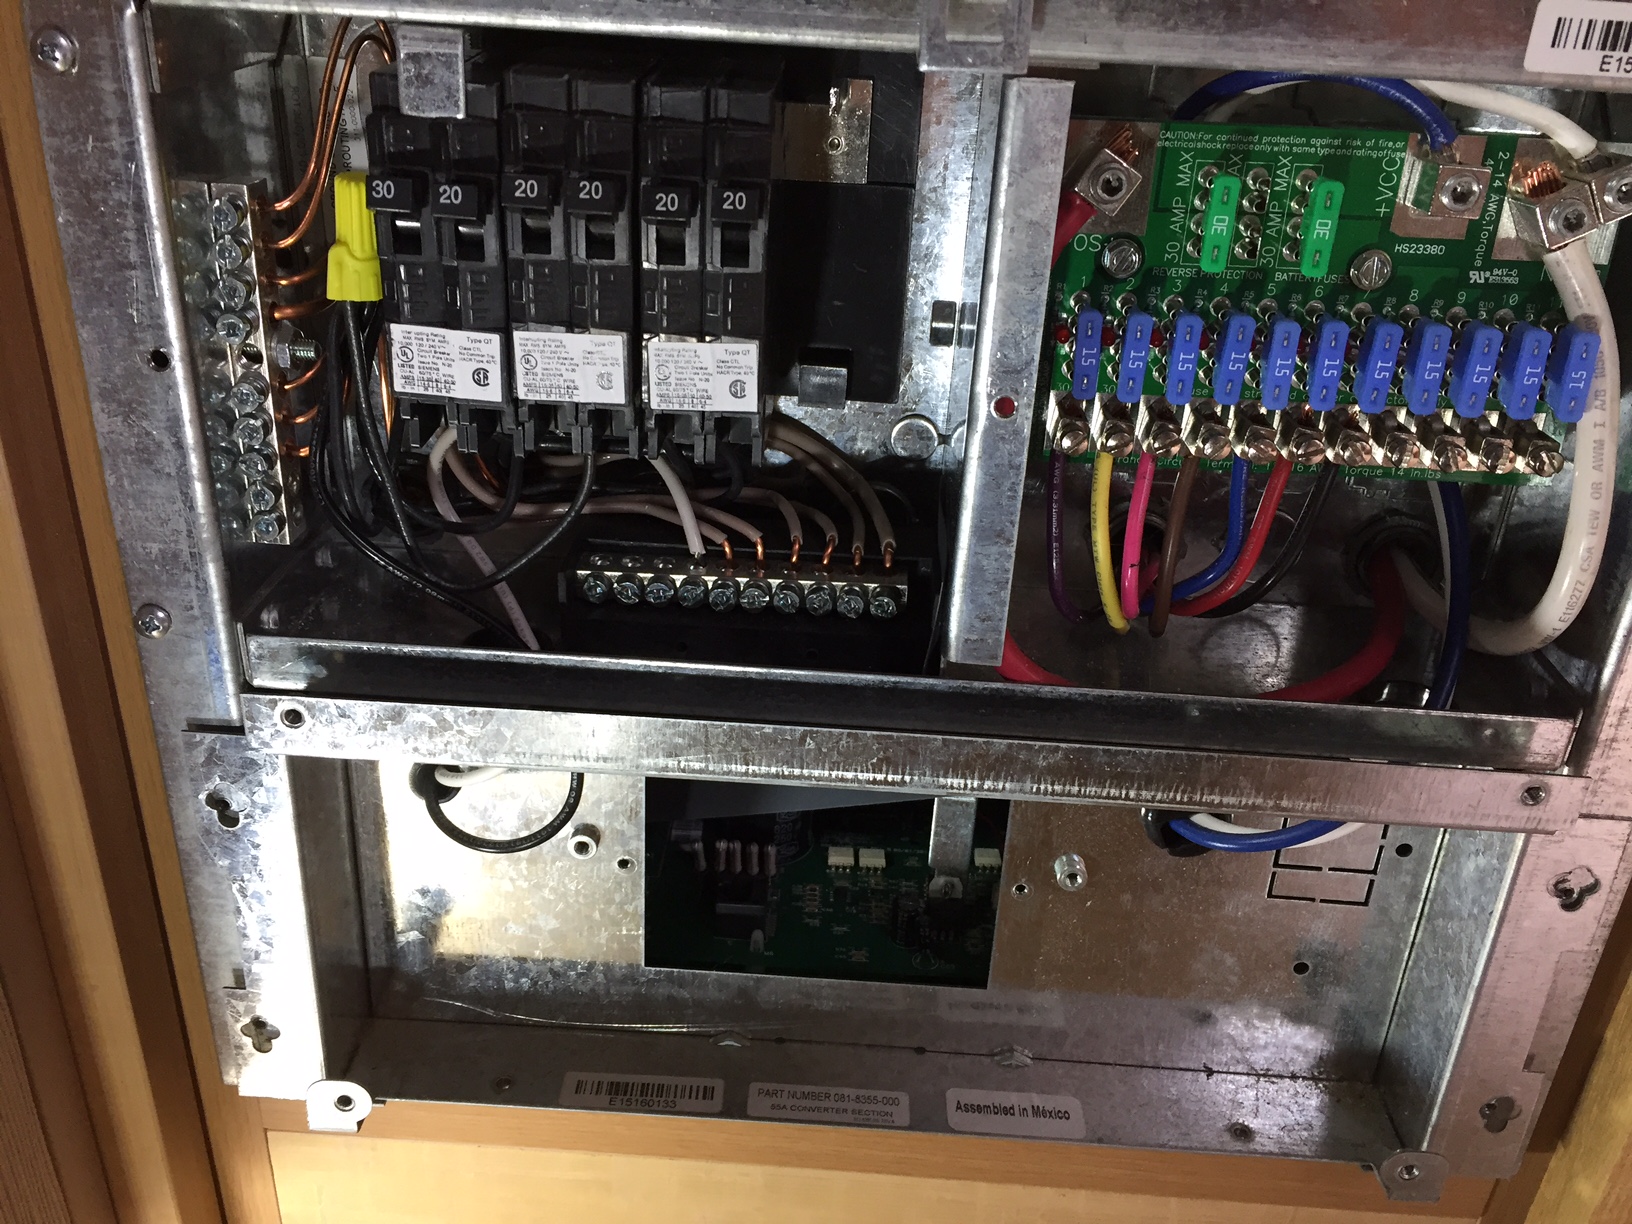
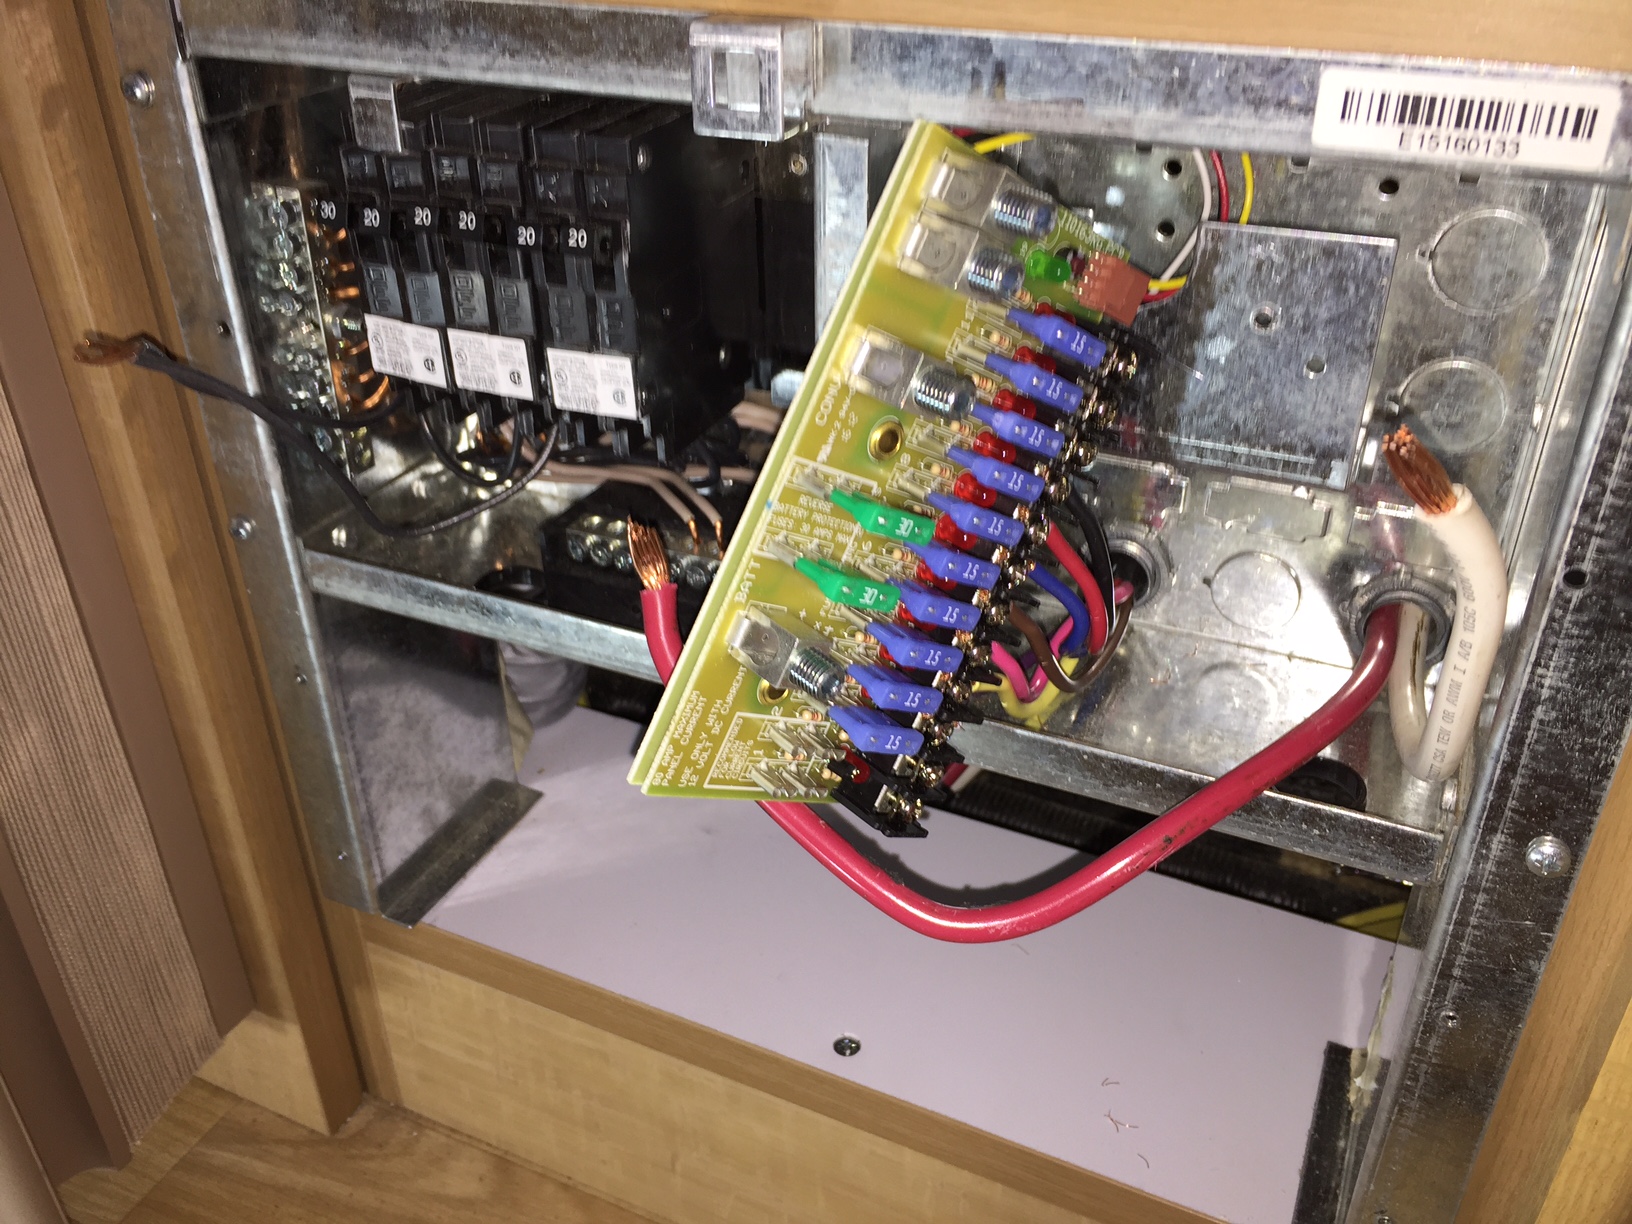
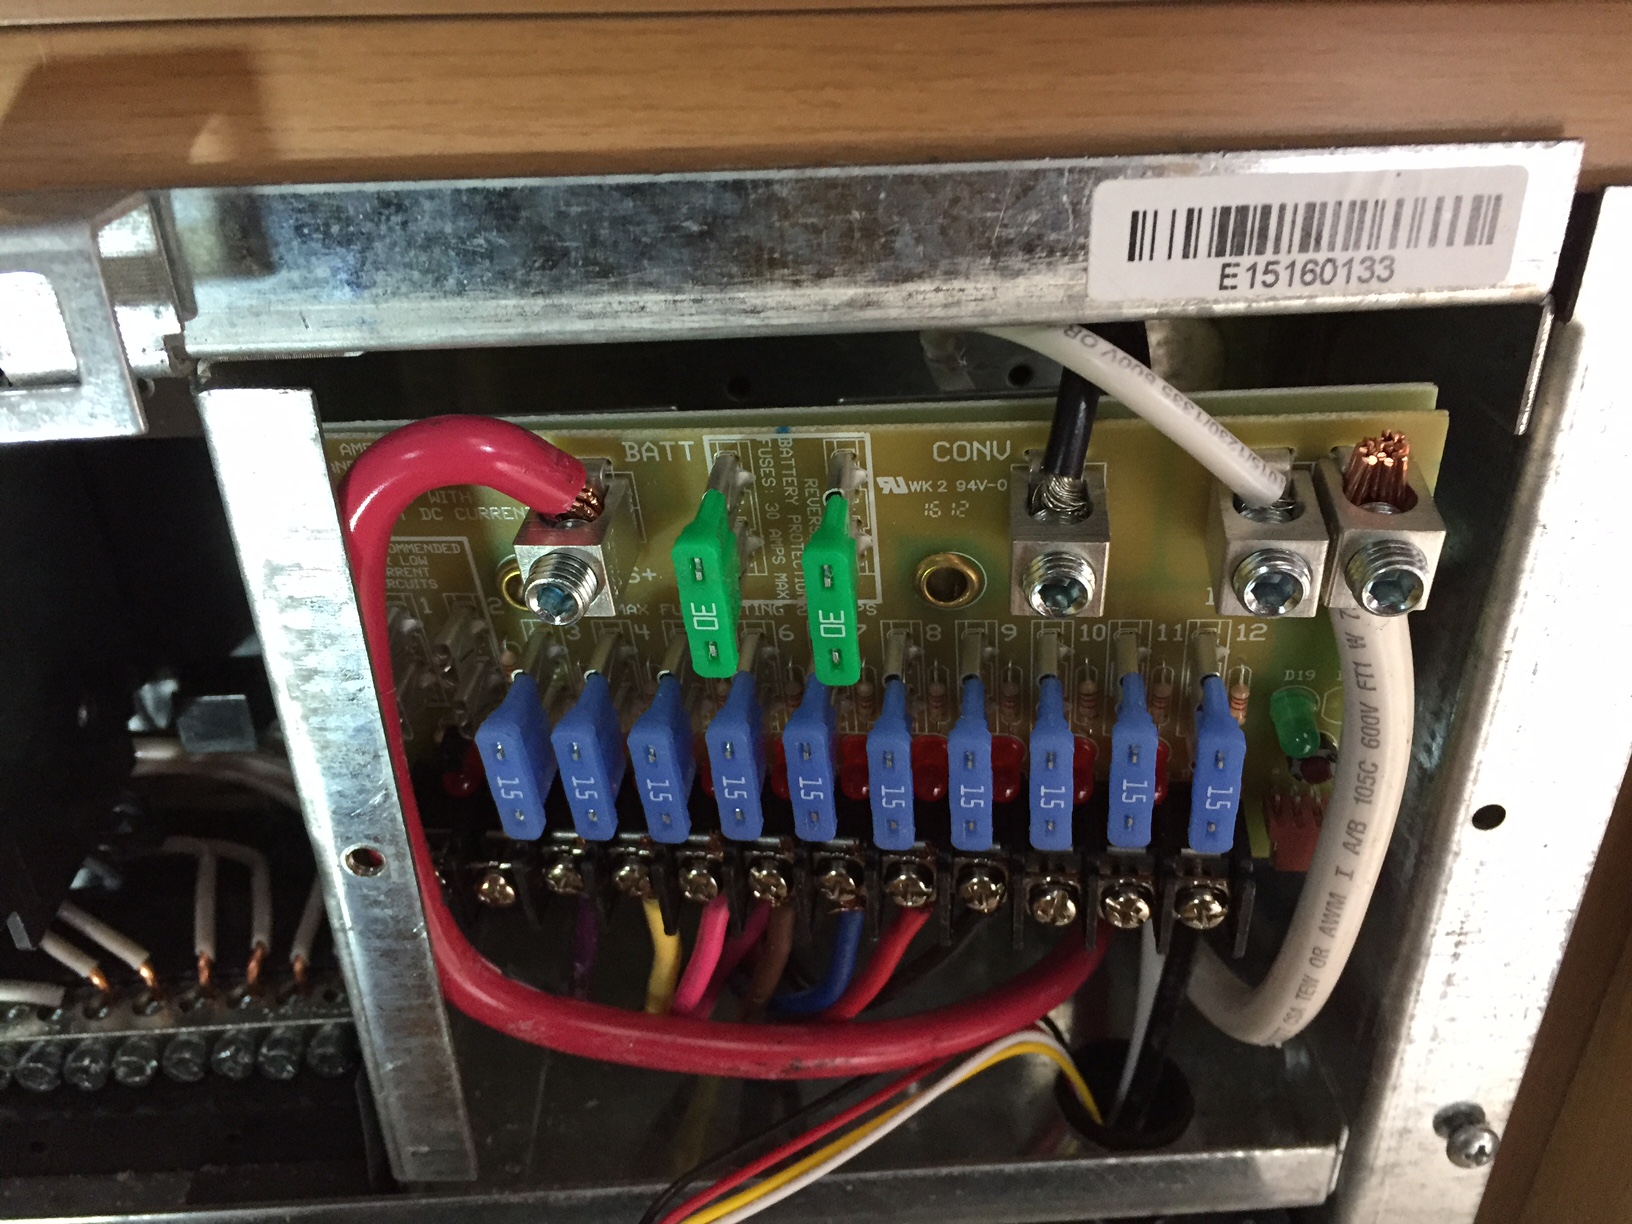
Next onto wiring in the new 12v distribution board. Here you can see the old board still installed and the new board in front. Take note that the boards are not identical, the new board has a set of low current connections on the left of the board. You do not want to use these, use the main ones only. You can see that I have pulled the 15 amp fuses from the old board and put them into the new board.
Notice that the PD4655 has a black and white 12v wires, not the blue and white as you removed. This is fine, the black wire on the new converter is the same as the blue wire on the old one.
Next onto wiring in the new 12v distribution board. Here you can see the old board still installed and the new board in front. Take note that the boards are not identical, the new board has a set of low current connections on the left of the board. You do not want to use these, use the main ones only. You can see that I have pulled the 15 amp fuses from the old board and put them into the new board.
 As most other threads on this subject note, its a bit tight working on the 12v board. The wires have no slack at all but I was able to pull the old board out and to the side which makes working on it easier. You can see I have removed the large red positive wire and the white negative wire.
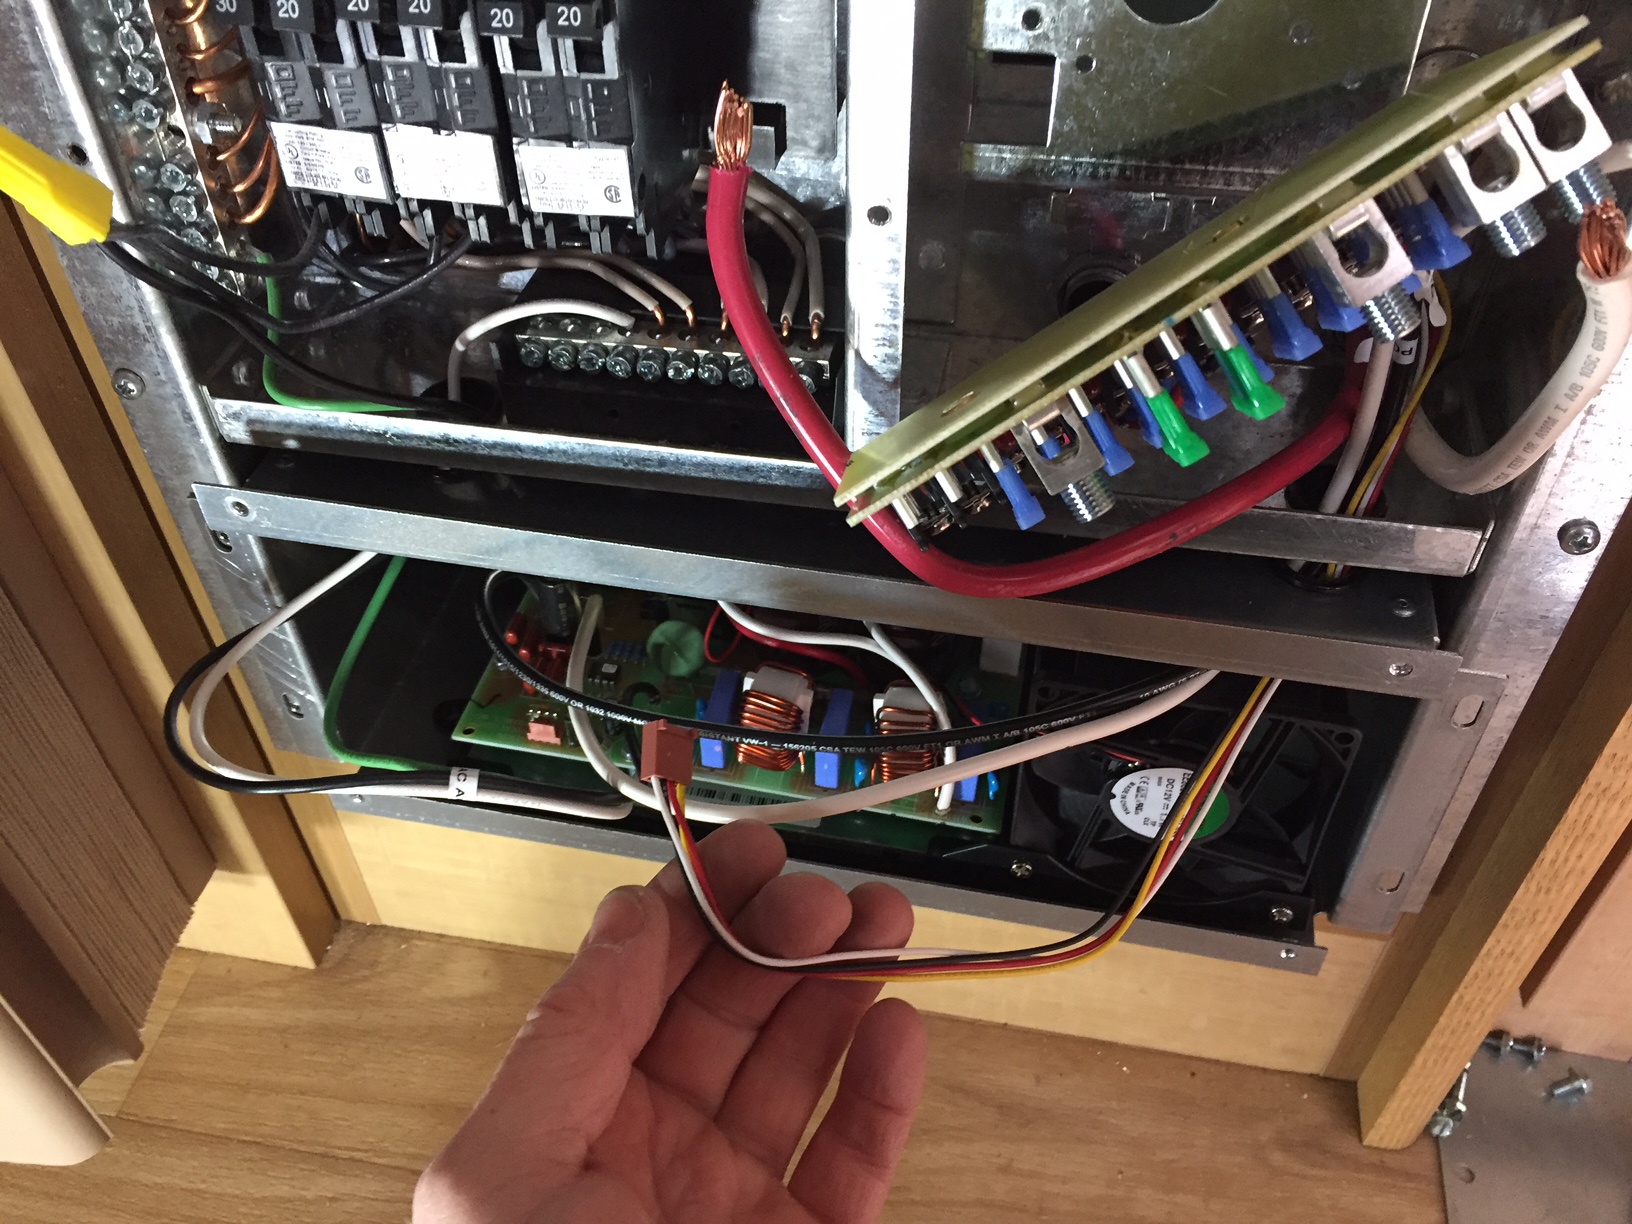
 Put the new 12v distribution board in place, dont forget to install the converter control cable as well, this is the wires with the plug on the end.
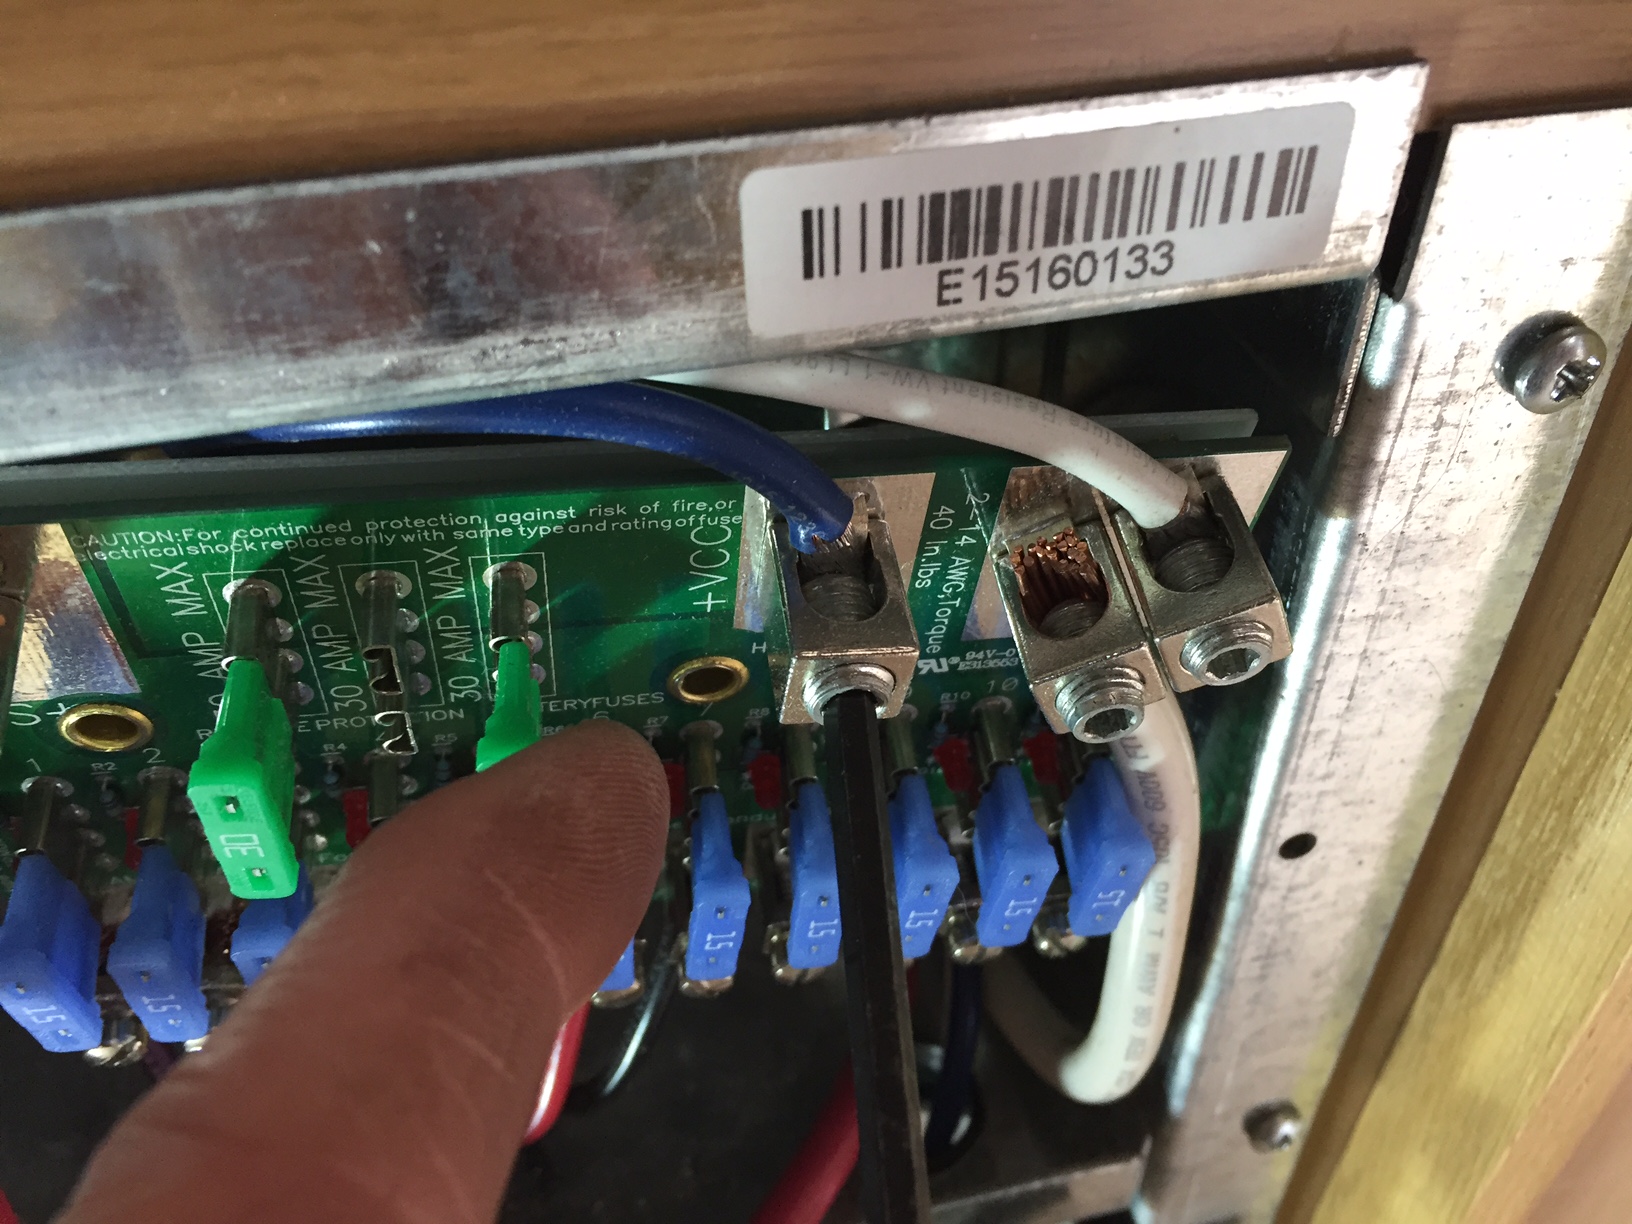
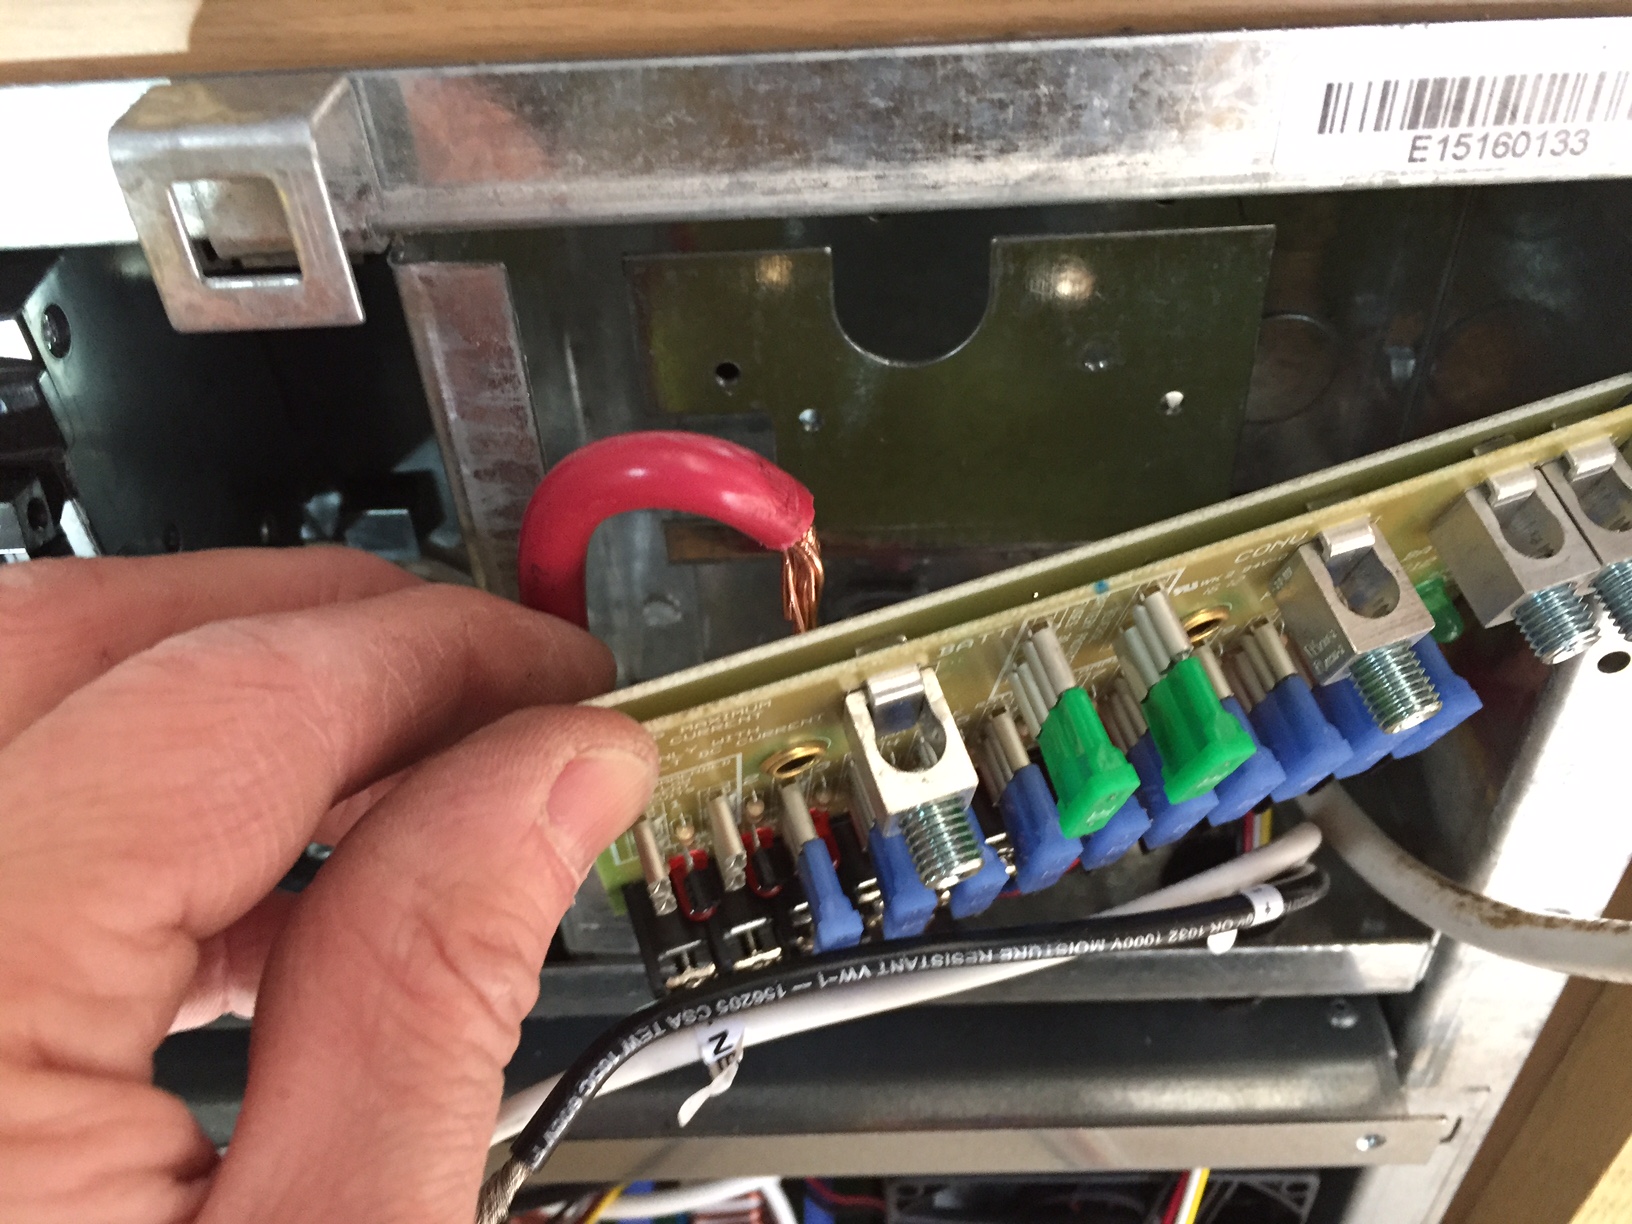
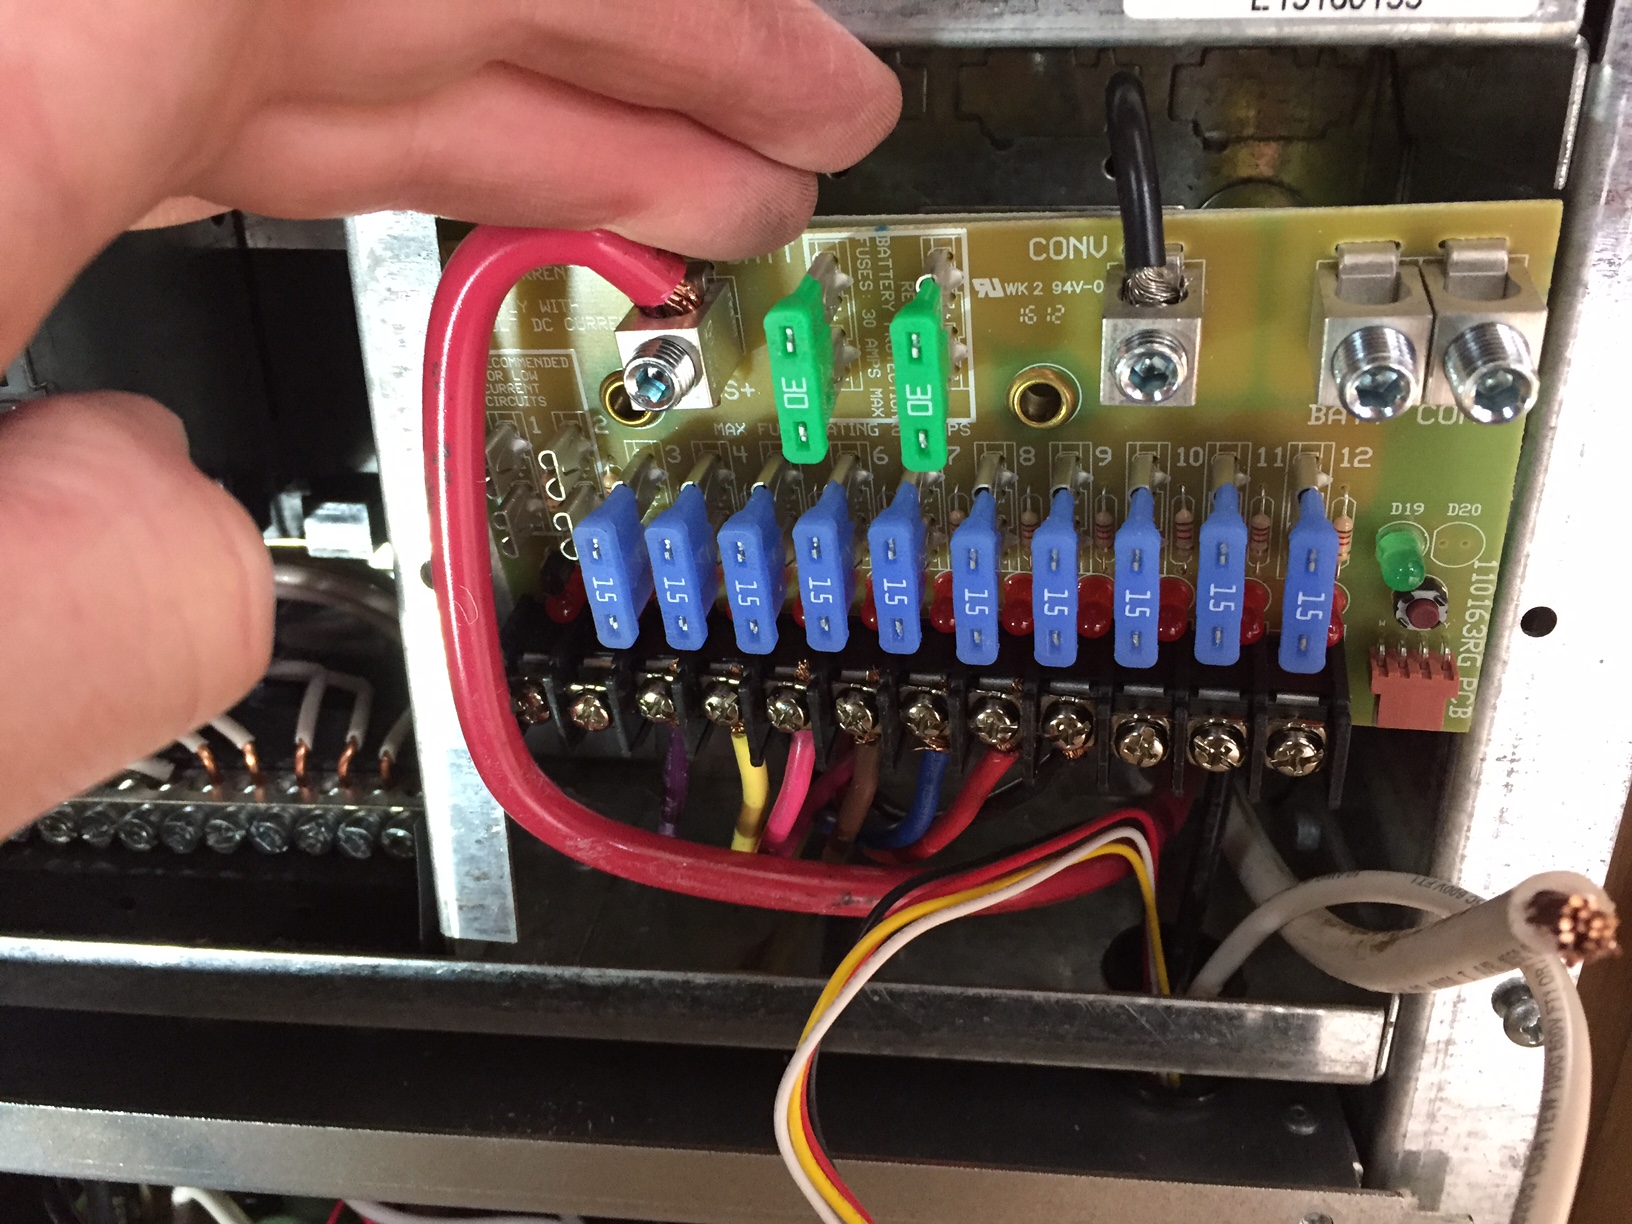
 For the large red wire, I found that if I looped the top over as in the picture it sat nicely in the connector
 I then connected the 12v feed wires, bottom of the board and the black wire to the top.
 Finally I connected up the white wires. If you are observant you will notice in the picture below that I forgot to install the control wires, hence the tip above not to forget it.
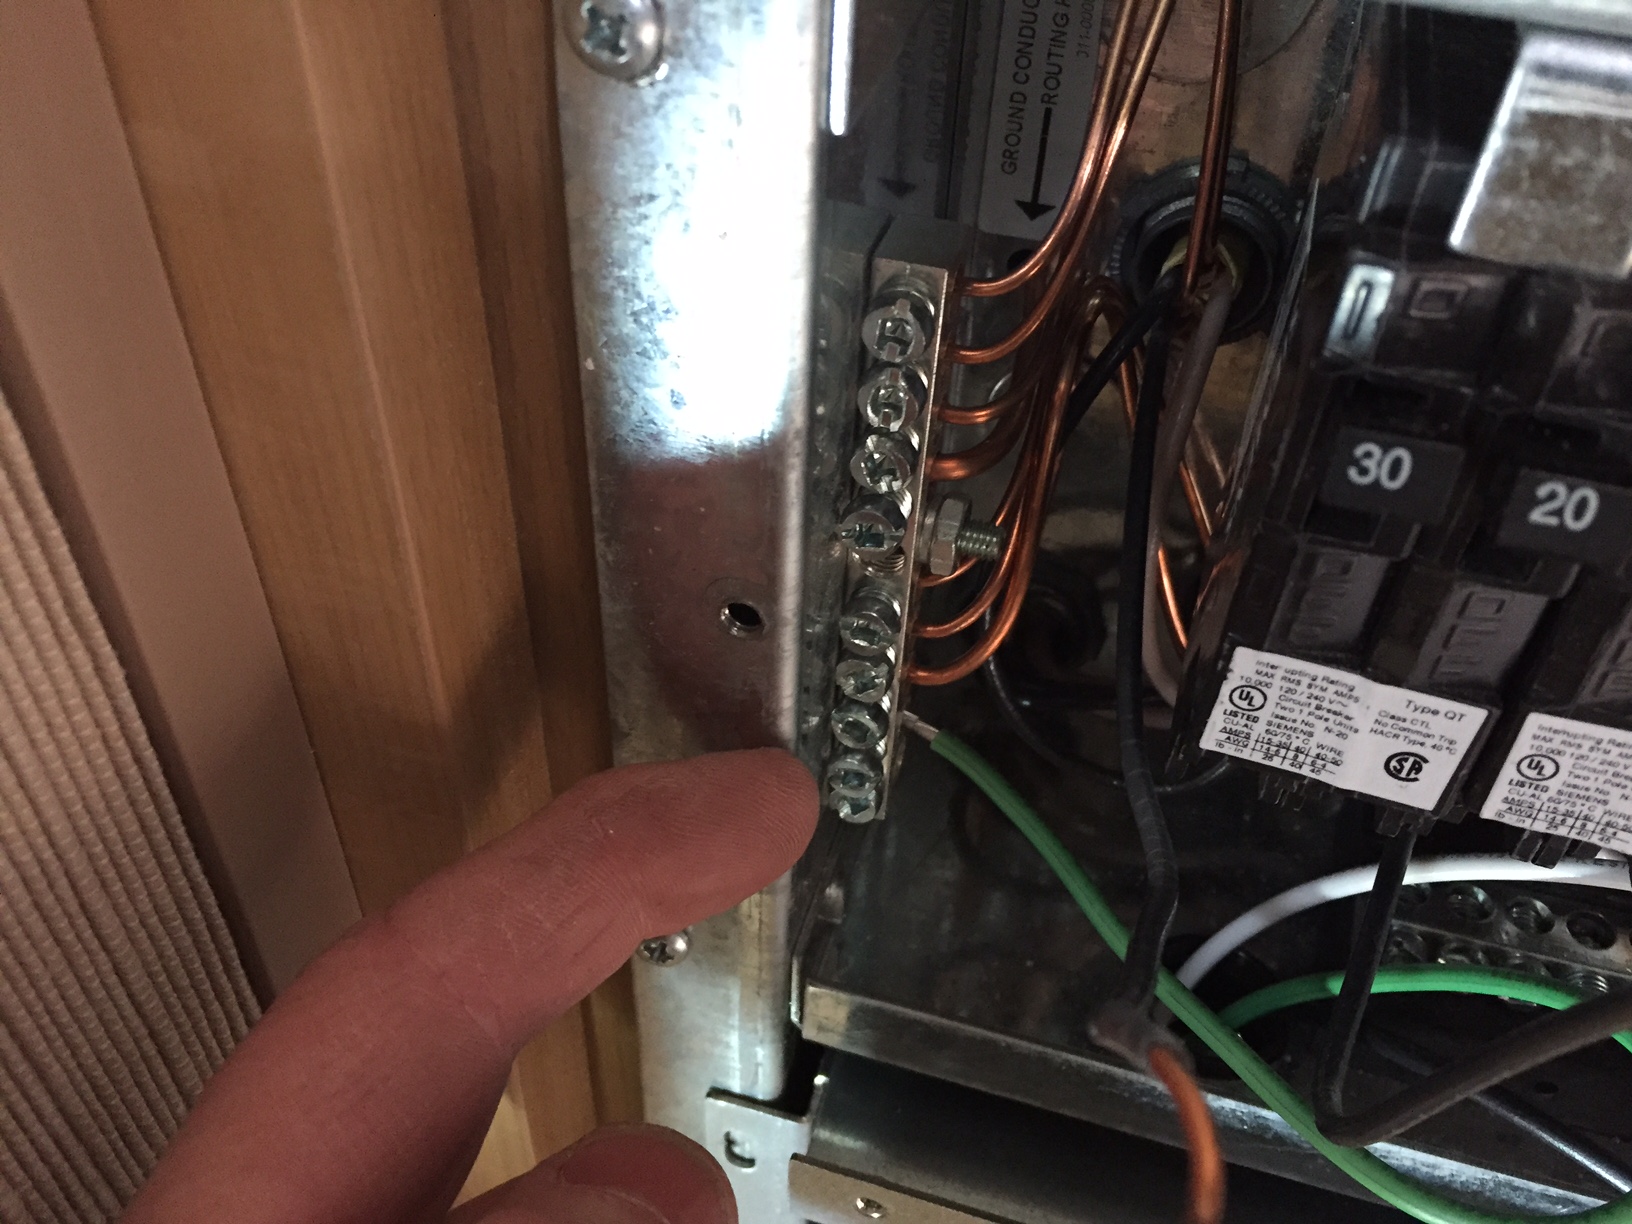
 Now its time to hook up the 110v to the new PD4655 converter.
The PD4655 has an earth, ground connection, the old converter did not. Hook the green ground connection from the converter to an available spot on the earth block. Look for the bare copper wires going into a block, this is the earth block.
Now its time to hook up the 110v to the new PD4655 converter.
The PD4655 has an earth, ground connection, the old converter did not. Hook the green ground connection from the converter to an available spot on the earth block. Look for the bare copper wires going into a block, this is the earth block.
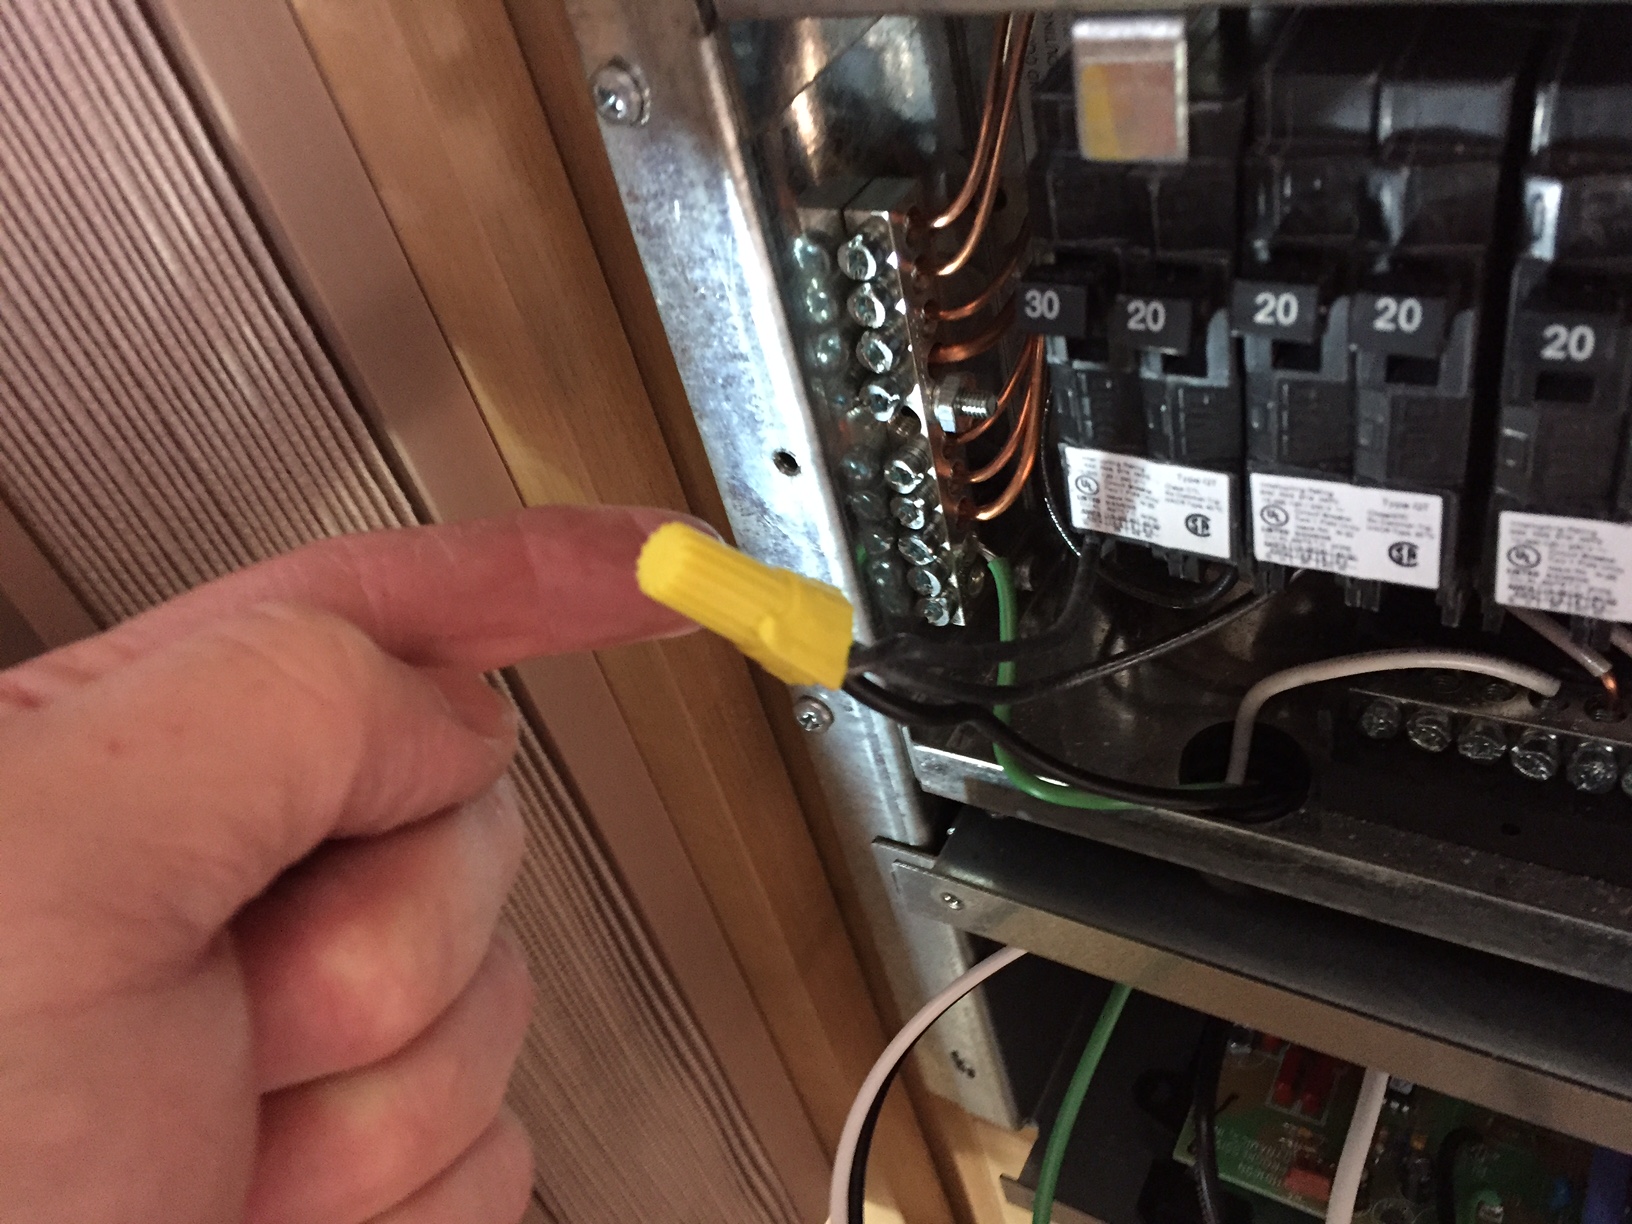
 The white wire of the new converter goes into the white wire distribution block, same place as the one you removed earlier.
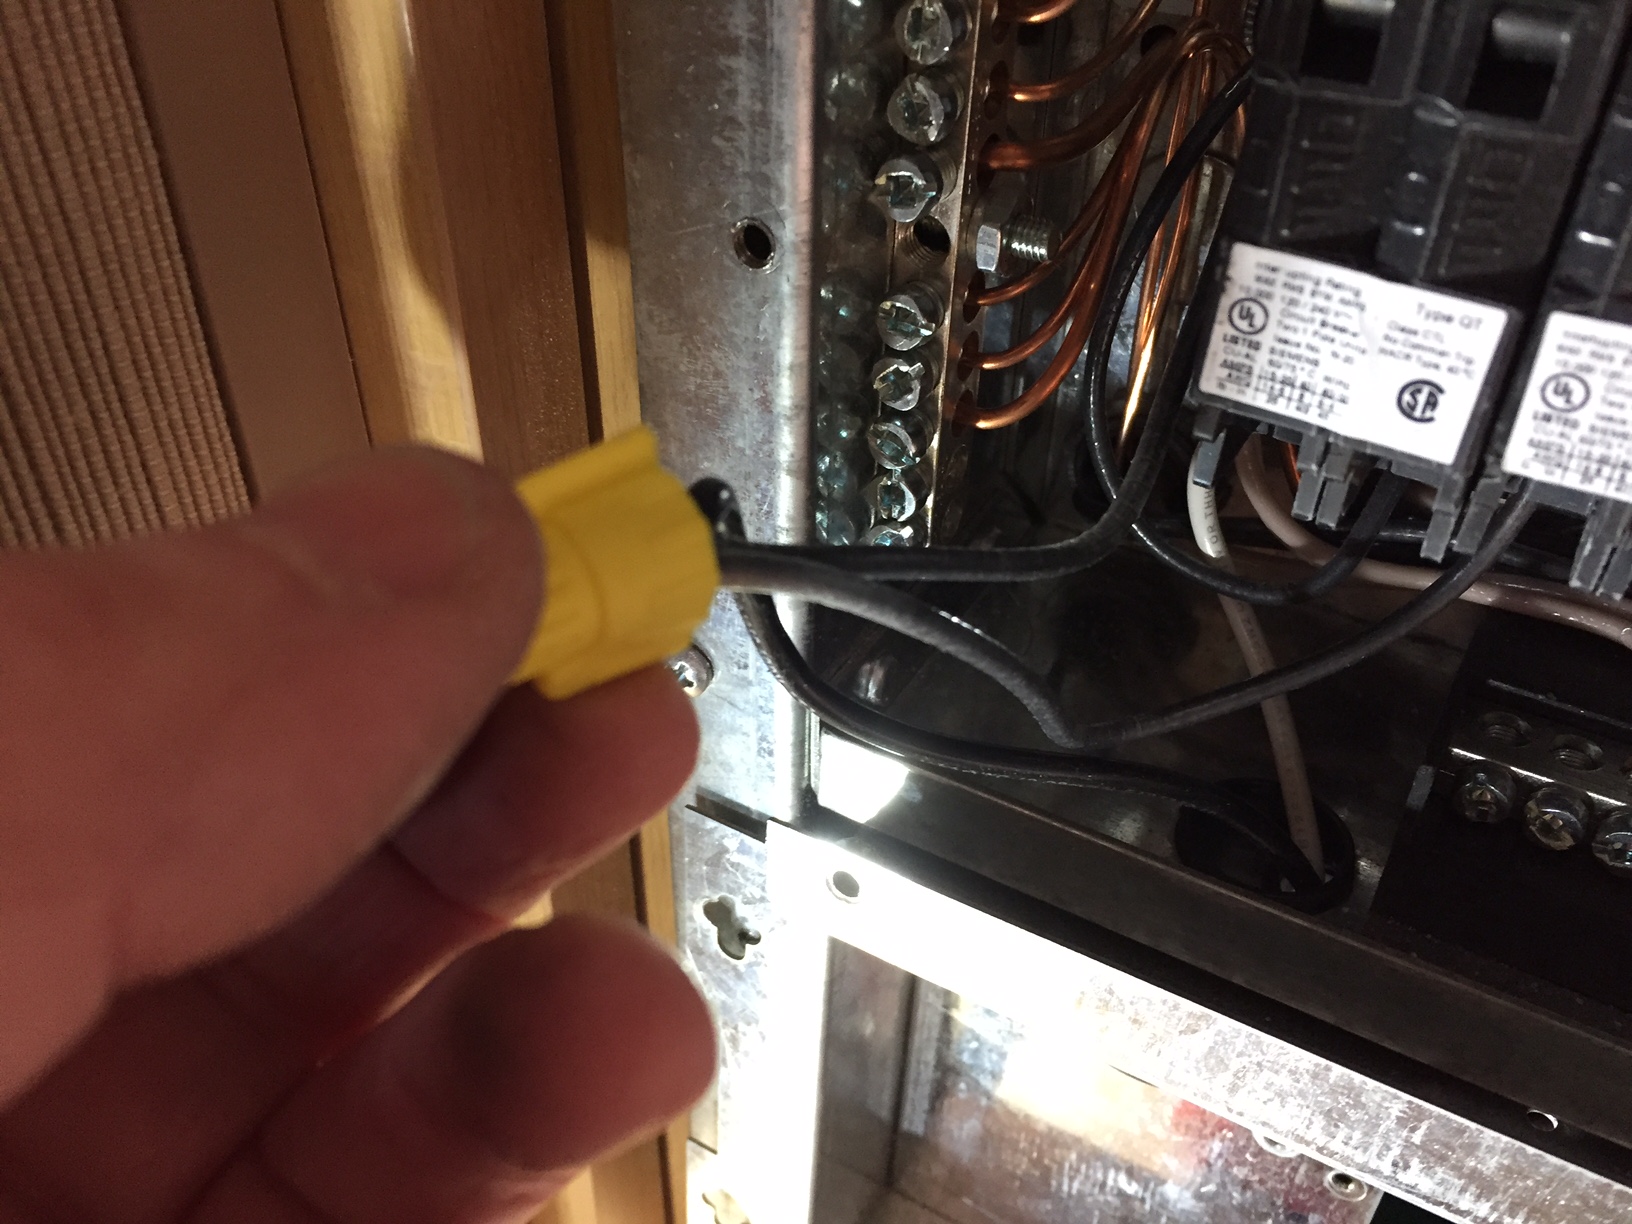
 The black wire connected to the other black wires using a wire nut, I reused the wire nut that was connecting the wires in the first place. Dont forget to connect all the black wires back, there were three total for me.
 Basically thats it.
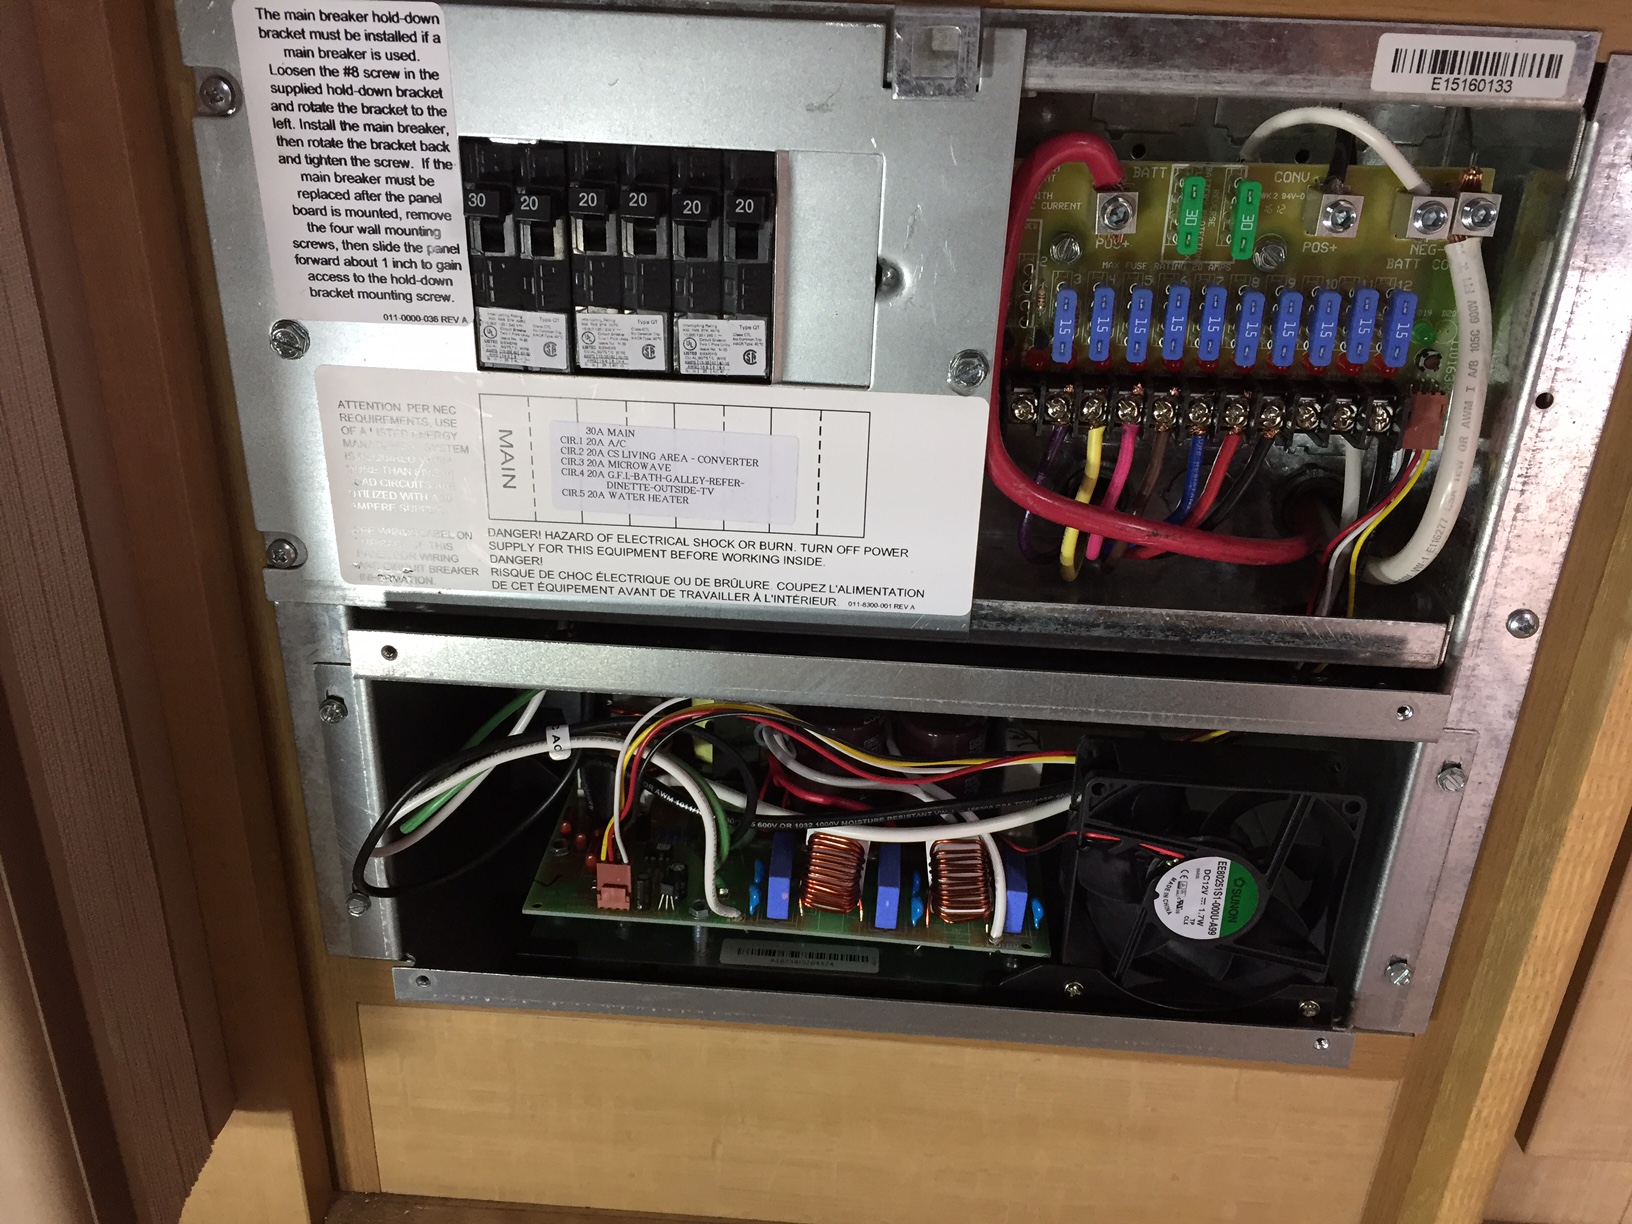 At this point I suggest checking everything you just did. Make sure that all wires are securely connected. Make sure that all wires are going to the correct connections.
STOP, check again, just in case ��
Turn back on the power, and make sure everything is working. The PD4655 worked perfectly for me. It powered up, charges as needed and more importantly, floats the batteries at the correct voltage. Now we can keep the Airstream plugged into shore power without fear that the batteries will be damaged.
I've installed a couple of banks of sealed lead acid 235 AH batteries, when I get time I'll create a thread on that too.
At this point I suggest checking everything you just did. Make sure that all wires are securely connected. Make sure that all wires are going to the correct connections.
STOP, check again, just in case ��
Turn back on the power, and make sure everything is working. The PD4655 worked perfectly for me. It powered up, charges as needed and more importantly, floats the batteries at the correct voltage. Now we can keep the Airstream plugged into shore power without fear that the batteries will be damaged.
I've installed a couple of banks of sealed lead acid 235 AH batteries, when I get time I'll create a thread on that too.
|
|
|
|
|
|
04-18-2022, 08:15 AM
|
#215
|
3 Rivet Member
2016 19' Flying Cloud
Portland
, Oregon
Join Date: Feb 2017
Posts: 155
|
Quote:
Originally Posted by Snowy
Where did all my pictures go?
I see the image links and the images are still live, but no long show up in thread?
|
Of course, now they are working. Strange.
|
|
|
|
|
07-13-2022, 08:15 PM
|
#216
|
|
Custom User Title
2016 19' International
Everett
, Pennsylvania
Join Date: Jun 2019
Posts: 40
|
Thanks for refreshing this information! I'm now at the point of - Step I - replacing our Parallax8355 converter to a PD4655VL.
Eventually - Step II - replace our (2) 12v AGM's with Lithium. It will either be a DIY winter project, or I'll pay MacGyver & Sons to do a more reliable, professional job.
".. the woods are lovely, dark and deep, but I have promises to keep, and miles to go before I sleep .. "
  
|
|
|
|
|
07-14-2022, 09:59 AM
|
#217
|
2 Rivet Member
2016 27' International
Las Vegas
, Nevada
Join Date: Nov 2021
Posts: 30
|
Quote:
Originally Posted by Snowy
Of course, now they are working. Strange.
|
Well, the pics are gone again!
But, I grabbed the pdf from devilsbox that was mentioned in the post on 08-15-2021, 12:52 PM.
I think they are the same pics that you originally posted.
|
|
|
|
|
07-14-2022, 10:22 AM
|
#218
|
2 Rivet Member
2016 27' International
Las Vegas
, Nevada
Join Date: Nov 2021
Posts: 30
|
I have an extra white 12 V wire compared to Snowy's installation
On Step 1, Snowy says to remove the Blue and White 12 V wires.
However, I have an extra white wire going into the board as compared to Snowy's installation pics.
Do I need to disconnect that also? Or just leave it there?
|
|
|
|
|
07-14-2022, 09:11 PM
|
#219
|
2 Rivet Member
2014 27' FB Classic
Lake Havasu
, AZ
Join Date: Apr 2019
Posts: 63
|
So wife/I have been Full-time RVers for over 6 years. Presently in a 2014 Classic Limited 27FB which I retrofitted with (2) Battleborn lithium batteries, about 500w of Zamp solar and upgraded OEM converter (Parallex 7355) with the PD4655VL from Best converters about 2 years ago. We also have Honda 2200EU generator and Victron BMV712 monitor. I usually monitor and know exactly what's going on with our electrical system...
So FFWD to present, Alaska... where I think it's the first time we solar alone hasn't been enough due to multiple back to back cloudy days. Broke out Honda 2200EU and noticed via bmv712 I'm only charging around 13.6V and never about 15 amps!
After several hours of reading, research and performing various tests I'm at a loss as to why I'm unable to charge above 15 amps.
Jumper is set to Lithium on 4655 board. No other loads turned on, at all except converter. Honda 2200 gen is in eco mode and barely working... taking it out of eco mode has no effect on converter output.
Ridiculous ... Its taking me over 6 hours to charge 2 BB batteries from 70ish percent to 100%... I'm expecting at least 30-50 amp charge rate!
I've done the progressive troubleshooting steps... Pulled both 30 amp fuses on OEM DC board to test converter output and battery voltage. Says I should be seeing 14.5-14.6V ... Fail. Actually see 16.2V. battery voltage shows 15.5V. Remember this is with both 30 amp fuses removed per Progressives procedure however it's still out of spec.
With fuses in and converter powered on I never see voltage above 13.6V and amos above 15 amps, never.
Anyone have any ideas as having to run generator 3x as long to recharge is expensive given $5+/gal gas.
Photos of jumper setting, Victron battery settings, etc.
https://photos.app.goo.gl/SjQgD86dGVHgb188A
|
|
|
|
|
07-15-2022, 06:09 PM
|
#220
|
Rivet Master
2011 22' Sport
Portland
, Oregon
Join Date: Aug 2017
Posts: 657
|
Quote:
Originally Posted by wingingit
So wife/I have been Full-time RVers for over 6 years. Presently in a 2014 Classic Limited 27FB which I retrofitted with (2) Battleborn lithium batteries, about 500w of Zamp solar and upgraded OEM converter (Parallex 7355) with the PD4655VL from Best converters about 2 years ago. We also have Honda 2200EU generator and Victron BMV712 monitor. I usually monitor and know exactly what's going on with our electrical system...
So FFWD to present, Alaska... where I think it's the first time we solar alone hasn't been enough due to multiple back to back cloudy days. Broke out Honda 2200EU and noticed via bmv712 I'm only charging around 13.6V and never about 15 amps!
After several hours of reading, research and performing various tests I'm at a loss as to why I'm unable to charge above 15 amps.
Jumper is set to Lithium on 4655 board. No other loads turned on, at all except converter. Honda 2200 gen is in eco mode and barely working... taking it out of eco mode has no effect on converter output.
Ridiculous ... Its taking me over 6 hours to charge 2 BB batteries from 70ish percent to 100%... I'm expecting at least 30-50 amp charge rate!
I've done the progressive troubleshooting steps... Pulled both 30 amp fuses on OEM DC board to test converter output and battery voltage. Says I should be seeing 14.5-14.6V ... Fail. Actually see 16.2V. battery voltage shows 15.5V. Remember this is with both 30 amp fuses removed per Progressives procedure however it's still out of spec.
With fuses in and converter powered on I never see voltage above 13.6V and amos above 15 amps, never.
Anyone have any ideas as having to run generator 3x as long to recharge is expensive given $5+/gal gas.
Photos of jumper setting, Victron battery settings, etc.
https://photos.app.goo.gl/SjQgD86dGVHgb188A |
I see peak of 56 amps @ 11.31VDC on my SOK206 battery, I don't know if I ever saw more than ~20-30amps on my BB100...but 15amps seems low. I will say that the PD4655 is horribly inefficient, that 56amps (~630W) was drawing 1200W+, I don't recall exact number.
As for the voltage when charging, it won't be 14.6V until the battery is approaching "full". Disconnect your battery and you should immediately see 14.6V out of the converter, but the batteries are drawing the voltage down as they pack in the electrons.
|
|
|
|
|
|
|
Currently Active Users Viewing This Thread: 1 (0 members and 1 guests)
|
|
|
 Posting Rules
|
You may not post new threads
You may not post replies
You may not post attachments
You may not edit your posts
HTML code is Off
|
|
|
|

 Recent Discussions
 |
|
|
|
|
|
|
|
|
|
|
|
|
|
|
|
|
|
|
|
|
|


 Linear Mode

