 |
 02-22-2017, 05:35 PM
|
#1
|
3 Rivet Member 
2016 19' Flying Cloud
Portland
, Oregon
Join Date: Feb 2017
Posts: 155
|
235 AH Battery Upgrade on 2016 19 Flying Cloud
I was happy to find out that our 2016 19’ flying cloud had the larger battery box easing the install of larger 6v batteries. I selected VMAX batteries, they are rated at 235 AH so a significant upgrade from the stock.
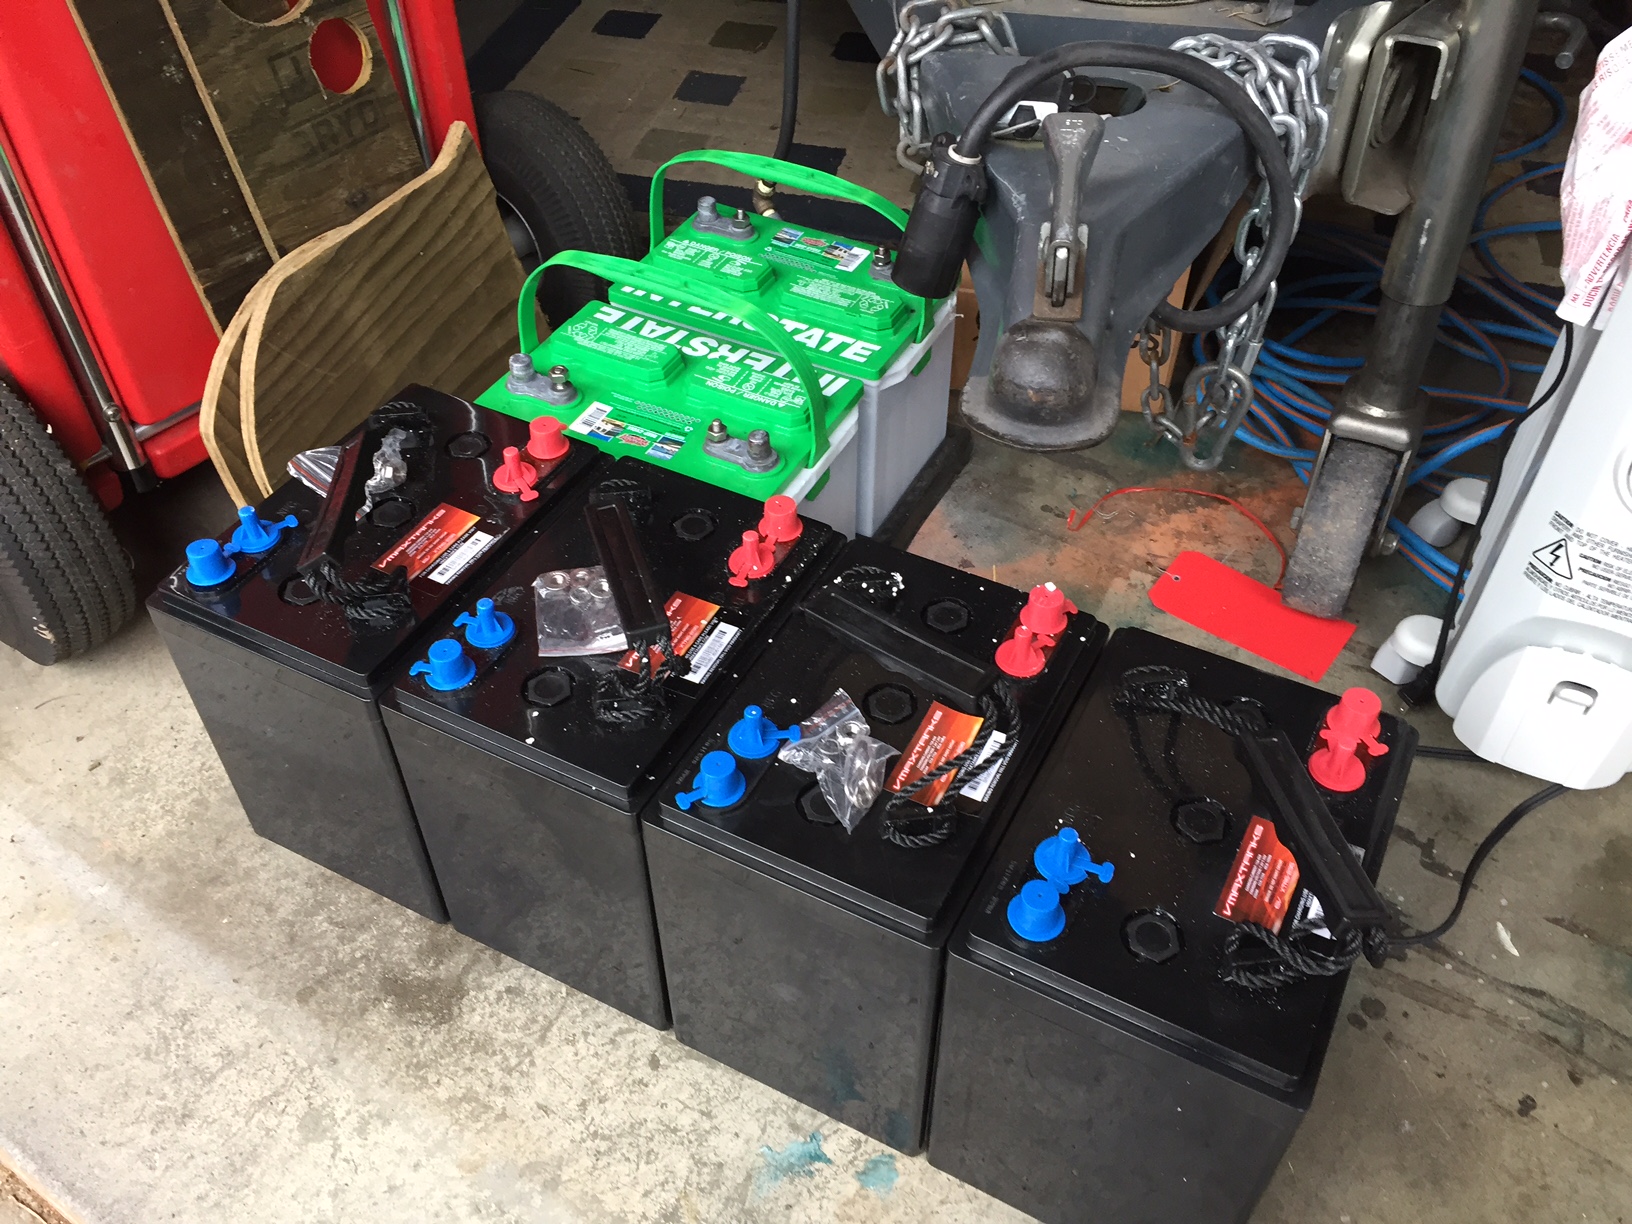 If you wonder why I have 4, it’s because I actually installed two banks, one in the stock location (this thread) and a second bank under the bed. They are installed as two separate banks, not directly connected. I’ll explain in detail in a separate thread but in summary, one bank is the main house batteries (stock location, this thread) and the second bank is for the inverters. My thought process is that if we use the luxury of the inverters I do not want to drain the important house batteries which power the fridge, furnace lights etc. However if for some reason we accidently drain the house batteries, leave a light on or something, I can use the second bank to power the main house circuit. In addition, I have automatic charge relays which connect the banks when a charge voltage is sensed on the main lines. Its cases like this that I am happy that I am a BEng with electrical and computer specialties.
The first thing I did was make a fused bus bar to connect the two 6 volt batteries together. The reason for a fuse between the batteries is two-fold, first as a safety backup. If for some reason the battery gets shorted the fuse between the two 6V will pop. This fuse should be bigger than the max load expected. The second reason for the fuse and the reason that it’s a reset’able fuse, is to act as a battery disconnect if needed.
If you wonder why I have 4, it’s because I actually installed two banks, one in the stock location (this thread) and a second bank under the bed. They are installed as two separate banks, not directly connected. I’ll explain in detail in a separate thread but in summary, one bank is the main house batteries (stock location, this thread) and the second bank is for the inverters. My thought process is that if we use the luxury of the inverters I do not want to drain the important house batteries which power the fridge, furnace lights etc. However if for some reason we accidently drain the house batteries, leave a light on or something, I can use the second bank to power the main house circuit. In addition, I have automatic charge relays which connect the banks when a charge voltage is sensed on the main lines. Its cases like this that I am happy that I am a BEng with electrical and computer specialties.
The first thing I did was make a fused bus bar to connect the two 6 volt batteries together. The reason for a fuse between the batteries is two-fold, first as a safety backup. If for some reason the battery gets shorted the fuse between the two 6V will pop. This fuse should be bigger than the max load expected. The second reason for the fuse and the reason that it’s a reset’able fuse, is to act as a battery disconnect if needed.
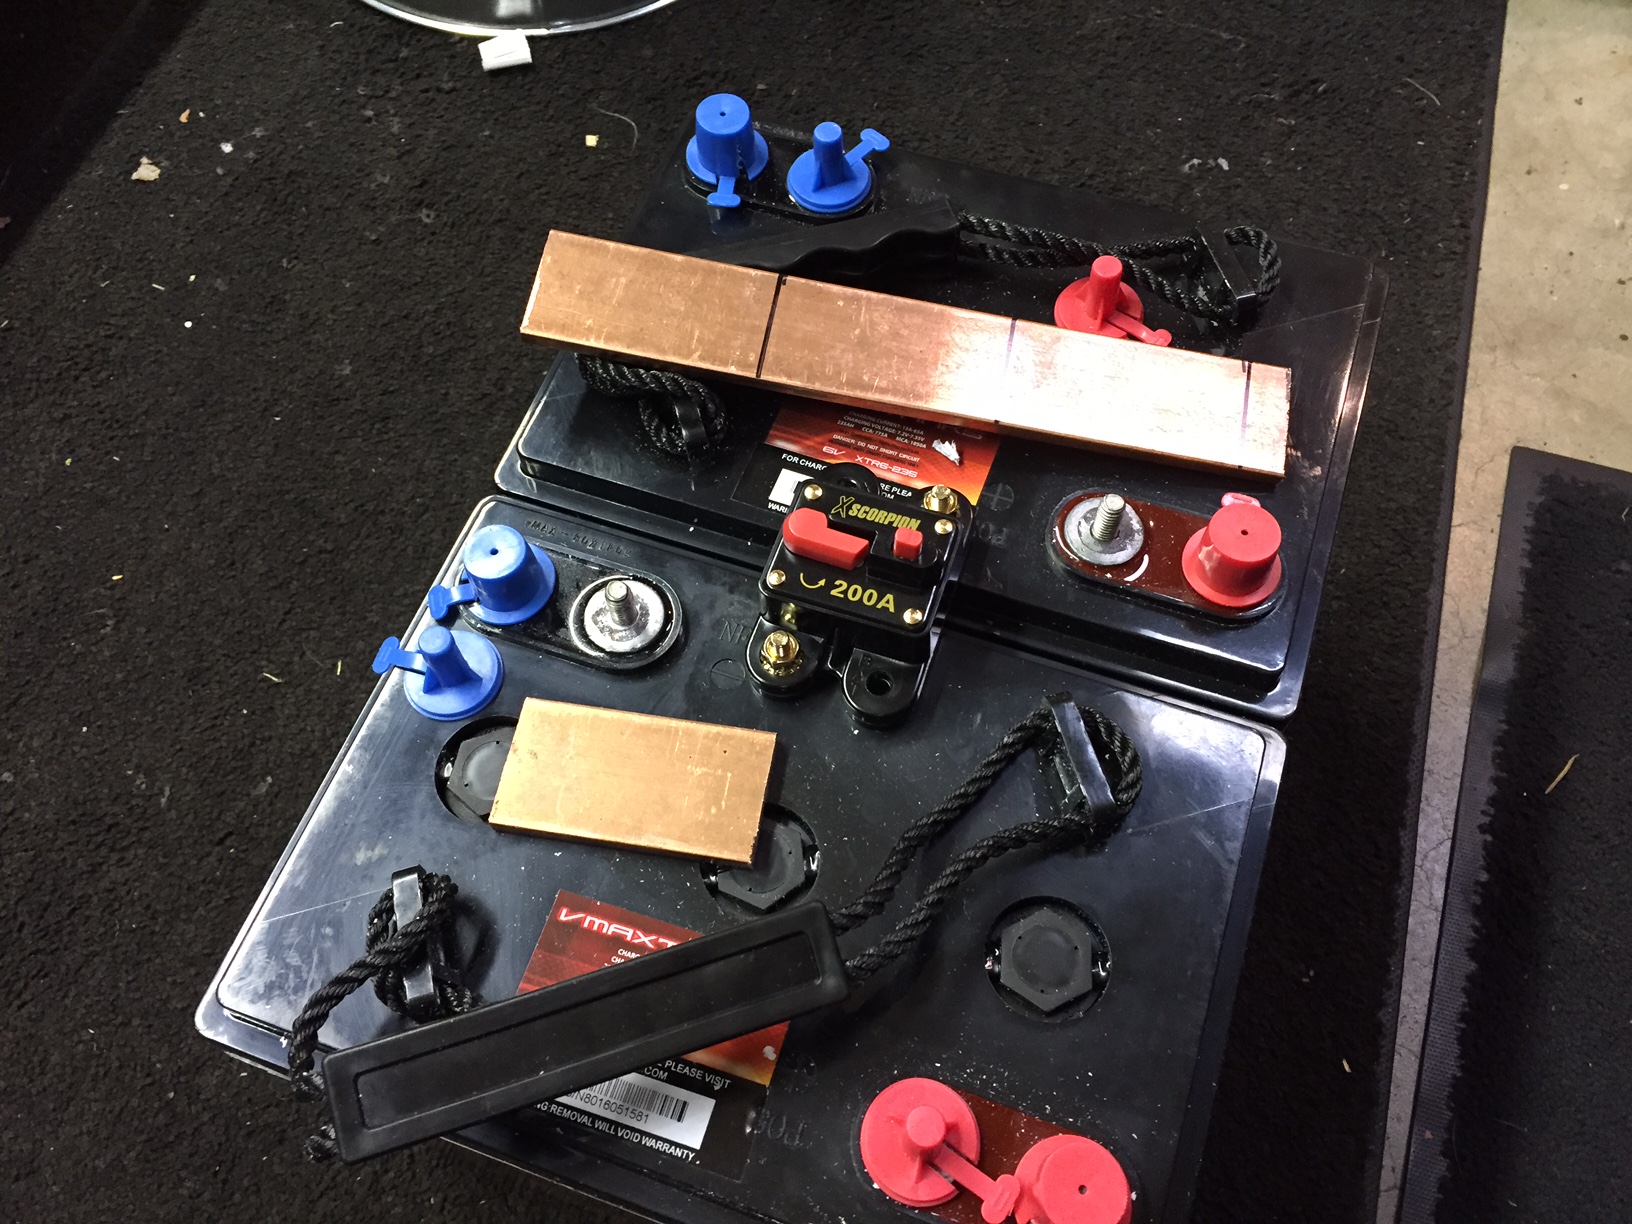 The bus bar is made out of copper bar and in this case a 2/0 welding cable wire.
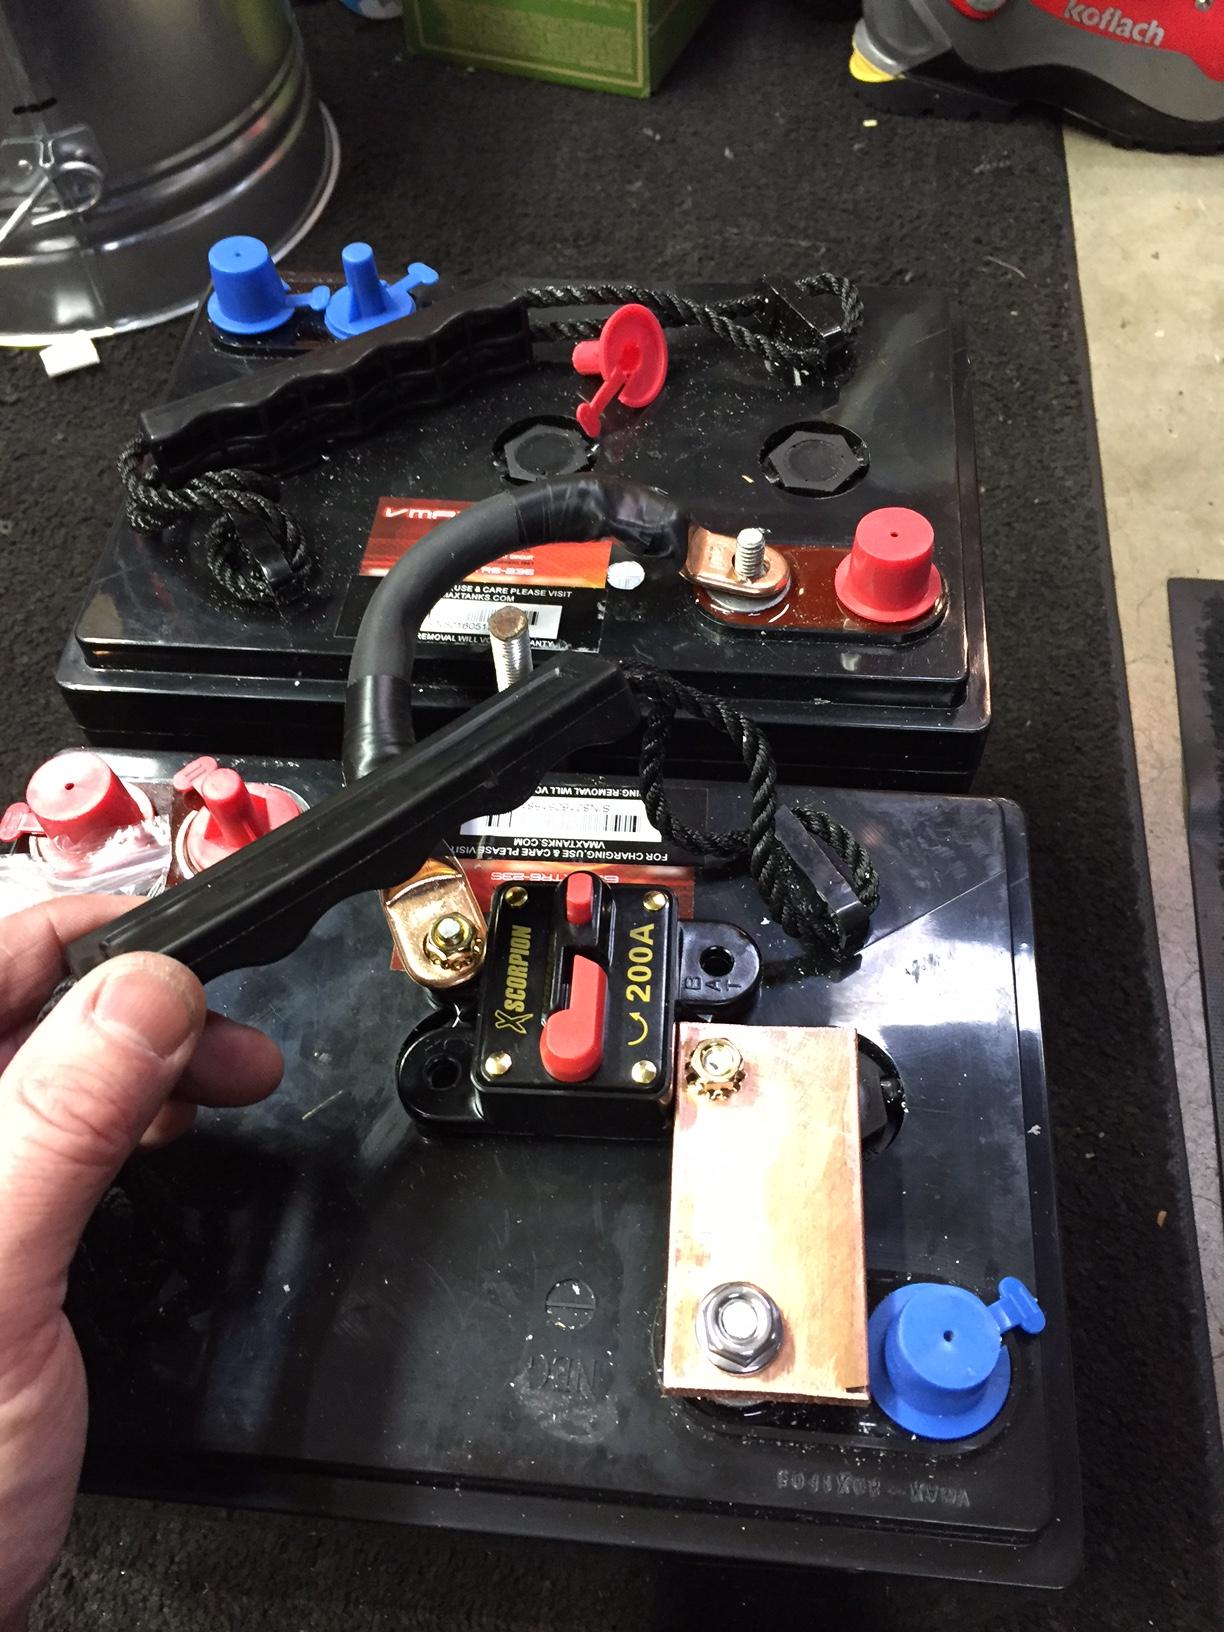 Above you can see why I couldn’t use two bits of copper for the bus bar, the battery tie down sits between them. On the second battery bank I was able to sit the batteries next to each other so use two copper bars with the fuse between them.
The batteries fit snugly in the battery box. Note I put a rubber hose over the threaded post and made a small plastic pad to help hold down the batteries. There is room on each side but I use 1.5” PVC pipe to ensure the batteries cannot move.
I wanted to measure the battery use so I installed a 500 amp shunt on the negative terminal
Above you can see why I couldn’t use two bits of copper for the bus bar, the battery tie down sits between them. On the second battery bank I was able to sit the batteries next to each other so use two copper bars with the fuse between them.
The batteries fit snugly in the battery box. Note I put a rubber hose over the threaded post and made a small plastic pad to help hold down the batteries. There is room on each side but I use 1.5” PVC pipe to ensure the batteries cannot move.
I wanted to measure the battery use so I installed a 500 amp shunt on the negative terminal
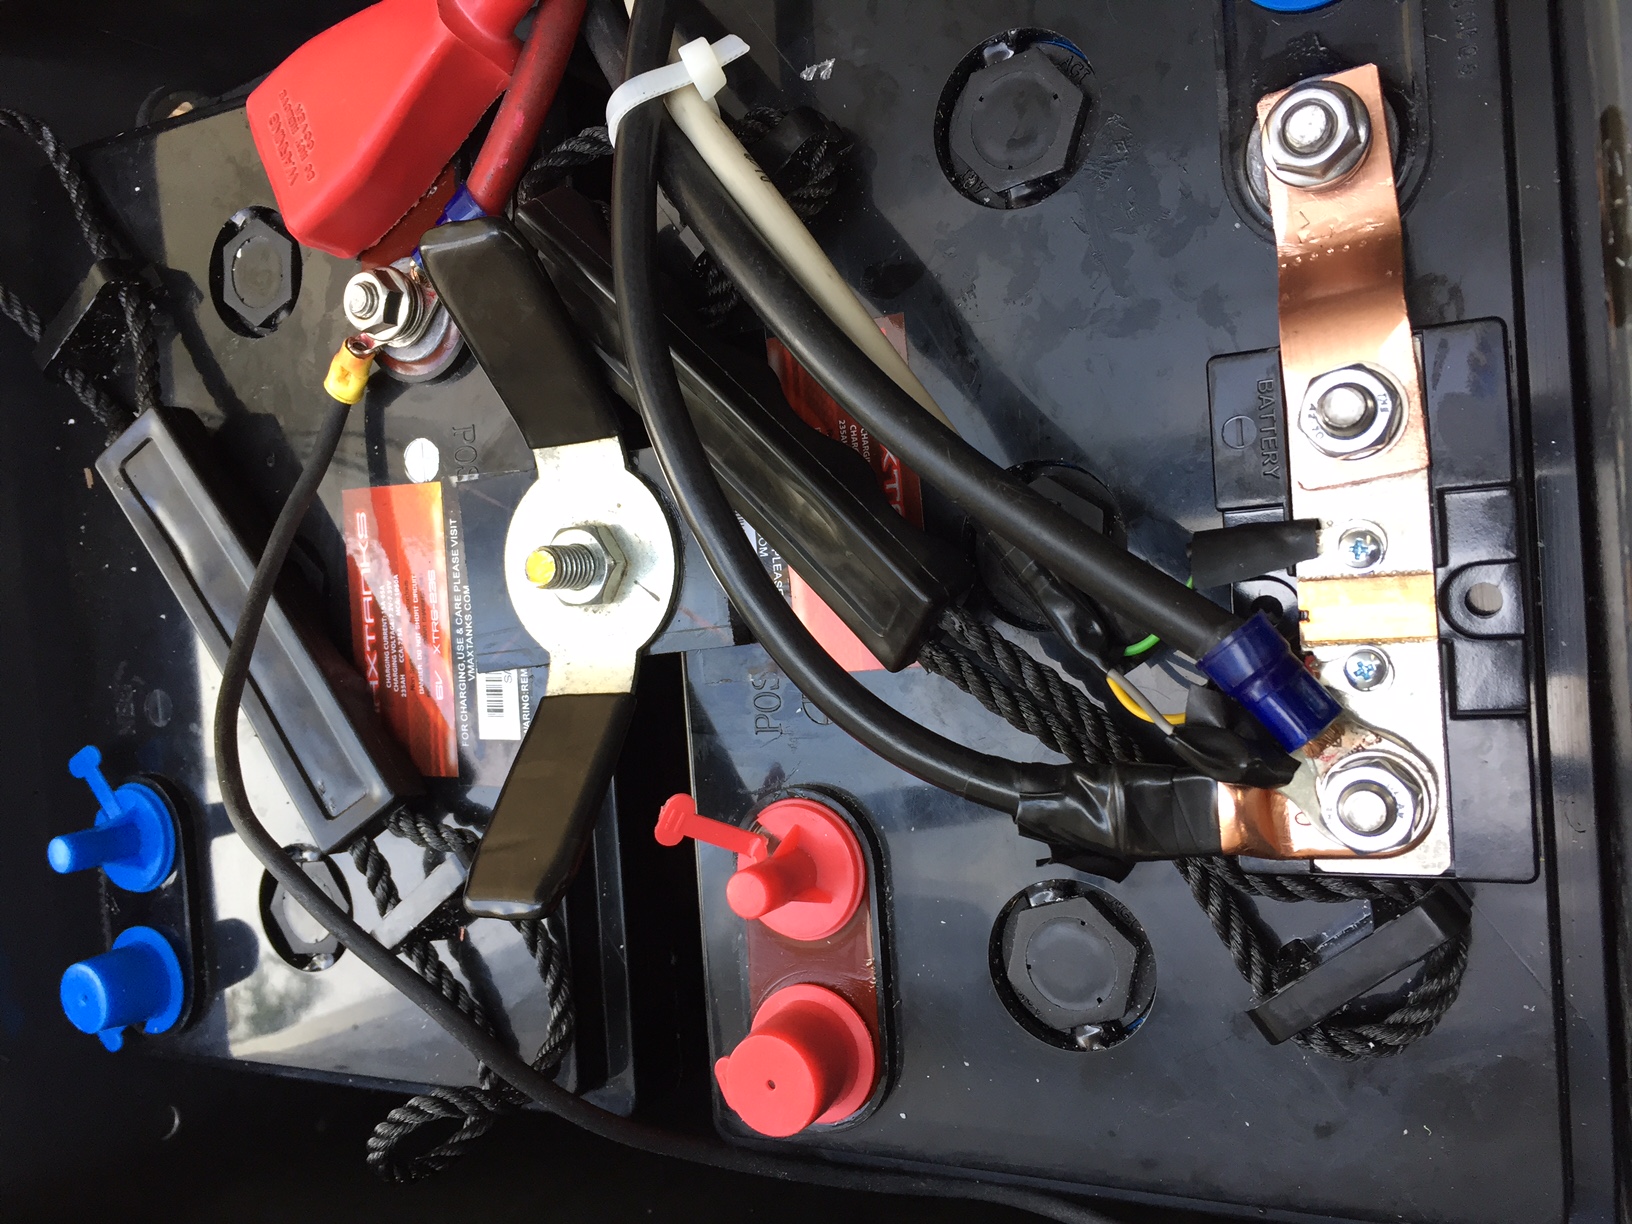 This is the shunt that came the Xantrex linkLITE AH meter. I am sure you can get better equipment but I’ve had good luck with the Xantrex stuff which is why I selected it. This and the linkLITE meter is small and installs via a simple hole.
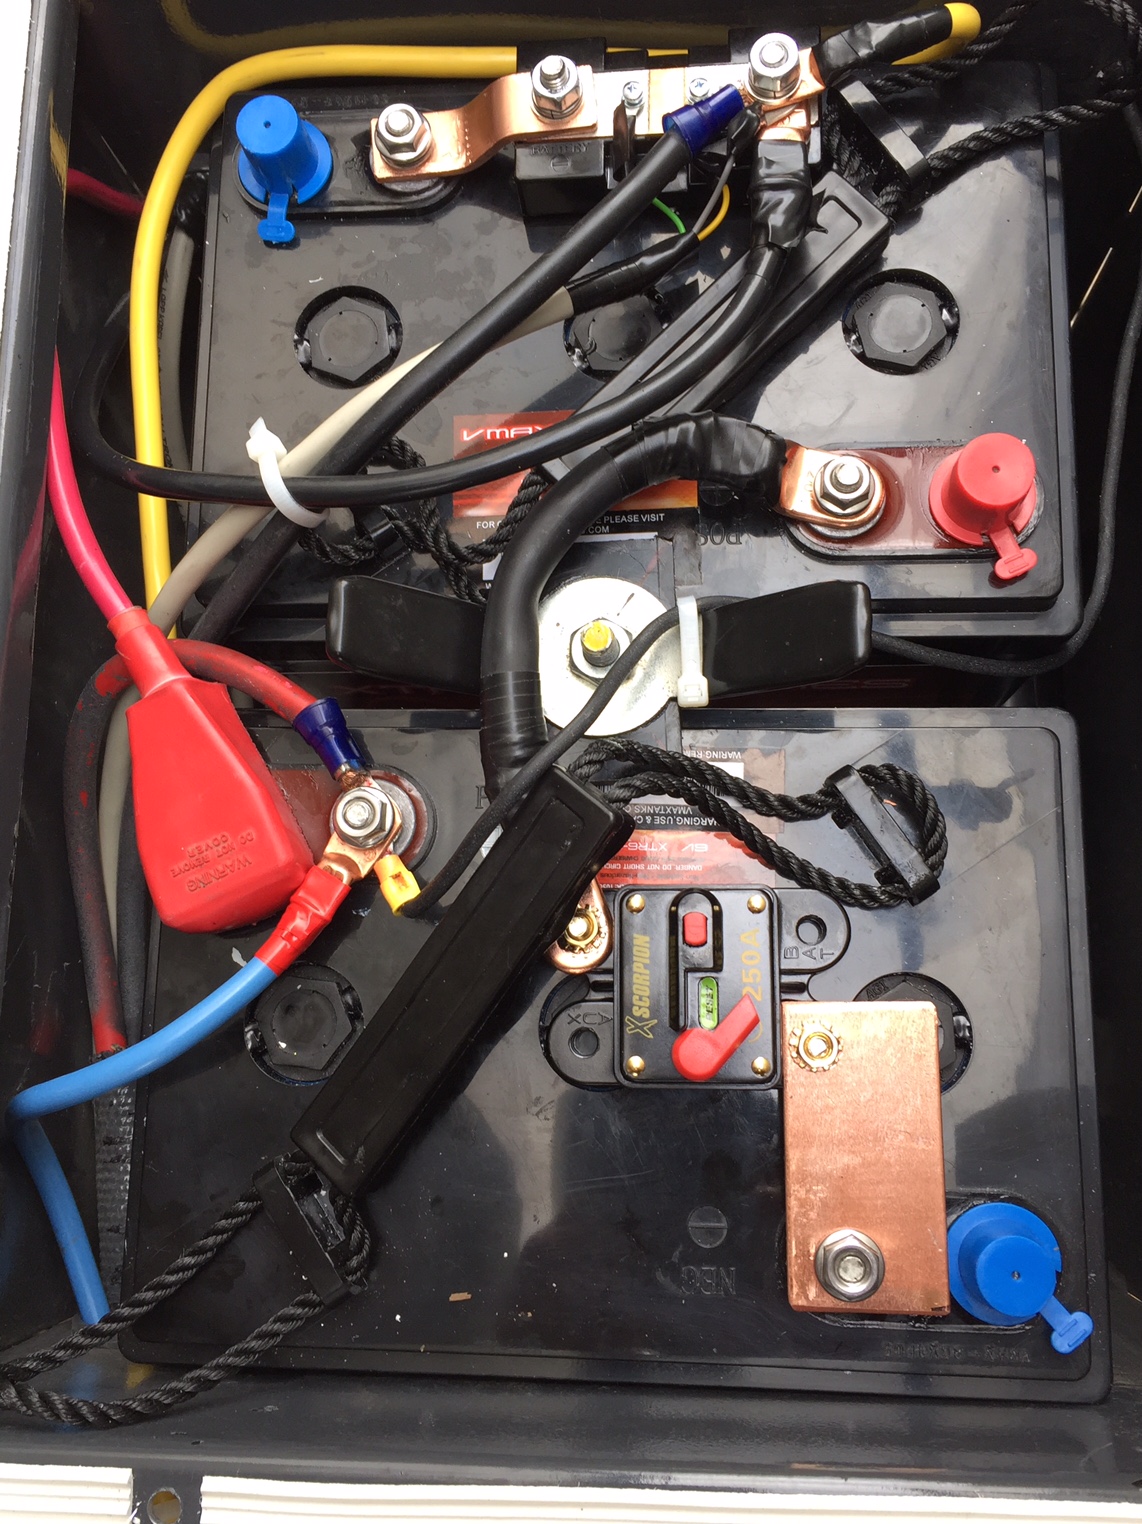 If you look at the above you can see that no negative cables go directly to the battery, they all go via the shunt. This way you can monitor amps used and amps charged.
In the picture you can also see the two 6V batteries in series making the 12V needed. I still have the direct inverter feed cables connected but they no longer power the inverters, instead, they now carry charge voltage to the second battery bank.
The blue and yellow cables are to enable me to plug in a portable solar charger, just in case the built in solar setup needs a helping hand.
If you look at the above you can see that no negative cables go directly to the battery, they all go via the shunt. This way you can monitor amps used and amps charged.
In the picture you can also see the two 6V batteries in series making the 12V needed. I still have the direct inverter feed cables connected but they no longer power the inverters, instead, they now carry charge voltage to the second battery bank.
The blue and yellow cables are to enable me to plug in a portable solar charger, just in case the built in solar setup needs a helping hand.
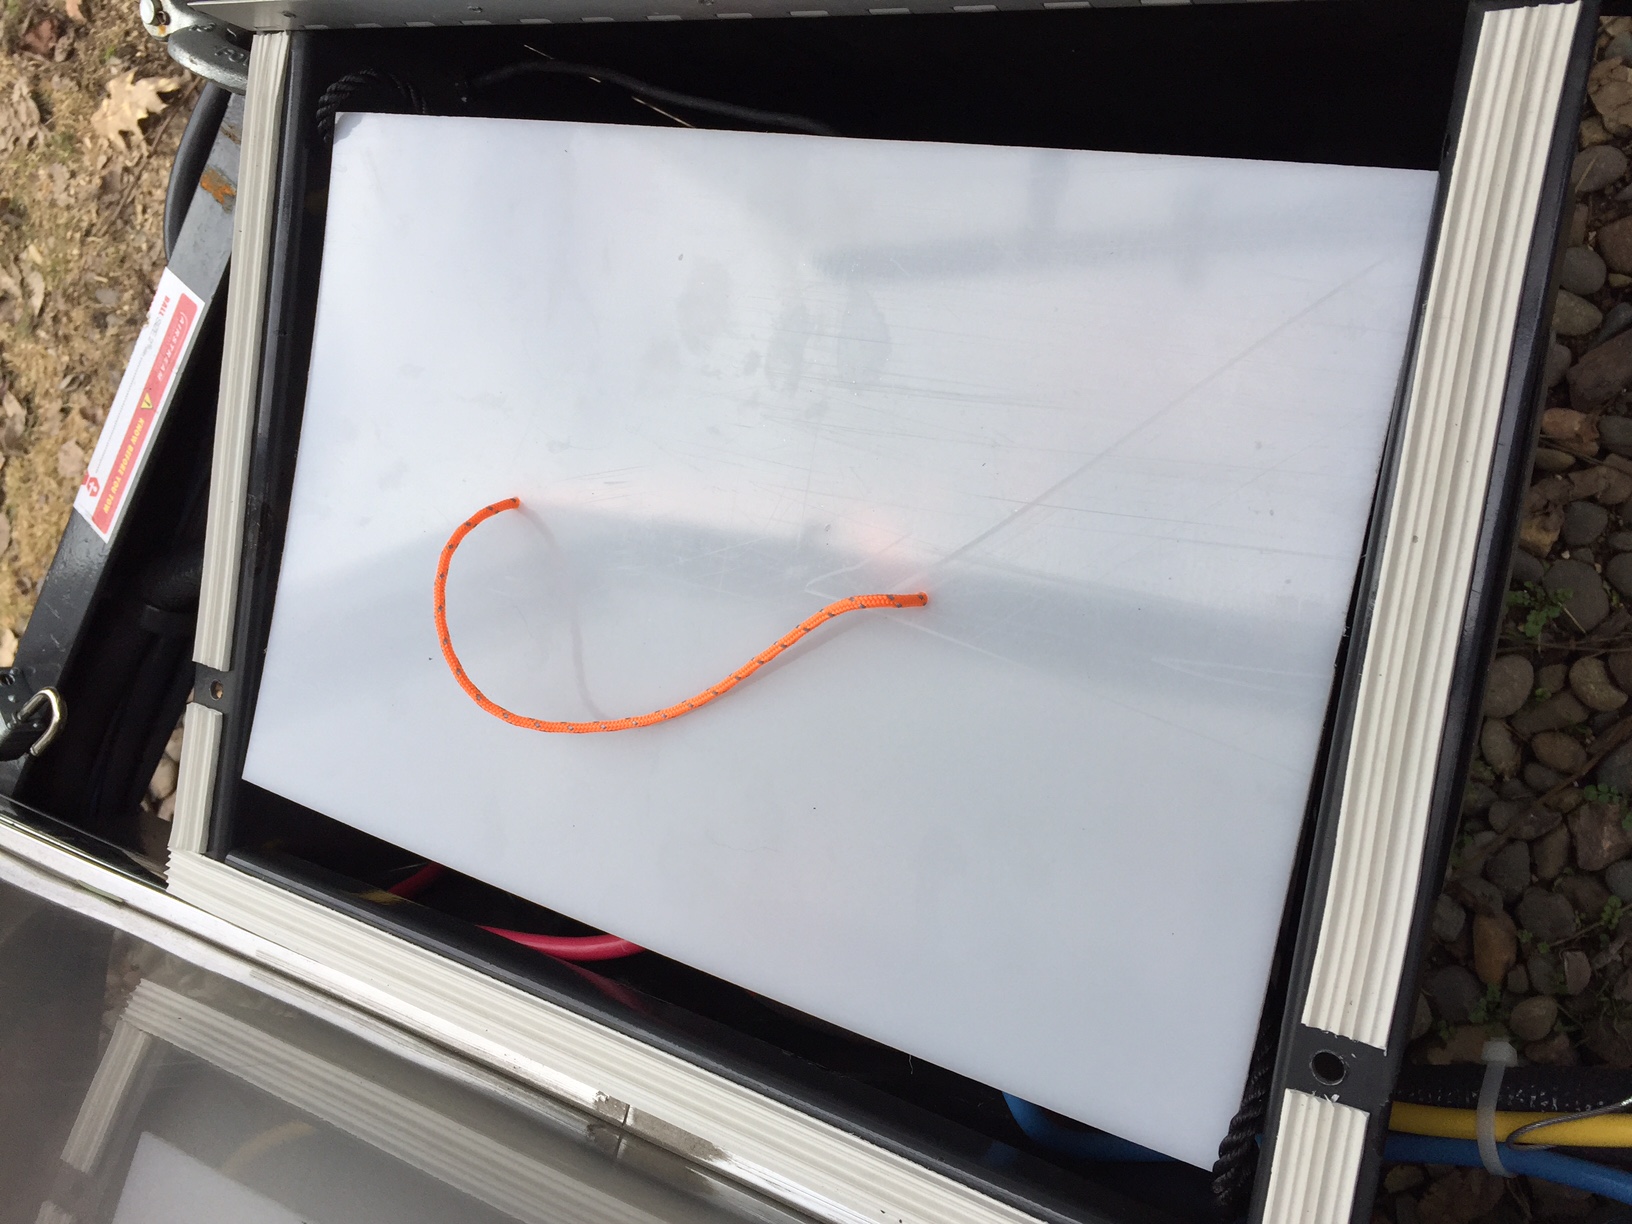 I made a little plastic cover for peace of mind that nothing is going to touch the battery box lid.
Talking of the lid, I drilled a couple of holes and installed locks
I made a little plastic cover for peace of mind that nothing is going to touch the battery box lid.
Talking of the lid, I drilled a couple of holes and installed locks
 I know you can get a locking catch but I can tell you they are weak and easily broken with a screwdriver. This lock setup is not much better but will slow down a thief.
Finally inside the trailer I installed the Xantrex linkLITE meter. It’s under the couch which might not be the best place for many, we don’t mind getting down to look at it.
I know you can get a locking catch but I can tell you they are weak and easily broken with a screwdriver. This lock setup is not much better but will slow down a thief.
Finally inside the trailer I installed the Xantrex linkLITE meter. It’s under the couch which might not be the best place for many, we don’t mind getting down to look at it.
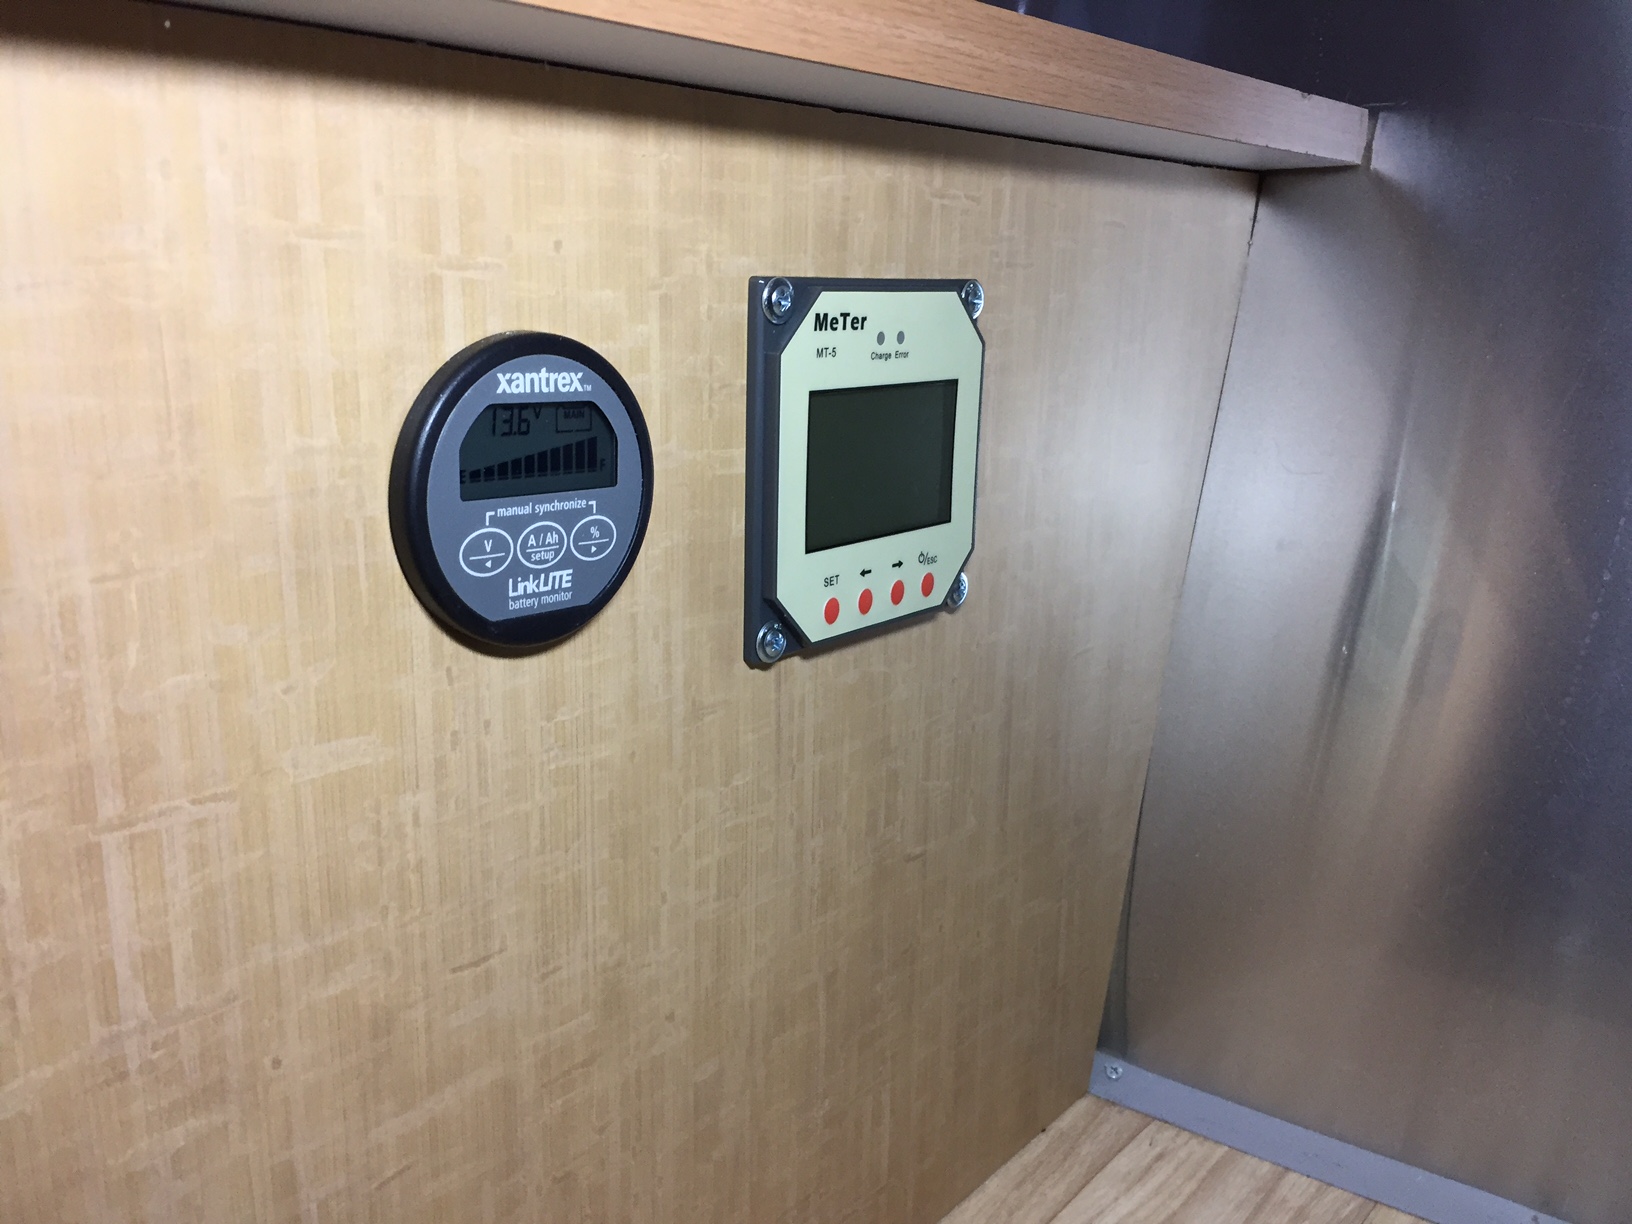 The AH meter is the one on the left, the one on the right is the solar meter.
Feel free to ask questions.
The AH meter is the one on the left, the one on the right is the solar meter.
Feel free to ask questions.
|

|

|


|
02-24-2017, 03:11 AM
|
#2
|
Rivet Master 
2016 30' International
redondo beach
, California
Join Date: Feb 2017
Posts: 772
|
Really nice.
And I like that cool shunt.
So you can reach in there and use the fuse as a switch and disconnect the batteries right?
|
|
|
|
|
02-24-2017, 06:57 AM
|
#3
|
4 Rivet Member 
2017 25' Flying Cloud
Gold Country
, California
Join Date: May 2015
Posts: 334
|
I've read and enjoyed your recent write ups. Thanks for taking the time!
|
|
|
|
|
02-24-2017, 07:04 AM
|
#4
|
3 Rivet Member
2016 19' Flying Cloud
Portland
, Oregon
Join Date: Feb 2017
Posts: 155
|
Quote:
Originally Posted by mythbuster88

Really nice.
And I like that cool shunt.
So you can reach in there and use the fuse as a switch and disconnect the batteries right?
|
Correct. Just press the button on the top of the fuse to open the connection and disconnect the batteries
|
|
|
|
|
02-24-2017, 12:39 PM
|
#5
|
3 Rivet Member
2015 19' Flying Cloud
2017 25' Flying Cloud
Rosemount
, Minnesota
Join Date: Oct 2015
Posts: 242
|
Thanks for taking the time to share. I was puzzled as to how to best secure that darn battery box lid and your solution is perfect!
I like your design of placing the second battery set aft of the axle. Do you have any concerns with hydrogen gas venting during a charge cycle both from an explosive as well as an acidic perspective?
__________________
2017 25' Flying Cloud
2018 F-250 6.2L Gas
Blue Ox SwayPro 1000#
|
|
|
|
|
02-24-2017, 01:42 PM
|
#6
|
3 Rivet Member
2016 19' Flying Cloud
Portland
, Oregon
Join Date: Feb 2017
Posts: 155
|
Quote:
Originally Posted by BoscoMN
Thanks for taking the time to share. I was puzzled as to how to best secure that darn battery box lid and your solution is perfect!
I like your design of placing the second battery set aft of the axle. Do you have any concerns with hydrogen gas venting during a charge cycle both from an explosive as well as an acidic perspective?
|
These are sealed lead acid, while they can vent if over-charged, it's unlikely, very, very unlikely.
I've used sealed batteries like this in other applications with zero issues.
|
|
|
|
|
02-24-2017, 02:20 PM
|
#7
|
Rivet Master
2015 25' Flying Cloud
2016 30' Flying Cloud
Blenheim Ontario
, Ontario
Join Date: May 2015
Posts: 1,263
|
Quote:
Originally Posted by Snowy
I was happy to find out that our 2016 19’ flying cloud had the larger battery box easing the install of larger 6v batteries. I selected VMAX batteries, they are rated at 235 AH so a significant upgrade from the stock.
If you wonder why I have 4, it’s because I actually installed two banks, one in the stock location (this thread) and a second bank under the bed. They are installed as two separate banks, not directly connected. I’ll explain in detail in a separate thread but in summary, one bank is the main house batteries (stock location, this thread) and the second bank is for the inverters. My thought process is that if we use the luxury of the inverters I do not want to drain the important house batteries which power the fridge, furnace lights etc. However if for some reason we accidently drain the house batteries, leave a light on or something, I can use the second bank to power the main house circuit. In addition, I have automatic charge relays which connect the banks when a charge voltage is sensed on the main lines. Its cases like this that I am happy that I am a BEng with electrical and computer specialties.
The first thing I did was make a fused bus bar to connect the two 6 volt batteries together. The reason for a fuse between the batteries is two-fold, first as a safety backup. If for some reason the battery gets shorted the fuse between the two 6V will pop. This fuse should be bigger than the max load expected. The second reason for the fuse and the reason that it’s a reset’able fuse, is to act as a battery disconnect if needed.
The bus bar is made out of copper bar and in this case a 2/0 welding cable wire.
Above you can see why I couldn’t use two bits of copper for the bus bar, the battery tie down sits between them. On the second battery bank I was able to sit the batteries next to each other so use two copper bars with the fuse between them.
The batteries fit snugly in the battery box. Note I put a rubber hose over the threaded post and made a small plastic pad to help hold down the batteries. There is room on each side but I use 1.5” PVC pipe to ensure the batteries cannot move.
I wanted to measure the battery use so I installed a 500 amp shunt on the negative terminal
This is the shunt that came the Xantrex linkLITE AH meter. I am sure you can get better equipment but I’ve had good luck with the Xantrex stuff which is why I selected it. This and the linkLITE meter is small and installs via a simple hole.
If you look at the above you can see that no negative cables go directly to the battery, they all go via the shunt. This way you can monitor amps used and amps charged.
In the picture you can also see the two 6V batteries in series making the 12V needed. I still have the direct inverter feed cables connected but they no longer power the inverters, instead, they now carry charge voltage to the second battery bank.
The blue and yellow cables are to enable me to plug in a portable solar charger, just in case the built in solar setup needs a helping hand.
I made a little plastic cover for peace of mind that nothing is going to touch the battery box lid.
Talking of the lid, I drilled a couple of holes and installed locks
I know you can get a locking catch but I can tell you they are weak and easily broken with a screwdriver. This lock setup is not much better but will slow down a thief.
Finally inside the trailer I installed the Xantrex linkLITE meter. It’s under the couch which might not be the best place for many, we don’t mind getting down to look at it.
The AH meter is the one on the left, the one on the right is the solar meter.
Feel free to ask questions.
|
So, with all that 'stuff' on the batteries, how do you check the water levels, and the SGs??
I like your idea on locking the battery box.
|
|
|
|
|
02-24-2017, 02:29 PM
|
#8
|
Rivet Master
2015 25' Flying Cloud
2016 30' Flying Cloud
Blenheim Ontario
, Ontario
Join Date: May 2015
Posts: 1,263
|
Reversing one battery
For those of you who are fed up with needing to undo a bunch of cables to check the water levels, and SG on the curbside battery; Here's what I did.
I reversed that battery, and rehooked up the cables. They all fit fine.
I also wrapped any crossing wires with 'Spirwrap' to prevent vibration wearing the cables and shorting them. 

It took about an hour.
That hex nut that you see on a battery, is an extra that I found in the box, and I had just set it on the battery when I photo'ed it.
|
|
|
|
|
02-24-2017, 02:59 PM
|
#9
|
Rivet Master 
2017 23' Flying Cloud
Parker
, Colorado
Join Date: Oct 2016
Posts: 1,772
|
These are AGM, sealed batteries. They do not vent under normal conditions and do not require water refilling. AGM cost more than wet cell lead acids, but are basically Maine free and can be stored inside if desired. They also charge quicker and usually have heavier plates, thus last through more charge cycles. If interested in learning more about the different types of batteries, I suggest the amsolar website, look under batteries or use link below:
http://amsolar.com/diy-rv-solar-inst...s/edbatteries/
__________________
Thanks,
Troutboy
|
|
|
|
|
02-24-2017, 04:41 PM
|
#10
|
Rivet Master
2005 19' Safari
GLENDALE
, AZ
Join Date: Aug 2004
Posts: 2,453
|
We have a 19' Bambi, too; so I'm curious what you are powering that needs so much battery capacity.
Also, have you weighed your Bambi with these new batteries installed? And, what tires are you running?
|
|
|
|
|
02-24-2017, 06:23 PM
|
#11
|
3 Rivet Member
2016 19' Flying Cloud
Portland
, Oregon
Join Date: Feb 2017
Posts: 155
|
Quote:
Originally Posted by Phoenix
We have a 19' Bambi, too; so I'm curious what you are powering that needs so much battery capacity.
Also, have you weighed your Bambi with these new batteries installed? And, what tires are you running?
|
We mainly dry camp, running out of power sucks. We didn't have room in our teardrop to make this size of modification, but I still squeezed in two extra batteries on that mounted underside.
I loathe generators, noisy smelly beasts, so battery, solar and TV is all we have power wise.
Didn't weigh, not overly worried.
Ties are Marathon load D
Time will tell how the tires wear. Kept at the correct inflation psi I think they will be fine.
|
|
|
|
|
02-25-2017, 09:29 AM
|
#12
|
3 Rivet Member
2016 19' Flying Cloud
Portland
, Oregon
Join Date: Feb 2017
Posts: 155
|
To clarify, as above, I'm using sealed lead acid batteries, sometimes referred to as AGM. They do not vent so safe to use in enclosed locations.
Never, ever use wet cell batteries in an enclosed location.
|
|
|
|
|
04-07-2017, 06:49 PM
|
#13
|
3 Rivet Member
2016 19' Flying Cloud
Portland
, Oregon
Join Date: Feb 2017
Posts: 155
|
Bump. I love this setup. Been watching the AH meter working out what the draw is from various items in the airstream. 2 1/2 days of normal use which included a lot of furnace took the batteries down to 70%. No solar so this was pure drain.
With good solar days I think we are going to be very comfortable.
|
|
|
|
|
|
Currently Active Users Viewing This Thread: 1 (0 members and 1 guests)
|
|
|
| Thread Tools |
Search this Thread |
|
|
|
| Display Modes |
 Linear Mode Linear Mode
|
 Posting Rules
|
You may not post new threads
You may not post replies
You may not post attachments
You may not edit your posts
HTML code is Off
|
|
|
|

 Recent Discussions
 |
|
|
|
|
|
|
|
|
|
|
|
|
|
|
|
|
|
|
|
|
|


