 |
 02-15-2016, 05:41 AM
|
#1
|
1 Rivet Member 
2022 25' Globetrotter
Currently Looking...
Baton Rouge
, Louisiana
Join Date: Jul 2015
Posts: 7
|
LED Ceiling Light Removal Instructions
How do I remove the Recessed Ceiling Light on a 2016 Interstate Grand Tour. I have one that is not working and I want to check for loose connections etc. Please advise as to the trick to its removal. Any help would be appreciated.
|

|

|
|
03-10-2016, 07:24 AM
|
#2
|
Rivet Master  Commercial Member
Currently Looking...
Denton
, North Carolina
Join Date: Jul 2006
Posts: 789
|
picture
Quote:
Originally Posted by DI27

How do I remove the Recessed Ceiling Light on a 2016 Interstate Grand Tour. I have one that is not working and I want to check for loose connections etc. Please advise as to the trick to its removal. Any help would be appreciated.
|
Can you post a picture?
__________________
Dan Brown Denton NC
|
|
|
|
|
09-10-2017, 05:25 PM
|
#3
|
4 Rivet Member 
2017 27' International
Lake Havasu City
, Arizona
Join Date: Feb 2017
Posts: 310
|
Here are photos of the ceiling light fixtures in my 2017 International Serenity, which may or may not be the same as the ones DI27 was asking about. These lights are in three pieces, as evidenced by the three concentric rings visible in the first photo.
There's an outer mounting ring that is held in the ceiling by a pair of spring-loaded wire loops that act like barbs or hollow wall anchors--that is, they're pushed into the ceiling to install, but then they spring open and can't be removed. You can pull the fixture down from the ceiling about an inch, as I've done in these photos, but no further.
Nested inside that outer mounting ring is the actual light fixture. In theory, it's possible to pry this from the outer ring--I have seen it done once by a person using their fingernails--but I have never been able to do it, and I've tried fingernails, plastic razor blades, wooden shims, and anything I could think of that might get into that crevice without scratching the trim ring. No dice.
The innermost ring is the lens. This is fairly easy to remove with fingernails or a similar thin instrument, but if the objective is to replace or rewire the light, that doesn't help you. To rewire or replace the fixture, you must either remove the light fixture (middle ring) or find a way to bypass the one-way action of the outer mounting ring's springs and remove the whole shebang. I have been unsuccessful at either task.
In short, I too would like to know how to remove these lights! Any suggestions would be welcome.


|
|
|
|
|
09-13-2017, 08:08 AM
|
#4
|
Rivet Master Commercial Member
Currently Looking...
Denton
, North Carolina
Join Date: Jul 2006
Posts: 789
|
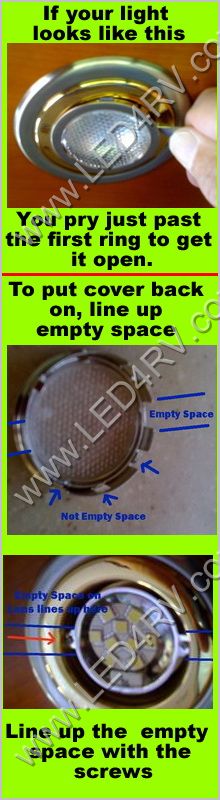
getting this light down
Just pull it down slowly until you see the clips. I call them butterfly clips and can be a lot like a mouse trap snap if you get your fingers in the way. This is one of those things that are so easy they are hard.
This is an LED light but the halogen work the very same. Here is a picture of this light and the clips.

Once it is hanging down by the wires you can turn it around with the back of the light facing you and put your thumbs on the back and push. This will separate the light from the bracket.
If your trying to get inside the light to the bulb or LEDs
__________________
Dan Brown Denton NC
|
|
|
|
|
09-16-2017, 01:03 PM
|
#5
|
4 Rivet Member
2017 27' International
Lake Havasu City
, Arizona
Join Date: Feb 2017
Posts: 310
|
Thanks, Dan. I guess the answer is "Pull really, really hard." I was afraid to do that because the coiled spring of the butterfly clip barely clears the hole in the ceiling, and I was afraid of distorting the ceiling's thin aluminum by brute-forcing it out. But I succeeded.
Now the question is: do you know of any warm-white replacements that will fit those holes? I plan to try adding amber theatrical gels first, as suggested by others, but the fall-back plan is to replace the lights.
|
|
|
|
|
09-18-2017, 08:50 AM
|
#6
|
Rivet Master Commercial Member
Currently Looking...
Denton
, North Carolina
Join Date: Jul 2006
Posts: 789
|
warm white
Quote:
Originally Posted by Paprika
Thanks, Dan. I guess the answer is "Pull really, really hard." I was afraid to do that because the coiled spring of the butterfly clip barely clears the hole in the ceiling, and I was afraid of distorting the ceiling's thin aluminum by brute-forcing it out. But I succeeded.
Now the question is: do you know of any warm-white replacements that will fit those holes? I plan to try adding amber theatrical gels first, as suggested by others, but the fall-back plan is to replace the lights.
|
I do and since you have the bracket you can get the light only.
http://led4rv.com/index.php?main_pag...roducts_id=486
__________________
Dan Brown Denton NC
|
|
|
|
|
11-04-2017, 11:33 AM
|
#7
|
3 Rivet Member 
2017 25' Flying Cloud
Lawn Guyland
, New York
Join Date: Jun 2016
Posts: 144
|
how do you remove just the "cold white" LED "bulb"?
I have the warm white bulb and have the puck open but can't figure how to get the original LED out?
__________________
Walt
WBCCI - 29375
|
|
|
|
|
11-04-2017, 11:59 AM
|
#8
|
|
The Aluminum Tent 3
2014 23' Flying Cloud
Park City
, Utah
Join Date: Aug 2015
Posts: 2,157
|
Quote:
Originally Posted by Paprika
Thanks, Dan. I guess the answer is "Pull really, really hard." I was afraid to do that because the coiled spring of the butterfly clip barely clears the hole in the ceiling, and I was afraid of distorting the ceiling's thin aluminum by brute-forcing it out. But I succeeded.
Now the question is: do you know of any warm-white replacements that will fit those holes? I plan to try adding amber theatrical gels first, as suggested by others, but the fall-back plan is to replace the lights.
|
I predict you will love the theater gel, and can do your whole coach for under 10 bucks. And you only need to remove the center ring that holds the glass lens. Remove the glass lens from that one and use one as a template to make a bunch of circles of gel with an exacto knife. Then put them in each light, using the little clips that hold the lens in place to secure the gels. You can use more than one layer in various lights to get the right effect. I used two in the coach, three in the bedroom area on my trailer.
|
|
|
|
|
01-03-2018, 05:32 PM
|
#9
|
1 Rivet Member
2019 25' International
Issaquah
, Washington
Join Date: Jul 2017
Posts: 17
|
Quote:
Originally Posted by Dan@LED4RV
Just pull it down slowly until you see the clips. I call them butterfly clips and can be a lot like a mouse trap snap if you get your fingers in the way. This is one of those things that are so easy they are hard.
This is an LED light but the halogen work the very same. Here is a picture of this light and the clips.
Once it is hanging down by the wires you can turn it around with the back of the light facing you and put your thumbs on the back and push. This will separate the light from the bracket.
If your trying to get inside the light to the bulb or LEDs
|
Hi Dan,
What are you using in the picture to pry the ring that holds the lens cover? I want to put film gels in each lens cover.
Thank you!
Florence
|
|
|
|
|
01-03-2018, 05:41 PM
|
#10
|
Rivet Master 
2007 22' International CCD
Corona
, California
Join Date: Jul 2013
Posts: 9,180
|
I found a thin, preferably dull, knife blade works well to separate the lens from the rest of the lamp housing.
I use a rather dull stainless steel Swiss Army knife main (larger) blade...idea is to not scratch the surface of the housing.
__________________
Rich, KE4GNK/AE, Overkill Engineering Dept.
'The Silver HamShack' ('07 International 22FB CCD 75th Anniversary)
Multiple Yaesu Ham Radios inside and many antennae sprouting from roof, ProPride hitch, Prodigy P2 controller.
2012 shortbed CrewMax 4x4 Toyota Tacoma TV with more antennae on it. 
|
|
|
|
|
01-03-2018, 06:11 PM
|
#11
|
2 Rivet Member 
Join Date: May 2015
Posts: 29
|
Thank you for showing us this. I bought the gel 6 months ago and didnt know how to do it
|
|
|
|
|
01-18-2022, 11:53 PM
|
#12
|
2 Rivet Member
2022 28' Pottery Barn
Las Vegas
, Nevada
Join Date: Jan 2022
Posts: 41
|
Quote:
Originally Posted by Paprika
Thanks, Dan. I guess the answer is "Pull really, really hard." I was afraid to do that because the coiled spring of the butterfly clip barely clears the hole in the ceiling, and I was afraid of distorting the ceiling's thin aluminum by brute-forcing it out. But I succeeded.
Now the question is: do you know of any warm-white replacements that will fit those holes? I plan to try adding amber theatrical gels first, as suggested by others, but the fall-back plan is to replace the lights.
|
Yes, I just pulled mine out to fix some noise issue. You have pull pretty hard and don't worry about breaking it.
|
|
|
|
|
01-17-2023, 10:20 AM
|
#13
|
2 Rivet Member
2017 Interstate Grand Tour Ext
san diego
, California
Join Date: Nov 2017
Posts: 29
|
It may be easier to just remove the lamp rather than the entire assembly. You will need to use a very small/skinny flat blade screwdriver to start to extract the lamp. Then you will need to use bigger flat blade screwdrivers progressively concurrently.
These 3 springs are fairly strong but perhaps not as intimidating as the ‘mouse trap strong springs’
In my case I removed the entire assembly with not too much difficulty. I think I got one spring down and out first and then slid the assembly which was at say 45 degrees out readily. Because I had the assembly on the kitchen table I as able to push the lamp out from the back.
Ignore the color on the pic, it’s really aluminum color.
|
|
|
|
|
|
Currently Active Users Viewing This Thread: 1 (0 members and 1 guests)
|
|
|
 Posting Rules
|
You may not post new threads
You may not post replies
You may not post attachments
You may not edit your posts
HTML code is Off
|
|
|
 Similar Threads
|
| Thread |
Thread Starter |
Forum |
Replies |
Last Post |
|
Installing LED bulbless ceiling light.
|
FSUeyedoc |
Electrical - Systems, Generators, Batteries & Solar |
10 |
02-25-2016 08:16 PM |
|
LED Retrofit for Fluorescent Ceiling Vent/Light
|
vswingfield |
Lights - Interior & Exterior |
5 |
12-30-2012 07:36 PM |
|
Clipper, Hella LED, Design Line Hella, LED Kit, Stop/turn LED
|
masseyfarm |
Flat-Front (Cutter, Clipper, XC, XL & Skydeck) Motorhomes |
1 |
12-15-2010 11:03 AM |
|
Black Tank Removal Instructions
|
somefun |
Waste Systems, Tanks & Totes |
3 |
05-09-2009 04:13 AM |
|

|
Recent Discussions |
|
|
|
|
|
|
|
|
|
|
|
|
|
|
|
|
|
|
|
|
|


 Linear Mode

