 |
|
 10-29-2011, 09:10 PM
|
#1
|
|
Streamin'
1995 30' Cutter Bus LE
Madison
, New Mexico
Join Date: Nov 2008
Posts: 312
|
 Waste valve handle and rod pulled out of the valve
I pulled on the Black Tank drain valve handle this morning to empty the tank as we prepared to leave the RV Park and get back on the road and the whole rod, rod extension and handle pulled out of the valve! 
The valve has been hard to operate the last few times and I knew a new Waste Valve was in my future, but I was hoping it would wait until we where parked in Florida.
We will be OK until we get to Florida but then
how am I going to get the valve open to empty the tank and flush it so we can put in the new valve?
Heres the poop on the project:
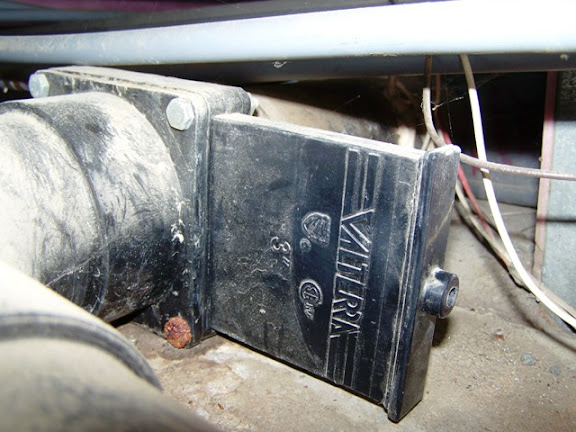
Valve: Black Tank Valterra 3 Waste Drain Valve (blade type gate valve)
Rig: 1995 30 Land Yacht LE
Just cant wait to get started on this project! 
Any ideas or lessons learned from experience will be greatly appreciated.
|

|

|


|
10-29-2011, 09:26 PM
|
#2
|
Rivet Master 
2003 22' International CCD
Kiln
, Mississippi
Join Date: Dec 2005
Posts: 2,779
|
I believe that rod screws into the waste gate internally to the valve assembly. Is the rod threaded? If it is, try threading into the hole and maybe get lucky and catch the gate and pull it open to dump normally.
Good Luck. Take pictures (not really).
__________________
Michael & Tina with Layla and Preston BZ The family has grown. 2003 22' INTERNATIONAL CCD
|
|
|
|
|
10-29-2011, 10:02 PM
|
#3
|
Rivet Master
2000 31' Land Yacht
Central
, Florida
Join Date: Aug 2007
Posts: 1,489
|
You can add another gate in place of the outside cap, using the same type of slots to use the pins, close it and then mess with the actual valve, if you can get it open once, your secondary valve will hold back the flood.
When you get to Fl replace the original, and either keep the secondary or remove.
|
|
|
|
|
10-30-2011, 04:56 AM
|
#4
|
Rivet Master
2005 30' Classic
Burlington
, Ontario
Join Date: Sep 2008
Posts: 2,743
|
This is a nightmare situation that I have often considered how I would deal with, I really don't know, maybe I'd just leave it to an RV dealer although generally I like to do repairs myself if I can.
I don't know this but I'm guessing the pull rod is threaded into the gate (maybe it is molded in?)
If it is threaded, maybe you can stick a wooden matchstick or something similar in the hole in the gate and get the thread to bite enough to pull the valve?
Another thought - if you are able to access the end of the gate. At places like Harbor Freight, you can buy slide hammers for auto body work. They often come with different ends, including a sort of tapered pointed thread - like a self tapper.
I wonder if that might engage the gate and then use the shock of the slide hammer to break the gate free. Just thinkin' out loud, I don't know if you can get at the bade of the valve to do this - never seen the AS design.
Maybe you could get a septic tank outfit to pump the tank via the toilet in order to make it at least less off an unpleasant repair?
I'll be interested to see how you make out so I can learn for when it is my turn!
Brian
__________________
Brian & Connie Mitchell
2005 Classic 30'
Hensley Arrow / Centramatics
2008 GMC Sierra SLT 2500HD,4x4,Crew Cab, Diesel, Leer cap.
|
|
|
|
|
10-30-2011, 05:28 AM
|
#5
|
Rivet Master
Currently Looking...
Corpus Christi
, Texas
Join Date: Mar 2011
Posts: 869
|
So sorry Barnacle Bill. I currently have a small pair of vice grips clamped to the rod to use as a handle for the waste tank valve. Handle broke off a few months back. Never realized the whole rod could come out. Getting it pumped out first sure does seem like a good idea. Maybe one of those "port-a-john" places could help with that.
__________________
Chuck & Skye
Rock and Roll Will Never Die!
WBCCI 3805
AIR 54011 Since July 2011
|
|
|
|
|
10-30-2011, 07:08 AM
|
#6
|
|
Retired.
Currently Looking...
.
, At Large
Join Date: Jun 2003
Posts: 21,276
|
The rod clipsa on the blade of the valve, so if it pulled off the valve, you're stuck. It's going to be messy, and most RV service places put a surcharge on that kind of repair, for obvious reasons. Good luck, and I really don't need pictures, the mental ones are gaphic enough...
__________________
Meddle not in the affairs of dragons, for you are crunchy, and taste good with ketchup.
Terry
|
|
|
|
|
10-31-2011, 05:00 AM
|
#7
|
Rivet Master
2005 30' Classic
Burlington
, Ontario
Join Date: Sep 2008
Posts: 2,743
|
Quote:
Originally Posted by overlander63

The rod clipsa on the blade of the valve, so if it pulled off the valve, you're stuck. It's going to be messy, and most RV service places put a surcharge on that kind of repair, for obvious reasons. Good luck, and I really don't need pictures, the mental ones are gaphic enough...
|
If that is the way it works, would it be possible to get at the assembly with a dremel tool and cut away enough of the two side plates of the valve i order to get a pair of vicegrips onto the blade in the area of the clip and pull the valve that way in order to dump the tank and then install a new valve?
I have no idea how much space there is to work around the valve. Guess you need to drop the pan in that area - or maybe cut an access hole.
Brian.
__________________
Brian & Connie Mitchell
2005 Classic 30'
Hensley Arrow / Centramatics
2008 GMC Sierra SLT 2500HD,4x4,Crew Cab, Diesel, Leer cap.
|
|
|
|
|
11-03-2011, 12:08 PM
|
#8
|
|
Streamin'
1995 30' Cutter Bus LE
Madison
, New Mexico
Join Date: Nov 2008
Posts: 312
|
Well, todays the day. I am going to cut the rest of the blade housing away from the valve and use vice grips to grab the blade and pull it open and drain the tank. Then after flushing the tank, I can remove the old valve and install a new one.
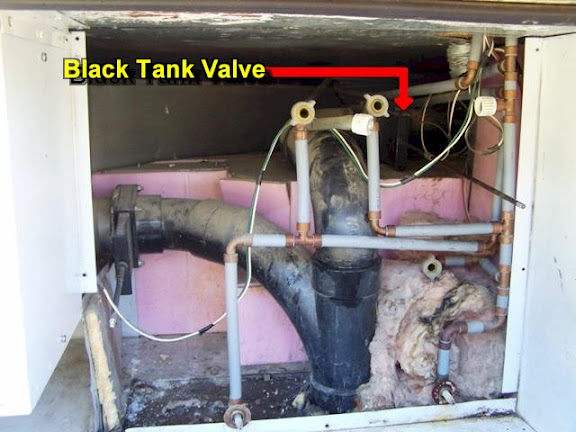
This is where the monster lives! There are a few things to remove before you can remove the panel.
Once the panel is off, there it is! Way in the back and nice and hard to reach

It turns out the rod does not screw onto the blade of the valve. The end of the rod had a detent and it looks like there must be some kind of clip arrangement. Ill know more after todays adventures.


I wish I could have found an exploded view of the Valterra gate valve, but my web searches did not turn anything.
I used a Dremal tool to cut off the end of the blade housing the other day to see what I could find but you cant see much wearing into that little slit.


OK Im off to put on the hazmat suit and get to work. More later
|
|
|
|
|
11-03-2011, 12:54 PM
|
#9
|
Rivet Master
2003 22' International CCD
Kiln
, Mississippi
Join Date: Dec 2005
Posts: 2,779
|
That last photo was all I needed to see, ughhhhh.
__________________
Michael & Tina with Layla and Preston BZ The family has grown. 2003 22' INTERNATIONAL CCD
|
|
|
|
|
11-09-2011, 08:57 PM
|
#10
|
|
Streamin'
1995 30' Cutter Bus LE
Madison
, New Mexico
Join Date: Nov 2008
Posts: 312
|
Old valve removed new valve installed!
Its done!
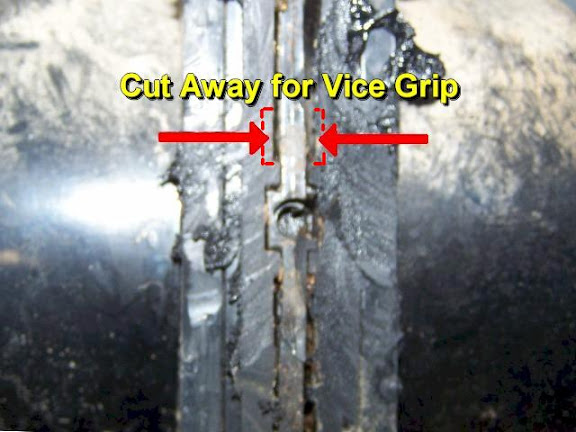
I used the Dremel tool to remove the rest of the blade housing. (Wingeezer and I where thinking the same here) By cutting about 1 at a time, I wound up cutting away the housing right down to the valve.

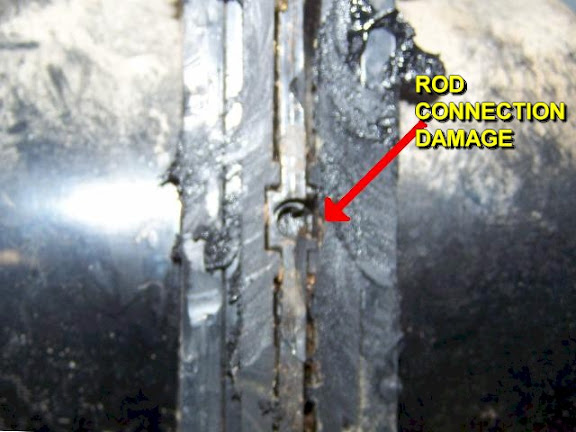
At this point I could see the end of the valves blade and the place where the rod was attached. I looked like the right side was damaged.
I used a Dremel high speed cutter like this one to cut away enough of the housing to get the Vice Grip to grab the blade.

Then, very carefully, I pulled the blade out of the valve. I was afraid if the blade came all the way out I would be doing a Robin Williams moment with the poop fountain.
I got the valve open, with little mess, and drained and flushed the tank. Then removed the old valve and installed the new valve.

Spreading the two pipes on either side of the valve to install the new valve was one of the hardest parts of the job. The gaskets need to be carefully seated to avoid leaks and make the valve work smoothly. I used generous amounts of Vaseline to hold the gaskets in place during installation.
Upon inspection of the old valve after removal, it appears one of the old gaskets was not installed correctly. It was pinched and crimped and may have been the reason the valve was hard to operate. Its the one on the right

And the answer to the question, How does the rod attach to the valve blade?
Like overlander63 said, the rod sort of clips on the blade of the valve.

With the blade removed, it looks like rod is molded into the plastic blade. In my case it looks like the plastic on one side of the blade/rod connection broke away and the rod pulled out of the blade.

I cant tell you how glad I am that this job is done! 
|
|
|
|
|
11-10-2011, 05:31 AM
|
#11
|
Rivet Master
2005 30' Classic
Burlington
, Ontario
Join Date: Sep 2008
Posts: 2,743
|
Great write up - I've always wondered how I would handle this problem it it happened to me. I can imagine your relief at having it all sorted out.
I suppose it might vary from model to model, but how difficult is it to get at the valve, and when you can see it, is there much room to work around it?
Did you drop a section of the belly pan, or just cut an access hole that you later put a patch plate over?
Brian
__________________
Brian & Connie Mitchell
2005 Classic 30'
Hensley Arrow / Centramatics
2008 GMC Sierra SLT 2500HD,4x4,Crew Cab, Diesel, Leer cap.
|
|
|
|
|
11-10-2011, 11:01 AM
|
#12
|
|
Streamin'
1995 30' Cutter Bus LE
Madison
, New Mexico
Join Date: Nov 2008
Posts: 312
|
Valve Access Notes
Thanks Brian. I couldnt find a post on how to do this project so I thought Id write it up. I hope it will help someone else in the future.
Im sure the access to the valve will vary, but if the valve is a Valterra Bladex waste valve, the replacement should be the same.
The valve was deep behind the locker back and there was not much space around it to work. Someone with short arms would be in trouble.
You could not see the two bolts on the rear of the valve so they had to be removed and replaced by feel alone.
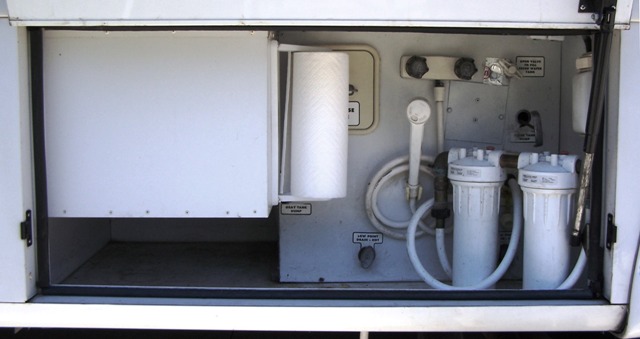
This valve replacement was done on a 30 Land Yacht LE Motorhome, so the valves are located behind a locker that contains the water and sewer hookups and an out-door shower.

First you have to remove all the hardware; shower, hot and cold drain valves, city water hook-up, sewer hose storage and valve handles.
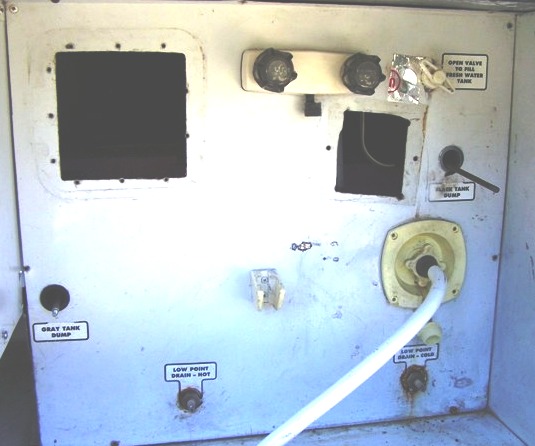
Then you remove the back of the locker that all this stuff was mounted on and you have access to the tank drain valves. The black tank is deep in the back (of course).
I hope this will help someone with this same project in the future. If anyone needs more help or advice, you can email me
bill.thompsonn@gmail.com
Cheers,
Bill
|
|
|
|
|
11-10-2011, 11:06 AM
|
#13
|
|
Moderator

1968 17' Caravel
Battle Ground
, Washington
Join Date: Dec 2002
Posts: 12,255
|
Great write up! Every time I pull the handle on our valve I worry it's going to come off and I'll be dealing with a similar fix (It's 40+ years old, let's face it, it's going to happen sometime). Now that I've seen it, at least it doesn't look too scary.
__________________
Stephanie
|
|
|
|
|
01-11-2014, 09:10 PM
|
#14
|
|
New Member
Fiveville
, Florida
Join Date: Jan 2014
Posts: 1
|
Bill,
I just wanted to say thanks for this post. I had the same exact issue and this was the only instruction I found on the internet that covered it, and in amazing detail too.
I wanted to add a few things in case anyone else runs into this issue:
Yes, the blade will come out completely once the box has been cut away. If you pull it out while there is stuff going through the pipe, it will come out the slot where the blade valve was.
If your tank is full, as soon as you pull the blade valve out a little, there will be some liquid that leaks out. It isn't a lot, so long as you don't pull the blade out completely, but it is enough that one should be sensitive to where they're dumping the tank.
The valve shouldn't leak so long as the blade is pushed all the way in. In my case, I removed the retention box at my house and then drove to the closest dump station to empty the tanks, so I was a little concerned that the valve might leak on the drive. It didn't, but I did put a strip of duct tape over the valve to make sure the blade didn't vibrate out on the drive.
Finally, I must admit that this wasn't nearly as bad as I thought it would be. If you take your time and are careful, this should be a relatively clean job. Oh, and due to the location of my valve, I used a hacksaw blade to remove the retention box. The plastic is fairly easy to cut through.
|
|
|
|
|
01-12-2014, 10:55 AM
|
#15
|
|
Streamin'
1995 30' Cutter Bus LE
Madison
, New Mexico
Join Date: Nov 2008
Posts: 312
|
Glad to hear the project was successful. Thanks for the add tips.
|
|
|
|
|
01-13-2014, 11:44 PM
|
#16
|
2 Rivet Member 
Stone Mountain
, Georgia
Join Date: Jul 2012
Posts: 64
|
Good timing on these posts. The valve handle on my '75 Landyacht came off in my hand yesterday :-(
|
|
|
|
|
01-14-2014, 12:06 AM
|
#17
|
Rivet Master
1978 31' Excella 500
Genoa
, Nevada
Join Date: Jul 2007
Posts: 1,554
|
For the next guyrl, would it be possible to drill and easy-out the blade, even though it wasn't threaded? The slot the rod came out might be a guide for the drill into the blade.
__________________
I admit to being powerless over housecleaning and social niceities
Airforums 22655 and now, WBCCI 22655
NevadaGeo
|
|
|
|
|
01-15-2014, 09:27 AM
|
#18
|
|
Streamin'
1995 30' Cutter Bus LE
Madison
, New Mexico
Join Date: Nov 2008
Posts: 312
|
Sorry to hear that SpiritAtBay, best of luck and let us know how it goes. NevadaGeo, if you look at the valve, the blade may be too thin and too far in the housing when closed, to reach with an easy-out .
Sent from my Transformer Prime TF201 using Airstream Forums mobile app
|
|
|
|
|
01-15-2014, 11:20 PM
|
#19
|
2 Rivet Member
Stone Mountain
, Georgia
Join Date: Jul 2012
Posts: 64
|
Quote:
Originally Posted by BarnacleBill
Sorry to hear that SpiritAtBay, best of luck and let us know how it goes. NevadaGeo, if you look at the valve, the blade may be too thin and too far in the housing when closed, to reach with an easy-out .
Sent from my Transformer Prime TF201 using Airstream Forums mobile app
|
In my case, just the handle came off, not the rod. So after I peeled back the panel, it was easy to operate the rod with a pair of pliers.
The valve assembly will have to be replaced eventually. ...
Thanks, Bill
|
|
|
|
|
06-12-2014, 03:01 PM
|
#20
|
|
New Member
Carrollton
, Texas
Join Date: Jun 2014
Posts: 1
|
This thread is great and really helped me understand exactly what I am up against, as I have this problem right now. Thanks, Barnacle Bill. I am going to try a slightly different approach, though, provided there is room on the other side of the valve. If possible, I plan to drill a small hole on the opposite side of the valve and use a rod to push the valve open, leaving the housing intact. I'll let you know if it works out.
|
|
|
|
|
|
|
Currently Active Users Viewing This Thread: 1 (0 members and 1 guests)
|
|
|
 Posting Rules
|
You may not post new threads
You may not post replies
You may not post attachments
You may not edit your posts
HTML code is Off
|
|
|
|

 Recent Discussions
 |
|
|
|
|
|
|
|
|
|
|
|
|
|
|
|
|
|
|
|
|
|


 Linear Mode

