 |
 07-25-2015, 04:57 PM
|
#1
|
3 Rivet Member 
1991 34' Excella
Boerne
, Texas
Join Date: May 2010
Posts: 119
|
'91 Waste Tank Pan removed and Black Water Flush Valve Pictures
Let me start by saying, this looks like a worse job than it is. Many forum users had complained about removing rusted and broken bolts that hold the pan below the grey and black water tanks but mine came off easy. The bolts on the cross members were not rusty at all but the bolts along the frame rail were partially rusted but came out moderately easy. Once the bolts were out the pan was pried loose from the frame and the bead of sealant holding it in place. I replaced the Thetford seals instead of replacing the whole set up with Valterra...the first set lasted 24 years. The seals were very dried and hard, everything came out easy peezy. While I was in there I got the tank flush sprayer working, the body of it and the orfices were full of bugs. I have some pictures, hope the link works...
https://onedrive.live.com/redir.aspx...=Photos&type=5

__________________
James B.
1991 34' excella 1000, bought 05/10, oak floors, granite countertops, Marble bathroom counter and floor, 2 A/C's, 2005 Hensley. 1600 Watts Solar/ 400Ah Lithium batteries
Tow With: 2006 Dodge 2500 Quad LB 2WD, 5.9 Cummins, Edge Insight CTS, Smarty Jr, Bilstein Shocks, Ingalls balljoints.
|

|

|


|
07-25-2015, 05:50 PM
|
#2
|
|
Site Team
1974 31' Sovereign
Ottawa
, ON
Join Date: May 2008
Posts: 11,219
|
I clicked on the link, and got this:
This item might not exist or is no longer available
This item might have been deleted, expired, or you might not have permission to view it. Contact the owner of this item for more information.
I think your "Onedrive" settings are off a bit.
__________________
Courage is being scared to death, but saddling up anyway. ...John Wayne...........................
|
|
|
|
|
07-25-2015, 07:45 PM
|
#3
|
3 Rivet Member
1991 34' Excella
Boerne
, Texas
Join Date: May 2010
Posts: 119
|
how about this link, the first one worked on my computer, of course I have full privileges to my own onedrive...so it's hard to troubleshoot.
https://onedrive.live.com/redir?resi...t=folder%2cjpg
or try this
https://onedrive.live.com/redir?resi...t=folder%2cjpg
__________________
James B.
1991 34' excella 1000, bought 05/10, oak floors, granite countertops, Marble bathroom counter and floor, 2 A/C's, 2005 Hensley. 1600 Watts Solar/ 400Ah Lithium batteries
Tow With: 2006 Dodge 2500 Quad LB 2WD, 5.9 Cummins, Edge Insight CTS, Smarty Jr, Bilstein Shocks, Ingalls balljoints.
|
|
|
|
|
07-26-2015, 06:00 AM
|
#4
|
Rivet Master  
1986 34' Limited
1975 27' Overlander
1969 21' Globetrotter
Conifer
, Colorado
Join Date: Jun 2009
Posts: 8,315
|
Hi from Minnesota. I did the same job as you did on my 86 Limited. My bolts were rusted pretty good. I soaked them with penetrate the day before which I am sure helped. None the less, I did break one of the bolts.
Yes, the job is doable. But it seems like a lot of trouble just to repair a leaky dump valve, which is a pretty common problem. I sure wish Airstream had provided an access hatch or cover that was easier to remove to gain access to the valves.
Thanks for posting your experiences with this not so fun job.
David
|
|
|
|
|
07-26-2015, 02:11 PM
|
#5
|
|
Site Team
1974 31' Sovereign
Ottawa
, ON
Join Date: May 2008
Posts: 11,219
|
Quote:
Originally Posted by texascanuk

how about this link, the first one worked on my computer, of course I have full privileges to my own onedrive...so it's hard to troubleshoot.
|
There ya go: both links worked. Great photos!
This is a job I had done on my trailer when I first got it, and it seemed to be quite labour-intensive. Plus everything looks a lot cleaner on yours. 
The pans on mine were rotted right out, and such doesn't appear to be the case on yours.
__________________
Courage is being scared to death, but saddling up anyway. ...John Wayne...........................
|
|
|
|
|
07-26-2015, 03:36 PM
|
#6
|
Rivet Master
1998 30' Excella 1000
Livingston
, Texas
Join Date: Jan 2014
Posts: 546
|
I read that when Airstream repairs these valves, they just cut an access panel in the bottom of the pan... duh, why didn't they just put one to begin with!
|
|
|
|
|
07-26-2015, 08:07 PM
|
#7
|
2 Rivet Member 
1996 25' Excella
Shakopee
, Minnesota
Join Date: Sep 2013
Posts: 26
|
Pan removal
I need to get to the flush line that is leaking. Can the pan be removed without the tank coming down with it. Is the tank supported by something other than the pan. Thanks.
|
|
|
|
|
07-27-2015, 06:50 PM
|
#8
|
Rivet Master
1986 34' Limited
1975 27' Overlander
1969 21' Globetrotter
Conifer
, Colorado
Join Date: Jun 2009
Posts: 8,315
|
Hi TimeForFun from Minnesota. Welcome to the AirForums where all the advice given is absolutely free. Actually, it is one of the best internet forums I have ever used. Very pleasant participants and helpful responses.
My tanks are not supported other than the pan. However, the drain and vent piping is hose clamped to the molded bosses on top of the tank The toilet flange holds up the black tank. The hose clamps kept the tank in position for me.
You can see the black tanks "just hanging around" in the photo below. No visible means of support.
I did have the shower drain into the gray tank come loose, but lucky me I was able to reattach it working through the round heat duct opening in front of the shower entryway.
The empty molded tanks weigh about 30 pounds each I'd guess. All water has to be out of the tanks before you drop the pan.
David
|
|
|
|
|
07-28-2015, 09:36 AM
|
#9
|
2 Rivet Member
1996 25' Excella
Shakopee
, Minnesota
Join Date: Sep 2013
Posts: 26
|
Taml Pan
David,
Thank you for the information. I won't be afraid to try it now.
Howard
|
|
|
|
|
07-29-2015, 04:00 PM
|
#10
|
3 Rivet Member
1991 34' Excella
Boerne
, Texas
Join Date: May 2010
Posts: 119
|
I was wrestling with the valves and discharge tubing last night and could not get it to fit. I realized that the grey water tank had sagged and put it out of plane with the black water tank. I shimmed it up to the floor above it with some wood pieces and the assembly went better. I was going to do a "wet test" to see if there were any leaks but I realized that if I put water into the tanks there's likely to be a big disaster. So I have to put it together without testing it for leaks and fill it once the pan is on and supporting the tanks.
I was looking at the Valterra valves but needed to figure out how to attach the extensions onto the rods that pull the valve open. Plus I was having trouble finding the parts to assemble it all. Valterra sells a hub that bolts onto the valve, the hub should fit into the 3" pipe. Next time I do this I might have to go that direction.
__________________
James B.
1991 34' excella 1000, bought 05/10, oak floors, granite countertops, Marble bathroom counter and floor, 2 A/C's, 2005 Hensley. 1600 Watts Solar/ 400Ah Lithium batteries
Tow With: 2006 Dodge 2500 Quad LB 2WD, 5.9 Cummins, Edge Insight CTS, Smarty Jr, Bilstein Shocks, Ingalls balljoints.
|
|
|
|
|
07-29-2015, 06:58 PM
|
#11
|
Rivet Master
1986 34' Limited
1975 27' Overlander
1969 21' Globetrotter
Conifer
, Colorado
Join Date: Jun 2009
Posts: 8,315
|
Yep, Valterra sells both 3" male and female end pieces that sandwich their valve in the middle. Valterra sells actuator rod extensions. I used pieces from the threaded rod section in my hardware store.
Here is a photo of my 66 Trade Wind Valterra valve set up. You can see the different ends on the center valves. It is neat the way they work, and the seals are simple and robust.
David
|
|
|
|
|
07-29-2015, 10:04 PM
|
#12
|
Rivet Master
1966 24' Tradewind
Kansas City
, Missouri
Join Date: Mar 2015
Posts: 638
|
David -
That looks like the setup I need for my '66 Tradewind. Do those tanks mount transversely? Do they rest on styrofoam in pans, like the original black water tank I just pulled out of my trailer last weekend? (with 4/22/66 written on top in black magic marker)
|
|
|
|
|
07-30-2015, 07:47 AM
|
#13
|
Rivet Master
1986 34' Limited
1975 27' Overlander
1969 21' Globetrotter
Conifer
, Colorado
Join Date: Jun 2009
Posts: 8,315
|
Hi Kansas City Slats,
My tanks mount transversely between the frame cross members. I moved the tanks forward from the rear frame bay. the next one up was only 19" wide, so I ordered pretty narrow tanks. The gray tank is the same, but it sits in a frame bay that is the standard 24" wide. This put the tanks closer to the axles.
I used 1" rigid foam insulation in the tank pan. Styrofoam doesn't have much strength. The Trade Wind tanks are hung on angle irons. But the 86 Limited uses the insulation in the pan for tank support.
David
|
|
|
|
|
08-04-2015, 08:26 PM
|
#14
|
4 Rivet Member 
2001 34' Limited
Tucson
, Arizona
Join Date: Jul 2012
Posts: 273
|
Thanks to all for the pics and written info. I have an upcoming similair project on my '01 Limited that I've been putting off, but it's getting worse.... So, I'm gonna have to get it started soon.
__________________
2013 Ram Power Wagon 2500 4X4 5.7 Hemi
2001 Airstream '34 Limited
Hensley Arrow
Fulltime in 2013 and LOVING it !!
|
|
|
|
|
08-31-2015, 11:07 AM
|
#15
|
1 Rivet Member 
1991 29' Excella
Livermore
, California
Join Date: Jan 2010
Posts: 15
|
Is the support pan hinged at the forward end, or it it screwed on like the other edges? Looking to do the same job on my '91 Excella 29'. Not looking forward to it. Did you use any gasket adhesive on the seals?
|
|
|
|
|
09-01-2015, 04:52 AM
|
#16
|
3 Rivet Member
1991 34' Excella
Boerne
, Texas
Join Date: May 2010
Posts: 119
|
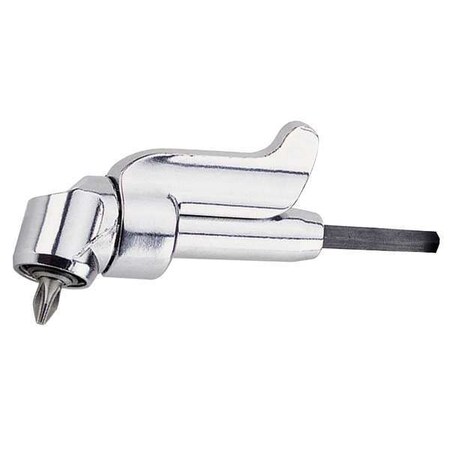
The pan is screwed on like the other sides. If you look at the pictures you'll see one looking at the grey water valve area. You can see the trailer frame has a L shape that the pan lip rested on. This L prevented the front from dropping. I didn't spend any time trying to lower the front because I had good access without doing that. I still haven't sealed up the lip edge since the repair but it's on my list.
Here's one of my very useful tools that allowed me to get up into the close spaces and loosen the 4 screwes that hold the valves in place.
It's the Milwakee tools Offset Drive Adaptor
good luck
__________________
James B.
1991 34' excella 1000, bought 05/10, oak floors, granite countertops, Marble bathroom counter and floor, 2 A/C's, 2005 Hensley. 1600 Watts Solar/ 400Ah Lithium batteries
Tow With: 2006 Dodge 2500 Quad LB 2WD, 5.9 Cummins, Edge Insight CTS, Smarty Jr, Bilstein Shocks, Ingalls balljoints.
|
|
|
|
|
|
Currently Active Users Viewing This Thread: 1 (0 members and 1 guests)
|
|
|
 Posting Rules
|
You may not post new threads
You may not post replies
You may not post attachments
You may not edit your posts
HTML code is Off
|
|
|
|

 Recent Discussions
 |
|
|
|
|
|
|
|
|
|
|
|
|
|
|
|
|
|
|
|
|
|


 Linear Mode

