 |
 07-27-2008, 04:51 PM
|
#1
|
Rivet Master 
1969 23' Safari
New Orleans
, Louisiana
Join Date: Aug 2007
Posts: 699
|
A&E Awning Repair w/o Removal?
Since my A&E awning currently works like a champ and only suffers from a couple of tears at each end I'm hoping someone can recommend the least-painful way I can repair it (since the tears get a little bigger each time I go camping) without removing the whole thing...
..this shot shows the tear and riveted tube holding the fabric on:
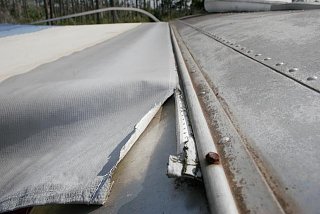
It would be crazy to drill out all those rivets just for a fabric repair, no?
I was thinking I could maybe just remove the arm that holds on the arm that holds the awning, then I saw it was crimped on....I could still back out those machine screws that are covered in Vulkem..

This shot shows a detail of how the fabric seam is containing a rubber gasket held in place by the riveted aluminum tube:

then over at the business end is that ominous sticker telling you not to go messin' with this contraption unless you know what you're doing!

All ideas will be given sincere consideration/appreciation..
I did find a suggestion to sew it up with dental floss and cover the sewing with Shoe-Goo...hey, that sounds viable to me...
|

|

|


|
07-27-2008, 05:17 PM
|
#2
|
Rivet Master Commercial Member
Vintage Kin Owner
Naples
, Florida
Join Date: Dec 2005
Posts: 7,508
|
Rick,
I've dealt with a problem like yours several times on A & E, Carefree and Gerard awnings. The major difference was that while the ends of the fabric were pulling away from the awning rail, the pocket that is sewn into the end of the fabric that accepts the poly-rope and keeps the awning in place was still there.
In your case, I feel that ANY type of in-place repair will be temporary at best, eventually pull out and leave you with a bigger mess. Plus you just won't have enough fabric to add a new pocket, ane the awning will have creases in it because it won't have a smooth, consistent pocket in it.
I would de-tension the torsion spring, remove the roller tube from the fabric and then slide the fabric out from the awning rail. Take it to a canvas shop and have them cut off the old pocket, sew a new pocket into the fabric.... effectively shortening the awning just a hair, and then re-assemble with new poly rope.
This will give you many more years of service from your awning, and will also give you the opportunity to remove the rust from your torsion spring (the major cause of spring breakage), coat the spring with a good lube like Boeshield T-9 and re-assemble everything.
Let me know if you need the procedure to remove it. It is NOT rocket science!!!! 2 people can do it and a little care is all that's needed (plus a rivet gun, drill and a few rivets) 
Suck it up and do it right the first time!!!!! 
__________________
lewster
Solar Tech Energy Systems, Inc.
Victron Solar Components and Inverters, Zamp Solar Panels, LiFeBlue and Battle Born Lithium Batteries, Lifeline AGM Batteries
|
|
|
|
|
07-27-2008, 05:31 PM
|
#3
|
Rivet Master
1969 23' Safari
New Orleans
, Louisiana
Join Date: Aug 2007
Posts: 699
|
Quote:
Originally Posted by lewster

Rick,
I've dealt with a problem like yours several times on A & E, Carefree and Gerard awnings. The major difference was that while the ends of the fabric were pulling away from the awning rail, the pocket that is sewn into the end of the fabric that accepts the poly-rope and keeps the awning in place was still there.
In your case, I feel that ANY type of in-place repair will be temporary at best, eventually pull out and leave you with a bigger mess. Plus you just won't have enough fabric to add a new pocket, ane the awning will have creases in it because it won't have a smooth, consistent pocket in it.
I would de-tension the torsion spring, remove the roller tube from the fabric and then slide the fabric out from the awning rail. Take it to a canvas shop and have them cut off the old pocket, sew a new pocket into the fabric.... effectively shortening the awning just a hair, and then re-assemble with new poly rope.
This will give you many more years of service from your awning, and will also give you the opportunity to remove the rust from your torsion spring (the major cause of spring breakage), coat the spring with a good lube like Boeshield T-9 and re-assemble everything.
Let me know if you need the procedure to remove it. It is NOT rocket science!!!! 2 people can do it and a little care is all that's needed (plus a rivet gun, drill and a few rivets)
Suck it up and do it right the first time!!!!! |
Hey Lew, I like your attitude! When you say "remove the roller tube from the fabric" you're speaking of the big spring-loaded tube, yes, not the little tube attached to the trailer? And yes, I WOULD like the procedure! I have the 4 page owner's manual but I don't think it includes that kind of repair.
Now when I look at that 'poly-tube' black rubber scrunched up inside that riveted aluminum, man I get the heebie-jeebies thinking how hard it's gonna be for me to re-insert my repaired one back in there. What's the deal there? Do I drill out the rivets up on the roof and pull off the assembly and maybe open up that aluminum tube a bit or something? Fill me in...thanks!
|
|
|
|
|
07-27-2008, 06:05 PM
|
#4
|
Rivet Master Commercial Member
Vintage Kin Owner
Naples
, Florida
Join Date: Dec 2005
Posts: 7,508
|
I'll do this in steps, and hopefully....  ...I don't forget anything!
Read the entire procedure AT LEAST twice!!!
1. extend the awning, but leave the rafter arms fully compressed.
2. immobilize the torsion spring. if you look at the end cap (left side facing the awning), you will see 2 little holes in the cap. there is a corresponding channel in the end of the torsion spring, and you need to push a long nail or other piece if 'hard metal or wire' thru the hole until it comes out the other side. this will immobilize the torsion. hardened piano wire will also do. it should be as large as the hole to accept the large forces on the roller spring. you might have to roll the roller tube slightly in one direction or the other to access the inner channel.
3. remove the bolt holding the end of the roller to the rafter arm.
4. remove the rafter arm from the roller tube fitting. it is best here to allow the roller to rest on a ladder of appropriate height
5. attach a large vise grip pliers to the end fitting, rotate it slighly clockwise and remove the retaining pin. MAINTAIN THE GRIP ON THE PLIERS HERE!!!
6. CAREFULLY unwind (counter clockwise) the torsion spring until all of the tension is out of the spring. count the # of turns it takes to completely unwind it
7. repeat steps 3 & 4 on the right side of the roller
8. if there are no channels visible in the end caps that will allow you to slide out the fabric, you need to drill out the rivets holding the cap on to the roller tube and remove them
9. carefully slide the roller off the fabric. it will now be loose and hanging at the side of the trailer
10. the fabric at the top awning rail should be secured by a screw on either end of the awning rail, at the top. remove these screws, and the fabric should slide right out of the awning rail. do not touch the awning rail, as it is to be left in place.
11. have the awning fabric repaired at your favorite canvas shop. they should have the poly rope and will insert it into the new pocket that they sew into the top of the fabric.
12. before you re-insert the fabric into the awning rail, you should do 2 things. 'A' insert a screwdriver into the end of the awning rail and force the ends apart to allow a slightly larger channel to feed the fabric into. 'B' spray the entire channel with a dry lube like DuPont Teflon Multi-purpose lube (Lowes)
13. insert the fabric and center it in the awning rail
14. remove the torsion spring, wire brush it and liberally coat it with Boeshield T-9 before re-inserting it into the roller tube
15. do back to step and work backwards
re-tensioning the torsion spring is just as trickey as de-tensioning it. I need the overall length to give you the # of winds, or you can just re-wind in the # of turns that you un-wound it in step 6.
PS: you wind the torsion clockwise.
That's it!
Have fun
__________________
lewster
Solar Tech Energy Systems, Inc.
Victron Solar Components and Inverters, Zamp Solar Panels, LiFeBlue and Battle Born Lithium Batteries, Lifeline AGM Batteries
|
|
|
|
|
07-27-2008, 09:34 PM
|
#5
|
Rivet Master
1969 23' Safari
New Orleans
, Louisiana
Join Date: Aug 2007
Posts: 699
|
whew! whew again! (deep breath) OK, that sounds like a bitc...I mean a real piece of work (but what on Airstreams isn't?)... since my trailer sits about 9 inches from a wood fence on the awning side I guess I'll have to wait until spring when the temps drop and I can tackle this one at my fave campground with a six pack and a friend..or two...
thanks, Lew, I appreciate the detailed response! this is a really nice awning it just needs a whole lotta tlc at this point...
|
|
|
|
|
07-28-2008, 12:06 AM
|
#6
|
Rivet Master Commercial Member
Vintage Kin Owner
Naples
, Florida
Join Date: Dec 2005
Posts: 7,508
|
Quote:
Originally Posted by fotochop
whew! whew again! (deep breath) OK, that sounds like a bitc...I mean a real piece of work (but what on Airstreams isn't?)... since my trailer sits about 9 inches from a wood fence on the awning side I guess I'll have to wait until spring when the temps drop and I can tackle this one at my fave campground with a six pack and a friend..or two...
thanks, Lew, I appreciate the detailed response! this is a really nice awning it just needs a whole lotta tlc at this point...
|
Do keep us posted on the progress!
__________________
lewster
Solar Tech Energy Systems, Inc.
Victron Solar Components and Inverters, Zamp Solar Panels, LiFeBlue and Battle Born Lithium Batteries, Lifeline AGM Batteries
|
|
|
|
|
07-30-2008, 01:43 PM
|
#7
|
Rivet Master
1972 Argosy 20
Middletown
, New Jersey
Join Date: Nov 2006
Posts: 589
|
It really isn't that hard to do, and the procedure Lew posted is dead nuts correct. When I took my A&E 8500 off, I didn't know the correct procedure and smashed the index finger on my left hand - the fingernail is STILL black, but that's growing out now. 
For your fabric replacement, check out Interwest Sports. The fabric for mine set me back all of about $150.00 and I had it in two days! I did have to buy a replacement front torsion spring though, the clutch was dead on mine and wouldn't stay in the open position. The local Camping World had it in stock for about $70.00.
__________________
Bob Fowler
Some people are like Slinkies. They're really good for nothing, but they still bring a smile to your face when you push them down a flight of stairs.
TAC - NJ-007
|
|
|
|
|
07-30-2008, 04:16 PM
|
#8
|
Rivet Master
1965 17' Caravel
1983 27' Excella
Walnut Grove/Laguna Woods
, California
Join Date: Jun 2004
Posts: 1,635
|
Our awning was about to do the same thing. I went to an RV repair facility that had some used awning parts and bought the five segment aluminum cover used on newer awnings. I had them cut down one that was too long, to the length I needed. Also got the piece that connects the segments to the awning rail. Cost me $50. I then drilled and put screws in the cut end like the uncut end so that it would stay together.
I took the awning to a boat canvas shop and had them cut off the sun exposed material of the first wrap and sew in the nylon rope to fit into the awning cover. That cost me $20. The awning, with the cover, was now the same size as the original awning without the cover.
We re-installed the awning with the "new" aluminum cover to protect the vinyl. No more sun damage to the first wrap of the awning.
Love it
|
|
|
|
|
09-06-2008, 09:37 AM
|
#9
|
Rivet Master
1963 26' Overlander
Austin
, Texas
Join Date: Feb 2008
Posts: 2,640
|
Awesome instructions Lew. I just re-installed my top awning bracket which had pulled out of the aluminum skin, and I will be replacing the awning fabric now. I have an EZ-Awn brand but these instructions sound like they're pretty close.
|
|
|
|
|
09-06-2008, 12:19 PM
|
#10
|
Rivet Master
1963 26' Overlander
Austin
, Texas
Join Date: Feb 2008
Posts: 2,640
|
Need Help for EZ-Awn
Okay, I'm looking at my awning and I don't think it's exactly like the others where instructions have been provided, so I'm hoping Lewster or someone else can help out. What I'm trying to figure out is how to get the roller off, de-tension it, get the old awning out, get the new awning in (I already have the new awning), and then re-tension and put it back together. Below are some pictures that might help get a clear picture of the differences between mine and other brands:
|
|
|
|
|
09-06-2008, 06:48 PM
|
#11
|
Rivet Master Commercial Member
Vintage Kin Owner
Naples
, Florida
Join Date: Dec 2005
Posts: 7,508
|
Quote:
Originally Posted by utee94
Okay, I'm looking at my awning and I don't think it's exactly like the others where instructions have been provided, so I'm hoping Lewster or someone else can help out. What I'm trying to figure out is how to get the roller off, de-tension it, get the old awning out, get the new awning in (I already have the new awning), and then re-tension and put it back together. Below are some pictures that might help get a clear picture of the differences between mine and other brands:
|
Looks like an old Carefree of Colorado. The arm come off the little bracket or rod that inserts into it. You have to get a vise grip pliers in that bracket or rod before removing the roller from the arm, or it will helicopter!!! This type of awning has no pin-hole to lock the roller so it doesn't rotate.
You have to exercise EXTREME CAUTION here when you remove the arm from the roller!!!!
__________________
lewster
Solar Tech Energy Systems, Inc.
Victron Solar Components and Inverters, Zamp Solar Panels, LiFeBlue and Battle Born Lithium Batteries, Lifeline AGM Batteries
|
|
|
|
|
09-23-2008, 09:42 AM
|
#12
|
Rivet Master
1963 26' Overlander
Austin
, Texas
Join Date: Feb 2008
Posts: 2,640
|
Quote:
Originally Posted by lewster
Looks like an old Carefree of Colorado. The arm come off the little bracket or rod that inserts into it. You have to get a vise grip pliers in that bracket or rod before removing the roller from the arm, or it will helicopter!!! This type of awning has no pin-hole to lock the roller so it doesn't rotate.
You have to exercise EXTREME CAUTION here when you remove the arm from the roller!!!!
|
Thanks Lew, appreciate the help.
While in the NON-extended position, I removed the casting from the rafter arm and spun the torsion spring to a neutral position (3 turns), then removed that curved metal bar which is the end of the torsion spring, and the whole spring assembly came out.
So now I have a couple of questions:
1) Is there a reason to extend the awning for removal, or can it be removed and replaced in the NON-extended position?
2) How exactly do you remove and replace the fabric? Does it just slide out of the roller slot, similar to how it slides out of the awning rail? Does it normally slide pretty easily? Mine is pretty decayed, so I'm not sure if it will bind up in either the awning rail or the roller slot.
3) Where do you find the Boeshield T-9 that you mentioned in your post to fotochop?
Thanks again for your help!
-Marcus
|
|
|
|
|
09-23-2008, 07:50 PM
|
#13
|
Rivet Master Commercial Member
Vintage Kin Owner
Naples
, Florida
Join Date: Dec 2005
Posts: 7,508
|
Quote:
Originally Posted by utee94
Thanks Lew, appreciate the help.
While in the NON-extended position, I removed the casting from the rafter arm and spun the torsion spring to a neutral position (3 turns), then removed that curved metal bar which is the end of the torsion spring, and the whole spring assembly came out.
So now I have a couple of questions:
1) Is there a reason to extend the awning for removal, or can it be removed and replaced in the NON-extended position?
2) How exactly do you remove and replace the fabric? Does it just slide out of the roller slot, similar to how it slides out of the awning rail? Does it normally slide pretty easily? Mine is pretty decayed, so I'm not sure if it will bind up in either the awning rail or the roller slot.
3) Where do you find the Boeshield T-9 that you mentioned in your post to fotochop?
Thanks again for your help!
-Marcus
|
OK,
Let's see................. You can't take the fabric off the roller tube if the awning isn't in the fully extended position. 
The fabric should pull off the roller tube thru the slot that becomes aparent when you remove the end cap. It should slid easily.
T-9 should be available at any well stocked hardware store (NOT big box types) or marine supply store. You might even find it at a good bicycle shop.
Also, be sure to spray a little DuPont Teflon Dry Lube (Lowes) onto both channels before trying to replace the fabric....makes the job a lot easier! 
__________________
lewster
Solar Tech Energy Systems, Inc.
Victron Solar Components and Inverters, Zamp Solar Panels, LiFeBlue and Battle Born Lithium Batteries, Lifeline AGM Batteries
|
|
|
|
|
09-23-2008, 08:14 PM
|
#14
|
Rivet Master
1963 26' Overlander
Austin
, Texas
Join Date: Feb 2008
Posts: 2,640
|
Quote:
Originally Posted by lewster
OK,
Let's see................. You can't take the fabric off the roller tube if the awning isn't in the fully extended position.
The fabric should pull off the roller tube thru the slot that becomes aparent when you remove the end cap. It should slid easily.
T-9 should be available at any well stocked hardware store (NOT big box types) or marine supply store. You might even find it at a good bicycle shop.
Also, be sure to spray a little DuPont Teflon Dry Lube (Lowes) onto both channels before trying to replace the fabric....makes the job a lot easier! |
Okay, yes, that was a dumb question. Please forgive thise n00b. 
Maybe this is what I was thinking-- if the roller tube has to come entirely off both rafter arms anyway, then is there any reason that you can't take the tube off of both rafter arms in the NON-extended position (where the torsion springs are less loaded and therefore less dangerous), and then slide everything out of the awning rail. Then, take the whole roller assembly, lay it down on the ground, unwrap it, and then slide it out of the channel?
Sounds complicated, but is it any less complicated than sliding the roller off the fabric while the fabric is still attached to the awning rail?
And on your advice I've already picked up the Dupont Teflon multi-purpose lube, so thanks for the heads-up on that!
-Marcus
|
|
|
|
|
09-23-2008, 09:14 PM
|
#15
|
|
Retired.
Currently Looking...
.
, At Large
Join Date: Jun 2003
Posts: 21,276
|
Marcus, do you REALLY want to be hefting an awning tube around while trying to slide the old awning out of the top bracket?
Unroll the awning, slide the fabric off the tube, then slide it off the rail. It will be easier to slide it on the tube before installing it in the top bracket. And you will need a helper (read spouse).
__________________
Meddle not in the affairs of dragons, for you are crunchy, and taste good with ketchup.
Terry
|
|
|
|
|
09-24-2008, 07:04 AM
|
#16
|
Rivet Master
1963 26' Overlander
Austin
, Texas
Join Date: Feb 2008
Posts: 2,640
|
Quote:
Originally Posted by overlander63
Marcus, do you REALLY want to be hefting an awning tube around while trying to slide the old awning out of the top bracket?
Unroll the awning, slide the fabric off the tube, then slide it off the rail. It will be easier to slide it on the tube before installing it in the top bracket. And you will need a helper (read spouse).
|
Well, you've gotten to the crux of my issue-- most of the work I do is alone, so I'm always trying to figure out some way to do things without relying on other people. When I'm working outside, it generally means Mary is tied up with the toddler inside the house. We can work together when the toddler is taking a nap, but those are difficult to plan around...
The truth is I'd rather have someone help and do it the way you and Lew are recommending, but as a solo project, I'm imagining it might be easier to leave the awning in the upright position and set the roller on my shoulder and slide the entire assy out of the awning rail, rather than extend the awning and do it the "right" way.
But usually, there's a reason the "right" way is the "right" way, and I believe that's what you and Lew are getting at... 
Thanks for the input!
-Marcus
|
|
|
|
|
09-24-2008, 08:09 AM
|
#17
|
Rivet Master Commercial Member
Vintage Kin Owner
Naples
, Florida
Join Date: Dec 2005
Posts: 7,508
|
Quote:
Originally Posted by utee94
Well, you've gotten to the crux of my issue-- most of the work I do is alone, so I'm always trying to figure out some way to do things without relying on other people. When I'm working outside, it generally means Mary is tied up with the toddler inside the house. We can work together when the toddler is taking a nap, but those are difficult to plan around...
The truth is I'd rather have someone help and do it the way you and Lew are recommending, but as a solo project, I'm imagining it might be easier to leave the awning in the upright position and set the roller on my shoulder and slide the entire assy out of the awning rail, rather than extend the awning and do it the "right" way.
But usually, there's a reason the "right" way is the "right" way, and I believe that's what you and Lew are getting at...
Thanks for the input!
-Marcus |
Marcus,
I've done fabric replacements solo on a few ocassions. You need 2 sturdy ladders to support the extended roller tube, and you can then work the fabric out with the ladders being your 'helper'.
__________________
lewster
Solar Tech Energy Systems, Inc.
Victron Solar Components and Inverters, Zamp Solar Panels, LiFeBlue and Battle Born Lithium Batteries, Lifeline AGM Batteries
|
|
|
|
|
09-24-2008, 08:34 AM
|
#18
|
|
Retired.
Currently Looking...
.
, At Large
Join Date: Jun 2003
Posts: 21,276
|
Marcus, you can get one of these to hold the other end of the tube in position, just rest the tube on the notch, and it is adjustable in height:
__________________
Meddle not in the affairs of dragons, for you are crunchy, and taste good with ketchup.
Terry
|
|
|
|
|
09-24-2008, 08:46 AM
|
#19
|
Rivet Master
1963 26' Overlander
Austin
, Texas
Join Date: Feb 2008
Posts: 2,640
|
Alrigh, alright-- you all have convinced me. I'll do it the "right" way!
I'm also thinking how tough it would be to roll the fabric back onto the roller if I attempted my proposed plan. There's pretty much no way it would line up correctly.
So, now I need to go buy a second ladder. I actually have two 16-ft extendable ladders, but only one a-frame ladder. Maybe I'll get one of those "little giant" type ladders, which can double as a short scaffolding for when I begin polishing!
|
|
|
|
|
09-24-2008, 08:56 AM
|
#20
|
|
Retired.
Currently Looking...
.
, At Large
Join Date: Jun 2003
Posts: 21,276
|
Quote:
Originally Posted by utee94
Alrigh, alright-- you all have convinced me. I'll do it the "right" way!
I'm also thinking how tough it would be to roll the fabric back onto the roller if I attempted my proposed plan. There's pretty much no way it would line up correctly.
So, now I need to go buy a second ladder. I actually have two 16-ft extendable ladders, but only one a-frame ladder. Maybe I'll get one of those "little giant" type ladders, which can double as a short scaffolding for when I begin polishing! |
Now is the perfect time to invest in a Telestep ladder. They are about 16" tall, but extend up to 10'. We have one, it goes everywhere the trailer goes, and has been invaluable. The fact it weighs about 15 pounds, and takes up as much room as a foot stool are both huge pluses.
Telesteps - Products
__________________
Meddle not in the affairs of dragons, for you are crunchy, and taste good with ketchup.
Terry
|
|
|
|
|
|
Currently Active Users Viewing This Thread: 1 (0 members and 1 guests)
|
|
|
 Posting Rules
|
You may not post new threads
You may not post replies
You may not post attachments
You may not edit your posts
HTML code is Off
|
|
|
|

 Recent Discussions
 |
|
|
|
|
|
|
|
|
|
|
|
|
|
|
|
|
|
|
|
|
|


 Linear Mode

