 |
|
 05-17-2012, 04:41 PM
|
#1
|
|
New Member
1966 30' Sovereign
austin
, Texas
Join Date: Mar 2012
Posts: 4
|
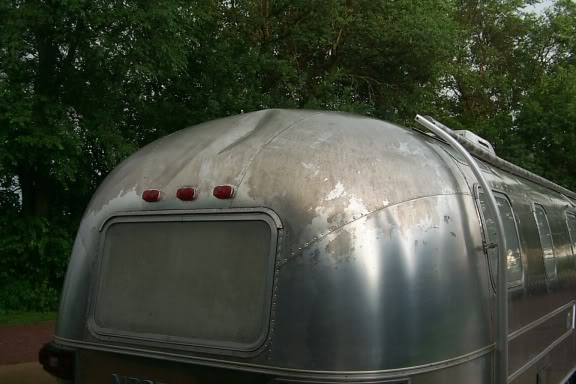
Polishing streaks leave me puzzled
Hello fellow airstreamers!
This is my first experience restoring a 1966 sovereign that was pretty oxydized.
Read the online posts and watched the utube videos on how to properly polish my pretty.
F7 was out of stock for a while so I started with F6 Nuvite on the heels of aircraft stripping.
Some parts shine right up, others are just dull and show streaks, not sure why.
Does not seem to be clear coat left.
Any advice?
Also have some lights out and read many discussions around pulling the dome to locate the harness.
Anyone knows where precisely it is located on a 31 footer? Does not show or either manuals.
Many thanks for any wisdom you can send my way!!!
|

|

|


|
05-17-2012, 05:45 PM
|
#2
|
Rivet Master  
1966 24' Tradewind
Placerville
, California
Join Date: Apr 2006
Posts: 3,328
|
Quote:
Originally Posted by 1966belle

Hello fellow airstreamers!
This is my first experience restoring a 1966 sovereign that was pretty oxydized.
Read the online posts and watched the utube videos on how to properly polish my pretty.
F7 was out of stock for a while so I started with F6 Nuvite on the heels of aircraft stripping.
Some parts shine right up, others are just dull and show streaks, not sure why.
Does not seem to be clear coat left.
Any advice?
Also have some lights out and read many discussions around pulling the dome to locate the harness.
Anyone knows where precisely it is located on a 31 footer? Does not show or either manuals.
Many thanks for any wisdom you can send my way!!! |
Are you using a buffer or do you have a cyclo polisher. Some can get a decent shine with minimal streaks with a right angle buffer, difficult, but a cyclo does a nice Swirl free job. Your photo doesn't clearly show the skin condition. I do know that on oxidized surfaces and scratches it will take several passes. Go slow. Let the polisher bring out the shine without wiping it clear. If it's not polishing out then you probably are using too much Nuvite. It doesn't take much.
Neil
__________________
Neil and Lynn Holman
FreshAir #12407
Avatar;
Kirk Creek, Big Sur, Ca. coast.
1966 Trade Wind
1971 Buick Centurion convertible
455 cid
1969 Oldsmobile Ninety Eight
455 cid
|
|
|
|
|
05-17-2012, 06:09 PM
|
#3
|
Rivet Master
Currently Looking...
Sioux Falls
, South Dakota
Join Date: Jun 2010
Posts: 2,403
|
This is my rear before dent repair and before polish started.
This is the same rear after the first cut with black compound and a 8" white airway wide wheel on a VS polisher.

Below is the front and side after polish with the Cyclo using the S compound.

After the black compound with the airway wheel, mine had marks from the wheel but those went away FAST with the Cyclo.
I used a narrow yellow 10" airway wheel with black compound on a 3,000 rpm polisher for the worst spots on my trailer. Then I went over it all with brown compound on a wide white 8" airway wheel with a slower polisher.
Mine is turning out very nice.
http://www.airforums.com/forums/f441...per-90054.html
`
|
|
|
|
|
05-17-2012, 06:24 PM
|
#4
|
|
Site Team
2002 25' Safari
Dewey
, Arizona
Join Date: Mar 2005
Posts: 15,617
|
Did you have any clearcoat to remove?
__________________
Richard
Wally Byam Airstream Club 7513
|

|
|
|
05-17-2012, 07:00 PM
|
#5
|
2 Rivet Member 
1973 23' Safari
Encino
, California
Join Date: May 2010
Posts: 39
|
After reading so many threads available on the proper way to buff out an airstream all the while struggling with the process for over a year myself, I discovered that each situation is different.
In my trailers case the top coat had either been stripped off or burned off from the sun some time before I purchased it. So the stripping of the top coat was minimal. However, the oxidation, pits and water marks were server. I used all the nuvite grades starting with F9, F7 and so on. With satisfactory results with the heavier cuts and not so much in the polishing levels. Also important is the right angle tool you are using. I used one with 7000 rpms and 1800 rpms. There are variable speed grinders available but I don't own one. Also the type of pad is critical. Cutting twilled vs buffing not twilled. In every and all cases watch out for the heat build up from friction.
Here's the kicker! After $800 in nuvite, and maybe that much money in aleve, I was unhappy with the results. I stepped back and used the trailer last summer. Only to trip across a different product called Gliptone Liquid Metal. They have 3 grades and my total cost for all 3 including shipping was $62.00. With the very fist spin of the pad the material was noticeably different. 3 buffing days later, success.
I would say start with F9,F7 and then switch over to Gliptone. Might be your answer too. Then the final polishing step with a cyclo is a must.
|
|
|
|
|
05-17-2012, 07:53 PM
|
#6
|
|
New Member
1966 30' Sovereign
austin
, Texas
Join Date: Mar 2012
Posts: 4
|
I did. Used regular stripper at first then moved to aircraft.
|
|
|
|
|
05-17-2012, 07:55 PM
|
#7
|
|
New Member
1966 30' Sovereign
austin
, Texas
Join Date: Mar 2012
Posts: 4
|
Thanks for sharing! I will look up that gliptone.
|
|
|
|
|
05-17-2012, 08:39 PM
|
#8
|
4 Rivet Member 
1974 23' Safari
Vintage Kin Owner
1947 25' Spartan
, Manor
Join Date: Sep 2011
Posts: 457
|
I have had a lot of success using a 400 or 600 wet sandpaper to cut though the oxidation and then either letting the paper break WAY down as I sand or switching to a 1000 grit wet sand. The F7 put a mirror shine in it RIGHT away after the sand without having to fight the oxidation first.
Before I tried the sanding and after using the pre-sand method was like night and day. I will not polish again without a quick sand (and it doesn't actually take that long).
|
|
|
|
|
05-17-2012, 08:54 PM
|
#9
|
Rivet Master
Currently Looking...
Sioux Falls
, South Dakota
Join Date: Jun 2010
Posts: 2,403
|
Links
Darkspeed's thread was my guide and I'm glad I followed his method.
http://www.airforums.com/forums/f441/polishing-the-aluminum-falcon-81822.html
If you go the airway wheel way, read everything written by Darkspeed you can first.
My initial order came from Caswell.
BLKBC7 Black Buffing Compound $9.99
BRBC7 Brown Buffing Compound $9.99
WBC7 White Buffing Compound $11.99
BC10 Treated Vented Buffing Wheel - 10
Hole Size: 1/2" $10.99
Treated Vented Buffing Wheels - Buffing Wheels - Buffing/Polishing - Caswell Inc
GA58 Grinder/Buffer Adapter $10.59
WR995 Wheel Rake $14.99
Grinder/Buffer Adapter 1/2" Dia Shaft - Grinder/Buffer Kits - Buffing Kits - Buffing/Polishing - Caswell Inc
I started out with one 1/2" adapter. I bought one more and two 5/8" as well to minimize setups.
I did most of the first and second cuts with 8" (wide style) airway white wheels. I used the yellow airway wheels on the heavy oxidation spots. I had some tree sap stains on two sides about 2' wide at the top. I used everything I had on those with good results. No one could find those spots now.
I bought a variable speed buffer from Northern Tool. I'm mostly done with it and it worked perfect. I think it cost $79. I had a heavy duty 2,000 RPM Sioux buffer that I used for the heavy cutting. I bought a new variable speed Cyclo and a set of pads. I like the Cyclo but I hate the location of the on/off switch. I'm constantly turning it off when I'm buffing.
I bought yellow round buffer pads at the local body shop supply as well as the white airway wheels. I think I ended up with three of everything. I think I'll have under $1,000 in the polish job including cloth, wheels, 2 new buffers, pads, compounds, and Nuvite. I'm just north of $800 right now.
I could have skipped the Caswell order, the local body shop supply store had everything locally I ordered from Caswell. I was happy with Caswell though, no problems of any kind with them.
This video is about the way I did mine.
This one is using a sewn wheel. I used airway white wheels.
Same idea though, and a nice job!
`
|
|
|
|
|
05-18-2012, 10:06 AM
|
#10
|
|
New Member
1966 30' Sovereign
austin
, Texas
Join Date: Mar 2012
Posts: 4
|
Thanks to all for the advice! Making real progress now!!
|
|
|
|
|
05-25-2012, 11:14 PM
|
#11
|
|
(-1 Rivet_
1965 20' Globetrotter
Jackson
, California
Join Date: Feb 2012
Posts: 175
|
Type of Cyclo Pads?
Splitrock,
What type of Cycle pads are you using?
Do you go from C to S with the Cyclo after cutting with Black/Brown/White?
Thanks in advance,
TIMK
__________________
Thanks in advance!
TAC CA-77
|
|
|
|
|
05-26-2012, 10:17 AM
|
#12
|
Rivet Master
Currently Looking...
Sioux Falls
, South Dakota
Join Date: Jun 2010
Posts: 2,403
|
Quote:
Originally Posted by REDSLED88
Splitrock,
What type of Cycle pads are you using?
Do you go from C to S with the Cyclo after cutting with Black/Brown/White?
Thanks in advance,
TIMK
|
I never used the white at all.
I used a yellow 10" narrow Airway wheel with black compound on the badly oxidized areas. There was one such area on each side about in line with the bathroom. I believe it was caused by the trailer sitting under a tree for an extended period. The sun bleached, clearcoat peeling, oxidized end caps cleaned right up with an 8" wool bonnet style buffing pad and black compound.
I tried different combinations but I settled on the first cut on all (except the worst spots) with an 8", wide white, airway wheel, (similar to the one the guy in the first video above is using) with black compound. There were good sections that I skipped with the black compound.
The second cut, I used a new 8", wide white, airway wheel, and brown (medium) compound. I did all of the trailer with this step. I'm not polishing the very top. I'm going to white coat that later.
Now, I'm on the final step (for me) and I'm using orange foam pads on the Cyclo with a soft cotton cloth cover and the "S" compound. I'm not going for a mirror finish, but I'm not far from that now.
I had dreaded doing this stripping and polishing job, but it's been easier than I thought, less work that I thought, more enjoyable than I thought, and the results are better than I had hoped. The posters on this forum gave me the knowledge, the courage, and the motivation to tackle it myself. The whole trailer is turning out rather remarkable.
I'd probably do the next one in 1/2 the time because I could skip all the false starts and experimental techniques. I'm thinking (in a better world) the next one I do will be smaller, newer, and with less tarnish.
|
|
|
|
|
05-29-2012, 08:31 AM
|
#13
|
|
(-1 Rivet_
1965 20' Globetrotter
Jackson
, California
Join Date: Feb 2012
Posts: 175
|
Keep compounding
Quote:
Originally Posted by 1966belle
Some parts shine right up, others are just dull and show streaks, not sure why.
Does not seem to be clear coat left.
Any advice?
|
I think that is clear coat which is showing the streaking....
I would try the stripper ( I only did stripper for about 5-10 minutes)
and then clean with Mineral Spirits, then move to compounding.
Try the black bar first and see if it cuts through.
I did as SPLITROCK did, and used a wheel on end.
I went with a 12" sewn cotton wheel from caswell and a 1/2" variable speed polisher running at around 3500 rpm, and it did fine.
I have some issues like yours also, and I just used a little more time, NOT PRESSURE, to get the streaks out.
Keep it moving so it doesn't heat up and it should all come out with a black bar.
TIMK
__________________
Thanks in advance!
TAC CA-77
|
|
|
|
|
05-29-2012, 08:35 AM
|
#14
|
|
(-1 Rivet_
1965 20' Globetrotter
Jackson
, California
Join Date: Feb 2012
Posts: 175
|
Thanks
Quote:
Originally Posted by Splitrock
Now, I'm on the final step (for me) and I'm using orange foam pads on the Cyclo with a soft cotton cloth cover and the "S" compound. I'm not going for a mirror finish, but I'm not far from that now.
|
I used a 1/2" variable speed polisher with 12" sewn cotton wheel and black bar yesterday for about 3 hours and it covered a very large area, and brought it to a very good shine.
I will move onto brown tripoli bar next.... but I don't think I'll do white either.
I don't have a cyclo yet, but wanted to get the right pads.
Are the "soft cotton cloth covers" cyclo brand or did you just get some from somewhere else?
I'll be ordering my finishing stuff next.
Yeah, the black bar seems to kick butt and really provides encouragement.
I thought it would be much worse than it is.
Thanks in advance,
TIMK
__________________
Thanks in advance!
TAC CA-77
|
|
|
|
|
05-29-2012, 02:29 PM
|
#15
|
Rivet Master
Currently Looking...
Sioux Falls
, South Dakota
Join Date: Jun 2010
Posts: 2,403
|
Quote:
Originally Posted by REDSLED88
Are the "soft cotton cloth covers" cyclo brand or did you just get some from somewhere else? TIMK
|
I got the cotton fabric from the fabric store. It's a mill end store and they have a ton of fabric. I got soft white cotton but not "t" shirt cotton. This is heavier, like a sweat shirt. One side has a downy feel to it. I start out with a chunk maybe three foot by three foot. I cut slits in the cloth to go over the motor and over the handle.
I polish with the slit over the motor, then I move the cloth down to the handle position and polish the same spot with just the cloth, no polish.

Look at this page:
Using the Cyclo Polisher : Polishing Cloths : PerfectPolish.com
`
|
|
|
|
|
06-03-2012, 07:05 PM
|
#16
|
|
Silver Mist
Currently Looking...
Riverhead
, New York
Join Date: Aug 2006
Posts: 3,011
|
I used the white compound after red, it was an incredible difference.
I used a 10" white open not sewn as recommended by Caswell.
Now just cleaning up the black crud.
__________________
Bob
|
|
|
|
|
06-03-2012, 07:30 PM
|
#17
|
Rivet Master
Currently Looking...
Sioux Falls
, South Dakota
Join Date: Jun 2010
Posts: 2,403
|
I got my rear polished this weekend.
|
|
|
|
|
06-03-2012, 07:37 PM
|
#18
|
|
Silver Mist
Currently Looking...
Riverhead
, New York
Join Date: Aug 2006
Posts: 3,011
|
Quote:
Originally Posted by Splitrock
I got my rear polished this weekend.
|
Not sure you need to share that with us. 
__________________
Bob
|
|
|
|
|
06-03-2012, 08:44 PM
|
#19
|
|
(-1 Rivet_
1965 20' Globetrotter
Jackson
, California
Join Date: Feb 2012
Posts: 175
|
Too funny!
Good one!
But on a more serious note, what are y'all doing for the roof.
I'm thinking Black/Sewn Wheel, Brown/Sewn Wheel, and then cyclo
with Nuvite C.
Not like anyones looking at it, plus it's a little sketch up there, even on scaffolding.
Thanks in advance,
TIMK
__________________
Thanks in advance!
TAC CA-77
|
|
|
|
|
06-03-2012, 08:47 PM
|
#20
|
|
Silver Mist
Currently Looking...
Riverhead
, New York
Join Date: Aug 2006
Posts: 3,011
|
Not polishing the top center, thinking about painting it white, not sure what brand to use?
__________________
Bob
|
|
|
|
|
|
|
Currently Active Users Viewing This Thread: 1 (0 members and 1 guests)
|
|
|
 Posting Rules
|
You may not post new threads
You may not post replies
You may not post attachments
You may not edit your posts
HTML code is Off
|
|
|
|

 Recent Discussions
 |
|
|
|
|
|
|
|
|
|
|
|
|
|
|
|
|
|
|
|
|
|


 Linear Mode

