 |
 09-30-2012, 06:46 PM
|
#1
|
Rivet Master 
1973 27' Overlander
Portsmouth
, Virginia
Join Date: Jun 2012
Posts: 776
|
New member, less than new AS, 1973 Tradewind with some issues
Mamma wanted an Airstream. We had a lightweight square side trailer a few years back. Had a leaky rubber roof I could never keep up with and the trailer had lots of interior water damage. Decided this year to look for an AS, I like older stuff and have done my fair share of renovations on "things".
So we picked up this trailer just this past Friday. Fairly good condition for almost 40 years old. Mostly original interior, mostly original appliances. I knew from the beginning that any trailer in our price range (around 6 grand) was going to need some work, I just didn't want one that needed a total gut and renovation. I think we ended up with one that has it's share of pluses and minuses, hopefully more pluses in the end. Here is the status as far as I can tell right now.

Immediate concern:
Seal all the leaks or potential leaks. Just today I pulled off the rear tail lights only to find them with mud from water. PO used plumbers putty to try and seal them up along with generous amounts of silicone sealer. I'm going to try and use some sealed cell weatherstripping as a gasket material along with a touch of silicone on the screw heads and see how that goes. Worse case I try something else if it doesn't work.
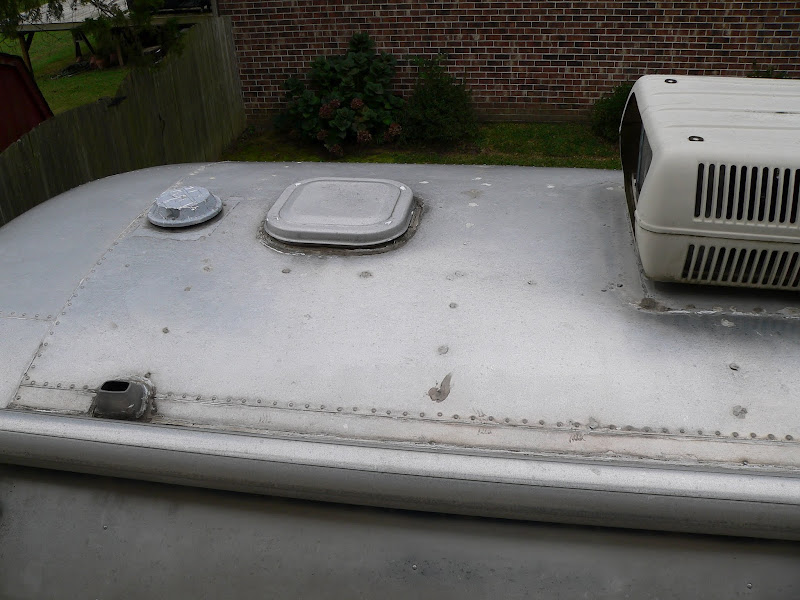
Going to coat the roof. Lots of silicone up there as well, I think this will do the best for keeping the water and the heat out.
Fix the rock guard, one of the plastic panels is out of the track

Winter projects:
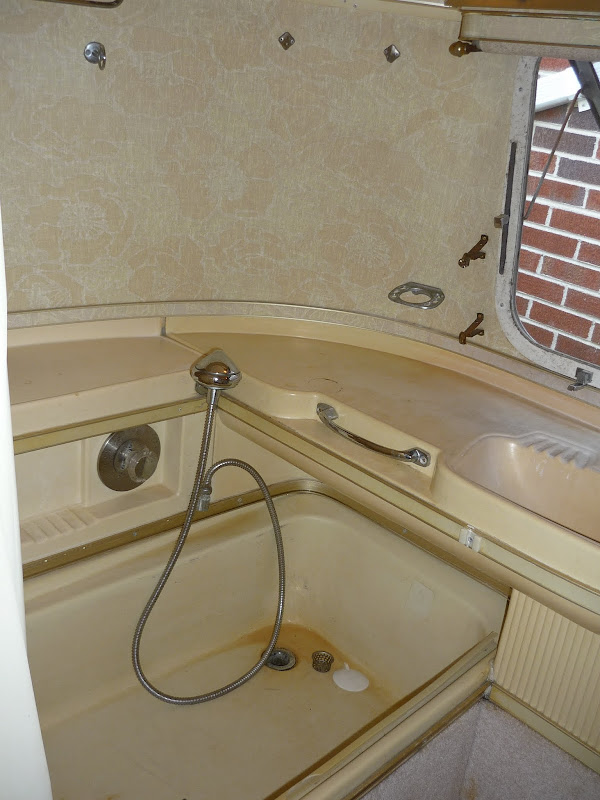
Soft spot in the far back corner of the bath, all the way by the edge, underneath the drain valves. I looked and poked, but this rot seems to be only in the last few inches, right by the frame where it counts the most. Couldn't really see any droop, but you can see some flex on the bumper if you step on it, maybe a 1/4 to 1/2 inch. Bathroom plastic fixtures aren't all that impressive, so I'm thinking of gutting the bathroom, redoing the flooring and then putting in a standup shower and separate sink. Just need to keep the weight down.

Axles are original and need replacement. I figured on those from the gitgo. Will order a set by the end of the year, Inland seems to have them on sale till then. Don't know if there are other suppliers or cheaper prices out there, maybe somebody can chime in here.
Going to pull the banana wrap and belly pan off to see what I've got. Will fix any bad sections of the frame or outriggers, then wirebrush and preserve the frame and paint. Probably will use some of the foam foil panels as replacement insulation unless somebody give me a reason to do otherwise. Looks like most of the belly panels are in decent shape except for the one farthest to the rear. One of the rear panel wraps has damage from a blown tire, so that will be fixed as well.

Longer term:
All the windows need help. Not sure what can be done, maybe pull the glass out and reinstall with new rubber channel?
PO put a dent in the back up on a rounded section. Not sure what I can do to smooth that out without pulling the section out. I may end up there, but it may stay like it is. I value function over form, mostly.
Fridge only runs on propane, not on 110. Need to figure out if I can fix it, think its something with the electric element, since the gas works fine.
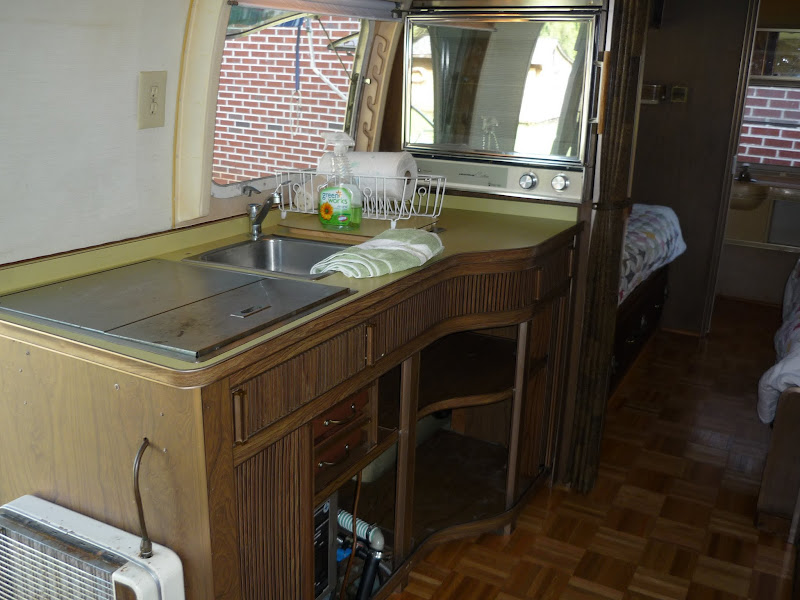
Interior needs updating. Some I like, some not so much. Too much 70's vintage dark. Next years project or maybe sometime after that. Not really crazy about the parquet, but I can sand it and reseal it

Of course it's not all bad. Trailer came with 3 zipdee awnings. Big one in front, long one on other side and one over the rear window.

I really like this little magic chef oven, just need to find a spot for a microwave as well.
So if anybody has an opinion or two, chime in. I'm generally very handy and have done quite a bit of home repair, machinery repair and lots in between. I do have a few questions, not sure whether to post them here or in the more specific forums.
Thanks in advance.
Bob
|

|

|


|
09-30-2012, 07:15 PM
|
#2
|
Rivet Master
1973 25' Tradewind
Bloomsbury
, New Jersey
Join Date: Jul 2010
Posts: 696
|
Hey Bob!
Bob,
I think you did pretty well. She looks good. BUT, I belive she is an Overlander model, and I think she's a 75, maybe 74, but not 73, 73's had different taillights. Clean her up and go camping, see how everything works (or does not) and repair as needed. Dark, maybe but that laminate last forever, I have it too, it has grown on me and I'm keeping it. I added colors with new goucho fabric and pillows. Most people feel I have a nice retro-original interior. Clean it up and enjoy, and welcome to the forums! MPJ
|
|
|
|
|
09-30-2012, 07:26 PM
|
#3
|
Rivet Master 
1972 25' Tradewind
Currently Looking...
McHenry County
, Illinois
Join Date: Jul 2003
Posts: 1,171
|
Wow. Very nice looking rig.
Looks like youre done your homework and are aware of the typical issues of the 70s Airstreams.
Virginia has mild winters compared to up here but make sure you get the exterior stabilized before it gets too cold.
As far as silicone goes Im sure youve read the pros and cons of all the different types. For quick touch up under the screw heads you can pick up a small tube of Permatex Ultra Grey at the auto parts store. Yes its aluminum compatible. Kool Seal on the roof is a good option. Make sure you prep the surface properly or it may leak.
You state the windows need help. If youre talking about the wing windows Im sure they do. The whole unit needs to come out for rebuilding. Permatex also has a flowable window sealer that I used on mine to slow down the leaks and condensation. Short term fix however.
For the fridge check the heating element junction block on the side of the vent cover. Mine had loose wire. Clean and tightened the wires. Works now.
All and all a great find. Enjoy the restoration/rehab ride.
Tom.
__________________
|
|
|
|
|
09-30-2012, 09:26 PM
|
#4
|
Rivet Master
1973 27' Overlander
Portsmouth
, Virginia
Join Date: Jun 2012
Posts: 776
|
Quote:
Originally Posted by moparjohn

Bob,
I think you did pretty well. She looks good. BUT, I belive she is an Overlander model, and I think she's a 75, maybe 74, but not 73, 73's had different taillights. Clean her up and go camping, see how everything works (or does not) and repair as needed. Dark, maybe but that laminate last forever, I have it too, it has grown on me and I'm keeping it. I added colors with new goucho fabric and pillows. Most people feel I have a nice retro-original interior. Clean it up and enjoy, and welcome to the forums! MPJ
|
My bad, it is an International Overlander model, 27' twin beds. We had been looking at a 25' Tradewinds a few months ago, probably had that on my brain. But it is a 73 for sure. I think the tail lights were changed at some point, there are some non-factory mods there with some sort of plastic or fiberglass stuck behind the metal and some ragged edges of the cutouts. Were the original tail light assemblies metal or plastic? These are plastic, dont look to be 30 years old.
Most of the interior will stay as is, but I do want to brighten it up some. Will worry about that down the road, right now I want to make sure it stays as dry as possible.
|
|
|
|
|
09-30-2012, 09:58 PM
|
#5
|
Rivet Master
1973 27' Overlander
Portsmouth
, Virginia
Join Date: Jun 2012
Posts: 776
|
Quote:
Originally Posted by Tom Nugler
Wow. Very nice looking rig.
Looks like youre done your homework and are aware of the typical issues of the 70s Airstreams.
Virginia has mild winters compared to up here but make sure you get the exterior stabilized before it gets too cold.
As far as silicone goes Im sure youve read the pros and cons of all the different types. For quick touch up under the screw heads you can pick up a small tube of Permatex Ultra Grey at the auto parts store. Yes its aluminum compatible. Kool Seal on the roof is a good option. Make sure you prep the surface properly or it may leak.
You state the windows need help. If youre talking about the wing windows Im sure they do. The whole unit needs to come out for rebuilding. Permatex also has a flowable window sealer that I used on mine to slow down the leaks and condensation. Short term fix however.
For the fridge check the heating element junction block on the side of the vent cover. Mine had loose wire. Clean and tightened the wires. Works now.
All and all a great find. Enjoy the restoration/rehab ride.
Tom.
|
Tom
OK, couple of questions then.
When you say stabilized, we are talking patching for leaks?
Currently there is lots of fairly dry and cracking caulk on all the seams. I'm thinking this is what was originally the vulkem used to seal up the seams when it was built. Can some of the dried off excess be scraped off without any problems? Can't really see where it would affect anything.
What is the best sealant to use? Permatex looks to be sold in very small tubes. The PO looks like he used quite a bit of silicone all over the place and it's not holding much at this point. Spots like the top of the window frames, around the door and the clearance marker lights need to be redone or replaced in the case of the lights.
The windows original channel liner is all dried out. Some of the windows look like they got moisture behind the glass and now have some nice mildew growing between the glass and the frame. Can the glass be removed and put back in with new rubber? Wing windows are fair, really about the same shape as most of the others. Can take some closer pix tomorrow if it helps.
What is the best roof coating to use? Ultra Seal, Snow Coat or something more exotic? How much roof prep do I need to do? Was planning on getting up there and scraping all the old silicone off, maybe wire brush it to get the bits off and then wash and mask some straight lines and lay it on.
PO said something was shorted or burned out on the heating element on the fridge. Will have to troubleshoot that some more.
Thanks for the response
Bob
|
|
|
|
|
09-30-2012, 10:28 PM
|
#6
|
Rivet Master
1966 24' Tradewind
1995 34' Excella
Lynchburg
, Virginia
Join Date: Jun 2006
Posts: 4,226
|
Bob
Sounds like you did well on your purchase and you will fit right in here on the forum. Your life will be changed for the good.
I second what Tom and others said about doing some camping now to see what you have and don't do anything drastic on the interior until you have lived with it for a while.
I can't help you much on caulking, but I know you want to stay away from silicone completely. Read up on the caulking threads. A good place to order caulking is from Vintage Trailer Supply.
I don't have any leaks, but I have taken a good look at the top of my trailer and the caulking looks like it was applied by a 5 year old. Funny how lots of other Airstreams have this problem too.
Did the seller live on Douglass Rd in Chesapeake? My daughter lives just down the road if this is the case.
The fridge fix should be pretty simple- either a bad connection or a bad heating element. Anyhow, we run ours on propane when we are camping because we do mostly boondocking. Propane is cheaper than electricity also, and it does not use a lot of propane. I think the heating element is only 180 watts; it does not take much propane to provide that amount of heat.
Clean it good, take care of your roof leaks and just go camping. October is just about the best month anyhow for camping.
I will stop by to see your new baby, if you like, next time we go visit my daughter in Chesapeake.
Dan
|
|
|
|
|
09-30-2012, 10:49 PM
|
#7
|
Rivet Master
1973 27' Overlander
Portsmouth
, Virginia
Join Date: Jun 2012
Posts: 776
|
Dan
This one came from up near Richmond, Powhatan out in horse country. Was on the Richmond CL. Leaks for sure over the next two weeks or so. Then maybe after Turkey day I'll start on the deconstruction. You're more than welcome to swing by and have a beer. I need to pick peoples brains on this one so I dont screw up.
|
|
|
|
|
09-30-2012, 11:00 PM
|
#8
|
Rivet Master
1971 25' Tradewind
Menlo Park
, California
Join Date: Jan 2010
Posts: 1,269
|
Bob, you sound like you've got a good perspective on the whole project. Welcome to the wonderful world of vintage Airstreaming!
We started with sealing leaks and replacing axles. We had to gut the bathroom to fix the floor rot and rear end separation and decided to replace the dark plastic interior with real birch. It was a decision based more on aesthetics than function. It's an ongoing project and a lot of work that we enjoy.
Our blog (see my sig below) has some pictures of what we've done with our bathroom and interior. Maybe some of the ideas will apply to your project.
Again, welcome to Airforums and the world of Airstreaming.
|
|
|
|
|
10-01-2012, 09:06 PM
|
#9
|
Rivet Master
1972 25' Tradewind
Currently Looking...
McHenry County
, Illinois
Join Date: Jul 2003
Posts: 1,171
|
Yes. Sealing the shell to prevent any further damage.
It’s doubtful the dry and cracking caulk is Vulkem. The vents and window frames had butyl tape applied as a sealant when the trailer was built. The seams may have been taped as well but I don’t know for sure.
The common sources for leaks are the roof vents, Vista-View windows and skylights, and the plumbing vent covers. Sometimes the foam seal for the A/C unit leaks as well.
The accepted standard caulk for resealing panels, vents, window frames is Tempro 635, the replacement for Vulkem, and Parbond. Tempro for big gaps, Parbond for small. There are gasket kits for the plumbing vents. Honestly the biggest leaks I’ve had on the 3 Vintage trailers I’ve had were from the stack vents. You can get all these on-line from Vintage Trailer supply, Inland RV and Out of Doors Mart.
You’ve already found the bad floor at the rear of the trailer. Water comes in from the bumper compartment cover. My TW had the frame repaired at the back before I bought it but the floor would still get wet. You need a real good seal back there. Good place to use the Tempro.
You have to remove the rivets from the window frames to remove the glass. Most clean the joints as good as possible and reseal the weatherstrip with the Vulkem/Tempro.
I haven’t painted the roof yet but I know people who have with mixed results. Surface prep is the key. There is a current thread running now about this with a lot of good tips and opinions.
http://www.airforums.com/forums/f478...ml#post1208379
You’ll find Airstreamers have lots of opinions. 
All that being said, get after the big leaks first, don’t sweat the small stuff and go camping in the new rig before the weather turns funky.
Good luck,
Tom.
__________________
|
|
|
|
|
10-01-2012, 09:13 PM
|
#10
|
Rivet Master
1973 27' Overlander
Portsmouth
, Virginia
Join Date: Jun 2012
Posts: 776
|
|
|
|
|
|
10-02-2012, 06:42 PM
|
#11
|
Rivet Master
1987 32' Excella
Nepean
, Ontario
Join Date: Mar 2006
Posts: 1,414
|
I'm far from being an expert on this, but permit me to make some observations:
First, when I bought my '87 Excella last year, I took it to Jackson Center and they found and fixed a leaking seam, along with leaking from cracked and missing caulking in the front windows which were behind the rock guards. The repair wasn't cheap, but it was done well and in a timely manner, literally as I waited (a week, but I stayed in it every night and they pulled it into the shop every morning at 7:30am). At the same time, I had them check all the caulking. They applied it with what looks like an oil can, but pumps out a small bead, about 1/16" in diameter.
The light over your doorway does not need to have a messy silicone caulking on it, as it needs to be removed any time you need to change the bulb. JC has the replacement plastic lens as they do yellow and crack with age (I have the same light).
On the subject of caulking, I can say with some certainty that silicone does not do the job. The PO of the '94 LY moho I had had used silicone caulking on the roof seams, and it leaked badly. When I took it to RV Canada (the local AS dealer here in Ottawa), their tech went up on the roof with me and, while it all looked good to me, he just put a fingernail under the silicone and the whole strip of caulking just lifted off.
You do have a very nice rig - I like parquet flooring in it. You should be quite comfortable in it.
One thing I did was to convert all my lights to LED's, both inside and out. LED4RV has a great kit to convert the rear tail lights to LED's - I did mine and it makes a huge difference.
__________________
VE3JDZ
AIR 12148
1987 Excella 32-foot
1999 Dodge Ram 2500HD Diesel
WBCCI 8080
|
|
|
|
|
10-02-2012, 07:19 PM
|
#12
|
Rivet Master
1973 27' Overlander
Currently Looking...
Jupiter
, Florida
Join Date: Apr 2006
Posts: 2,062
|
As an owner of that identical trailer -looks like you have a good one!
¤ Rear utility hatch gasket. Don't think twice if its not perfect.
¤ Pull enough tank baffle panels inside the trunk or belly skin to get to & clean up & anti-corrosion paste the primary ground tab, located just aft of the toilet on the inside of the ladder frame rail. Proximity to the toilet means it turns green and can give a tingle touching the shell too easily.
¤ ANY soft floor at the toilet itself will transfer weight onto the black tank itself which may already mean the tank top is cracked, worth checking.
¤ The fresh water fill port is weak spot - check for any cracks in the plastic funnel and gently replace the fill pipe and vent lines. It is also permanently open to atmosphere, dropping the translucent tank via sliding the massive plywood basement tank compartment floor forward will give you peace of mind after it has been inspected, cleaned and disinfected. The vent line attach nubs are brittle. Be gentle. Make sure it is drained and/or be prepared for 100 pounds of water weight, will pretzle the tank at 1/2 way open.
¤ Be gentle with the main door latch. Irreplaceable. If the chrome plate is not corroded & peeling already you have a jewel, oil or clearcoat preserve it!
¤ Block the hitch A-frame tubes just at the coupler, use stainless steel pot scrubbers and some spray foam to glue them in - major rodent entry point.
¤ A 1/16" dremel tool stainless steel wheel brush will prep seams and window frames for parbond or vulkem, takes a steady hand to keep from drifting and marring skin metal. If you don't get down to the clearcoat / bare metal the caulk will go away in one season.
¤ Do not trust the furnace until you make sure the fire box has not rusted out - anything not vintage is still suspicious, but even if it was updated sometime its still begging for a look-see.
¤ The bath drain trap hangs beneath the floor and came with a frisbee looking drain pan - not that it would do much damage seeping water onto the belly skins when in use its something to look at when/if you get the opportunity.
¤ Beware of too-hot bulbs in the dashboard, the wrong bulb will melt & scorch/bubble the plastic.
And thats just off the top of my 'ead... good camping!!
__________________
The days are short and the night is long and the stars go tumbling by.. . ~Airstream~
|
|
|
|
|
10-02-2012, 07:46 PM
|
#13
|
|
TIG welder, 30 years expe
1973 25' Tradewind
Wilson
, New York
Join Date: Sep 2006
Posts: 20
|
'73 TW, 25 foot issues!!
My 25' TW had rusted out back-up light buckets. I removed them, copied them with some strips of aluminum I cut out,, welded them up, with tabs to hold the lenses on, and they work good as new.
I never thought of taking any pictures to post.
I also had a 6" hole in the outer skin, just below the door for the 110 outlets toward the rear awning support. I made a patch of aluminum and welded it in, and blended it down smooth. It still has a bit of discoloration from the clear coat being heated, sanded and lightly polished. It is tough to blend it in perfectly, but it is WAY better than having that 6x2" hole! (It was wind damage) I did take pictures, but don't know how to post them here. I would like to." I have them in an e-mail, but can't seem to get them to post.
Anyone want to see them, shoot me an e-mail to sidcranston@yahoo.com and ask for them. Put A/S pics in the subject.
|
|
|
|
|
10-03-2012, 06:23 PM
|
#14
|
Rivet Master
1973 27' Overlander
Portsmouth
, Virginia
Join Date: Jun 2012
Posts: 776
|
First restoration on this puppy, I've taken the tail lights all apart, wirebrushed the lamp holders and am spraying them with Rustoleum bright cold galvanizing spray. Will see how well that does holding down the rust and providing a nice reflective surface for the light. Originally they were only galvanized anyway. Going to be using some thin closed cell weatherstripping as a gasket material and leaving a small gap at the bottom as a weep hole just in case. Pix to follow.
And on a different tack, now that I know this old beast does not have a gray water tank, what are my options to retrofit one. I have to think somebody has done this already. In the off chance we ever go dry camping, would make life so much simpler. 
Bob
|
|
|
|
|
10-13-2012, 07:16 PM
|
#15
|
Rivet Master
1973 27' Overlander
Portsmouth
, Virginia
Join Date: Jun 2012
Posts: 776
|
Been fixing the rear tail lights, wire brushed, sprayed with bright galvanizing paint and then fronts clearcoated. Playing with some closed cell weatherstripping for a gasket, will see how well it works and keeps out the water. Replaced all the rusting screws with stainless pan heads. Put the fiber optic lines back into the back of each tail light. Also rewired one of the overhead fixtures over to LED strip lights off a roll for about 5 bucks a light:
Repaired tail light assembly:

Upgraded fixture to LED (LED closest to camera, original near front):

First time hooked up to the truck, going out next weekend. First and only time before deconstruction starts:

Light retrofit documented in this thread: $5 Retrofit LED's for 6 light ceiling lights in '73 Overlander - Airstream Forums
|
|
|
|
|
|
Currently Active Users Viewing This Thread: 1 (0 members and 1 guests)
|
|
|
 Posting Rules
|
You may not post new threads
You may not post replies
You may not post attachments
You may not edit your posts
HTML code is Off
|
|
|
|

 Recent Discussions
 |
|
|
|
|
|
|
|
|
|
|
|
|
|
|
|
|
|
|
|
|
|


 Linear Mode

