 |
|
 06-06-2014, 10:02 PM
|
#61
|
|
Hope
1971 23' Safari
Anthem
, Arizona
Join Date: Apr 2014
Posts: 125
|
Quote:
Originally Posted by megan

I can't wait to see what you do with the bathroom. We have the same bathroom and it has been gutted. I can't seem to find where to look for a new shell.
|
Hello Megan,
A felllow Airstreamer sent me this link for a corner shower, which my wife and I are consider: Airstream Corner shower
__________________
"Hope" - '71 23' Safari Twin Land Yacht
Anthem, AZ
|

|

|


|
06-07-2014, 07:22 PM
|
#62
|
Rivet Master  
1987 32' Excella
Nepean
, Ontario
Join Date: Mar 2006
Posts: 1,414
|
Quote:
Originally Posted by Gnorts
Here's the device that fits on the little ball next to the main hitch ball.
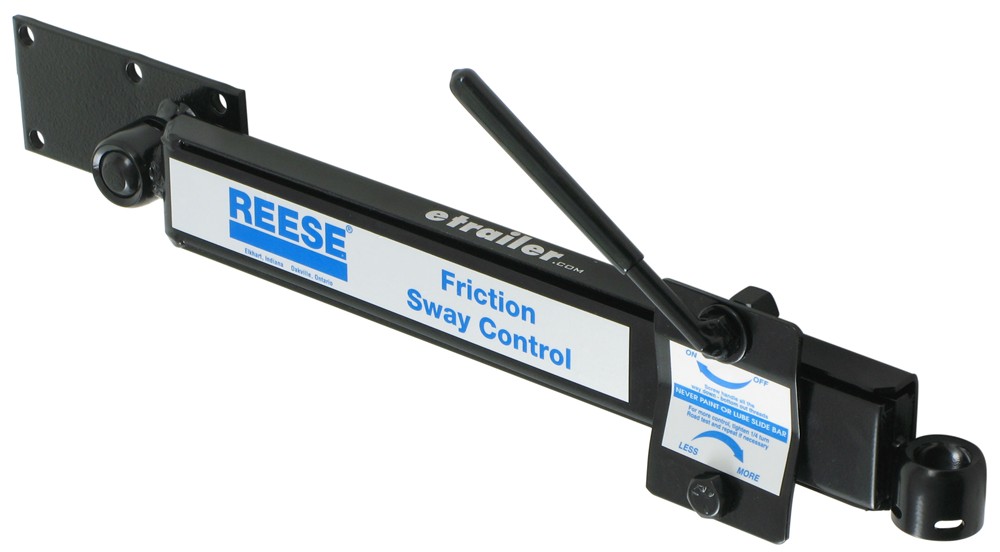
It's a simple sliding friction device that was pretty effective on our old 18 footer. If you're shopping for Reese hitches, their "strait-line" hitch includes another type of sway control:
 I now have one of these on the hitch that came with our 27. Still setting up the hitch - the dealer got it wrong, as they often do - so can't comment yet on how effective it is. The things that look like turnbuckles are the sway controllers. |
This hitch is also referred to as the dual cam type. I have it on my 32-ft Excella, and it was set up for my by JC.
When the TV-trailer is not in a straight line, the cams on the end of the equalizer bars ride up in their saddles - one going back the other going forward. This produces a force to bring the whole TV-trailer back to a straight line. It is an active form of sway control, unlike the friction type in the top photo.
Mine doesn't have the turnbuckles, so to do the final adjustment, the saddles across the frame have to be loosened and tapped slightly to get them into position whereby, in a straight line, the cams sit precisely in the saddles with no gap either to the front or the back. The process of setting up the hitch actually took almost an hour, as the tech at JC used a tape measure to first determine that the height between the road and the top of the fender wells (front and back) dropped the same distance when the trailer was hitched. The next process was to drive around the building and then drive in a totally straight line for a couple of hundred feet and then stop. The position of the cams was then adjusted - on the newer version as shown in the lower photo, this would be accomplished using the turnbuckles and a pocket knife to ensure that there is no gap.
From a practical point of view, I was driving through DFW in TX last December on my way to AZ just after they had a snowfall. The road had icy ruts whenever there was a bridge over a creek or roadway. The TV lurched sideways about 6 or 8 inches but the TV-trailer stayed in a perfectly straight line.
__________________
VE3JDZ
AIR 12148
1987 Excella 32-foot
1999 Dodge Ram 2500HD Diesel
WBCCI 8080
|
|
|
|
|
06-07-2014, 08:14 PM
|
#63
|
Rivet Master
1973 27' Overlander
Portsmouth
, Virginia
Join Date: Jun 2012
Posts: 776
|
Quote:
Originally Posted by Kei
Hello Megan,
A felllow Airstreamer sent me this link for a corner shower, which my wife and I are consider: Airstream Corner shower |
Thats not cheap, hopefully it would fit without a lot of work.
|
|
|
|
|
06-08-2014, 05:34 PM
|
#64
|
|
Hope
1971 23' Safari
Anthem
, Arizona
Join Date: Apr 2014
Posts: 125
|
Hello Gnorts,
Have you had an opportunity to look at the photos I posted with the glossy white panels and the teak and holly floor?
I'm hoping to be able to purchase these type of panels and doors and greatly appreciate it if you can point me to a distributor. Same thing for the teak and holly flooring. Any guidance will be most appreciative!
Keith
__________________
"Hope" - '71 23' Safari Twin Land Yacht
Anthem, AZ
|
|
|
|
|
06-08-2014, 06:10 PM
|
#65
|
|
Hope
1971 23' Safari
Anthem
, Arizona
Join Date: Apr 2014
Posts: 125
|
Quote:
Originally Posted by aquinob
Thats not cheap, hopefully it would fit without a lot of work.
|
Hello Bob, You're right. The shower unit is price is pricey, so I'm considering all my other options. I hope to come up with the shower decision soon, since the rest of Hope's floorplan will be determined by hour much of a footprint I use for the bathroom. I'm narrowing down the choices and hope to be able to show my wife my recommendations soon, so that we can make a final decision...
__________________
"Hope" - '71 23' Safari Twin Land Yacht
Anthem, AZ
|
|
|
|
|
06-08-2014, 09:23 PM
|
#66
|
|
Hope
1971 23' Safari
Anthem
, Arizona
Join Date: Apr 2014
Posts: 125
|
Hope's Log - Month 2 Day 8: 06/08/14
As much as I would have loved to work on Hope's brakes this weekend, and install my recently purchased Tekonsha P3 brake controller, the 100+ degree temperatures kept me working inside my garage and home office. I was able to help my friend install the new transom, bow compartment and dashboard on the Starcraft boat he is restoring and prepared another 10 vintage parts for shipping on Monday for my fellow Airstreamers, but after 8 hours in the heat, I was exhausted and spent the evening watching the Kings beat the Rangers in Game 2 of the Stanley Cup Finals (Tough weekend...)
I also took the time to take exact measurements of the inside of Hope in order to design her interior on my computer using Visio (See attached drawing).
I figure I can maximize the size of the new bathroom and the shower space by creating a custom aluminum unit and by eliminating the original curbside wardrobe closet (mine) while leaving the streetside wardrobe closet (hers) inside the bathroom and moving the new bathroom door forward by 12 inches. She will want to change her clothes in the bathroom rather than in the open part of the trailer, so this design will work out well.
My wife is also concerned about not having enough storage, so I will increase the size of the overhead and underbunk storage by more than 12 inches in width while still leaving enough room to walk down the middle aisle. (The gray areas in the drawing indicate all the locations for storage).
In measuring the interior, I learned a few interesting things. First, the interior of a 23' Safari Twin is only 18 feet 8 inches long by 7 feet 5 inches wide, so the extra 4' 4" must account for the length of the hitch and bumper! A bit of a dissappointment, but I should have known... 
The other interesting thing I learned is the original layout has the middle aisle off center by 4 - 5 inches (More on the stove/sink-side than the refrigerator-side), which I thought was the case when I first stepped into Hope, but didn't fully realize it until I started to measure for the new layout. Since I love symmetry, I look forward to installing the new layout perfectly centered with the twin bunks and storage cabinets.
The next step is to get my wife to approve the bathroom design, approve having me design and build the custom shower unit and then have her pick out the new toilet and sink, so I can keep moving forward.
Lastly, I ordered POR-15 Marine Clean from Amazon.com, which should arrive on Tuesday, so next weekend will be spent cleaning the interior on Saturday then going kayaking on Lake Pleasant on Sunday for Father's Day. My how time flies when having fun!
Have a great week everyone!
Keith
__________________
"Hope" - '71 23' Safari Twin Land Yacht
Anthem, AZ
|
|
|
|
|
06-09-2014, 12:25 AM
|
#67
|
1 Rivet Member 
1971 23' Safari
Anthem
, Arizona
Join Date: May 2014
Posts: 7
|
Kei... I would like to put a question out there regarding an oven. Does anyone ever use theirs and could that space be better suited for something else?
Sent from my SCH-I545 using Airstream Forums mobile app
|
|
|
|
|
06-09-2014, 09:16 AM
|
#68
|
|
Slowpoke
2012 27' Flying Cloud
Portland
, Oregon
Join Date: Dec 2013
Posts: 255
|
Quote:
Originally Posted by Kei
Hello Gnorts,
Have you had an opportunity to look at the photos I posted with the glossy white panels and the teak and holly floor?
I'm hoping to be able to purchase these type of panels and doors and greatly appreciate it if you can point me to a distributor. Same thing for the teak and holly flooring. Any guidance will be most appreciative!
Keith
|
I'm in the NW and have dealt with Edensaw in the past. You may find a supplier closer to you. Google "teak holly plywood."
Marine Plywood- Teak and Holly Plywood | Edensaw Woods Ltd
I don't know about gloss white panels, but there are probably many ways to accomplish that look with laminate or paint. Really smooth painted finish on plywood will require sanding sealer, probably multiple coats with sanding in between coats. Mucho labor. I'd go with laminate. A glossy finish will show every scuff.
You can google "white laminate plywood" and get all sorts of ideas. Also try "white laminate honeycomb." Honeycomb core panels would save a lot of weight as opposed to plywood for your bulkheads. You could also laminate your own panels if you have the skills, tools and shop space.
Teak trim is available in a lot of configurations from several suppliers. Seateak is one brand I'm familiar with. You can get it at West Marine.
Teak Accessories
Google "marine teak trim."
I love yacht interiors and prefer the "downeast" look which is quite simple and classic. I will offer a suggestion. Keep it simple! You are working with a very small space, and a lot of ideas will work in larger spaces but will look overdone and cheesy in a small space. Do a google images search for "down east yacht interiors" and concentrate on smaller boats, both power and sail. It's a classic look, and actually pretty easy to fabricate. Something like this:

Search google images for "Morris Yachts" and "Hinckley Yachts." They are two Maine builders who do beautiful classic interiors. The image above is a Morris sailboat.
__________________
Like the tortoise, travelin' slow with the house on our back
2012 FC27FB "Ted Zeppelin"
2010 Tundra Crewmax Platinum "Silver Rhino"
|
|
|
|
|
06-09-2014, 02:10 PM
|
#69
|
|
Hope
1971 23' Safari
Anthem
, Arizona
Join Date: Apr 2014
Posts: 125
|
Quote:
Originally Posted by Gnorts
I'm in the NW and have dealt with Edensaw in the past. You may find a supplier closer to you. Google "teak holly plywood." ....
Search google images for "Morris Yachts" and "Hinckley Yachts." They are two Maine builders who do beautiful classic interiors. The image above is a Morris sailboat.
|
WOW! Thank you Gnorts for all the great information! I'm convinced that the look and feel we are going for and will achieve is similar to that Morris Sailboat! I can't wait to start researching and building my Bill of Materials although I'm sure I will need to negotiate the budget with my wife, but I'm certain she will love this look and will complement her creative interior design (She's very talented with that stuff! Right honey?...  )
Thank you again!
Keith
__________________
"Hope" - '71 23' Safari Twin Land Yacht
Anthem, AZ
|
|
|
|
|
06-09-2014, 10:32 PM
|
#70
|
4 Rivet Member 
1951 21' Flying Cloud
Sacramento
, California
Join Date: Nov 2012
Posts: 263
|
Hope's Log - '71 23' Safari Twin Renovation Journal
Love that look! If you're looking for varnish you should check out Le Tonkinois. It's a French varnish that's tung oil based and all natural. Since there are no driers in it it's flexible, which means it won't get those small stress cracks from bumping down the road. I've used it on wooden boats, furniture and will be using it on our AS when the time comes, and best of all it's really goof-proof. I get mine from American Rope & Tar. Check out their photo gallery: http://www.tarsmell.com 
|
|
|
|
|
06-09-2014, 10:44 PM
|
#71
|
|
Hope
1971 23' Safari
Anthem
, Arizona
Join Date: Apr 2014
Posts: 125
|
Quote:
Originally Posted by calais66
Love that look! If you're looking for varnish you should check out Le Tonkinois. It's a French varnish that's tung oil based and all natural. Since there are no driers in it it's flexible, which means it won't get those small stress cracks from bumping down the road. I've used it on wooden boats, furniture and will be using it on our AS when the time comes, and best of all it's really goof-proof. I get mine from American Rope & Tar. Check out their photo gallery: http://www.tarsmell.com Attachment 213946 |
Thank you for the tip, Calais66! Will check it out.
__________________
"Hope" - '71 23' Safari Twin Land Yacht
Anthem, AZ
|
|
|
|
|
06-11-2014, 09:33 AM
|
#72
|
2 Rivet Member 
1971 31' Sovereign
Lake Minnetonka
, Minnesota
Join Date: May 2014
Posts: 42
|
Great thread, tagging along! I'm trying to troubleshoot my fridge, how did you bypass the thermostat?
|
|
|
|
|
06-12-2014, 12:22 AM
|
#73
|
|
Hope
1971 23' Safari
Anthem
, Arizona
Join Date: Apr 2014
Posts: 125
|
Bypassing thermostat
Quote:
Originally Posted by bakes
Great thread, tagging along! I'm trying to troubleshoot my fridge, how did you bypass the thermostat?
|
Thank you bakes! To determine why the refrigerator wasn't working after I plugged it in, I first looked at the wiring diagram on the back of the unit then removed the cover from the area that contains all the spade connectors.
Using my my volt meter, I physically traced the wires to see where I have voltage. When I realized the problem was related to the thermostat, I simply took one spade connector for the heater element and connected it directly to the hot wire, thereby bypassing the thermostat (and the switch). The heater element immediately started to get hot, so I let it run overnight and had an icy freezer and cold refrigerator in the morning.
Keith
__________________
"Hope" - '71 23' Safari Twin Land Yacht
Anthem, AZ
|
|
|
|
|
06-12-2014, 12:55 AM
|
#74
|
|
Hope
1971 23' Safari
Anthem
, Arizona
Join Date: Apr 2014
Posts: 125
|
__________________
"Hope" - '71 23' Safari Twin Land Yacht
Anthem, AZ
|
|
|
|
|
06-17-2014, 01:17 PM
|
#75
|
|
Hope
1971 23' Safari
Anthem
, Arizona
Join Date: Apr 2014
Posts: 125
|
Hope's Log - Month 2 Day 17: 06/17/14
Although I haven't made any physical progress on Hope since the last update, my wife and I have made great progress agreeing to the design and the material that we will use to renovate the interior. (Many hours of discussions and negotiations, which felt like a debate at the United Nations over nuclear disarmament!  ).
We agreed to the following: - Wall and Trim Material
- Original interior's vinyl walls will be painted glossy or satin white.
- Brushed aluminum for the curbside refrigerator wall as you enter.
- Brushed aluminum for the twin bunks head and foot walls.
- Brushed or shiny aluminum wall panels around the kitchen's stove & sink area.
- Shiny aluminum for the underside of the top cabinets above the twin bunks, so when you look up you see your reflection with two or three recessed LED lights.
- Teak trim wherever trim is required.
- Kitchen
- I wanted to replace the original stove/oven and double-bowl sink with a new cooktop and a deep, round, single-bowl sink.
- My wife convinced me to keep the original stainless steel Magic Chef stove/oven and double-sink, since they are in great condition.
- What really convinced me is her promise to bake me cakes and meatloaf when we travel, so you don't have to tell me twice!
- Although the kitchen area will now maintain a vintage-like appearance, we will replace the original yellow formica counters with teak and the tambour cabinetry with white wainscot cabinets to get that downeaster yacht look we are going for...
- Bathroom
- After many ideas that I engineered in my head and tried to explain to my wife, including using a large, single-bowl kitchen sink that I'd fabricate into a shower enclosure that fit into the rounded corner, a friend suggested going with a larger rectangular tub.
- My original concern of the tub protruding too far out from the corner and blocking the window was addressed by going with a 24" x 32" x 16" fiberglass tub and a novel shower curtain rail design that can be pushed aside when not in use to make the window fully visible from the inside and outside.
- I drew the attached pencil sketch as a visual aid to explain the idea to my wife.
- She approved the design and the tub is scheduled to arrive this Friday, so I should be able to place it in Hope and take pictures to further refine the design.
- My wife likes the idea of the rectangular tub being away from the curved walls and wants a teak trim/seat to fill in the gap around the corners.
- She also wants a bowl-type sink that sits above the bathroom cabinet and is visible out the back window, so that design is still a work-in-progress...
- New toilet will be selected by my wife, so she can never say she doesn't like what I picked (Smart, eh?).
- Other activities include:
- Boxed up and sold over a dozen vintage parts to my fellow Airstreamers, so that they can fullfill their dream projects. The money from these sales will help defer the cost of the new parts, so it's a win-win situation!
- My children gave me two great books for Father's Day, "Restoring a Dream: My Journey Restoring a Vintage Airstream" by Tim Shephard and "RV Vacations for Dummies!" (What are they trying to tell me?
 ) )
- Performed the "jump on the bumper test" to confirm the axles are indeed shot and added to the project timeline the task to purchase new axles and brakes before I get too far along with the interior (I know the brakes and exterior lights are suppose to be a priority, but it's not as fun as daydreaming and designing the interior in my head...).
I look forward to putting in a full 16-hour day on Saturday cleaning the interior walls with Marine Clean and laying out the floor plan with blue tape, so that the real fun of assembly can begin and I promise to take lots of pictures.
Have a great week everyone!
Kei
__________________
"Hope" - '71 23' Safari Twin Land Yacht
Anthem, AZ
|
|
|
|
|
06-17-2014, 02:53 PM
|
#76
|
2 Rivet Member
1971 25' Tradewind
Richardson
, TX
Join Date: Mar 2014
Posts: 42
|
Great thread! I've got a '71 TW in am renovating. I am most interested in your posts on the bathroom remodel. Where did you pick up the 24"x32"x16" tub. I think I might be able to convert my wet bath into a standard bath with a tub that size.
Thanks again and I look forward to following your progress.
|
|
|
|
|
06-17-2014, 04:17 PM
|
#77
|
2 Rivet Member
1971 25' Tradewind
Richardson
, TX
Join Date: Mar 2014
Posts: 42
|
Vent stack
What are you going to do with the vent stack for the sink and old wet bath shower drain?
|
|
|
|
|
06-17-2014, 06:04 PM
|
#78
|
|
Hope
1971 23' Safari
Anthem
, Arizona
Join Date: Apr 2014
Posts: 125
|
Bathtub brainstorm ideas
Quote:
Originally Posted by jbwillingham
Great thread! I've got a '71 TW in am renovating. I am most interested in your posts on the bathroom remodel. Where did you pick up the 24"x32"x16" tub. I think I might be able to convert my wet bath into a standard bath with a tub that size.
Thanks again and I look forward to following your progress.
|
I purchased it through Amazon, because I have Free Shipping through my Amazon Prime account and saved ~$48.00 in shipping costs.
My wife and I looked at hundreds of tubs, including mini claw foot, japanese soaking tubs, stainless steel cheese vats and finally settled on the small rv tub to avoid having me fabricate a stainless steel/aluminum shower enclosure from scratch.
The two rv tubs we narrowed the search down to were the Step/Seat Tub
Lyons 32" x 24" White Right Center Drain Step/Seat Tub - Step/Seat Tubs - Bath Tubs - Showers & Tubs - Plumbing
and the Full Bathtub
Lyons 32" x 24" White Right Center Drain Full Bathtub - Full Tubs - Bath Tubs - Showers & Tubs - Plumbing
The step/seat tub looked like it would fit better by having the seat sit above the curbside hatch that accesses the battery and inverter, however, when I realized I had to move the tub ~12" away from the curbside wall to fit a 32" rectangular tub, the full tub became a better choice, since it will not be next to the hatch's opening (I will upload a revised Visio drawing of the floor layout tonight).
As for the vent pipe and drain opening, I plan to re-plumb the drain to the new location and with the estimated 12" gap between the side of the tub and the curbside wall, I will either use an exposed aluminum or stainless steel vertical pipe to run up to the ceiling's vent opening (I may even mount the shower head and handheld shower from it too) or do what Aerowood did in his AS by burying the vent pipe in the curbside wall if I choose to pop off the interior wall panel (I really like my exposed vertical pipe idea!).
On Saturday, I should be able to work out all the logistics and measurements to determine if what I see in my head is close to reality...
__________________
"Hope" - '71 23' Safari Twin Land Yacht
Anthem, AZ
|
|
|
|
|
06-22-2014, 11:54 AM
|
#79
|
|
Hope
1971 23' Safari
Anthem
, Arizona
Join Date: Apr 2014
Posts: 125
|
Hope's Log - Month 2 Day 22: 06/22/14 - Bathroom Design Day!
On Friday, the new 32" x 24" tub arrived and after unboxing it my wife and I realized we had made a good choice, because after searching for a tub/shower solution for several weeks, this tub appears to be the right size for our AS.
On Saturday, I was like a kid on Christmas morning and rushed outside with my new tub to see how it looked in the back curb-side corner. My first reaction was, "Oh crap!" The rectanglar tub doesn't fit into the round corner as well as it did on the Visio drawing I had created, but it turns out the curve I drew on the computer is not the same dimensions as the AS corner, so I was faced with a new problem and a reality check.
I spent the next two hours taking measurements, drawing chalk lines and visualizing what the walls would look like as they rise vertically to meet the AS curved ceiling walls. The issue is with being 6' tall and being too close to the ceiling as it curves inward at the 5' mark while trying to shower.
I was still struggling with the layout when my wife walked into the AS. Before I explain what happened next, I have to give a little background. My nickname for my wife is the "Queen of Kitty Corner", because she insists on putting our bed and the armoire kitty-corner in our master bedroom and tries to do the same with the couch and chairs in our living room! She tried to get me to consider doing the same for the tub when I was drawing it on the computer, but I simply said it wouldn't fit...
...So...after explaining my dilemma, she walked over to the tub and turned it kitty-corner. Viola! It worked beautifully!
I failed to realize that, unlike the house, where using kitty-corner in a square room seems like a waste of space (large empty triangle behind the headboard and the armoire) it works much better with a curved corner!After taking a few more measurements and working out the details of the bathroom sink/cabinet, I thanked my wife for solving the bathroom design problem. We are now well on our way to getting the bathroom built!
I will update the Visio drawing and post it in another blog later this week.
In the meantime, while visualizing the vertical walls and how they will meet the ceiling, I realize the original seams between the vinyl walls/ceiling and the bathroom's fiberglass end cap were not going to work.
So, I took my Dewalt grinder and cut a straight line from one wall across the ceiling to the other wall at the point where the ceiling rails that hold the center ceiling panel ends.
This will make a very clean transition just inside the bathroom. I will post additional pictures as I build the bathroom walls and my "porthole bathroom door", which will be my "Signature Piece" for this project...
My wife and I spent Saturday evening cleaning the entire interior with Marine Clean degreaser then washed it all down with clean water. Now we are sitting on Sunday morning with our laptops trying to find a blog that can help us understand the best way to prime/paint the interior vinyl walls and the front and back endcaps. We are very excited, but also nervous about using the wrong products on the different materials. Any advice is greatly appreciated.
Happy Sunday Everyone! Good luck Team USA against Portugal Today!
Kei
__________________
"Hope" - '71 23' Safari Twin Land Yacht
Anthem, AZ
|
|
|
|
|
06-22-2014, 02:33 PM
|
#80
|
Rivet Master
1973 27' Overlander
Portsmouth
, Virginia
Join Date: Jun 2012
Posts: 776
|
What I have found is that you can start out with a plan in your head, but as soon as you start actually looking at the interior space with all its curved surfaces, you have to transition to a design as you go mode. Be mindful that more mistakes crop up when you go that route.
Things that look good on paper, may not work so well in the flesh. When I got my shower pan for the bath, I physically sat it in the space like you did and moved it to I got to a point where I was happy with the ergonomics. I stood in it and swung my arms around to see if there would be problems with a shower spray in my hand. Also, I wanted to keep the battery box where it was to help keep the weight down on the tongue. That necessitated moving the shower pan back from the wall, but in my case, it is still even with the door opening. I created a seat on two sides that matches the curved contour and gives me and the wife a spot to sit if we need to as well as a spot to store shampoo and soap.
The other issue I dealt with was that lovely big window. On newer trailers, you will notice that they shrunk that window and offset it to one side, so that the shower area isn't in front of a window and the water isn't near the window either. Even catty-corner your tub will have some exposure in front of the window. Are you planning on some sort of shower curtain to provide privacy and to also keep the window from getting wet from the overspray? Looking at the one picture, it doesn't seem obvious to me how much space you will have available to put a sink cabinet in there as well, but maybe you've already got an idea about that.
|
|
|
|
|
|
|
Currently Active Users Viewing This Thread: 1 (0 members and 1 guests)
|
|
|
 Posting Rules
|
You may not post new threads
You may not post replies
You may not post attachments
You may not edit your posts
HTML code is Off
|
|
|
|

 Recent Discussions
 |
|
|
|
|
|
|
|
|
|
|
|
|
|
|
|
|
|
|
|
|
|


 Linear Mode

