 |
|
 10-24-2016, 07:57 PM
|
#41
|
3 Rivet Member 
1974 25' Tradewind
Calgary
, Alberta
Join Date: Jul 2015
Posts: 109
|
Quote:
Originally Posted by Mx468

I also noticed a loose wire, see pic, does anyone know where it attaches to?
|
Just noticed this thread. If that black/white/green cable is the 110V circuit that goes to the shore power (30A) plug: The ground (green) is disconnected and if you were to plug the trailer into shore power, you could inadvertently make the entire trailer live through some stray connection, presenting a lethal shock hazard to anyone touching any part of the trailer shell.
So... figure out where the other end of that green wire connects before you do anything. If it is part of the shore power ground circuit, then attach it to the trailer frame. It will also connect to your 120V breaker box at the appropriate bus bar.
|

|

|


|
10-25-2016, 09:21 AM
|
#42
|
Rivet Master 
1972 23' Safari
Middletown
, Rhode Island
Join Date: Sep 2016
Posts: 546
|
Quote:
Originally Posted by Alumineer
Just noticed this thread. If that black/white/green cable is the 110V circuit that goes to the shore power (30A) plug: The ground (green) is disconnected and if you were to plug the trailer into shore power, you could inadvertently make the entire trailer live through some stray connection, presenting a lethal shock hazard to anyone touching any part of the trailer shell.
So... figure out where the other end of that green wire connects before you do anything. If it is part of the shore power ground circuit, then attach it to the trailer frame. It will also connect to your 120V breaker box at the appropriate bus bar.
|
Hi Alumineer, that wire actually goes from the 12v battery in back to the front tow hitch and powers the brake away cable and electric jack.
|
|
|
|
|
10-25-2016, 09:32 AM
|
#43
|
4 Rivet Member 
1972 23' Safari
Camas
, Washington
Join Date: Oct 2012
Posts: 258
|
Quote:
Originally Posted by Alumineer
Just noticed this thread. If that black/white/green cable is the 110V circuit that goes to the shore power (30A) plug: The ground (green) is disconnected and if you were to plug the trailer into shore power, you could inadvertently make the entire trailer live through some stray connection, presenting a lethal shock hazard to anyone touching any part of the trailer shell.
So... figure out where the other end of that green wire connects before you do anything. If it is part of the shore power ground circuit, then attach it to the trailer frame. It will also connect to your 120V breaker box at the appropriate bus bar.
|
these pictures were taken when we were deconstructing the trailer. I took the picture for future reference. I believe the green wire is connected in this picture. It does appear like its not but it was. Thanks for pointing this out in case someone thinks otherwise. After this was taken I had no shore power during the reconstruction, I was sure my grounds were done properly before I even plugged in and tested everything to avoid electrocution. My Father was an electrical engineer and taught me electricity can KILL! Be careful and hire a professional if you are unsure.
|
|
|
|
|
10-27-2016, 07:45 PM
|
#44
|
Rivet Master
1972 23' Safari
Middletown
, Rhode Island
Join Date: Sep 2016
Posts: 546
|
Axle check...
Ok today I jacked up my trailer and the wheels dropped down a few inches, so I'm guessing my axles are still ok. When I towed it back on my 45 minute drive a month ago it seemed to handle the highway bumps pretty good. Can anyone tell if they are visually ok by the pics I've attached? First pic is the airstream raised on my jack and the second pic the airstream is on the ground.
|
|
|
|
|
10-28-2016, 07:28 PM
|
#45
|
Rivet Master 
1986 34' Limited
1975 27' Overlander
1969 21' Globetrotter
Conifer
, Colorado
Join Date: Jun 2009
Posts: 8,319
|
Hi Mx468. You need to take the wheels off to best check the axles. Standard Airstream dura torque axles have a "starting angle" of 22 degrees pointing downward. So your "swing arms" ought to point downward about that much.
The fact you are getting some relaxation movement from jacking up the trailer until the wheels can rotate is a positive sign.
I jacked my trailer up and took off the wheels. My "starting angle" is near horizontal. This means my axles have hardened rubber rods and need replaced. I don't know when I will do it. $$$$
David
|
|
|
|
|
12-22-2016, 04:00 PM
|
#46
|
Rivet Master
1972 23' Safari
Middletown
, Rhode Island
Join Date: Sep 2016
Posts: 546
|
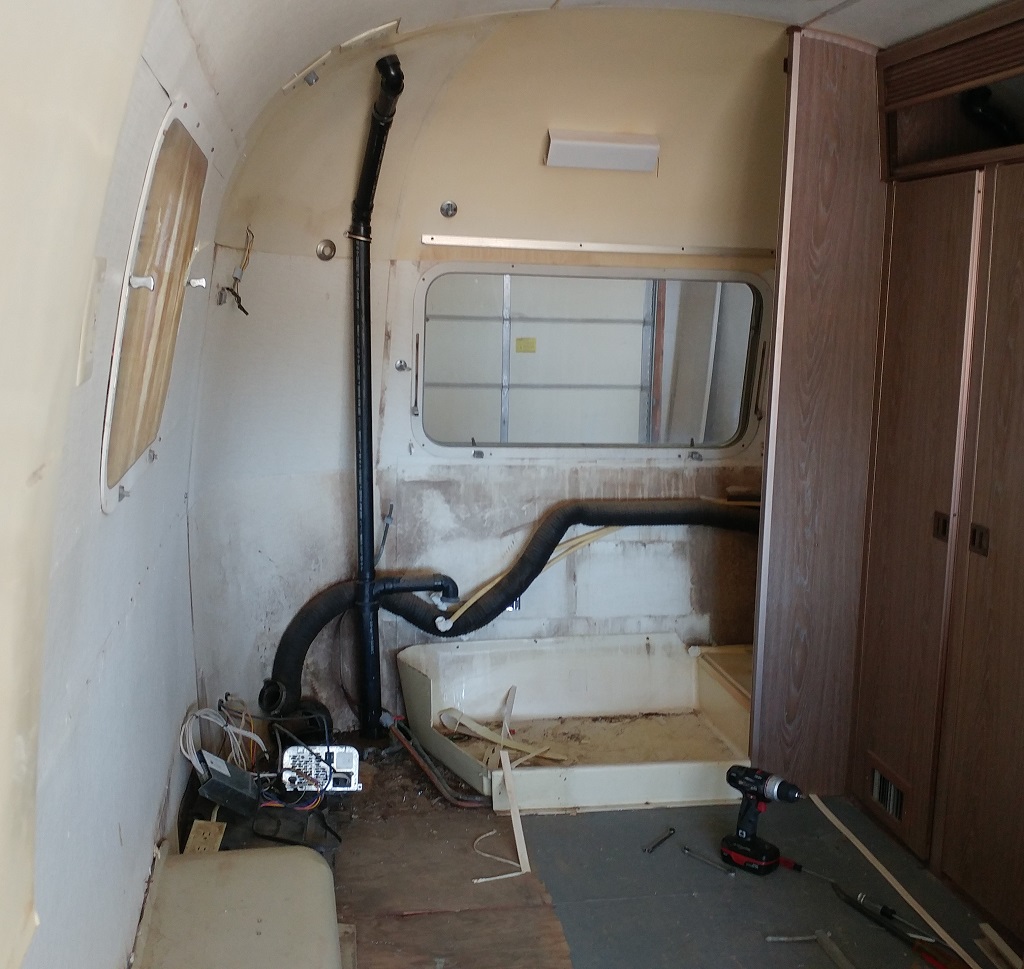
I'm back to renovating again...
So I finally started taking my bathroom apart to get access to the rear floor and to have my welder weld in some new supports on my trailer frame. I got the sink and toilet out but had a question about removing the rest of the bathroom. Do I also need to remove the beds and bedroom closets to get the shower tub and the rest of the bathroom out? Any tips, suggestions will be much appreciated. Hope to gut her out by next week.
|
|
|
|
|
12-22-2016, 04:23 PM
|
#47
|
2 Rivet Member 
1972 23' Safari
2024 22' Bambi
Sierra Vista
, Arizona
Join Date: Jan 2011
Posts: 92
|
On the curb side, you might have to remove the overhead cabinet, or maybe not, but it won't be supported well if you remove the bathroom wall that supports the rear of the overhead. Removing that wall makes it a lot easier to get out the rest of the bathroom closet and shower tub and sliding door and stuff. I don't think you'll have to remove the bed, although I removed mine, as it also needed repair (I ended up modifying it quite a bit).
|
|
|
|
|
12-22-2016, 04:25 PM
|
#48
|
2 Rivet Member
1972 23' Safari
2024 22' Bambi
Sierra Vista
, Arizona
Join Date: Jan 2011
Posts: 92
|
Also the toilet flange might unscrew from the black tank, which will help you get things apart. It's a 3" pipe thread or something.
|
|
|
|
|
12-23-2016, 05:41 AM
|
#49
|
Rivet Master
1977 23' Safari
Niagara on the Lake
, Ontario
Join Date: Aug 2011
Posts: 984
|
My new 1972 Safari
I removed the bathroom walls when I did mine. That makes it much easier to work on the bathroom.
I left the beds and overhead cabinets in place but temporarily supported with 2x4s.
The worst part for me was taking the shower drain off, I had to cut it out from underneath.
__________________
1977 Safari Land Yacht
2005 Toyota Tundra SR5
2022 Toyota 4Runner SR5
|
|
|
|
|
12-23-2016, 08:33 AM
|
#50
|
Rivet Master
1972 23' Safari
Middletown
, Rhode Island
Join Date: Sep 2016
Posts: 546
|
Last question before I continue... should I drill out the rivets from the channels, pull closet walls out from the channels or drill out the rivets that connect the whole closet to the airstream with the channels still connected to the closet wall?
|
|
|
|
|
12-23-2016, 09:05 AM
|
#51
|
2 Rivet Member
1972 23' Safari
2024 22' Bambi
Sierra Vista
, Arizona
Join Date: Jan 2011
Posts: 92
|
Yes. Kind of depends...if the rivets holding the channel to the wall are all in good condition, then you could leave the channel where it is. If not then you probably want to re rivet it, so might as well remove it.
|
|
|
|
|
01-11-2017, 05:18 PM
|
#52
|
Rivet Master
1972 23' Safari
Middletown
, Rhode Island
Join Date: Sep 2016
Posts: 546
|
Anyone know where to get a new bath fan unit?
Anyone know where to buy one of these bathroom fans or something comparable? Do I need to reconnect this fan at all? I'm planning on getting a compost toilet and will be hooking it up to the old black tank vent pipe for ventilation. Also will be using power to run the fan on the composting toilet from the switch next to the original toilet which turned on the original exhaust fan.
|
|
|
|
|
01-11-2017, 05:41 PM
|
#53
|
Rivet Master
1977 23' Safari
Niagara on the Lake
, Ontario
Join Date: Aug 2011
Posts: 984
|
I think the exhaust fan is most important for using the shower.
My '77 Safari doesn't have a bathroom fan, but I rarely use the shower anyway.
__________________
1977 Safari Land Yacht
2005 Toyota Tundra SR5
2022 Toyota 4Runner SR5
|
|
|
|
|
01-11-2017, 06:57 PM
|
#54
|
Rivet Master
1972 23' Safari
Middletown
, Rhode Island
Join Date: Sep 2016
Posts: 546
|
I just assumed it was for the toilet smell because it's located right next to it pretty low. What about just cracking open the rear window for shower? 
|
|
|
|
|
01-12-2017, 02:29 PM
|
#55
|
2 Rivet Member
1972 23' Safari
2024 22' Bambi
Sierra Vista
, Arizona
Join Date: Jan 2011
Posts: 92
|
I removed that fan, and am adding a roof vent fan. Might not be the way you want to go...
Opening the window would also work.
|
|
|
|
|
01-12-2017, 02:40 PM
|
#56
|
Rivet Master
1955 22' Safari
Laredo
, Texas
Join Date: Nov 2013
Posts: 1,342
|
Options
My bathroom has no fan. We just crack open the bathroom window. I did replace the motor in the galley exhaust fan with a modern equivalent purchased on Ebay. Just try to match dimensions, rpm, etc if there is a nameplate on the motor.
|
|
|
|
|
01-15-2017, 11:31 AM
|
#57
|
Rivet Master
1972 23' Safari
Middletown
, Rhode Island
Join Date: Sep 2016
Posts: 546
|
Quote:
Originally Posted by BambiTex
My bathroom has no fan. We just crack open the bathroom window. I did replace the motor in the galley exhaust fan with a modern equivalent purchased on Ebay. Just try to match dimensions, rpm, etc if there is a nameplate on the motor.
|
You wouldn't happen to have a link or model number of the exhaust fan that you bought?
|
|
|
|
|
01-17-2017, 03:51 PM
|
#58
|
Rivet Master
1972 23' Safari
Middletown
, Rhode Island
Join Date: Sep 2016
Posts: 546
|
New Updates
So I finally removed the rotten piece of flooring in the rear bath about 2.5 feet and also managed to regrease all my wheel bearings, por-15 my brake hubs and mounted my new rims and tires. Next step is to weld my rear frame and por-15 the frame. I do have a few questions though, how do you remove the battery compartment, just drill out the rivets on the outside? I have all the screws removed on the inside. 2. When replacing the battery compartment which rivets do I use and do I need a special rivet gun or will my regular rivet gun suffice, 3. how does one get the back floor piece in, do I just slide it in from the rear, push up and then slide the wood into the rear channel? What bolts do people recommend? Elephant bolts from VTS or just regular carriage bolts from hardware? And should I use stainless ones or galvanized. Nylon washers? Thanks. pic below only shows 1 new rim & tire on the AS, forgot to take a pic when they were all on. 
|
|
|
|
|
01-17-2017, 05:39 PM
|
#59
|
Rivet Master
1972 23' Safari
Middletown
, Rhode Island
Join Date: Sep 2016
Posts: 546
|
I figured out the battery box, I will be drilling rivets out then using olympic rivets with my regular rivet gun. Now about answers for the other questions...
|
|
|
|
|
01-17-2017, 05:51 PM
|
#60
|
Rivet Master
1977 23' Safari
Niagara on the Lake
, Ontario
Join Date: Aug 2011
Posts: 984
|
In my Safari the c channel sits on top of the plywood so I just slid it in from the back/outside.
I secured the shell to the frame with two 5/16 grade 5 bolts through the c channel and frame with "washers" I made out of 1/8" plate.
I made a new rear hold down plate and attached that with about 6, 1/4" bolts and fender washers through the c channel plywood and rear crossmember.
Then I sprayed all the steel with rustcheck to prevent corrosion, its kind of like fluid film.
Sent from my iPhone using Tapatalk
__________________
1977 Safari Land Yacht
2005 Toyota Tundra SR5
2022 Toyota 4Runner SR5
|
|
|
|
|
|
|
Currently Active Users Viewing This Thread: 1 (0 members and 1 guests)
|
|
|
 Posting Rules
|
You may not post new threads
You may not post replies
You may not post attachments
You may not edit your posts
HTML code is Off
|
|
|
|

 Recent Discussions
 |
|
|
|
|
|
|
|
|
|
|
|
|
|
|
|
|
|
|
|
|
|


 Linear Mode

