 |
|
 02-26-2013, 06:48 AM
|
#1
|
Rivet Master 
1995 30' Excella
Bowie
, Maryland
Join Date: Apr 2005
Posts: 2,345
|
Removing ceiling vinyl from the '90s-era trailers
Our trailer has that lovely vinyl covering on the ceiling. We started a project over the weekend to remove it. Fun times! I'm starting on the most annoying panel, namely, the one closest to the front of the camper, over the door and living room area. Hopefully this means the rest of them (with the possible exception of the large one over the bed in the back) will be easier to finish.  I plan to get some pictures, although I have to admit I was more interested in finishing than stopping to get pictures, which is rare for me - I'm usually the one with the camera at every step.
I wanted to start this thread as sort of a catch-all discussion of the project, where we can share ideas and experience, because I know others have done the same thing, but I don't think the info is compiled in one spot.
Here's what I did: 1. Remove the smoke detector, light, valances, and head-banging door thingie. All of these are held in with phillips head screws.
2. Tape up some plastic - 10' x 20' works extremely well to cover both the width of the trailer, taped above the curtains and draped to the floor, and the length - the couch to about the kitchen area for ours.
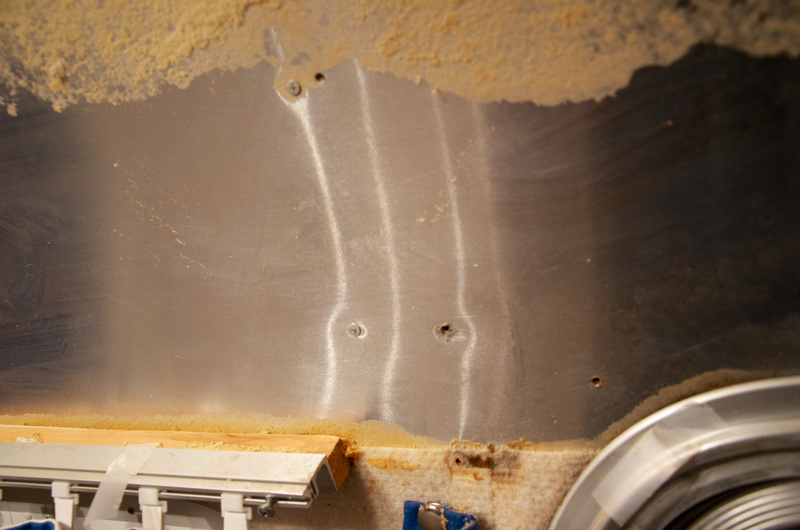
3. Remove the vinyl. Rest assured this is the easy part. I carefully cut along the metal strip that adjoins it to the plastic interior endcap piece, and along the overhead cabinet above where the TV would go. I think everywhere else, I was able to pull it out. I did cut it into a couple pieces just to make it easier to handle while removing. I tried not to touch the aluminum with the knife blade.
4. Now the fun part - cleaning up the old foam. In our case, the issue wasn't that the glue failed (for the most part - in fact, you'll be thrilled when you discover a section where this is in fact the problem!), but that the vinyl separated from its foam backing. So of course there's a lot of foam to remove, then glue residue.
5. We plan to polish the aluminum, but we figure that's something that can be done at leisure. And, it looks very, very good even without polishing.
The method I finally settled on was using a plastic putty knife to scrape as much of the foam off as I could, then using dish sponge (like a Scotch Brite) to "sand" it down further. Then I've been using Goo Gone to soak and clean up, rubbing it with paper towels. My experience has been that the Scotch Brite rough side scratches the aluminum, and the sponge side doesn't do anything, but I discovered paper towels soaked in Goo Gone work, eventually. It's not easy.
In perhaps 8 hours or so of work, I've managed to clean to bare aluminum around the light and the smoke detector, as well as the entire streetside panel above the window, and several inches up the curbside panel above the window and door.
My main initial goal was to clean enough around the head-banger, valances, light, and smoke detector that they could be re-mounted without having to remove them again later. This goal was because (1) I have this thing about putting screws into aluminum repeatedly...too easy to strip them out, and (2) I wanted the camper to be usable, if not perfect, for camping. I accomplished that within a couple hours of work. The plan is to complete one vinyl panel at a time, shine it up, then move on to the next one, rather than trying to do the entire camper at once.
What I've found so far: It looks BEAUTIFUL with just the aluminum. We already love it, and when this panel is done, I'm going to treat myself to installing the colored LEDs I bought for it a while back. I need to get some pictures - it'll provide all of the inspiration you need.
Things I've learned: 1. It's easy to scratch aluminum. I knew this already but it's still worth noting.
2. You're not going to get a perfect piece of aluminum. It still looks great! But you'll probably find some imperfections. For example:
2a. Airstream left several 'extra' holes in the aluminum - i.e., drilled it in the wrong spots. I can't complain, though; I put a few extra holes in myself with our first attempt to "fix" the headliner by putting more screws in. Someone suggested I glue some buck rivets in the holes, which I plan to do.
2b. Airstream also put some magic marker markings on the aluminum, but the one I tried to remove was coming off with the Goo Gone.
2c. I also found a couple scratches that the factory must have made. Again, not complaining, just want people to understand what they're getting here!
2d. It's not a continuous sheet of aluminum inside - it looks like it might be sheets lengthwise, but there's actually three separate aluminum panels we've uncovered so far. It's not an unbroken stretch of aluminum down the walls.
I'm not trying to deter you from doing this project, or pick on Airstream; my point here is just to make sure you understand what you get out of this before you start, so you have reasonable expectations. I'll get some pictures of what kinds of things I mean.
3. The "horse barn smell" we've had and others with the same era camper have noted seems to be reduced already, and the vinyl is still in the camper (it's in a trash bag on the floor). Or this may just be wishful thinking, but my wife and I both thought it independently - I was thinking it, then she said it without me asking her. It looks like it may have gotten a little wet at some point, which may or may not have contributed to the odor. Yes, we'll be watching the holes mentioned above for signs of water coming in!
4. Wear old shoes. The foam likes to clump in your shoes, then you drag it everywhere. I finally settled on wearing one pair of shoes into the camper, then changing to work, then switching shoes again while leaving the camper.
5. The plastic strips between each of the vinyl panels is pop-riveted on (you have to "peel back" one side to see the rivets). I haven't removed one yet but it looks pretty normal - drill out the rivet. Note, more holes.
Things I'm wondering and would like feedback on: 1. A better chemical stripper that isn't super nasty?
2. Any better methods anyone can think of? Better materials than a paper towel? I want to try some of my shop towels (the blue ones) to see how they work.
3. Any suggestions for removing the glue that, for example, is between the cabinet and the ceiling? I got as far in as I could with the paper towel, but I might have to admit defeat on that one. (On the other hand, I can work on that issue at any time in the future.) I considered a toothbrush before deciding it's too big to fit in the gap. Removing the cabinets is theoretically an option, but I'm afraid that would cause more problems than it solves.
4. We plan to remove the vinyl inside the cabinets too. How difficult do you think this will be? Extremely? I suspect the issue will just be getting your arm in to work on it. On the other hand, they're all small, so it shouldn't take too long to do one of them. Any thoughts on this? Thanks.
__________________
1995 Airstream Classic 30' Excella 1000
2014 Ram 2500 Crew Cab with Cummins 6.7L Diesel
Sold but not forgotten: 1991 Airstream B190
Sold: 2006 F-250 6.0L Powerstroke Supercab
|

|

|


|
02-26-2013, 10:06 AM
|
#2
|
3 Rivet Member 
Austin
, Texas
Join Date: Apr 2010
Posts: 105
|
Sounds like a great project, and one I would like to tackle in the future. Can't wait to see your pictures!
|
|
|
|
|
02-26-2013, 05:36 PM
|
#3
|
Rivet Master
1995 30' Excella
Bowie
, Maryland
Join Date: Apr 2005
Posts: 2,345
|
Some pictures!
Of course, this is what it looks like to start with...
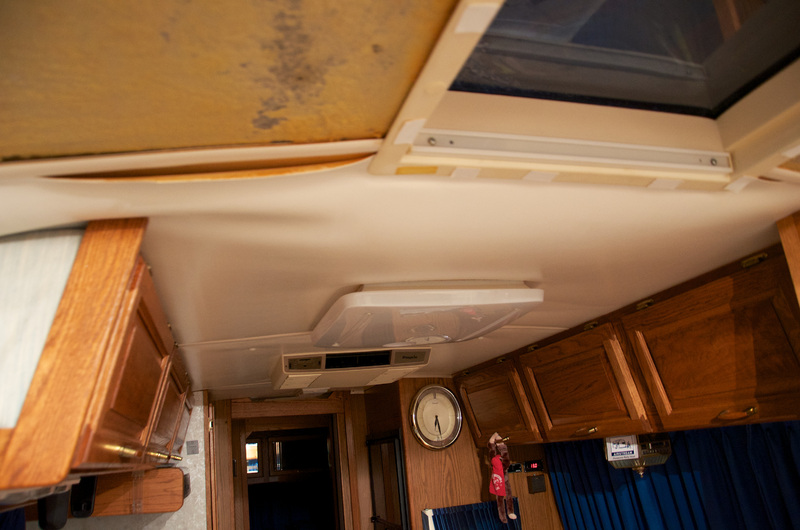
Here is what I've done around the light, smoke detector, and antenna crank. (The wire is for our Sirius tuner.)

Closeup of the result so far. The lower holes are for the valance and head bang protector. I've already "sanded" all of the foam as described above.
There are two more pictures here for your enjoyment.
__________________
1995 Airstream Classic 30' Excella 1000
2014 Ram 2500 Crew Cab with Cummins 6.7L Diesel
Sold but not forgotten: 1991 Airstream B190
Sold: 2006 F-250 6.0L Powerstroke Supercab
|
|
|
|
|
02-26-2013, 05:50 PM
|
#4
|
3 Rivet Member
Austin
, Texas
Join Date: Apr 2010
Posts: 105
|
Looking good! Are you planning on removing the yellow plastic window frames? I am curious to know what is under there. I hope it is continuous aluminum skin.
|
|
|
|
|
02-27-2013, 08:14 AM
|
#5
|
Rivet Master
1995 30' Excella
Bowie
, Maryland
Join Date: Apr 2005
Posts: 2,345
|
Quote:
Originally Posted by yve79

Looking good! Are you planning on removing the yellow plastic window frames? I am curious to know what is under there. I hope it is continuous aluminum skin.
|
Do you mean on the skylight? If so, I'm pretty sure that's all one piece, but I'm really not sure. I probably should look at it more closely - if nothing else, the one screw holding the shade on our skylight is pulling out, and it'd be nice to be able to clean under the edge a bit better.
If you do mean the windows, I'm not sure what plastic frames you mean. I'm pretty sure ours are aluminum, but I could be wrong...I'd have to look again.
Also, I forgot to mention: If you click on the link for more pictures, in the first and last picture you can see the seam between the two pieces of aluminum interior skin. (It looks like the skin sheets go fore and aft, rather than across.) I took a picture of the other side where you can see it more clearly, but it didn't come out well and I deleted it. I'll get a better one next time I work on it.
__________________
1995 Airstream Classic 30' Excella 1000
2014 Ram 2500 Crew Cab with Cummins 6.7L Diesel
Sold but not forgotten: 1991 Airstream B190
Sold: 2006 F-250 6.0L Powerstroke Supercab
|
|
|
|
|
02-27-2013, 08:49 AM
|
#6
|
4 Rivet Member 
1994 30' Excella
Truckee
, California
Join Date: Jan 2012
Posts: 261
|
Looks very promising for good results. Have you given any thought to also removing the mousefur on the walls? As if you don't already have enough to do!
|
|
|
|
|
02-27-2013, 10:06 AM
|
#7
|
Rivet Master
1995 30' Excella
Bowie
, Maryland
Join Date: Apr 2005
Posts: 2,345
|
Quote:
Originally Posted by bganso
Looks very promising for good results. Have you given any thought to also removing the mousefur on the walls? As if you don't already have enough to do!
|
The wife did. That's way down the road, if ever. It's not causing a problem and it's a lot of work...
__________________
1995 Airstream Classic 30' Excella 1000
2014 Ram 2500 Crew Cab with Cummins 6.7L Diesel
Sold but not forgotten: 1991 Airstream B190
Sold: 2006 F-250 6.0L Powerstroke Supercab
|
|
|
|
|
02-27-2013, 10:25 AM
|
#8
|
Rivet Master
2010 27' FB Classic
N/A
, Texas
Join Date: Apr 2008
Posts: 1,809
|
Have you tried a heavy duty heat gun on the glue to make it easier to remove?
I've never done what you are doing, but I noticed when taking decals or pin strips off cars that the heat seems to help.
__________________
"Theres two kinds of people, them goin somewhere and them goin nowhere. Ands that whats true". -Ben Rumson
|
|
|
|
|
02-27-2013, 01:46 PM
|
#9
|
Rivet Master
1995 30' Excella
Bowie
, Maryland
Join Date: Apr 2005
Posts: 2,345
|
Quote:
Originally Posted by Bluto
Have you tried a heavy duty heat gun on the glue to make it easier to remove?
I've never done what you are doing, but I noticed when taking decals or pin strips off cars that the heat seems to help.
|
I was wondering that, too. Unfortunately I don't have a gun to try it, so I'd have to buy one.
__________________
1995 Airstream Classic 30' Excella 1000
2014 Ram 2500 Crew Cab with Cummins 6.7L Diesel
Sold but not forgotten: 1991 Airstream B190
Sold: 2006 F-250 6.0L Powerstroke Supercab
|
|
|
|
|
03-02-2013, 08:04 AM
|
#10
|
Rivet Master
1995 30' Excella
Bowie
, Maryland
Join Date: Apr 2005
Posts: 2,345
|
Quote:
Originally Posted by yve79
Looking good! Are you planning on removing the yellow plastic window frames? I am curious to know what is under there. I hope it is continuous aluminum skin.
|
I looked again while I was out there working yesterday, and the only ones I saw matching what you describe were on the porthole windows. I didn't intend to do anything below the level of the vinyl, at least not as part of this project, so I think the answer to your question is "no".
I did remove the trim on the skylight. You have to remove the blind (4 screws), then remove the trim (4 more). All eight screws go into blocks of wood that appear to be mounted for just that purpose. I was able to clean around the edge of the skylight trim much easier, and since ours actually goes into the next vinyl section, I cleaned that area too so hopefully I won't have to remove the trim a second time.
Our skylight has seen better days - the interior film (blue) is coming off, and it had some signs of mildew. There were some threads on here about people replacing their skylights and I kind of want to do that too at some point. Not now though.
__________________
1995 Airstream Classic 30' Excella 1000
2014 Ram 2500 Crew Cab with Cummins 6.7L Diesel
Sold but not forgotten: 1991 Airstream B190
Sold: 2006 F-250 6.0L Powerstroke Supercab
|
|
|
|
|
03-03-2013, 07:03 PM
|
#11
|
Rivet Master
1995 30' Excella
Bowie
, Maryland
Join Date: Apr 2005
Posts: 2,345
|
Phase 1 (the first piece of vinyl) is complete! It really looks great. I'll get some pictures soon. I spent a bunch of time out there today cleaning it up, reinstalling the valances, etc.
If you try to use a shop vac to clean up the mess...you'd better have that fine filter installed. The standard foam filter just atomizes it. I switched to an old (regular) vacuum we have and it worked fine.
__________________
1995 Airstream Classic 30' Excella 1000
2014 Ram 2500 Crew Cab with Cummins 6.7L Diesel
Sold but not forgotten: 1991 Airstream B190
Sold: 2006 F-250 6.0L Powerstroke Supercab
|
|
|
|
|
04-25-2013, 07:03 PM
|
#12
|
2 Rivet Member 
1999 25' Safari
Carlsbad
, California
Join Date: Dec 2007
Posts: 57
|
Update
Skater,
I was hoping you could post some pics of the final product. I am curious if there is a noticeable gap between the plastic strip that joins the panels and the aluminum now that one of the panels is missing.
|
|
|
|
|
05-16-2013, 09:38 PM
|
#13
|
|
New Member
1995 30' Excella
Las Vegas
, Nevada
Join Date: May 2013
Posts: 1
|
This is my first day into working on my ceiling. The vinyl is off and the foam has been scraped off. The original glue was perfectly stuck to both the scrap pieces of ceiling and the foam which just this year began to disintegrate.Our 95 excella sits in the hot desert sun, unprotected with temperatures up to 115 degrees. Can anyone tell me the name of the glue used and where to get it?
Also, if I used the same stuff, I would not bother to dissolve all the old glue because it is part of the aluminum?
|
|
|
|
|
06-20-2013, 12:13 PM
|
#14
|
Rivet Master
1994 30' Excella
Currently Looking...
Milwaukee
, Wisconsin
Join Date: May 2004
Posts: 1,935
|
I am set up at a campground (we are the hosts) for the rest of this month or I would give you the name of the adhesive. I got it from the upholstery store who sold me the vinyl. It comes in a spray can. Now, please be careful it is highly flammable. Where I had taken down the cabinets there was a wire which I did not tape off completely. The vinyl touched it and caught fire. By time I got the fire extinguisher and put it out the interior was black with soot. I had to replace all of the vinyl I had just installed and refinish the lower cabinets.
__________________
Chaplain Kent
Forest River Forester 2501TS
|
|
|
|
|
06-20-2013, 12:29 PM
|
#15
|
Rivet Master
1995 30' Excella
Bowie
, Maryland
Join Date: Apr 2005
Posts: 2,345
|
Adhesive for reinstalling the vinyl? We like it better without. MUCH better.
I can't believe I never posted my pictures of the first section that is now finished. It looks great - we're both thrilled with the results. To reward myself, I installed some color LEDs on the sides of the light fixture, so they shine along the aluminum ceiling. Blue most of the time...red when the Capitals are playing...
Next I plan to remove the vinyl from the cabinets in the kitchen.
__________________
1995 Airstream Classic 30' Excella 1000
2014 Ram 2500 Crew Cab with Cummins 6.7L Diesel
Sold but not forgotten: 1991 Airstream B190
Sold: 2006 F-250 6.0L Powerstroke Supercab
|
|
|
|
|
06-20-2013, 12:45 PM
|
#16
|
2 Rivet Member
1994 34' Limited
Ottawa
, Ontario
Join Date: Sep 2009
Posts: 66
|
We have a 1994 Limited with faux leather ceiling. Two years ago one panel started to come down. We cleaned off the adhesive and foam from the panel and metal and glued it back in place using Rhino two-sided tape. It is intended for glueing carpet to stair steps and is quite strong. Our repair is still hanging in. Pun intended.
This past winter two panels, the front and the back, came down in a major way, beyond the "tape fix'. We had them replaced at the factory this spring. This involved removing the vinyl, cutting out and replacing the metal and glueing up new vinyl. Replacement of two panels cost $2K. On a positive note, it looks like they did a great job.
Airstream, however, are still using the same material on the Limited, at least they were the last time I looked, a couple of years ago.
|
|
|
|
|
06-20-2013, 01:18 PM
|
#17
|
Rivet Master
1999 34' Excella
Currently Looking...
Hillsboro
, Texas
Join Date: Feb 2013
Posts: 6,408
|
I have used 3m spray adhesive to install car headliner and other upholstery.
Get some and try on a couple samples to work out how to handle before making a huge mess.
__________________
Peace and Blessings..
Channing
WBCCI# 30676
|
|
|
|
|
06-20-2013, 04:10 PM
|
#18
|
4 Rivet Member
1969 18' Caravel
Northwest
, Missouri
Join Date: Dec 2009
Posts: 325
|
Factory adhesive for sale
I have two boxes of used factory Airstream ceiling adhesive if interested, removed from a 94 Sovereign earlier today. Photos attached, buyer pays shipping.
|
|
|
|
|
06-20-2013, 05:29 PM
|
#19
|
4 Rivet Member
1969 18' Caravel
Northwest
, Missouri
Join Date: Dec 2009
Posts: 325
|
I agree 100%
I agree with Skater, pull it, clean it, leave it bare. What you don't put up won't come back down. I like the bare bones look of the aluminum, and the spiders have fewer places to hide now.
|
|
|
|
|
07-15-2013, 01:48 PM
|
#20
|
4 Rivet Member
1969 18' Caravel
Northwest
, Missouri
Join Date: Dec 2009
Posts: 325
|
The first section is down. The rest can wait to be a winter project, it's just too dog-gone hot.
|
|
|
|
|
|
|
Currently Active Users Viewing This Thread: 1 (0 members and 1 guests)
|
|
|
 Posting Rules
|
You may not post new threads
You may not post replies
You may not post attachments
You may not edit your posts
HTML code is Off
|
|
|
|

 Recent Discussions
 |
|
|
|
|
|
|
|
|
|
|
|
|
|
|
|
|
|
|
|
|
|


 Linear Mode

