 |
 09-13-2011, 09:03 AM
|
#1
|
Rivet Master 
1981 31' Excella II
New Market
, Alabama
Join Date: Sep 2011
Posts: 6,145
|
C-Channel How many breaks does it have?
Since I am in the process of fixing my rear floor, I figured I would ask a question. The C-channel has gaps in it and where there is a gap there is probably water coming out that gets into the sub floor. The water could be from leaks but I expect there is a fair amount that collects in that channed from condensation. My recent leak situation was mainly caused by a bumper seal failure but I also had rotten wood right around where the end caps transition into the straight walls. So am I correct in assuming that this location is where there is a gap in the C-channel? I have some areas in the front in the same location that is discolored but not rotten. I don't want to have to deal with the same situation in the front. I was thinking about pulling back the inner skin in the front and sealing gaps in the C-channel. Naturally, if I know where the gaps are I won't have to fully remove the inner skins but rather pull them back fill the gap and pop rivet the skin back on.
So am I correct about where the gaps are and how many more of these gaps should I expect?
Perry
|

|

|


|
09-13-2011, 09:14 AM
|
#2
|
Rivet Master 
1991 34' Excella
1963 26' Overlander
1961 26' Overlander
Central
, Mississippi
Join Date: Nov 2006
Posts: 5,919
|
Yup, there are gaps in those exact locations on my '91.
Don't be fooled into thinking all of the water is coming from condensation. a huge amount can come from a single loose rivet. Mee's gussin that you have leaks! (they all leak)
In my '63, I have all of the interior out and got to watch the 'condensation' on the inside of the exterior walls over the last few months...it never created enough to drip and puddle. Toss a good rain storm and water POURS through stuff as small as a loose buck rivet. My '91 has pop rivets in some locations, these may as well be plumbed to the freash water system with the amount of water that they allow to enter the trailer.
|
|
|
|
|
09-13-2011, 10:06 AM
|
#3
|
Rivet Master
1981 31' Excella II
New Market
, Alabama
Join Date: Sep 2011
Posts: 6,145
|
Well we know these things are going to leak we just don't want the water to get to the subfloor and rot it out. Has anyone thought of putting drains along the C-Channel to drain the water to the belly area where it won't do as much harm?
I would think a stainless steel tube that goes through the floor and is sealed with Valkem at the C-Channel would help.
Perry
|
|
|
|
|
09-13-2011, 10:58 AM
|
#4
|
Rivet Master
1981 31' Excella II
New Market
, Alabama
Join Date: Sep 2011
Posts: 6,145
|
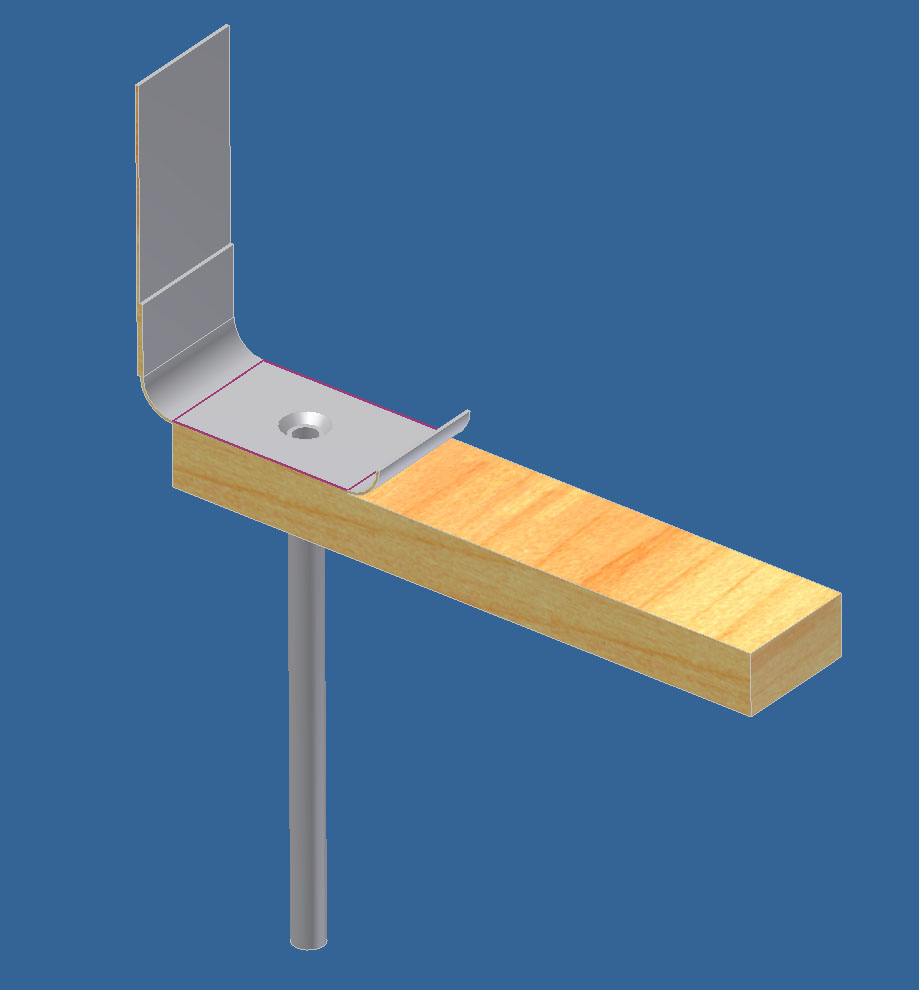
Here is what I have in mind. Let me know if I have this drawn correctly. I did not draw the frame because there are only a few places where the shell is actually attached to the frame. Most attachments are at the front and back with a few on the frame ribs.
Maybe a drain on each side of a C-Channel Gap with the gap filled with Vulkem to keep the floor dry. There is no reason the tube could not run below the belly skin if you are worried about water accumulating in there. If you flare the Stainless steel tube it would work even better. I would think this could greatly reduce floor rot problems from minor leaks. I am not advocating intentionally leaving leaks or poor maintenance just being practical here these things are full of holes by design.
Perry
|
|
|
|
|
09-13-2011, 04:41 PM
|
#5
|
Rivet Master
1956 22' Safari
2015 27' Flying Cloud
Vintage Kin Owner
Conifer/Evergreen
, Colorado
Join Date: Feb 2002
Posts: 12,702
|
Quote:
Originally Posted by perryg114

Since I am in the process of fixing my rear floor, I figured I would ask a question. The C-channel has gaps in it and where there is a gap there is probably water coming out that gets into the sub floor. The water could be from leaks but I expect there is a fair amount that collects in that channed from condensation.
|
What year is your trailer?
I know on our '56 & previously owned '64 the C-Channel would not be able to "hold water" - at all...it isn't a continuous trough-like piece, it's got notches and pieces spliced in it to make the curves and is pieced randomly. Here's a pic of the front:

and back:

I'm going to have to look for a better close-up on my other computer - but I think you can see the vertical "snips" I am talking about in these two pics. Actually, there is a section of straight C-Channel that hadn't been installed yet missing from the second pic under the back compartment door...I know it got installed before the interior skin went back on though - but there are joints where they come together. Even if you could seal them all up before putting on the interior skin, I'm afraid the movement down the road would flex them open again before long.
One of the other "weak links" is at every bolt attachment through the channel & into the wood...water will get in there, even if you paint or epoxy coat the surface of the floor - the bolts/screws compromise the epoxy. We put a dap of Vulkem at every biolt/screw but I'm not convinced itreally makes a big difference...but we did it anyways.
The best bet is to stop the leaks from the outside (or inside of the exterior skins)...that really is the biggest problem area. And unfortunately, the more end cap segments - like our 13-panel, the more opportunity for leaks to get in and travel around...
Shari 
|
|
|
|
|
09-13-2011, 05:02 PM
|
#6
|
Rivet Master
1981 31' Excella II
New Market
, Alabama
Join Date: Sep 2011
Posts: 6,145
|
Mine is an 81. I was wondering how they made it curve. I don't have my end cap skins all the way off. I will take a look at mine. I am thinking that they found a way to extrude a curved C-Channel in the newer units.
I just looked at mine and the c-channel seems to be more or less continous but there are notches where they put the bolts too close to the edge. I am not sure why they did that. Well I may wet install the bolts with Vulkem to reduce water penetration that way. I am not going to cure the problem but slow it down. I will get in the habit of checking the bumper seal on a yearly basis.
Perry
|
|
|
|
|
04-06-2021, 10:36 AM
|
#7
|
3 Rivet Member 
1987 34' Limited
Hantsport
, NS
Join Date: Jan 2021
Posts: 168
|
Hey Folks; new at the airstream restoration exercise and looking to minimize grief and optimize rewards by accessing the wealth of experience-based information on this forum.
I've done a lot of reading but am unsure of a few things.
Where there are gaps in the C channel, is the best strategy on a shell-off subfloor replacement to copy the old floor as a tracing template (some areas are super sketchy and rotted right through), holes and all, when putting C channel back on the new floor? Where the goal is to line up former rivet holes from the shell with the C channel, I can see where a 1/32" misstep will become a huge headache.
Or, do you fit the C channel but do not screw it into place until after the body comes back down to rest...affix the rivets to mate the body skin with the C channel, then screw down the C channel through the outriggers?
1987 34' Limited.
Opinions welcome and appreciated.
Thank you!
Cheers....Denis
|
|
|
|
|
04-07-2021, 05:31 AM
|
#8
|
Rivet Master
1981 31' Excella II
New Market
, Alabama
Join Date: Sep 2011
Posts: 6,145
|
It is kind of a chicken or the egg thing. I expect that attaching the C-channel to the wall first is the way to go or just leave it attached to the skin in the first place. If you put the C-channel on the floor, you will have problems getting it right. Gap are just transition points between a straight extrusion and the curved corner pieces. The corners are the hard part. I would make the new floor match the old floor if you have old floor left to model from. It might be possible to just put in the floor in the center straight sections bolt it to the shell then do the curved sections when you have the shell on and you have the shell curve there to guide you. The front and back are really critical areas and the hold down plates at the front and back and how those are done can vary from model to model. The only real attachment points are at the front and back.
Perry
|
|
|
|
|
04-07-2021, 10:20 AM
|
#9
|
3 Rivet Member
1987 34' Limited
Hantsport
, NS
Join Date: Jan 2021
Posts: 168
|
Hi Perry, thank you for the reply. On my 1987 the floor inserts into the C channel edges, so I cant see how the floor can be replaced without separating the channel from the lower skins, and then the C channel from the floor. I guess that a guy could stretch the sides apart and pop the subfloor in place but that means removing the inner wooden bracing in place to protect the body from morphing into a custom shape. Ill be laying the subfloor sideways in single 4x8 sheets and dont want to cut them any smaller.
A related question I asked in another forum pertains to the end plates you mention. There are none - neither front nor back on mine. Only pieces of metal plate acting like large washers on top of the C channel at bolt points at the front and rear. So, Im missing those reference points, and wondering why the factory elected to not include the plates on my 34 footer.
Cheers
|
|
|
|
|
04-08-2021, 06:38 AM
|
#10
|
Rivet Master
1981 31' Excella II
New Market
, Alabama
Join Date: Sep 2011
Posts: 6,145
|
Attach the C-Channel to the bottom of the straight walls after you have replaced the floor. You might be able to just remove screws from the C-channel and leave it attached to the skins. The floor does not have to be flush with the skin. There just needs to be enough overlap for the C-channel to overlap the floor. I am not saying to a crappy job but if there is 1/8" miss match between the floor and the C-channel you won't be draw and quartered by the Airstream Gods. If you have the inner skins removed, and you should, you can get to the bolts and wood screws holding the C-channel down to what is left of the floor. Don't remove it unless you have to for other reasons.
Perry
|
|
|
|
|
04-08-2021, 08:57 AM
|
#11
|
Rivet Master
1958 26' Overlander
Battle Ground
, Washington
Join Date: Jun 2013
Posts: 871
|
Quote:
Originally Posted by perryg114
Well we know these things are going to leak we just don't want the water to get to the subfloor and rot it out. Has anyone thought of putting drains along the C-Channel to drain the water to the belly area where it won't do as much harm?
I would think a stainless steel tube that goes through the floor and is sealed with Valkem at the C-Channel would help.
Perry
|
I installed drain tubes through the channel into the belly pan. I used a rigid plastic tube 3/8" o.d. - 1/4" i.d. It's flush with the bottom of the C channel and projects below my perimeter frame. (I installed a 1.5X1.5 steel tube under the entire channel to get the subfloor out of the 'sandwich' and add more support to the shell. It's welded to the frame rails and outriggers.)
 
To get the water out of the belly pan I installed 1" aluminum house vents. The hole is punched with a dimple die to lower the vent below the surface of the belly pan. I epoxied the vents in place. Make sure you point the vent slats to the rear so they don't act as water scoops going down the road on a rainy day 
 
 https://ventmastersstore.com/collect...-mill-bag-of-6
The drains have to be installed between each rib of the shell and the vents installed in each 'compartment of the belly pan created by the frame/outriggers.
No, I don't have any insulation in the belly pan.
I did one additional thing. Around the idea of condensation or water leaks in the walls. Potentially it can form on both inner and outer skins. When I installed the inner skins I trimmed the bottom a little so the skin is inside the channel. It had to be notched to go around the ribs. Last winter was the first time the trailer wasn't out in the weather over the winter. No leaks into the interior so far from the skins.
|
|
|
|
|
04-08-2021, 09:32 AM
|
#12
|
3 Rivet Member
1987 34' Limited
Hantsport
, NS
Join Date: Jan 2021
Posts: 168
|
Quote:
Originally Posted by perryg114
Attach the C-Channel to the bottom of the straight walls after you have replaced the floor. You might be able to just remove screws from the C-channel and leave it attached to the skins. The floor does not have to be flush with the skin. There just needs to be enough overlap for the C-channel to overlap the floor. I am not saying to a crappy job but if there is 1/8" miss match between the floor and the C-channel you won't be draw and quartered by the Airstream Gods. If you have the inner skins removed, and you should, you can get to the bolts and wood screws holding the C-channel down to what is left of the floor. Don't remove it unless you have to for other reasons.
Perry
|
Could we be thinking of a slightly different version of C channel? Mine is attached to the bottom of the outside skins with rivets, and the lip sits on top of and under the horizontal edge of the subfloor material, and captures that edge on each side. The C channel and floor are bolted through to the outriggers. I need to pull the shell off to repair the outriggers and frame, and replace the subfloor. The interior skins and bellypan are off. I don't see how the subfloor could be wedged into the C channel without pulling the sides of the trailer out and away from one another to increase the distance enough that the part of the floor that goes into the C channel will fit into the lip, then let the sides compress back to the engineered width of the trailer. I'd love to avoid removing that C channel from the lower outer skins if there's a way to make that work without bending the trailer trying to fit the floor back into the lip of the channel. If I were to remove the C channel from the skins, my question pertained to how one would line things up again (given the gaps) if I put the C channel on the floor first. Regrets if I confused the question, and thank you for the reply.
|
|
|
|
|
04-09-2021, 03:39 PM
|
#13
|
Rivet Master
1991 34' Excella
1963 26' Overlander
1961 26' Overlander
Central
, Mississippi
Join Date: Nov 2006
Posts: 5,919
|
Quote:
Originally Posted by Daytonacoupe
... If I were to remove the C channel from the skins, my question pertained to how one would line things up again (given the gaps) if I put the C channel on the floor first. Regrets if I confused the question, and thank you for the reply.
|
Just drill new holes in the C channel. You will spend DAYS trying to line up all that stuff.
|
|
|
|
|
04-10-2021, 08:06 AM
|
#14
|
Rivet Master
1981 31' Excella II
New Market
, Alabama
Join Date: Sep 2011
Posts: 6,145
|
I got it. The newer C-channel has a lip that wraps around the sub floor. The older ones don't have that lip. Drill new holes and try to make sure you are as close to the original shape as possible. Maintain the same width as it was originally. You need to get some cleckos and the correct drill bits and buck rivets. I would not use pop rivets to attach the C-channel to skin. Practice makes perfect.
Perry
|
|
|
|
|
04-10-2021, 08:46 AM
|
#15
|
3 Rivet Member
1987 34' Limited
Hantsport
, NS
Join Date: Jan 2021
Posts: 168
|
OK; that's two consecutive votes for drilling new holes in the C channel if necessary, thank you. Yes, I do have a buck riveting gun and buck rivets. Just waiting for the winter winds to subside before removing the shell. Cheers.
|
|
|
|
|
04-10-2021, 04:46 PM
|
#16
|
Rivet Master
1981 31' Excella II
New Market
, Alabama
Join Date: Sep 2011
Posts: 6,145
|
Make sure you make lots of measurements.
Perry
|
|
|
|
|
|
Currently Active Users Viewing This Thread: 1 (0 members and 1 guests)
|
|
|
 Posting Rules
|
You may not post new threads
You may not post replies
You may not post attachments
You may not edit your posts
HTML code is Off
|
|
|
|

 Recent Discussions
 |
|
|
|
|
|
|
|
|
|
|
|
|
|
|
|
|
|
|
|
|
|


 Linear Mode

