You may have heard the saying "Its not really yours until you've drilled it full of holes..." Well, I've finished drilling and filling holes for a while on our 2018 Classic 30, after performing solar, battery and wifi upgrades.
First, solar. Although I installed a 300W system on our 27FB, I decided to let AMSolar do the 600W install on the Classic. A large part of the decision was my unwillingness to crawl up on the Classic's roof in the 100 degree plus heat of summer's desert southwest.
The system consists of 6 100W panels in parallel, Victron MPPT 100/50, and Victron BMV-712 battery monitor. The solar feed is run down the inside of the curb-side wardrobe, forward under the galley cabinetry, and then forward along the propane lines before popping up under the sofa. MPPT 100/50 and the battery monitor shunt is mounted under the sofa, curbside. AM Solar did the hard work of moving all the grounds to the shunt under the sofa, which made the subsequent battery upgrade much, much easier.
I then followed with the WiFi/cellular modem install. I looked at Cradlepoint, but ultimately selected PepWave MAX BR1 MK2, along with a MobileMark LTM MIMO LTE/WiFi/GPS antenna. I piggybacked onto the roof penetration for the solar cables, installing the modem in the wardrobe. A toggle switch was installed to turn off the modem to save power if cellular and wifi is not needed.
For batteries, based on our experience with the 200 AHr AGM system I installed on the 27FB, along with observations of our typical boondocking power usage in the Classic, I decided to go with four FullRiver 220AHr 6V AGM batteries. yielding 440 AHr total, 220 AHr usable. These batteries are group 27 size, so two of them go in the battery box, and two underneath the sofa. I moved the subwoofer to one side to fit the AGMs under the center section of the sofa.
And then, to keep things balanced, I upgraded the converter to an 80 amp Boondocker 1280C and pulled new 2/0 cable between the converter and the battery banks. I considered the existing 6 gauge wire from the existing converter to be inadequate for the bulk current into the 440 AHr battery system. The battery cables followed the route that AM Solar took with the solar feed. The Boondocker was mounted on a board, secured to the floor, rather than just shoved in loose as the WFCO converter was.
To top off the upgrade, I also installed Progressive Industries EMS-HW50C surge protector. This went into the cavity behind the AC breaker panel along with the converter. The surge protector was mounted vertically on the forward interior wall of the cavity. A tight squeeze, but it worked out nicely. Photos follow.

Solar Panels. Just forward of the (unused) Zamp solar connector box you can see the MobileMark MIMO antenna, on its own ground plane.

Cellular Modem, in the curbside wardrobe. At top is the display for the surge protector. I mounted it in the closet so that is easy to see if I need it, but otherwise is not illuminating the trailer at night with flashing numbers. The BlueSea switch is the solar panel cutoff switch. The small round black rocker switch controls power to the modem. The cable loom that you see next to the surge protector display carries solar feed and antenna cables from the roof penetration down the cable chase behind the display.

MPPT Solar controller display and battery monitor display to the right of Firefly.
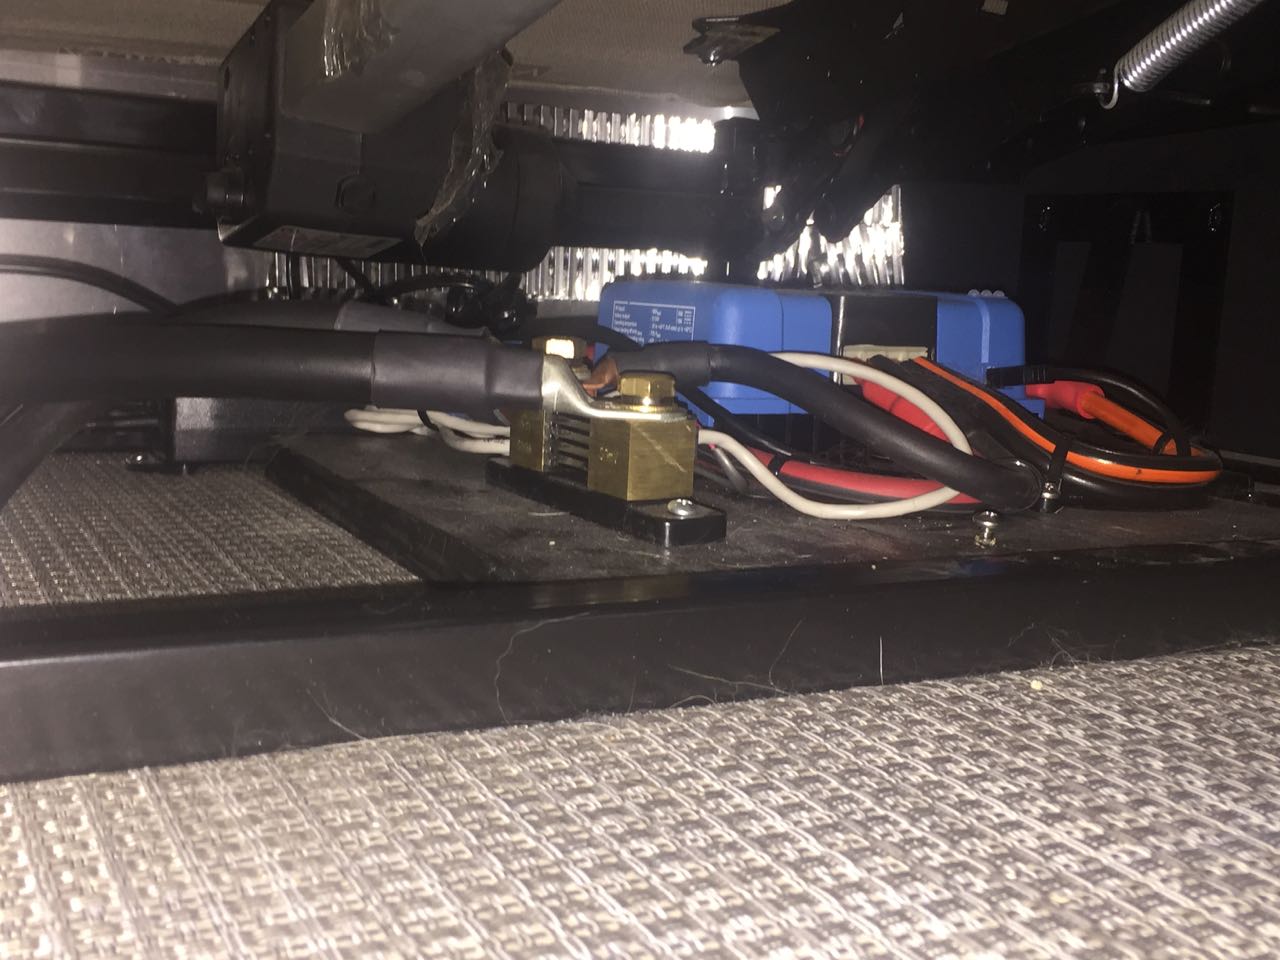
MPPT Solar controller and shunt, under curbside end of sofa.

DC220-6 battery bank, under center section of sofa.

They tuck right in there. I mounted a dual group27 battery tray on a piece of plywood, with strap tie downs, to keep them secure.

The other pair of DC220-6, in the battery box. I added a Bluesea 4 position switch to isolate house, inverter, or both from the battery. At lower left you see the solar battery-side breaker that AM Solar mounted on the tongue.

Behind the AC breaker panel, EMS-HW50C mounted vertically, with the Boondocker BD1280C mounted on board to floor.
So that wraps it - now we're ready to get out there!


 Linear Mode


