 |
|
 01-07-2014, 05:49 PM
|
#21
|
3 Rivet Member 
2014 25' FB Flying Cloud
Down the Shore
, New Jersey
Join Date: Jan 2010
Posts: 156
|
Quote:
Originally Posted by Rrroberts40

I hate to say it once again but for what an Airstream costs it should have a PD4655 installed originally...jus sayin'...
|
I agree. Cost me about $200 retail, so what could be the diff to Airstream? But I guess you have to draw the line somewhere, all those little upgrades on my original $60k base price trailer and we'd be talking real money!  That's what we get for wanting "different" than SOB. A lot of my friends ran Chevys. Me, I liked Pontiacs. Them..$ Me....$$$ Go figure. Next thing you'll be wanting LEDs standard!
Rich
__________________
Rich
|

|

|


|
01-07-2014, 06:11 PM
|
#22
|
4 Rivet Member 
1999 34' Excella
NE Central
, Kansas
Join Date: Jul 2011
Posts: 321
|
stop gap
Quote:
Originally Posted by idroba
Shut the circuit breaker off for the old Paralax converter and hook a regular maybe 10 amp battery charger to the batteries out on the tongue. You should be OK until your new converter comes and you have time to install it.
|
This is an excellent suggestion. My neighbor has an el cheapo 3 stage battery charger I used for 10 days last January after my converter was fried. It kept my battery from being ruined as well. I'll post the details on brand/model when I get a chance...it might be a good 'emergency item to have on hand (and it weighs less than 2 pounds).
|
|
|
|
|
01-07-2014, 07:11 PM
|
#23
|
2 Rivet Member 
2007 27' Safari FB SE
Greenbrae
, California
Join Date: Dec 2008
Posts: 89
|
Not to worry Rich, I understand about that work problem! I'd rather be Airstreamin! I just appreciate this forum and all the great people that are willing to share their knowledge.
Julie
|
|
|
|
|
01-07-2014, 08:58 PM
|
#24
|
Rivet Master 
1974 Argosy 20
2014 20' Flying Cloud
Kooskia
, Idaho
Join Date: Jul 2009
Posts: 4,591
|
Quote:
Originally Posted by Lucky Dog
I agree. Cost me about $200 retail, so what could be the diff to Airstream? But I guess you have to draw the line somewhere, all those little upgrades on my original $60k base price trailer and we'd be talking real money! That's what we get for wanting "different" than SOB. A lot of my friends ran Chevys. Me, I liked Pontiacs. Them..$ Me....$$$ Go figure. Next thing you'll be wanting LEDs standard!
Rich |
The problem is (I think) that Airstream uses the Paralax panel which is an integrated 120 volt and 12 volt system with the converter/charger included. It is very convenient for them to have all the systems in one place and buy one panel for all. The problem is that Paralax does NOT make a 3 stage converter/charger so if AS wants to use the one piece power center they cannot get one with a 3 stage converter/charger. They would have to essentially rip out the Paralax converter/charger parts and put in another brand, essentially voiding any warrantee from Paralax and adding a lot more work on the assembly line.
Apparently no one makes an integrated 120 volt circuit breaker panel and 12 volt panel, with a 3 stage charger included. And Airstream does not want to use three separate systems like they did in the past, with a 120 volt circuit breaker panel, a 12 volt fuse panel, and a converter/charger (Univolt). I can't blame them, but wish that I didn't have to do the change out myself, a month after I paid big bucks for a 20' FC.
|
|
|
|
|
01-07-2014, 11:30 PM
|
#25
|
|
2013 Int. Sig 23D
2013 23' International
Des Moines
, Washington
Join Date: May 2013
Posts: 44
|
I guess putting it that way makes sense. I do like the integrated nature of the setup. Airstream needs to put a little horsepower out and get parallax or somebody to step up and build a 3 stage setup. The technology exists so let's get into the 2010's.
|
|
|
|
|
01-09-2014, 10:11 AM
|
#26
|
2 Rivet Member
2007 25' International CCD FB
Bend
, Oregon
Join Date: Apr 2007
Posts: 71
|
I bought a battery charger and hooked it up externally to the two batteries before heading out on an eight day work trip. My wife reported last night that the 12VDC components are still working, so I have my fingers crossed that she'll make it through the next six days.
When I get home, I'll be doing the upgrade to a 4655.
Thanks to everyone for contributing to the forum!
__________________
Let's Just Go!
|
|
|
|
|
02-28-2014, 12:11 PM
|
#27
|
1 Rivet Member 
Join Date: Feb 2014
Posts: 16
|
Quote:
Originally Posted by Lucky Dog
Jaojamjab
The main pos and neg battery wires are thick and pretty stiff and a little tough to work with but with the little extra slack provided, I was able to get them in place on the new board with out too much trouble. I then installed the new DC board and transferred the wires from the old board to the new board one at a time, in the same order. I found that easier than having two boards flopping around in the same space. Yes, there are more than enough connectors, I just lined them up in the same sequence as the old board.
Rich
|
Thanks Rich, we just installed the converter and your photos and descriptions were a great help.

In retrospect I would've run the larger battery cables behind the board. Also, note that the left most circuits, numbers one and two, were suggested for only low current circuits. I avoided those.
|
|
|
|
|
03-03-2014, 08:05 AM
|
#28
|
Rivet Master
1995 30' Excella
Bowie
, Maryland
Join Date: Apr 2005
Posts: 2,345
|
Quote:
Originally Posted by AirGal04
In retrospect I would've run the larger battery cables behind the board.
|
It's not as easy as it sounds or looks. This picture makes it look easy, but that was probably the hardest part of the job. You did better by not trying it. 
__________________
1995 Airstream Classic 30' Excella 1000
2014 Ram 2500 Crew Cab with Cummins 6.7L Diesel
Sold but not forgotten: 1991 Airstream B190
Sold: 2006 F-250 6.0L Powerstroke Supercab
|
|
|
|
|
05-06-2014, 08:55 PM
|
#29
|
3 Rivet Member
2013 30' Flying Cloud
Cincinnati
, Ohio
Join Date: Sep 2012
Posts: 205
|
My Progressive Dynamics Converter installation
I replaced my Parallax 7355 converter with a Progressive Dynamics 4655 in my 2013 FC30. I have factory solar/inverter/Lifeline AGM batteries. I bought the new PD 4655 from Best Converter website. Here is what I encountered in the converter install:
Problem #1. How to get the converter cover off? What is a T10 Torx screw? Thanks to someone with the big motorhome in the B storage building for helping me with that.
Problem #2. One of the 4 cover Torx screws was stripped (I am blaming the factory on this one although I may have tried my Swiss Army knife on this one). Thanks to the same guy with the big motorhome and bigger tool box for help with that. (Luckily PD 4655 comes with 4 new screws for the cover and they are Phillips. The Torx screws are in the garbage now)
(at this point, I was an hour into a process that others have said took them 30 minutes. Good thing I like spending time in my Airstream, even at the storage location)
Problem #3. Step 10 of the instructions In the AC power section, connect new converter neutral (white) wire to neutral distribution block and converter ground (green) wire to ground bar.
The old converter only had 2 wires a white and a black. The PD 4655 has 3 wires that go to the AC section. So what to do with the green wire? Where is the ground bar? Thanks to posts by Rrroberts40 and Luckydog for their earlier posts and pics. I attached my green wire to the ground bar running along the top of the AC panel - I used the far right position because it was not unused.
Problem #4. I had just about finished wiring the AC section, and I was left with one grey wire with its end exposed. It was not a new wire, but an existing wire. For the life of me I could not remember where it was connected, and I didnt take enough pictures to show. What to do with this wire and why cant I remember where it came from? Based on the picture from the instructions, it looked like there were 3 wires connected with the black wire from the converter (connected with a yellow twist cap), and based on the location of this wire and its length, I decided this is where it came from, so I undid the yellow twist cap, added this wire to that and connected all 3 together, and added a little electrical tape.
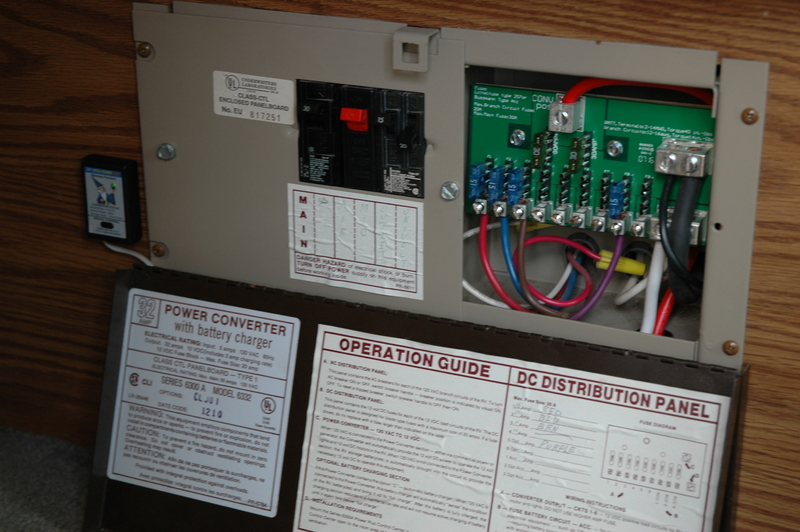
Problem #5. In the original install, there were 2 wires with slot connections to the original connection one white and one black. You can see the 2 wires in the original picture lower right corner. Replacing the white wire was easy the new converter had a white wire that I connected to the neutral bar on the left side of the AC panel. But the original black wire, with the slot disconnected from the original converter, had the other end going into circuit breaker #3. There was no mention of this extra, unneeded wire in the instructions. So what to do with it? I figured it was not needed, but I didnt want to remove it from the circuit breaker in case for some reason I had to reverse this whole process and put the old converter back in, so I put some electrical tape around the slot connection, coiled up the wire, and tucked it back into the AC section where it would (hopefully) do nothing.
On the DC side, I installed the new DC panel that is provided with the PD 4655 unit. I dont know why the old panel wouldnt have worked they look very similar. But they gave it to me for some reason so I put it in. You need an allen wrench for these connections (the old panel just used regular screws), and it is a tedious job to transfer all 12 of the wire connections in the right order. My main battery cables had enough slack so didnt have to add any wiring I had to give the battery cables a good pull to get 5 inches or so more, which is about what I needed since the connections are in different locations. If I had to do it over again, I would have pulled the battery cables out when I had the converter location empty I think I could have reached down and helped the cables through the hole if I had thought of that earlier. With the 8 colored wires along the bottom of the DC panel, I skipped positions 1 and 2 on the new panel since they were labeled low voltage, so the positions 1-8 in the original install were shifted to 3-10 in the new one. Position 6 (original, or now Position 8) was interesting the original install had 2 wires (red, and black with grey stripe) here whereas all of the others had one. I had difficulty getting the 2 to fit, so I was going to separate them and put the second wire into its own slot (that should work, right?) but as I kept working at it I got better at it, and then I went back to slot #6 and put the same 2 wires there that had been in the original install. I had extra slots in the DC panel in addition to 1 and 2 being unused, 11 and 12 were also unused. Once nice feature of the new DC panel is there are red lights to tell you which fuse is blown.
(all told, I spent 4 hours doing this. I took the tortoise approach on this one. Even though this project was more difficult than I thought it would be, I would do it again.)
So for the moment of truth once I re-installed the AGM batteries that have spent the winter charging in my garage (I took better pictures and notes from that, no guesswork there!) and everything seems to work. It has been 3 days now. Time will tell and hopefully I have accomplished what I wanted a better converter that will extend battery life, hopefully quieter with the fan activity - that Parallax was very noisy when the fan went on, usually in the middle of the night (although the Parallax manual says it is whisper quiet!). And when Im connected to shore power I dont have to remember the battery disconnect button or worry about frying the batteries.
If anyone is going to be at Alumapalooza in JC in late May, I will be there and I can give you and update on how the PD 4655 is working.
Rich
|
|
|
|
|
05-06-2014, 09:00 PM
|
#30
|
3 Rivet Member
2013 30' Flying Cloud
Cincinnati
, Ohio
Join Date: Sep 2012
Posts: 205
|
pictures now
Original converter (if I can figure out how to post a picture)
|
|
|
|
|
05-06-2014, 09:04 PM
|
#31
|
3 Rivet Member
2013 30' Flying Cloud
Cincinnati
, Ohio
Join Date: Sep 2012
Posts: 205
|
rest of install pictures
original converter no fuses
new converter before wiring
the wire - what to do with it
what I did with the wire
|
|
|
|
|
05-06-2014, 09:06 PM
|
#32
|
3 Rivet Member
2013 30' Flying Cloud
Cincinnati
, Ohio
Join Date: Sep 2012
Posts: 205
|
final 2 pics of my PD 4655 install
new converter no fuses
new converter, final
|
|
|
|
|
05-06-2014, 10:02 PM
|
#33
|
3 Rivet Member
2014 23' Flying Cloud
Reed Point
, Montana
Join Date: Jan 2014
Posts: 151
|
I have a brand new A/S, if I upgrade the converter to a 4655 55 amp will this effect my two year warranty?
|
|
|
|
|
05-06-2014, 10:18 PM
|
#34
|
3 Rivet Member
2013 30' Flying Cloud
Cincinnati
, Ohio
Join Date: Sep 2012
Posts: 205
|
Well, I am no lawyer but if the new converter causes a problem due to a defect or bad install, I wouldn't expect Airstream to cover it. Why would they? The Parallax will work fine if you don't plug in for very long and don't cook your batteries, and in any event that will likely take longer than 2 years and the warranty period will be over. I am no electrician, and I changed out the converter (in a 1 year old unit) based on what others have said at last year's Alumapalooza and what I've read on the forums. I wanted to do this last summer, but I didn't have the confidence to do it. But since then I have replaced the tires (had to get rid of the Marathons), the jack switch (broke-jack would only go down!), the water pump (leak), and now the new PD 4655 converter. They are all "little" projects that aren't worth a trip to a dealer, or are repairs I would rather do myself.
You'll have to make a decision of what you're comfortable with. No reason to jump into this as your first repair -- especially if nothing is broken at the moment.
|
|
|
|
|
05-06-2014, 10:20 PM
|
#35
|
|
Living Riveted since 2013

2016 Interstate Lounge Ext
Green Cove Springs
, Florida
Join Date: Dec 2013
Posts: 8,210
|
What if I had my dealer install it? That should maintain the warranty. It would cost a lot more, but using an authorized service technician ought to cover it.
__________________
Rocinante Piccolo is our new-to-us 2016 Interstate Lounge 3500 EXT
(Named for John Steinbeck's camper from "Travels With Charley")
|
|
|
|
|
05-07-2014, 09:11 AM
|
#36
|
|
Living Riveted since 2013
2016 Interstate Lounge Ext
Green Cove Springs
, Florida
Join Date: Dec 2013
Posts: 8,210
|
Ah, interesting. Switz makes a good point here in a very similar parallel thread: http://www.airforums.com/forums/showpost.php?p=1452453
__________________
Rocinante Piccolo is our new-to-us 2016 Interstate Lounge 3500 EXT
(Named for John Steinbeck's camper from "Travels With Charley")
|
|
|
|
|
07-06-2014, 11:26 PM
|
#37
|
|
Living Riveted since 2013
2016 Interstate Lounge Ext
Green Cove Springs
, Florida
Join Date: Dec 2013
Posts: 8,210
|
Thanks to everyone who posted their experiences and pictures for this conversion. I could not have done it without your help and support. Here's a post of my experience doing the upgrade today: http://www.airforums.com/forums/f449...ml#post1478980
|
|
|
|
|
09-03-2014, 09:43 AM
|
#38
|
Rivet Master
2014 25' FB International
2007 20' Safari SE
2005 19' Safari
Qualicum Beach
, British Columbia
Join Date: Sep 2004
Posts: 1,096
|
Quote:
Originally Posted by Silvery Moon
|
And a big thanks to you. I received the converter in the mail yesterday, and because I had read your account numerous times, I got it installed on the same day and everything works!
Airstream sure saves money on the amount of wire they use,don't they.
Thanks for the hint about the wire for the "charge wizard ". It was much easier to put through the hole before sliding in. Other than having a bit of trouble lining up the 2 holes on the DC circuit board ( short pos. battery wire.) and one bad screw for the cover it was a very straightforward install. Now I can relax a bit when on shore power.
George
|
|
|
|
|
09-03-2014, 11:22 PM
|
#39
|
|
Living Riveted since 2013
2016 Interstate Lounge Ext
Green Cove Springs
, Florida
Join Date: Dec 2013
Posts: 8,210
|
Thanks, I'm really pleased that the advice was helpful. Welcome to the upgraded converter club!
|
|
|
|
|
09-18-2014, 10:54 PM
|
#40
|
Rivet Master
2015 25' FB Eddie Bauer
2013 25' FB Eddie Bauer
2012 20' Flying Cloud
Small Town
, *** Big Sky Country ***Western Montana
Join Date: Feb 2010
Posts: 2,860
|
My next project ... thanks for taking the time to post experiences and photos.
__________________
2015 25' Eddie Bauer Int'l FBQ / 2023 Ford Lightning ER
2022 Ford F350 6.2 V-8; equalizer hitch + Shocker air hitch
Honda Eu3200; AIR# 44105; formerly WBCCI 2015.1
Terminal Aluminitis; 2-people w/ 3+ dogs
 
|
|
|
|
|
|
|
Currently Active Users Viewing This Thread: 1 (0 members and 1 guests)
|
|
|
 Posting Rules
|
You may not post new threads
You may not post replies
You may not post attachments
You may not edit your posts
HTML code is Off
|
|
|
|

 Recent Discussions
 |
|
|
|
|
|
|
|
|
|
|
|
|
|
|
|
|
|
|
|
|
|


 Linear Mode

