 |
|
 12-23-2017, 02:45 PM
|
#81
|
Rivet Master 
Kensington
, Maryland
Join Date: Jan 2016
Posts: 554
|
Quote:
Originally Posted by carver 1

I recently did the changeover and added the pendant so I could see the charge status without opening the access door to the unit. I find it helpful to just look down the center isle when entering to check battery charge status.
|
I had the 4655VL installed and just rec'd in the mail a pendant. I'm looking for where this plugs in and can not find the location of the accessory port.
This is the pendant I got from bestconverter (thank you sirs):
PD92201TV Remote Pendant (4600 Series)
The business end is a female 4 pin receiver not a RJ45 style plug.
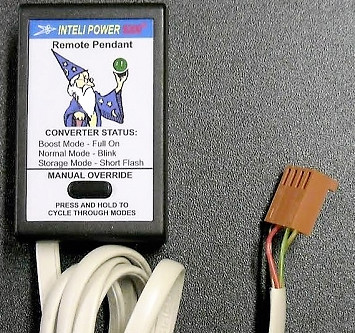 pendant pendant by , on Flickr

|

|

|


|
12-23-2017, 04:37 PM
|
#82
|
Rivet Master
Currently Looking...
Walnut Creek
, California
Join Date: May 2015
Posts: 3,952
|
It is on the power board. Black wire (at least, I think it is black, runs from DC dist board, down to the left. Look for a similar plug to the one on the dongle. Remove the one that is plugged in. Leave it loose and then plug in the dongle plug. Then call up the folks who sent it to you and ask why they do not take the time to print up a simple instruction sheet when they send the dongle out to the customer. Pat
|
|
|
|
|
12-23-2017, 07:39 PM
|
#83
|
Rivet Master
Kensington
, Maryland
Join Date: Jan 2016
Posts: 554
|
Quote:
Originally Posted by PKI
It is on the power board. Black wire (at least, I think it is black, runs from DC dist board, down to the left. Look for a similar plug to the one on the dongle. Remove the one that is plugged in. Leave it loose and then plug in the dongle plug. Then call up the folks who sent it to you and ask why they do not take the time to print up a simple instruction sheet when they send the dongle out to the customer. Pat
|
Thanks Pat, I searched besterconverter.com and think I found it. *Pic from bestconverter.com
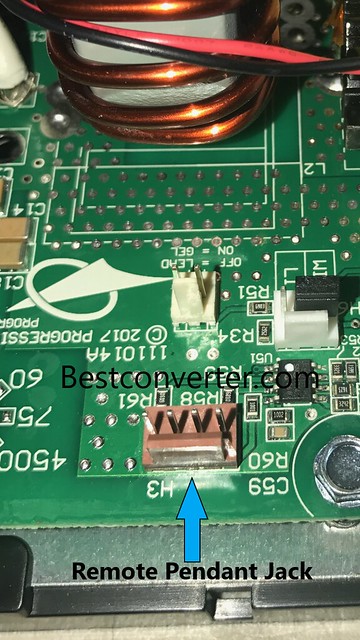 pendantjack1 pendantjack1 by , on Flickr
|
|
|
|
|
12-24-2017, 02:26 PM
|
#84
|
Rivet Master
Kensington
, Maryland
Join Date: Jan 2016
Posts: 554
|
Got the pendant installed and it works in all modes and shows the stated charge values verified with a meter 
I've put it into "normal" mode. In the morning I should see it in "storage mode" @ 13.2 and I'll relax 
Thanks for the help
|
|
|
|
|
04-29-2018, 01:46 PM
|
#85
|
4 Rivet Member 
2014 25' FB Flying Cloud
Des Peres
, Missouri
Join Date: May 2016
Posts: 266
|
I installed a PD4655 in a 2014 25 ft in November and purchased to new group 31 batteries. Each time I checked the status and got a 13.2V reading
Added water one time over the winter
I also get 13.2V reading at the batteries using a Fluke tool
Now as I'm getting ready to leave on a 6 week trip I was cleaning and thought I would remove the shore power and run the led lights and retest voltage
Surprised to see my batteries drop in 10 minutes to 12.2V
Are my batteries bad? What is wrong ? Is the PD4655 doing its job if I get a 13.2V on shore power? help
|
|
|
|
|
04-30-2018, 10:34 AM
|
#86
|
|
Living Riveted since 2013

2016 Interstate Lounge Ext
Green Cove Springs
, Florida
Join Date: Dec 2013
Posts: 8,210
|
Replaced a Paralax 7355 with PD 4655 converter
Was your battery switch in the use or store position while plugged in? Meanwhile, to determine the health of your batteries, I would definitely check the status of each cell in each battery with the usual flooded lead acid battery tester.
__________________
Rocinante Piccolo is our new-to-us 2016 Interstate Lounge 3500 EXT
(Named for John Steinbeck's camper from "Travels With Charley")
|
|
|
|
|
04-30-2018, 02:44 PM
|
#87
|
Rivet Master
2005 31' Classic
Garner,
, North Carolina
Join Date: Oct 2012
Posts: 1,031
|
WOW man.. put in some paragraphs. this super hard to read.
Quote:
Originally Posted by Rrroberts40
Let's assume you are replacing a Paralax 7355.
#1- Make sure you unplug your trailer from shore power and disconnect your neg battery cables (both) and shield them I used leather gloves but make sure they don't move around and touch the posts in any way.
You remove the 4 torx screws at the bottom of the cover that is over the converter and fuse/breaker unit. Remove the 2 screws on the left AC side plate where the breakers are. You will see a white wire going to the buss on the left late outward at the top and unscrew that bolt that holds the blue wire onto the plate. Then on the back side of the plate unscrew the white wire that goes down to the converter and pull those two wires out thru the hole in the encasement. Now is where you will need to decide if the 2 heavier battery wires are long enough to reach around the back and to the top of the new fuse plate that comes with the new PD4655. Mine were not. These wires are much heavier guage that the other two one is red housing the other white. If there is little or no slack in these two they will not reach and unless you want to pull the whole assembly out of the wall and see if you can get slack I would just use the old fuse plate. So remove the 4 screws from the old converter and pull it out and feed the 4 wires out as you go. So if you have decided you don't have the slack just leave the fuse plate in place and slide the new PF4655 in where the old unit was making sure you feed the wires back thru the encasement holes as you go. There will be three wires now on the left AC side one black, one white, and one green. The other 2 wires that go into the DC side are one black and one white instead of the originals where one was blue with a wire eye in the end and the other one is the same white. Now on the left AC side replace the yellow wire nut with a red one and put the black wire in with the other two already there making sure the are even and wire nut them together. Now still on the left side put the white wire back in where you removed the old white wire on the left side buss. Now the green wire is new there wasn't one on the old setup. It needs to go in the ground buss at the top of that opening..it looks similar to the buss where you put the white wire in but there will be several copper wires that have no insulation on them. If you have an open spot put it in that one..I did not so I put it in with the smallest guage ground wire in the buss..now these three wires on the AC side were all way too long so I did cut them down and resoldered the ends to make it so it was cleaner although you could be careful and route those wires and keep them the same length..personally I would cut them and resolder prep the ends. Now on to the right DC side. If you choose to use the old fuse plate like I did you are almost done. You will need to hit the hardware store and get a crimp on eye to put on the end of the black wire like the original blue wire had...do not shorten the wire you will need all the length..make sure to route the wires behind the plate and watch out for the mounting area behind the plate when you screw it back down and not to pinch the wire in there. then attach the white wire in the same place the original white wire went and you're good to go...the battery wires should still be attached where they were...if you removed them just re attach them where they were.If your battery wires had enough slack run them around the back of the fuse plate and into the proper spots on the new board. They are well marked. If you use the new plate you do not need to add the eye to the black wire. Put the 4 screws in the new converter and reinstall the cover plate with the 4 new screws that come with the kit as they are slightly smaller than the original ones.
|
__________________
Carl, Raleigh NC
2-24-16 got a 2005 Classic 31D 460 watts solar, lithium 230 AH, 16" LT's, pulled by:
2003 F-250 SD, CC, 7.3L PowerStroke
WBCCI#1691, Piedmont Airstream Club, Unit #161, Region #3
|
|
|
|
|
04-30-2018, 08:09 PM
|
#88
|
4 Rivet Member
2014 25' FB Flying Cloud
Des Peres
, Missouri
Join Date: May 2016
Posts: 266
|
Quote:
Originally Posted by Rocinante
Was your battery switch in the use or store position while plugged in? Meanwhile, to determine the health of your batteries, I would definitely check the status of each cell in each battery with the usual flooded lead acid battery tester.
|
The switch was on use all winter and plugged to shore power.
I pulled the batteries and took them to the dealer who tested each cell and load test both batteries.
They tested fine
So, now I'm very confused why I was getting such low voltage readings
When you pulled the shore power does the batteries drop and then come back once off the charger?
|
|
|
|
|
|
|
Currently Active Users Viewing This Thread: 1 (0 members and 1 guests)
|
|
|
| Thread Tools |
Search this Thread |
|
|
|
| Display Modes |
 Linear Mode Linear Mode
|
 Posting Rules
|
You may not post new threads
You may not post replies
You may not post attachments
You may not edit your posts
HTML code is Off
|
|
|
|

 Recent Discussions
 |
|
|
|
|
|
|
|
|
|
|
|
|
|
|
|
|
|
|
|
|
|


