 |
|
 01-31-2010, 09:47 AM
|
#21
|
Rivet Master 
1974 Argosy 26
Morrill
, Nebraska
Join Date: Nov 2009
Posts: 6,014
|
Trailer body and Frame
I have a '74 Argosy with some minor floor rot near the entrance door and in the bath. While doing the repairs. A question came to mind. How is the Aluminum frame of the body attached to the steel frame of the trailer? I can see that the floor is attached to the steel frame and there are sheetmetal screws that attach an aluminum channel in which the floor is sandwiched. It looks like the ribs (aluminum frame members) are attached to this aluminum channel as well as the inner and outer skin. Is the floor wood an intergral part of the frame structure? If it is rotted in too many places will the body become detached from the frame? ")
|

|

|


|
01-31-2010, 09:58 AM
|
#22
|
2 Rivet Member 
1979 31' Excella 500
1973 25' Tradewind
Cinnaminson
, New Jersey
Join Date: Mar 2006
Posts: 40
|
I have used Alco Gutter Seal on every seam of the exterior, and have not had any problems since. It produces a finer bead than Vulkem does, IMHO
__________________
Tom Beitz
6760 PA Unit
TAC NJ-5
Riverton, NJ
|
|
|
|
|
01-31-2010, 10:31 AM
|
#23
|
Rivet Master
1967 24' Tradewind
Greenville
, South Carolina
Join Date: Jan 2009
Posts: 1,107
|
That rust doesn't look too bad. If it structurally sound , I'd just POR 15 or similar product it and be done with it.
|
|
|
|
|
01-31-2010, 11:16 AM
|
#24
|
Rivet Master
1973 27' Overlander
Currently Looking...
Jupiter
, Florida
Join Date: Apr 2006
Posts: 2,061
|
As is, if you use enough paint to get the bottom edges of the rusted outriggers it will glue the aluminum to the iron - if the main ladder rails don't appear to need immediate care you can fold that wrap section down like a flower petal and care for the outriggers - just have to have the will-power not to scratch any other itch :/
__________________
The days are short and the night is long and the stars go tumbling by.. . ~Airstream~
|
|
|
|
|
01-31-2010, 03:34 PM
|
#25
|
4 Rivet Member 
2005 16' International CCD
Austin
, Texas
Join Date: May 2009
Posts: 356
|
I have cut out larger sections of the floor and will post pics of what I have found. Hopefully this will give a better idea of the rust situation. My initial gut feeling based on the feedback I've gotten so far is that it's just surface level. There are some areas that seem to be corroding deeper than that, but only in small spots....pics coming in a few hours.
|
|
|
|
|
01-31-2010, 10:04 PM
|
#26
|
4 Rivet Member
2005 16' International CCD
Austin
, Texas
Join Date: May 2009
Posts: 356
|
|
|
|
|
|
02-01-2010, 10:58 AM
|
#27
|
Rivet Master
1973 27' Overlander
Currently Looking...
Jupiter
, Florida
Join Date: Apr 2006
Posts: 2,061
|
Wow. You really don't want to hear what I want to say so I will say this... Looks like your timing is perfect, just enough damage to warrant refurbishing but not enough you will be splicing in new metal.
__________________
The days are short and the night is long and the stars go tumbling by.. . ~Airstream~
|
|
|
|
|
02-01-2010, 12:43 PM
|
#28
|
4 Rivet Member
2005 16' International CCD
Austin
, Texas
Join Date: May 2009
Posts: 356
|
Quote:
Originally Posted by Wabbiteer

Wow. You really don't want to hear what I want to say so I will say this... Looks like your timing is perfect, just enough damage to warrant refurbishing but not enough you will be splicing in new metal.
|
My intent from the beginning was to refurbish it, but that didn't include doing major frame work. What I now want to know is does this look like I need to deal with frame repair? Is this much rust normal for a 30 year old Airstream?
|
|
|
|
|
02-01-2010, 04:44 PM
|
#29
|
Rivet Master
Join Date: Nov 2008
Posts: 1,177
|
Yes! I mean No!, Wait a minute. What was the first question?
The frame looks okay for its age. If you find areas with lots of missing metal you will want to do something about it. Otherwise, just get to it with a wire wheel and a drill, etc. I used jasco rust-convertor on my frame before priming and painting it, and it worked really well. Inspect the welds for poor workmanship as well as rust. My frame had holes blown in it by the welder at the time it was made.
Carry on, it looks like all the rest of them.
Rich the Viking
Quote:
Originally Posted by adwriter73
My intent from the beginning was to refurbish it, but that didn't include doing major frame work. What I now want to know is does this look like I need to deal with frame repair? Is this much rust normal for a 30 year old Airstream?
|
|
|
|
|
|
02-01-2010, 05:01 PM
|
#30
|
4 Rivet Member
2005 16' International CCD
Austin
, Texas
Join Date: May 2009
Posts: 356
|
Do I need to treat the rust or just make sure no more water gets in? The reason I ask is because I would need to remove the belly pan to get at all of it. I am willing to do this if it is absolutely necessary. Just was hoping if I prevent any future rust, then the current state of the frame could be let alone. Thoughts on that?
|
|
|
|
|
02-01-2010, 05:03 PM
|
#31
|
Rivet Master
1979 31' Sovereign
1950 22' Liner
Powhatan
, Virginia
Join Date: May 2009
Posts: 521
|
Just for reference - Our 1979 looked similar to yours at the rear when we got it last summer. A little less flaking but probably as many pits in the metal. The front sides looked better on ours but we didn't have much of a leak anywhere else except the rear.
First thing we did after polishing was to make sure that all of the leaks were fixed. The bumper leaked in a number of areas (inside the trunk, between the trunk roof and base of the camper walls, along the top edges of the frame rails, etc.). There is a good thread on that call "Inexplicable Bumper Design" that helped me find all of these spots.
After the leaks were gone, I hit the frame with a drill wired brush to get back to metal all over the exposed frame where rust appeared, hit it with a good spray primer and then paint. The rust was only at the far ends of the frame rails and the bottom next to the bellypan/wraps. I think the bumper on ours was leaking for quite some time and water didn't have a quick exit.
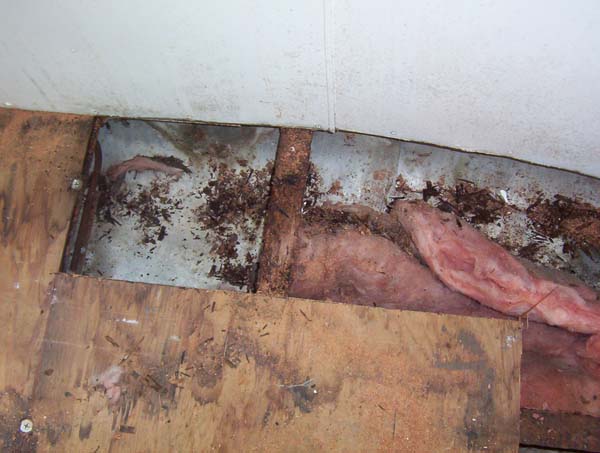
The worst of it (before shot). The junk in the pan was rotted pieces of wood:
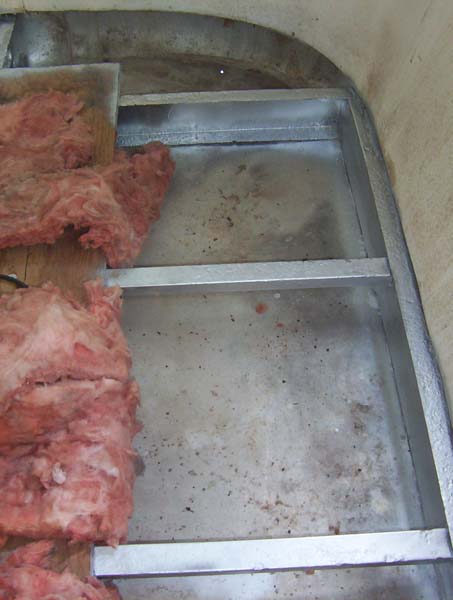
The worst of the pitting is shown here. Look at the base of the top, horizontal frame rail. The pitting on the bottom of this rail extends outside to the end under the bumper:
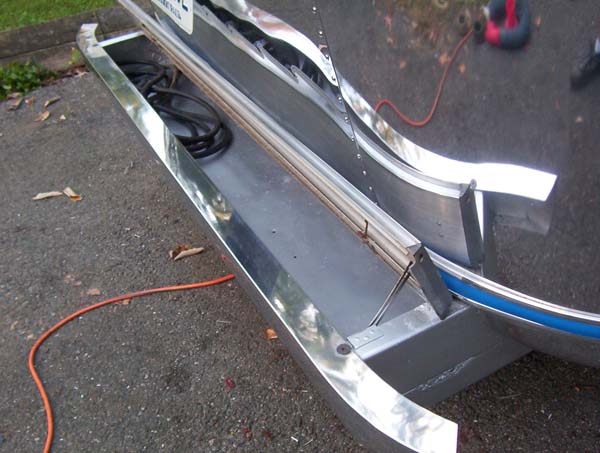
You can see the pitting extended to the outside (right side frame rail). Again, we wire brushed and primed, then painted it here.
__________________
Tadd, Beth, Grundgetta and Weeble
Our blog
Proud to be Air #37137
|
|
|
|
|
02-01-2010, 05:42 PM
|
#32
|
Rivet Master
Join Date: Nov 2008
Posts: 1,177
|
Best thing is to remove the belly pan and get all of the rust out of there. You can't keep water out of the belly and shouldn't try to. The idea is to make your frame as rust-proof as possible. It doesn't help to put the fiberglass insulation back in when you fix this. I would go to sheet polyurethane with closed cell structure, or a radiant barrier. Just nothing that will hold water. Do use a rust convertor. Primer and paint alone do not do the same job.
Rich the Viking
Quote:
Originally Posted by adwriter73
Do I need to treat the rust or just make sure no more water gets in? The reason I ask is because I would need to remove the belly pan to get at all of it. I am willing to do this if it is absolutely necessary. Just was hoping if I prevent any future rust, then the current state of the frame could be let alone. Thoughts on that?
|
|
|
|
|
|
02-01-2010, 08:23 PM
|
#33
|
4 Rivet Member
2005 16' International CCD
Austin
, Texas
Join Date: May 2009
Posts: 356
|
Bowmans, thanks for the post. Sanding, priming and painting seems like it would help. The only problem is that it appears there is rust where the frame meets the belly pan almost everywhere. Some of the pics I took are me looking down under the subfloor sections I have not pulled up. I may just suck it up and attempt to drop the belly pan and do this right.
On another note, Bowmans. I looked at your posts and pics and you are doing everything I want to do to mine. I may pick your brain later. Your trailer looks beautiful!
|
|
|
|
|
02-01-2010, 08:25 PM
|
#34
|
4 Rivet Member
2005 16' International CCD
Austin
, Texas
Join Date: May 2009
Posts: 356
|
Quote:
Originally Posted by VIKING
Best thing is to remove the belly pan and get all of the rust out of there. You can't keep water out of the belly and shouldn't try to. The idea is to make your frame as rust-proof as possible. It doesn't help to put the fiberglass insulation back in when you fix this. I would go to sheet polyurethane with closed cell structure, or a radiant barrier. Just nothing that will hold water. Do use a rust convertor. Primer and paint alone do not do the same job.
Rich the Viking
|
Thanks for your advice. I agree with you on this. Pulling that belly pan off makes me nervous. I feel like I might be getting in over my head with that. Although, I'm already starting to feel that way now!
|
|
|
|
|
02-01-2010, 10:04 PM
|
#35
|
|
1972 Travelux Princess 25
Cobourg
, Ontario
Join Date: Oct 2008
Posts: 1,059
|
It's not a question of what is "normal" but is the strength of the frame compromised?
Generally speaking surface rust does not take away strength but holes rusted through, does. But even then a few small holes will not ruin the frame if they are not in a critical area.
In your case it looks as though you can clean the rust off and paint the frame even though the edges are eaten away in a few areas.
Paint with a rust killing paint lik POR 15 or Rustoleum. If you use Rustoleum give at least 2 coats for complete protection.
It would be best if you could take off the belly pan for complete access, however I understand why you do not want to do this. Do the best you can to get complete paint coverage.
__________________
Living in the trailer park of sense, looking out the window at a tornado of stupidity.
|
|
|
|
|
02-02-2010, 09:16 AM
|
#36
|
Rivet Master
1973 27' Overlander
Currently Looking...
Jupiter
, Florida
Join Date: Apr 2006
Posts: 2,061
|
From what I've seen you are fortunate - full-time occupied and slight black water seepage acids make iron vanish anywhere within 5-8 feet of the leak, trailers located near the ocean for any lengthy period of time have wind-blown salt that disappear iron everywhere, towing the trailer in the snow belt on roadways messy and wet with ice-melt chemicals make it all grow crystals for years and years afterward.
Unless there are surprises hidden by the belly pan sheet metal it looks like its good to paint.
You are wise to recognize the belly pan and wraps are getting complicated but you don't have to take them all off at once, folks have dropped half a pan sheet and repaired above it, reattached the sheet and then dropped the other half. Same thing with the wraps, if you do it the side pieces at same time as belly sheet the morale boost of seeing it go back together before continuing further is great.
The factory frame paint on my trailer was an waxy asphalt base and something akin to creosote. In the protected subfloor area in front of the axles where it was fresh and clean I covered it with two coats of aerosol flat black Rustoleum.
I used POR-15 to spot the rusted bottom edges, anywhere aluminum would contact the iron, and POR-15 everywhere outside the ladder frame and behind the axles... I would not consider using anything else, just have the prep work done, brush on two coats, three where it looks rough, and it is armor plated for another 30 years. Honestly POR-15 is " paint over rust fifteen " - get rid of the top rust scale, wipe it down to get the rust dust off and paint. The only glitch with it is the waxy original frame paint will not allow it to bond well but then spot treating rust spots with POR-15 and over coating with Rustoleum is an easy fix...
__________________
The days are short and the night is long and the stars go tumbling by.. . ~Airstream~
|
|
|
|
|
02-02-2010, 02:22 PM
|
#37
|
4 Rivet Member
2005 16' International CCD
Austin
, Texas
Join Date: May 2009
Posts: 356
|
Quote:
Originally Posted by Wabbiteer
S
I used POR-15 to spot the rusted bottom edges, anywhere aluminum would contact the iron, and POR-15 everywhere outside the ladder frame and behind the axles... I would not consider using anything else, just have the prep work done, brush on two coats, three where it looks rough, and it is armor plated for another 30 years. Honestly POR-15 is " paint over rust fifteen " - get rid of the top rust scale, wipe it down to get the rust dust off and paint. The only glitch with it is the waxy original frame paint will not allow it to bond well but then spot treating rust spots with POR-15 and over coating with Rustoleum is an easy fix...
|
Interesting idea about dropping just parts of the belly pan at a time. If that makes the job easier, I am all for it. I think I will try a section to see how successful I am. I'm curious about your suggestion to use POR-15. Will Rustoleum alone not do the trick? Rustoleum is actually what the local Airstream shop (North Dallas RV) recommended.
|
|
|
|
|
02-02-2010, 02:48 PM
|
#38
|
Rivet Master
Join Date: Nov 2008
Posts: 1,177
|
Rustoleum isn't as durable as POR-15, but I went with it anyway. At about 1/4 the cost, and locally available, it's a tough choice  The most important thing is to get a rust convertor applied before you prime & paint. There are several kinds out there. I used Jasco convertor and rustoluem primer and paint. It comes in Fire Engine Red!
Rich the Viking
Quote:
Originally Posted by adwriter73
Interesting idea about dropping just parts of the belly pan at a time. If that makes the job easier, I am all for it. I think I will try a section to see how successful I am. I'm curious about your suggestion to use POR-15. Will Rustoleum alone not do the trick? Rustoleum is actually what the local Airstream shop (North Dallas RV) recommended.
|
|
|
|
|
|
02-02-2010, 03:06 PM
|
#39
|
Rivet Master
1973 27' Overlander
Currently Looking...
Jupiter
, Florida
Join Date: Apr 2006
Posts: 2,061
|
The technology behind POR-15 is similar to what structural steel for highway overpasses and bridges are coated with; Aluthane is another good product along the same lines for about 1/3 less money. Either one you can't go wrong.
Hopefully without sounding like an advertisement... POR-15 is not undercut by rust, no filigree creep under the paint radiating outward from a chip or abrasion, no tree ear scallops of paint lifted and harboring moisture that make the neat little rust growth rings as the metal goes south, it simply welds itself into the metal pores and just sits there nearly inert. Great stuff. (Edit: I just looked out in the snow at my frame and am impressed still.)
Other folks think time is better spent using other products since the trailer will be sold off anyway or some other reasoning but I hope to have this airstream another thirty years. This summer will be 3 years and I have yet to see any flaw with the paint - just my application where I missed a air bubble in a pit or failed to wet down a crusty patch on an outrigger or a weld...
Beware the brand choice of 'rust converter' if you decide to go that way, at least one brand contains a plastic coating that can and will trap water underneath it and allow the coatings to fail by being undercut from any puncture to the film. There are places on my F-150 rear differential cover that are tin-foil thin from using the local speed shops converter product, I literally peeled off a dinner plate section of rust off it after coating it once it saw the first Minnesota winter...
__________________
The days are short and the night is long and the stars go tumbling by.. . ~Airstream~
|
|
|
|
|
02-02-2010, 06:12 PM
|
#40
|
Rivet Master
1974 Argosy 26
Morrill
, Nebraska
Join Date: Nov 2009
Posts: 6,014
|
Frame Rust
I think AS made a mistake in not ventilating the area between the belly pan and the interior floor. Since virtually everything above the belly pan is metal it is subject to the thing called CONDENSATION. Which occurs virtually every time the temperature is at DEW POINT. You see this when your cars windshield is covered with ice or is wet from the morning dew. That same condensation forms on virtually every metal surface whether it is internal or not. The black water you see exiting the tail pipe on your vehicle is the condensation that forms inside the exhaust system and engine. It's not so much the exterior moisture that destroys the exhaust system as it is the interior moisture. When you don't run your vehicle long enough to dry down the exhaust system you get premature failure of the system because the acidic component of the moisture eats it away from the inside. This is what happens inside the belly of the beast so to speak. All be it a slower process on the trailer. WE vent the attic and crawl space on our homes to prevent this condensation build up even on wood surfaces. I have seen ice an inch and a half thick on the underside of a home roof that is made from wood, because of poor ventilation. There is a lot of moisture inside your home and if not ventilated especially in cold climates can destroy the structure. It's not just exterior leaks that cause wood to dry rot, it's the condesation forming on the metal surfaces that are in contact with the wood. Wood framed travel trailers are very susceptible to this action. That's my 2 cents worth.
|
|
|
|
|
|
|
Currently Active Users Viewing This Thread: 1 (0 members and 1 guests)
|
|
|
| Thread Tools |
Search this Thread |
|
|
|
| Display Modes |
 Linear Mode Linear Mode
|
 Posting Rules
|
You may not post new threads
You may not post replies
You may not post attachments
You may not edit your posts
HTML code is Off
|
|
|
 Similar Threads
|
| Thread |
Thread Starter |
Forum |
Replies |
Last Post |
|
Got Rot! Now What?
|
Chasmorgan |
Floor Finishes |
29 |
12-21-2010 05:40 AM |
|
Why some floors rot
|
LI Pets |
Repairing/Replacing Floor &/or Frame |
10 |
10-07-2006 05:53 AM |
|
Rot Dr.
|
Mariner |
Repairing/Replacing Floor &/or Frame |
5 |
04-15-2004 08:25 PM |
|
To rot or not to rot.
|
Charming Wino |
Repairing/Replacing Floor &/or Frame |
15 |
03-01-2004 10:39 PM |
|
I have some rot
|
ipso_facto |
Repairing/Replacing Floor &/or Frame |
4 |
11-07-2003 06:23 PM |
|

|
Recent Discussions |
|
|
|
|
|
|
|
|
|
|
|
|
|
|
|
|
|
|
|
|
|


