 |
|
 08-05-2007, 07:29 PM
|
#1
|
2 Rivet Member 
1969 31' Sovereign
Cogan Station
, Pennsylvania
Join Date: Aug 2007
Posts: 34
|
New to it all - 1969!!
Hello everyone!
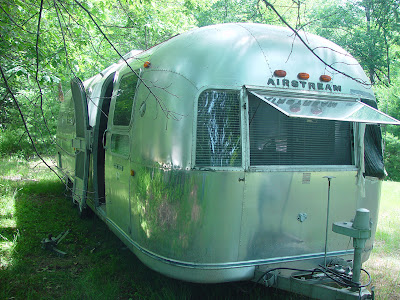
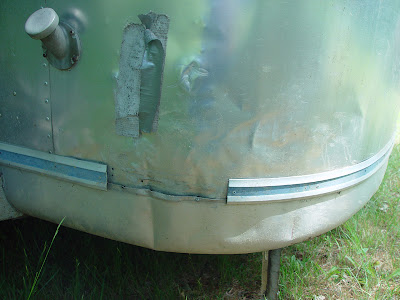
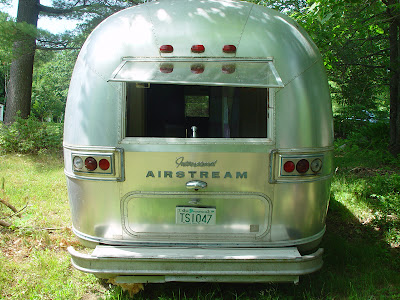
I just purchased a '69 Sovereign for $2500.00 and I have alot of work to do.
First I need to fix all of the marker lights, directionals, brake, etc. Second, I need to fix or replace the brakes. Finally, I need to replace 3 broken windows.
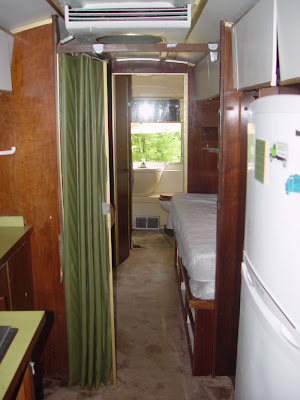
If I can get this old girl down to Pennsylvania from New Hampshire, I can use it to live in for a short period while I get my house livable.
After reading throught the forum a bit, I am sold on restoring the airstream in the future, but for now I need to fix some stuff.
Brakes and lights are not a problem, windows on the other hand look like they are going to beat me up. Especially the fixed windows(ones that do not open).
I need help on removing rivots and attacking the replacement.
Any help would be greatly appreciated!
thanks all!
|

|

|


|
08-05-2007, 07:41 PM
|
#2
|
|
Retired.
Currently Looking...
.
, At Large
Join Date: Jun 2003
Posts: 21,276
|
Hi, Ira, and welcome to the forums. Your "new" 69 has some windows that are unique to the 1969 models, hopefully you will not need to replace them. As for removing rivets, you can either use a fairly sharp putty knife and hammer to cut the heads off, or use an impact-type center punch to nick a spot in the center of the rivet for drilling.
As for the brakes, you should have no problem getting parts for them, although you may want to update them as you go. There have been some advances in electric braking since your trailer was built, and it would help your braking efforts to look into the new (oval magnet) type.
__________________
Meddle not in the affairs of dragons, for you are crunchy, and taste good with ketchup.
Terry
|
|
|
|
|
08-05-2007, 08:43 PM
|
#3
|
Rivet Master 
1963 16' Bambi
1962 22' Safari
Yreka
, California
Join Date: Mar 2006
Posts: 1,937
|
Welcome!
Welcome to the forums and congrats on your Airstream! This is the best place to find all the answers! 
Up near the top right you will find the word "search" in the blue tool bar, pull it down and search for the topics you are interested in! Your search may find all threads that have that key word in them, so sometimes just posting a query will bring you the fastest answers!
My recommendation is go for safety factors first, then deal with the comfort and beautiful aspects as time allows. It is a great idea to live in your Airstream awhile... it will give you great insights into what things you may want to keep and what you may want to change! 
Have fun and post some pictures ~ now and later! We love pictures here!
Mrs. NorCal Bambi (traveling in S Tardis)
|
|
|
|
|
08-05-2007, 08:48 PM
|
#4
|
2 Rivet Member
1969 31' Sovereign
Cogan Station
, Pennsylvania
Join Date: Aug 2007
Posts: 34
|
Hey, thanks for the quick reply!
Because the brakes surely need some work, I will take your advice and re- build with oval type. I wonder, would I need to replace the backing plates?
I have been looking over the forums and noticed a few options that I haadn't thought of. One was to cover the "skinny" windows with aluminum, per post: http://www.airforums.com/forums/f454...gin-34135.html
The other was to use lexan instead of having the local Airstream dealer order new glass.
Any thoughts on this?
Also, about running new wires. Is there a trick to this? Is there a chase of some kind to help eliminate cutting holes? I am really good a fishing wires in houses, but I have not idea about the internal structure of the walls of the trailer. So I really do not know where to begin.
Thanks again,
Ira
|
|
|
|
|
08-05-2007, 08:57 PM
|
#5
|
2 Rivet Member
1969 31' Sovereign
Cogan Station
, Pennsylvania
Join Date: Aug 2007
Posts: 34
|
|
|
|
|
|
08-05-2007, 09:04 PM
|
#6
|
|
Moderator

2015 25' FB Flying Cloud
2012 23' FB Flying Cloud
2005 25' Safari
Santa Rosa Beach
, Florida
Join Date: Jul 2006
Posts: 13,159
|
Welcome to the Forums. We're glad to have you with us.
The old girl actually looks pretty good. She is well worth the effort.
__________________
SuEllyn & Brian McCabe
WBCCI #3628 -- AIR #14872 -- TAC #FL-7
2015 FC 25' FB (Lucy) with ProPride
2020 Silverado 2500 (Vivian)
2023 Rivian R1T (Opal)
|
|
|
|
|
08-05-2007, 09:30 PM
|
#7
|
3 Rivet Member 
1963 19' Globetrotter
1963 22' Flying Cloud
1963 24' Tradewind
,
, Minnesota
Join Date: Apr 2007
Posts: 245
|
Welcome to the forum. Id go with L.E.D for the lights I just got mine done 197 diodes total on whole trailer. Then you never have to worrie about having lights out. Looks like you got a good deal to me. Restoring an Airstream is real addicting have fun 
|
|
|
|
|
08-06-2007, 05:00 AM
|
#8
|
2 Rivet Member
1969 31' Sovereign
Cogan Station
, Pennsylvania
Join Date: Aug 2007
Posts: 34
|
finding the answers
WOW!
I got online last night, registered on the forum and dropped a few posts. Not 20 minutes later, I was welcomed by a few members, received advice about brakes and lights and found a lot of the answers I was looking for. My fear of getting the "old girl" into shape is beginning to fade.
I am still having trouble finding posts about retro fitting wires, but as for rivots, this link pretty much put my fears to rest:
http://www.airforums.com/forums/f381...lation-23.html
Fantastic step-by-step and wonderful pictures. Not to mention the great replies.
|
|
|
|
|
08-06-2007, 05:11 AM
|
#9
|
|
Retired.
Currently Looking...
.
, At Large
Join Date: Jun 2003
Posts: 21,276
|
Of wires and windows
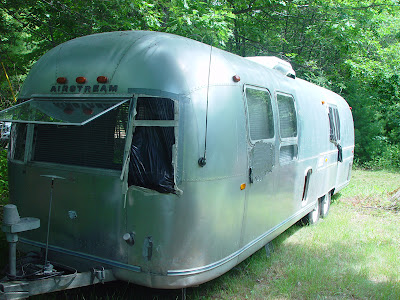
First, the left wing window (in front of the trailer) is specific only to 1969 models. If the frame is still good for the window, you will probably be looking at lexan to replace it. The other windows you may luck out, and find a replacement that will fit with little or no modification.
All the 12v wiring for the coach runs inside the center panel of the ceiling, on the curb (right) side of the coach. The exception would be wiring for the brakes, obviously that runs low, and splits to feed all 4 wheels.
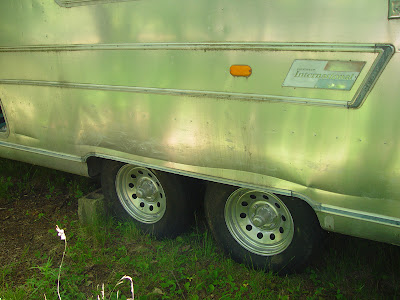
The easiest way to fix your brakes is to get loaded backing plates, they can be had for $50 each, and as long as your drums are in good shape, you can repack the bearings, install new seals, adjust the brakes, and you're ready to go. Note the brakes are different, left and right. It is important to get them on the correct side (duh), or they won't work properly.
__________________
Meddle not in the affairs of dragons, for you are crunchy, and taste good with ketchup.
Terry
|
|
|
|
|
08-06-2007, 05:55 AM
|
#10
|
4 Rivet Member 
1962 16' Bambi
Newtown Square
, Pennsylvania
Join Date: Apr 2005
Posts: 402
|
Hi Ira,
Welcome to the forums! Looks like you found yourself a nice Airstream to live in. What part of PA are you heading to?? Good luck with the project.
__________________
George 
1962 16' Bambi (sold  )
1996 Buick Roadmaster Estate Wagon
Airforums# 7906, WBCCI #4248, WDCU
|
|
|
|
|
08-06-2007, 06:48 AM
|
#11
|
2 Rivet Member
1993 30' Excella
1969 18' Caravel
Lovettsville
, Virginia
Join Date: Aug 2004
Posts: 43
|
Wing window replacement...
Hi IRA
I'm in the process of replacing the front road side wing window of my new to me Caravel - the same window that you need to replace.
The process to do this is not too difficult but it is time consuming. I used a combination of an initial center drilling of the rivet heads, which seemed to produce a slight gap underneath the head, and then using a cold chisel under the exposed gap to knock the rest of the head off. Then I used a putty knife to (carefully) pry the frame off. The extremely close proximity of the window frame virtually butted up against the front window does not make this a fun task (later ASs had a divider bar between the windows - much better design). After the frame is removed simply use a dremel tool and grind the rest of the rivet flush with the skin and use a heat gun to remove the old vulkem.
The factory has replacement windows in plexiglass ALREADY FRAMED. I decided to go this route since my curbside window was already replaced at some point with plexiglass.
Good luck with your new purchase...
Bob
|
|
|
|
|
08-06-2007, 09:01 AM
|
#12
|
Rivet Master
1983 34' Excella
1967 24' Tradewind
Little Rock
, Arkansas
Join Date: Nov 2006
Posts: 3,825
|
 Welcome to the Forums
Hi Ira,
It is a pretty nice looking trailer. Certainly worth fixing up. It is a good size to live in while you work on your house, too. Keep us updated on your progress.
Vaughan
|
|
|
|
|
08-06-2007, 10:07 AM
|
#13
|
2 Rivet Member
1969 31' Sovereign
Cogan Station
, Pennsylvania
Join Date: Aug 2007
Posts: 34
|
Thanks for the incoming info!
I called a local AS dealer to ask about windows and the parts guy made it clear that the AS factory wants pictures and measurements. takenitez, where did you find premade plexi windows with frames?
Thanks again everyone!
|
|
|
|
|
08-06-2007, 11:44 AM
|
#14
|
|
Married to Soldiermedic
San Antonio
, Texas
Join Date: Nov 2006
Posts: 437
|
Welcome good to see another younger face here, good luck with the rehab of the AS. It can be time consuming but well worth it.
|
|
|
|
|
08-06-2007, 03:09 PM
|
#15
|
2 Rivet Member
1969 31' Sovereign
Cogan Station
, Pennsylvania
Join Date: Aug 2007
Posts: 34
|
OK, I think I know what I have to do as far as windows go. The Frames are all in good condition, so buying new windows with frames may not be necessary, I hope. I was quoted near or over $400 to replace each window(Not installed). $1000 is far to much considering the other work that needs to be done. 1/8" Lexan is about $7 a squart foot at the local glass place. No more than $50 a window and they will cut to fit frame. Now, if I can find the proper seals for the frame, this should allow me to put $$ into other areas, like safety stuff(brakes, etc.)
If anyone can see error in my thinking, please let me know.
Thanks again everyone,
|
|
|
|
|
08-06-2007, 03:46 PM
|
#16
|
|
Retired.
Currently Looking...
.
, At Large
Join Date: Jun 2003
Posts: 21,276
|
Quote:
|
Originally Posted by badelson
Now, if I can find the proper seals for the frame, this should allow me to put $$ into other areas, like safety stuff(brakes, etc.)
If anyone can see error in my thinking, please let me know.
Thanks again everyone,
|
Grab a tube of Vulkem, and seal away. It's about $7 a tube. One tube should do 2-4 windows, depending on size.
__________________
Meddle not in the affairs of dragons, for you are crunchy, and taste good with ketchup.
Terry
|
|
|
|
|
08-06-2007, 04:44 PM
|
#17
|
2 Rivet Member
1969 31' Sovereign
Cogan Station
, Pennsylvania
Join Date: Aug 2007
Posts: 34
|
Thank you!
I will assume that vulcam sticks well to lexan.
Thanks again Overlander63 for all your help.
|
|
|
|
|
08-06-2007, 04:47 PM
|
#18
|
|
Retired.
Currently Looking...
.
, At Large
Join Date: Jun 2003
Posts: 21,276
|
Quote:
|
Originally Posted by badelson
Thank you!
I will assume that vulcam sticks well to lexan.
Thanks again Overlander63 for all your help.
|
I have found Vulkem sticks to just about anything it comes into contact with, and have the ruined clothes to prove it...
__________________
Meddle not in the affairs of dragons, for you are crunchy, and taste good with ketchup.
Terry
|
|
|
|
|
08-06-2007, 05:46 PM
|
#19
|
2 Rivet Member
1993 30' Excella
1969 18' Caravel
Lovettsville
, Virginia
Join Date: Aug 2004
Posts: 43
|
Wing window part #
Ira
The part # for the framed streetside wing window is #680190, which was given to me when I called the AS factory parts dept. Then I called an AS dealer who ordered this part for me.
My window seal was in bad shape which is why I didn't attempt an "on the trailer" window replacement.
Good luck with your window replacements and I wish you "leak free" fixes...
Bob
|
|
|
|
|
08-06-2007, 06:44 PM
|
#20
|
2 Rivet Member
1969 31' Sovereign
Cogan Station
, Pennsylvania
Join Date: Aug 2007
Posts: 34
|
Bob, thanks for the part no.
On a different thread, I was told that lexan and plexi flex and that you can have issues with the seal. You would think that you could lay a bead of some kind of sealant to eliminate this problem. I wonder if the people that have used lexan have gone with a full 1/8" or something thinner. 1/8 inch lexan should be reasonably rigid.
Hey, what is the thickness of the original glass anyway? If you are not going to use the original rubber seal, why couldn't you go with a thicker piece of lexan?...Say 3/16", that should help with the flex issue and maybe still leave room for the previously recommended vulkam sealant. When I pulled the old rubber seals out of the frames yesterday, I could have sworn that between the glass and the seal there was at least a quarter inch to work with in the frame.
Any thoughts?
|
|
|
|
|
|
|
Currently Active Users Viewing This Thread: 1 (0 members and 1 guests)
|
|
|
 Posting Rules
|
You may not post new threads
You may not post replies
You may not post attachments
You may not edit your posts
HTML code is Off
|
|
|
|

 Recent Discussions
 |
|
|
|
|
|
|
|
|
|
|
|
|
|
|
|
|
|
|
|
|
|


 Linear Mode

