 |
|
 05-29-2013, 02:23 PM
|
#141
|
2 Rivet Member 
Join Date: Mar 2008
Posts: 76
|
Quote:
Originally Posted by El Gitano

Hi, we just purchased #16 from Boyd Freemman.
Thanks, David Bishop (El Gitano)
|
Congratulations David. Roz just posted in another thread that they just recently purchased #70, and brought it back to their home in Dallas, Oregon. I think there's another Custom in Portland as well. So there are at least three in a fairly small area. We'll have to have to try and plan a local Winick Rally sometime.
|

|

|


|
05-30-2013, 02:54 AM
|
#142
|
|
'06 75th Winick Prototype
2006 19' International CCD
1968 22' Safari
The Swamps of Hell
, Lousy-Anna
Join Date: Oct 2006
Posts: 228
|
Quote:
Originally Posted by kd7trx
Just before removing those reflectors I installed the louvered vents to replace the plastic fridge vents, and that's a very nice upgrade that I'd recommend.
Here are some images of those two recent projects.
|
I almost went with those vents, but I always loved the radius'd Airstream aluminum vents. They were super expensive to buy and install...but I'm VERY glad that I went with them. I love the way they look. Last year I did a bunch of mods...I added three windows to the curbside (that Airstream installed crooked at first), streetside full size awning, rear window awning, stainless riveted water heater cover, 2nd Fantastic gray fan, three clearance lights across the front over the Airstream logo, all clearance lights changed once again (first time was at Bates) to the latest LED lights with "Classic" aluminum bezels, added a porthole window over the stove (Airstream installed the WRONG window...it is clear frosted; haven't fixed that yet), and added a solar panel. It was VERY expen$$$ive...and not very good work at the factory. I had ZipDee make some Pacific Blue Fancy wide chairs to match my awnings with "Airstream" logos added (which cost almost as much as the chairs themselves; I don't recommend it). I also removed all the stupid warning stickers and such...but left all the original logos. The factory every now and then totally rebuilds vintage trailers in the service bay; Rick at Airstream has had just a few "Custom" emblems actually custom made (no pun intended) for use on these trailers...effectively "1 of 1" trailers...I purchased one of these "Custom" emblems as the script matched the "75th Custom" Winick emblems on my trailer and had it installed on the rear of my trailer where a "Bambi" emblem would normally be (of which my trailer has none anywhere). You can see it some of the pics below. My trailer being the prototype had nothing there and it needed something...the "Custom" emblem was the perfect choice. It was very difficult getting them to sell me one, but with all the f up's during my trailer's mods they relented. I'm glad they did; especially since the trailer surely is 1 of 1 and gets more custom every year.
I've just recently added a modern TV; a 32" Samsung LED, and replaced the Parallax POS (that has been replaced twice-once by Bates prior to pick-up and once by Airstream as it failed while it was there for service) with an Intellipower PD9280. I've also had a custom screen made for the back window to allow it to be opened like a normal window. Seems I'm constantly changing something on the trailer...coming up are a new Furrion power inlet, custom blue power cord, custom blue TV cable cord, blue sewer hose, aluminum sewer support, and even a blue water hose...going crazy on the "matching" thing. 
Here are a few pics:


I also had my rims and tires for my SSR done to match what I did to my Airstream wheels and tires. I had the insides powdercoated sparkly transparent blue over chrome, added blue bowtie reflective logos and had dual blue lines added by DiamondBack tires to some Atturo AZ800 tires:
|
|
|
|
|
05-30-2013, 05:54 AM
|
#143
|
|
CampADK
Orleans
, Ontario
Join Date: Jun 2006
Posts: 6
|
All I can say is WOW! I love the extra window on the door side. We always have a water view from that window so you've got me thinking.
|
|
|
|
|
05-30-2013, 08:39 AM
|
#144
|
|
'06 75th Winick Prototype
2006 19' International CCD
1968 22' Safari
The Swamps of Hell
, Lousy-Anna
Join Date: Oct 2006
Posts: 228
|
Quote:
Originally Posted by kamper
All I can say is WOW! I love the extra window on the door side. We always have a water view from that window so you've got me thinking.
|
Yep, it made a huge difference...there was nothing there on that wall; just a huge empty space inside and out. The windows look like they should have been there all along. The difference inside is amazing. The trailer already is super roomy and the extra windows just open it up more. Just don't let Airstream install them...when I complained that the windows first installed were not level and straight with the ones right next to them I was told that I was being too picky and expected a level of perfection that they could not provide. I had to get in touch with Bob Wheeler who had the windows removed and reinstalled properly the next morning...not a fun experience.
|
|
|
|
|
05-30-2013, 08:43 PM
|
#145
|
4 Rivet Member 
2007 19' Bambi
Ottawa
, Ontario
Join Date: Jun 2006
Posts: 460
|
Nice Jeff!
Wow you're Winick must be worth over $100K now! 
I think my favorite mod you did is the extra set of windows by the bed.
Do you have photos looking from the inside you can post?
Did you replace the rear light assemblies which tend to end up with the filiform corrosion? We have some corrosion on one rear assembly ourselves.
Now you need to replace/buy/build a bike to match the Airstream lol.
|
|
|
|
|
05-30-2013, 10:46 PM
|
#146
|
2 Rivet Member
Join Date: Mar 2008
Posts: 76
|
Quote:
Originally Posted by campadk
Nice Jeff!
Did you replace the rear light assemblies which tend to end up with the filiform corrosion? We have some corrosion on one rear assembly ourselves.
|
Dave - I do a walk around the trailer real frequently, and pretty much keep up with the filiform corrosion spots while they're real small. This Spring during my walk-around, I spotted some pretty serious filiform starting on the tail light housings. I took the tail light lens trim rings off and tackled these new spots. Most of the filiform started at the screw holes for the trim ring fasteners, so cleaned those up real well along with the visible filiform, and put the finish on.
I've always noticed water dripping from the lights onto the rear bumper cover after washing "Wanda", and knew this was at the root of the problem. To give the water a better escape route, I drilled two small holes on the lower edge of each trim ring and reinstalled. They no longer trap water and no more dripping long after drying the trailer off.
We store "Wanda" in a covered storage facility somewhat near here, so I'll try to get down there in the next few days and take a photo of the trim ring holes.
I've had a Defender 90 for about 18 years now, which have tail light corrosion issues in the bulb socket, and drilling holes in the tail light lens is an old trick that works perfectly on those rigs. So I figured a similar action would probably be a good solution for the trailer as well, and I think it's going to be a success.
I'll post a photo soon.
Ed
|
|
|
|
|
05-31-2013, 01:27 AM
|
#147
|
|
'06 75th Winick Prototype
2006 19' International CCD
1968 22' Safari
The Swamps of Hell
, Lousy-Anna
Join Date: Oct 2006
Posts: 228
|
Quote:
Originally Posted by campadk
Nice Jeff!
Wow you're Winick must be worth over $100K now!
I think my favorite mod you did is the extra set of windows by the bed.
Do you have photos looking from the inside you can post?
Did you replace the rear light assemblies which tend to end up with the filiform corrosion? We have some corrosion on one rear assembly ourselves.
Now you need to replace/buy/build a bike to match the Airstream lol. |
I don't have any pics from the inside; I will try to take some this weekend but I keep the trailer in a storage so you won't see much scenery through the windows ha ha...
When I bought the trailer from Bates the taillights were horribly corroded (like almost ALL new Airstreams I've seen on lots...the most recent are the worst, they have this yellowing bubbly corroded appearance that looks like cat pee solidified on the lights).
One of the purchase agreements for my trailer was that Airstream would supply new light assemblies which they did. But, I've never installed them. They are clearcoated, but you KNOW what would happen to them if they were installed...filiform time! I didn't want to go on the "quest" to find out what kind of clearcoat wouldn't peel or corrode. I'm going to have them powdercoated chrome sparkly blue to match my truck wheels and my trailer trim and see what they look like on there. Might look horrible, but it's just for fun as I've repaired my original light assemblies last year to perfection by sanding...and sanding...sanding...sanding...sanding...endless sanding...sanding...cussing...fingers raw...bleeding...sanding...sanding...sanding...non-stop f'in' sanding.
After countless hours of sanding (did I mention sanding???) to remove the filiform I simply polished them. No more filiform...
I took the housings off and stripped them with paint stripper. The Airstream clearcoat came off in thin plastic-like sheets.
At first I did a test area of about 2" x 3". All of my sanding has been done wet, with 3m wet/dry sandpaper. It took forever, but it seemed to work. In order to get through the filiform, I actually had to use 120 grit sandpaper (I was thinking maybe 320 or at the most 220 would at least get rid of it but no) as the filiform really eats deep into the metal. So, on the test area I sanded in stages by hand, going in only one direction per grade of sandpaper. When I would switch from 120 to 220 I would then sand entirely in the opposite pattern, and so on until the last grit. I worked my way down on this little 2" x 3" section for hours going through 120, 220, 320, 400, 600, 800, 1000, 1500, and 2000 grit. I then polished (rather easily) by hand with a rag and Mother's Power Metal aluminum polish. The results on this test area were mirror smooth and shiny.
There is absolutely no way to remove the filiform on these taillights with ANYTHING less than 120 grit. And, it takes literally hours to get down to where the aluminum isn't pitted anymore. It would be impossible to remove it with 1000 grit. If all you wanted to do was remove the white chalky lines and the superficial corrosion, you can do that with 320 grit...but the pitted indented slightly darkened aluminum will remain. 120 grit is the least harsh grit to use to actually sand past the pits by hand. And, again...it takes hours, just with the 120 grit. Then, 220, 320, 400, 600, 1000, and 2000 followed by hand buffing (or machine buffing if you wish). Even at that point, it will be possible to see pits in the aluminum from the filiform if you didn't go deep enough with the 120 grit.
I taped off everywhere that I didn't want to touch with 120 grit as I didn't want to make unnecessary work for myself; I didn't want to buff out anything that didn't need it. So, only the filiform areas were hit with 120, 220, and 320. I initially sanded the entire casings with 400 only after I had taken care of the filiform areas to 320.
But, anyhoo...eventually they were completely polished, done and perfect looking. Removing filiform thoroughly the right way SUCKS. Did I mention removing filiform sucks? If I didn't, then I just want to say that removing filiform sucks. Sucks bad.
I'm leaving them exposed natural polished aluminum (the same as polishing aluminum rims...no clear coat). That way, any natural oxidation will be easily removed with aluminum polish. The filiform creates deep pits where it spiders under the clearcoat. With no clearcoat, the filiform shouldn't form. Just regular old fashioned aluminum oxidation...which is simple to remove and maintain. They have held up PERFECTLY with no clearcoat, and I've not re-polished them (or done ANYTHING to them) since I reinstalled them last year.
After sealing them, I surrounded the joint with 1/4" chrome trim (the same manufacturer "Cowles Products" as the chrome on the beltline, just thinner). Airstream REALLY liked the trim as it really finishes the lights, and were toying with the idea of incorporating it. I doubt if they will though, as it requires a keen eye and attention to detail to install it straight, true, proper, and competently. If you just slapped it on it would look like hell. I'll try to take a picture of the trim as well.
Here are some pics after I (and my loving girlfriend) polished the assemblies until we had no skin left on our fingers:


This is the ONLY way to fix the taillights and expect them to not turn back into a filiformed mess. Don't clearcoat them...when they get a tiny bit dull (mine haven't yet whatsoever after a year) just wipe them with some aluminum polish for about 3 minutes. Back to perfection. But getting there sucks. Did I mention removing filiform sucks? It sucks. But, once it's gone, it's not hard to maintain the aluminum. Just a quick wipe here and there. Simple and easy.
Jeff
|
|
|
|
|
05-31-2013, 05:27 PM
|
#148
|
1 Rivet Member 
2007 19' Bambi
Avondale Estates
, Georgia
Join Date: Aug 2008
Posts: 10
|
I've got a winick 75th bambi in Georgia, used carefully over the years. We love it but thinking of another, bigger. Is anybody out there in need of a wonderful little 19-footer?
|
|
|
|
|
06-06-2013, 03:48 PM
|
#149
|
2 Rivet Member
Join Date: Mar 2008
Posts: 76
|
Here are the photos I said I would post of the holes I put in the tail light trim rings to let water drain quickly. I found some minor filiform on the left tail light housing recently, and discovered it originated in the screw holes for the trim ring fasteners. I always noticed water dripping from the tail lights for hours after washing the trailer, and this has completely stopped.
I'd used the term drilling before, but actually I used a very small diameter grinding bit on a Dremel tool and removed just a small amount of plastic at two places on all four trim rings. These holes are not visible unless you drop to a knee and look up.
If you keep up with any filiform you see, you should never need to go through the stripping process that Jeff describes above. I use the Dremel for removing any filiform while the spots are very small, using a felt polishing cone. Sometimes I follow up with a fine grit paper in the direction of the aluminum graining, then a liberal application of rubbing compound, before applying some clear finish.
I've also attached a photo taken after removing the side reflectors. The rear reflectors left a pair of holes directly below a pair of original rivets, almost perfectly aligned.
|
|
|
|
|
06-06-2013, 04:00 PM
|
#150
|
2 Rivet Member
Join Date: Mar 2008
Posts: 76
|
Quote:
Originally Posted by ggoat!!!
I've also had a custom screen made for the back window to allow it to be opened like a normal window.
|
Jeff - I like your idea for making the rear window operable. Could you go into a little more detail on how you accomplished that.
We often release the locks which allows the window to tilt out a tiny amount at the bottom edge, but really not enough for any kind of ventilation. I've thought about a prop outside, but would like the option of closing the window during the night.
Thanks, Ed
|
|
|
|
|
06-07-2013, 02:24 AM
|
#151
|
|
'06 75th Winick Prototype
2006 19' International CCD
1968 22' Safari
The Swamps of Hell
, Lousy-Anna
Join Date: Oct 2006
Posts: 228
|
I simply had Airstream make me a new screen that has a slit in the frame only on the left side for the stablizing arm to fit through. You could have your original screen cut for this I suppose, but I didn't feel like going through the trouble. "Kristina Vogal" at Airstream will know exactly what to order for you; just tell her you talked to Jeff Koon who had a screen made for the rear window of a 75th Bambi to make it able to open like a normal window. I believe it was around $77...pretty expensive but everything is with Airstream.
I'm currently awaiting them to send me the base bracket that actually bolts to the inside of the window frame. They forgot to send that...it's the part that the stabilizing prop arm actually sits in to hold the window open.
On my trailer the bathroom wall obscures the right frame edge of the screen, hence the need for only one slot in the screen frame on the left side and only one stabilizing arm.
I tried to have Airstream install this last year when I was there but was told they couldn't install it themselves as it is technically an escape hatch...which it still is, but now you can open it like an ordinary window. Of course they had no problem selling me the parts so I could install myself what they refused to...
Hope this helps!
Jeff
|
|
|
|
|
06-11-2013, 05:16 PM
|
#152
|
4 Rivet Member
2007 19' Bambi
Ottawa
, Ontario
Join Date: Jun 2006
Posts: 460
|
Doors that Fly Open - Come on Airstream!
We're on a road trip right now. We were calling it the 'Steven Tyler Don't Wanna Miss a Thing' road trip since we were inspired seeing Steven Tyler, his camp and Lake Sunapee on Opra's first show a few years back.
Anyways all I can say is RAIN! So we are renaming it the 'Don't Wanna Miss the Rain' road trip...
So we had a 4.5 hour drive on Monday on our way to the Lake Sunapee (NH) area, and low and behold we arrive only to find the Fridge open (some contents on the floor) as well as the big clothes cupboard open and stuff on the floor. In the past we have also had the bathroom door open while travelling.
Why the heck after 70+ years hasn't Airstream figured out how to stop things from opening while travelling! 
One thing we have discovered this season that I don't think any of us Winick owners have mentioned is that David's design includes a LOT of counter top/flat areas for cooking, our bar, nick nacks and other stuff. If you compare it for example to a larger Airstream such as a 23ft, David's design has much more surface area.
We have a larger kitchen surface area, the area behind the seat road side, and the area under where the tv is (in our case we took out the power hogging TV).
The Winick indeed has lots of surface areas especially for a 19ft trailer!
|
|
|
|
|
06-11-2013, 05:25 PM
|
#153
|
|
'06 75th Winick Prototype
2006 19' International CCD
1968 22' Safari
The Swamps of Hell
, Lousy-Anna
Join Date: Oct 2006
Posts: 228
|
I have had the overhead cabinet doors open as well as the drawers under the closet and the refrigerator. I haven't had the closet door or the bathroom door open yet. The drawers under the closet actually fell onto the floor when I first pulled the trailer away from the dealer. Ever since then I run a bungee cord through the handles to keep them from opening all the way and secure the bungee cord to the small cabinet handle just below the drawers. I also stretch a bungee cord across the front of the refrigerator while under travel just because I don't trust the Dometic latch mechanism as it failed immediately upon purchase... good thing the fridge was empty. I also have mounted small cabinet pulls/handles in brushed nickel on the back of my Samsung 32 inch TV and use these as tie downs to secure the TV to the countertop/cabinet below with tarp straps as I don't trust the lock on the mount which was also changed/upgraded in my trailer... but again I don't trust it going down the road. I wedge 1/2 of a wooden clothes pin in between each of the overhead cabinet doors as well as they bounce all over the place (and rattle like hell whenever there's any type of music playing).
|
|
|
|
|
06-25-2013, 05:40 PM
|
#154
|
4 Rivet Member
2007 19' Bambi
Ottawa
, Ontario
Join Date: Jun 2006
Posts: 460
|
* Start of Rant *
Well we are just back from a 2 week road trip. Not a lot of miles, maybe 600 miles total with the 40 Winker in tow on the fine highways of NY to NH.
We had a great trip, but alas yet a few more very simple, yet very annoying issue with travelling.
So on the first leg of our trip the tall closet door came open as well as the fridge. Kate's first attempt to secure the fridge door failed so now we use a bungie cord run from the stove handle to the cutlery handle to keep the darn fridge closed. Bad on Dometic! Not rocket science guys!! 
The piece over the shower door also fell off (again) - forgot to mention that previously. It was held on by a few staples! Come on Airstream get your act together!!! for $60K splurg on a few screws will you! lol
On the leg home the whole shower accordion door unit fell off completely. Two sided tape, some caulking and a little clip was all that was holding it in place! This is the same shower design they have been using for years I gather... come on Airstream get your act together! These are supposed to be roadworthy right?
Don't mean to sound so negative, these are really minor things, and easily fixed, but they really get Airstream owners upset after paying big bucks and the unit isn't setup to survive a little drive down the road. They cheap out on the dumbest little details that can leave a huge negative impression. Especially after all these years of making these trailers!
I'd hate to think what would happen if we took a road trip across the country, rather than just 2 small states...
Thankfully we are fixing the flaws ourselfs. Most 'repairs' cost $5 or less. The 'mental' cost is more like $1000 per incident. So our mental cost now is about $5K.
I should send Airstream a photo of our trailer when these things happen, as well as a photo of all the bungies and straps holding everything in whenever we need to pull the trailer down the road a few miles for piece of mind...
* End of Rant *
Other than the above annoyance,s we still love our Winick and have another 2 - 2 week outings booked this summer along with several smaller trips in the fall. I'll post a few recent photos in another post from some of our A/S adventures.
|
|
|
|
|
06-25-2013, 05:57 PM
|
#155
|
|
'06 75th Winick Prototype
2006 19' International CCD
1968 22' Safari
The Swamps of Hell
, Lousy-Anna
Join Date: Oct 2006
Posts: 228
|
Quote:
Originally Posted by campadk
Kate's first attempt to secure the fridge door failed so now we use a bungie cord run from the stove handle to the cutlery handle to keep the darn fridge closed. Bad on Dometic! Not rocket science guys!! |
Hey! Didn't I tell you I had to do that a few weeks ago?!??? Never trust that little Dometic 1/8" piece of plastic to hold all the weight of what's in the fridge when it tips over ha ha...
Quote:
Originally Posted by campadk
The piece over the shower door also fell off (again) - forgot to mention that previously. It was held on by a few staples!
|
What exact part are you talking about??? Maybe I have a different shower set-up...
Quote:
Originally Posted by campadk
On the leg home the whole shower accordion door unit fell off completely. Two sided tape, some caulking and a little clip was all that was holding it in place! This is the same shower design they have been using for years I gather...
|
Wait...you have an accordion shower door? Again, I have a shub in mine...I don't see how mine could possibly come off. Do you have a picture?
Quote:
Originally Posted by campadk
I should send Airstream a photo of our trailer when these things happen, as well as a photo of all the bungies and straps holding everything in whenever we need to pull the trailer down the road a few miles for piece of mind...
|
I doubt they would care. All of my "safety straps" were in place when I brought my trailer to them last year...they didn't even address them. They DID install some stronger catches on my drawers and closet door, though, as well as the bed slideout; they told me that Winick used the version of the catches that isn't nearly as strong; apparently they make different strength catches. I still don't trust them, though...when I head out next week I WILL be using my plethora of straps and bungee cords to keep everything where it needs to be.
|
|
|
|
|
06-25-2013, 06:57 PM
|
#156
|
4 Rivet Member
2007 19' Bambi
Ottawa
, Ontario
Join Date: Jun 2006
Posts: 460
|
I'll take a few photos next time for you.
The rectangular wood piece above the bathroom door is the part that fell off. The walnut piece was stapled to some plywood with 3 staples. It is now screwed on. I am sending Airstream a bill for 2 cents lol.
The speakers above the dinette are something you would buy at the dollar store and they rattle like heck. There is a lot of wasted storage space behind them as well, so one side now has a clock on it which we will setup on a hing to store stuff behind it. The other will have a pewter moose instead on a plaque to enhance our 'Adirondack Style' Winick. Again on a hing so we can use the area behind for storage. Kate is coming up with lots of great little 'tweeks'. There is an amazing amount of wires up above where are TV used to be. I might take that out at some point as well. Its quite a nest and would be a great storage area! 
The area where the TV is 'supposed to be' is a great area with a decent surface area. In our case it tends to end up as a great spot for my camera equipment and a charging area for iphones, ipads, macbooks and other 'stuff'.
We'll take a bunch of photos anyways on our next trip which happens to be on Sunday!
Where are your interior shots?
|
|
|
|
|
06-25-2013, 07:56 PM
|
#157
|
4 Rivet Member
2007 19' Bambi
Ottawa
, Ontario
Join Date: Jun 2006
Posts: 460
|
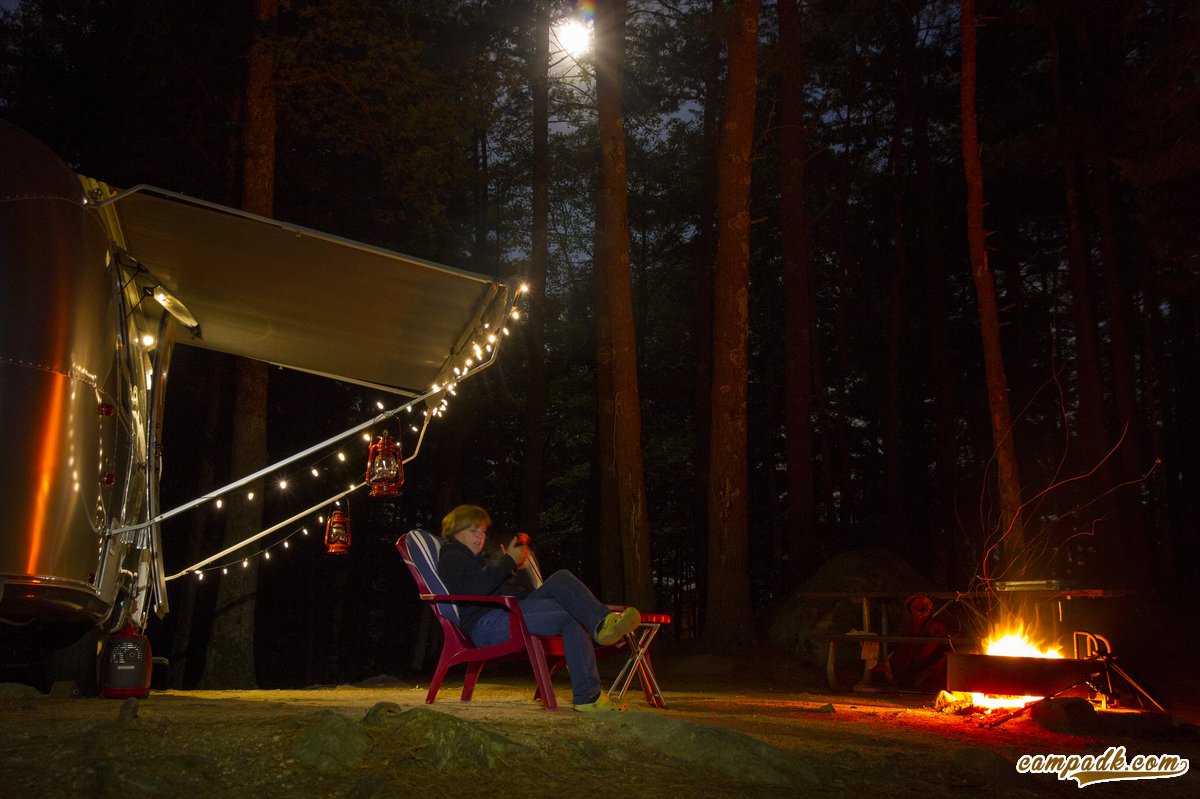
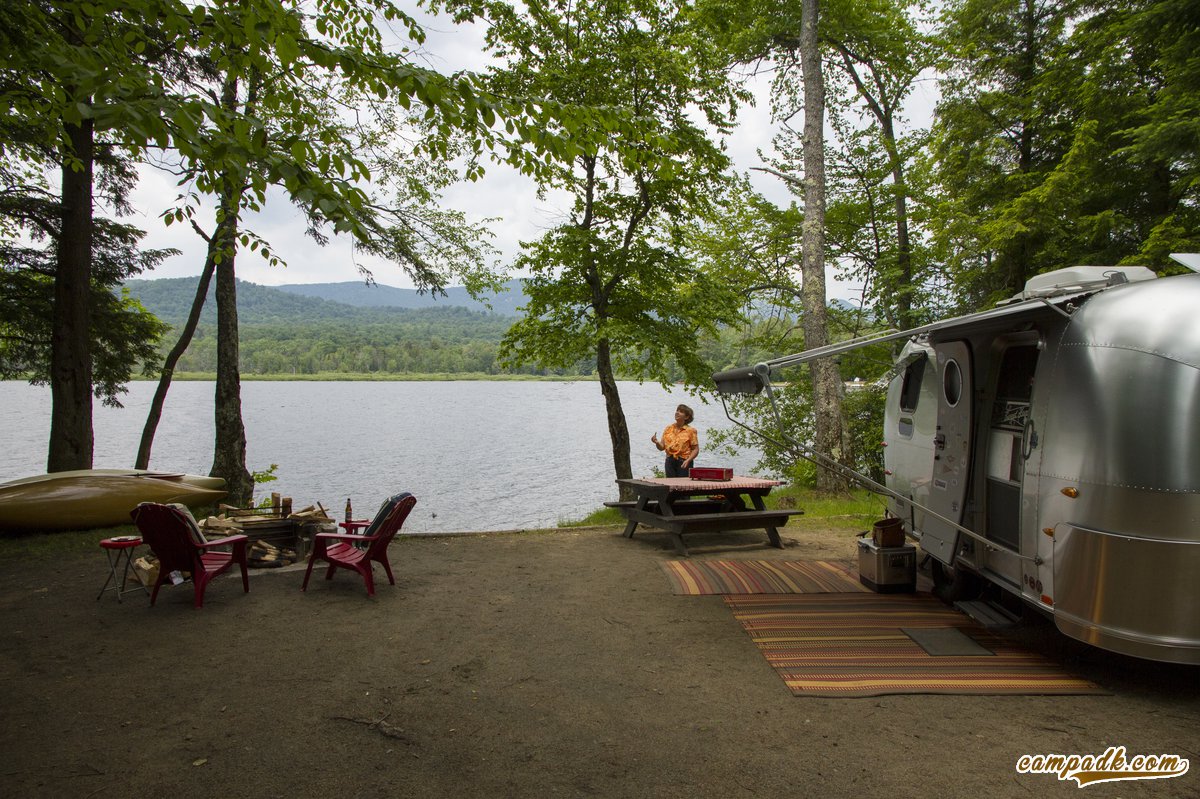
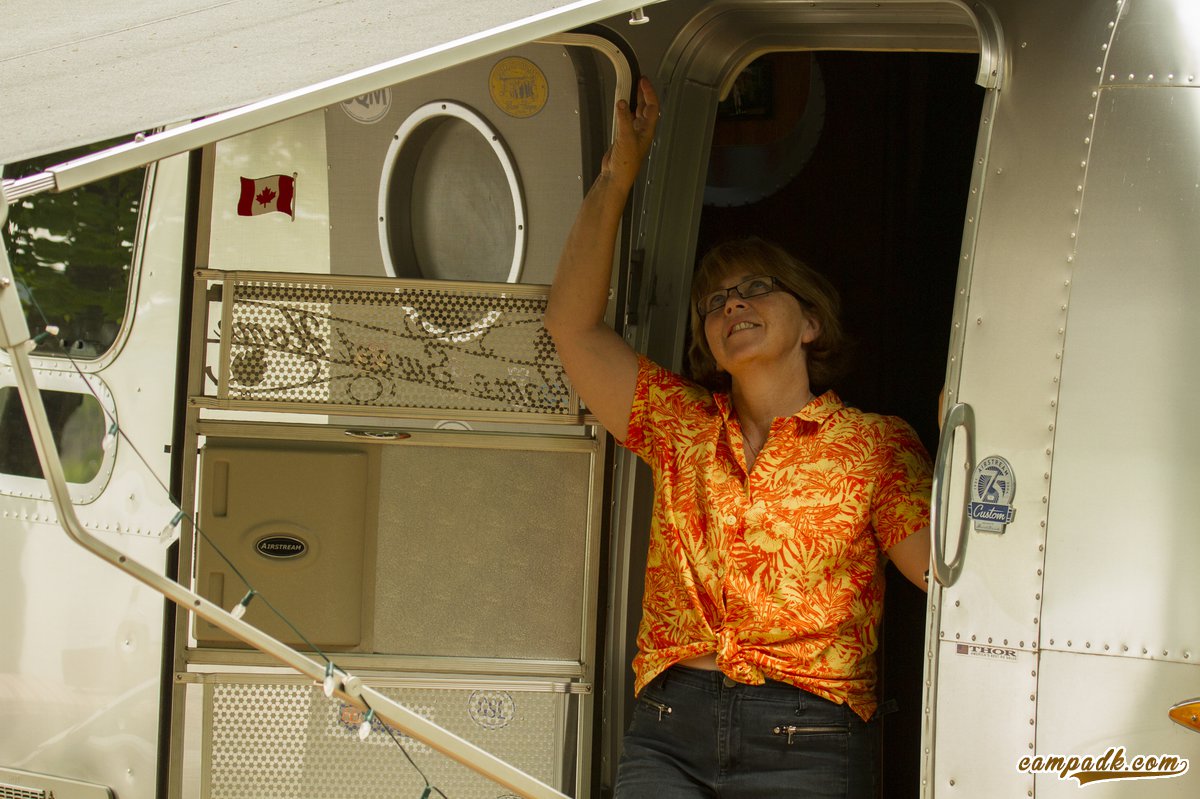
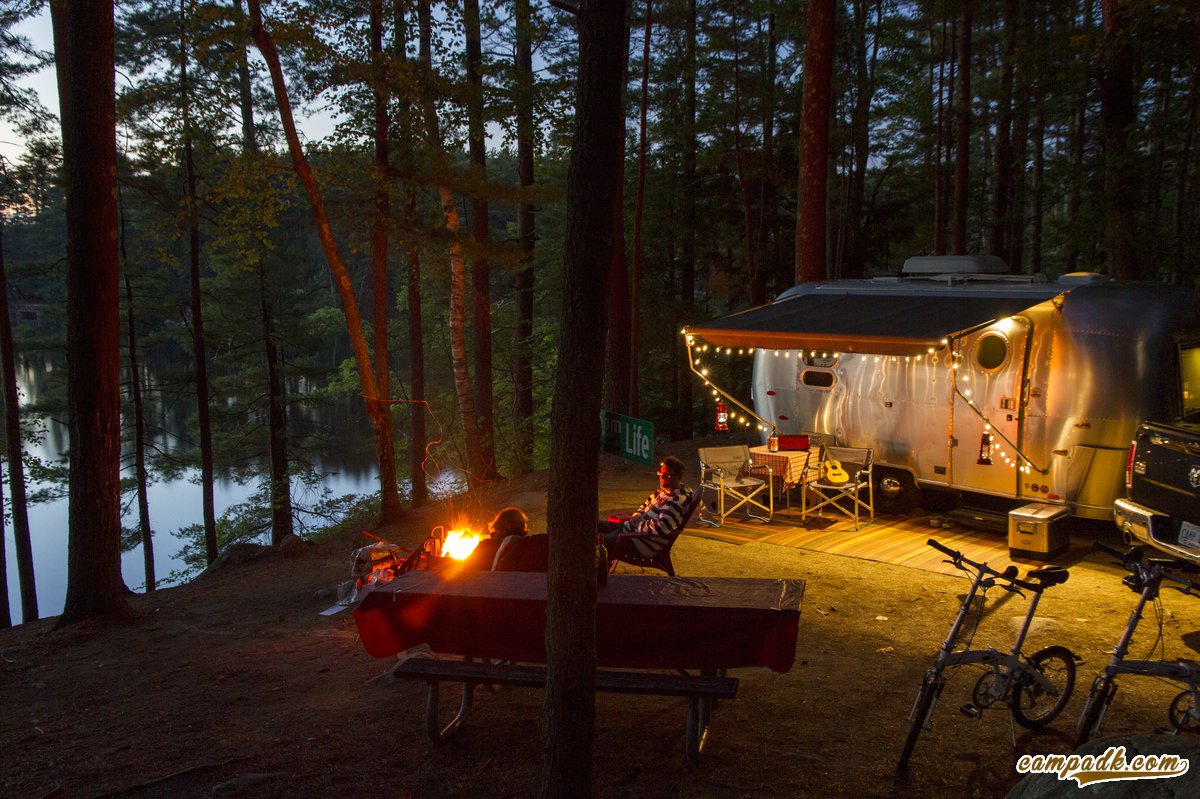
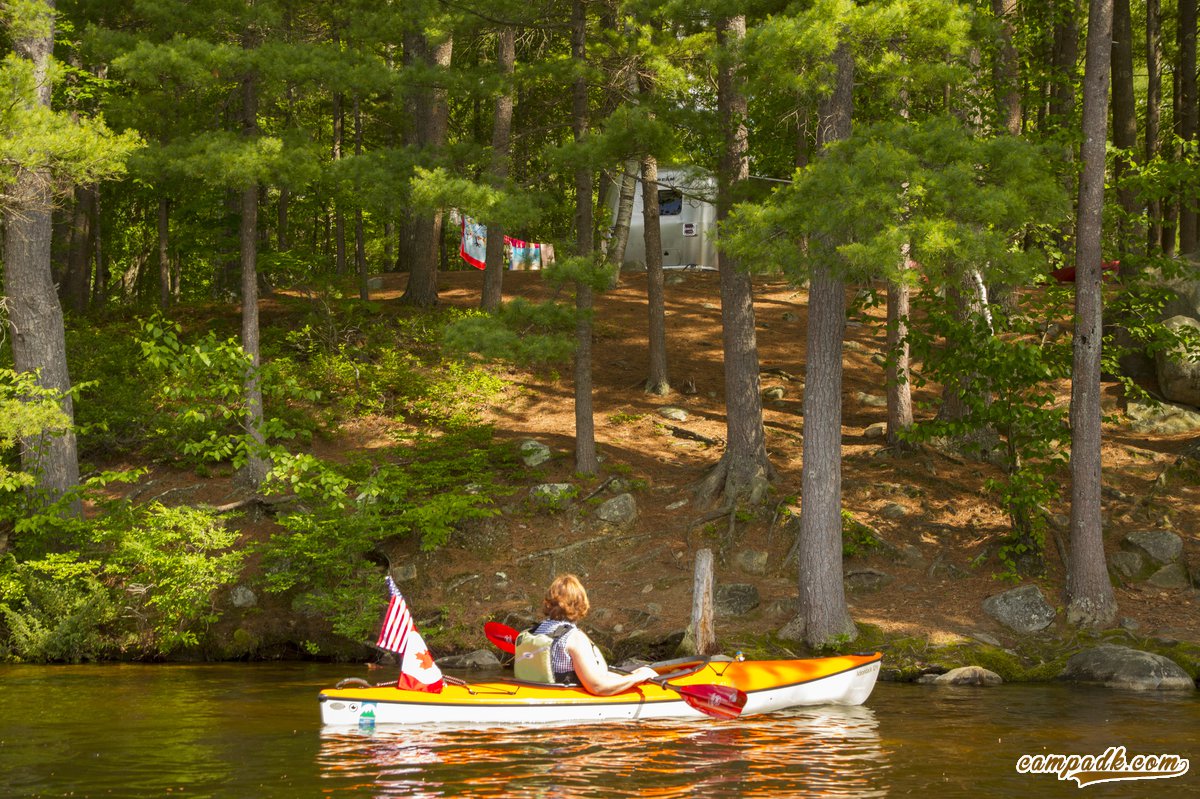
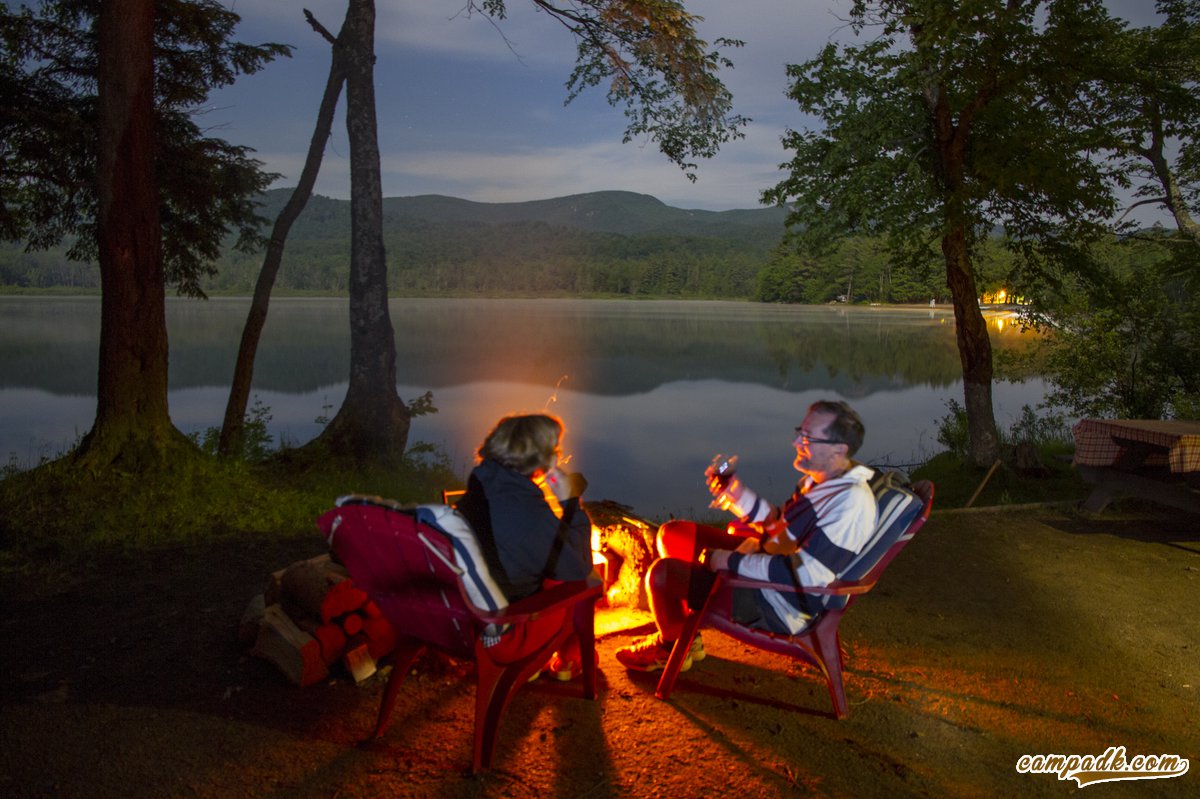
Ok a few of our favorite shots from our last two trips! We'll I have a lot of other great shots of some amazing places, but these one are on topic 
You'll notice we are always lakeside! This summer we pretty much had the best lakeside campsites at all the campgrounds we stayed at.
New tow vehicle! RAM Laramie Longhorn. Fine mate for our 40 Winker! Handles the hills nicely.

Verona Beach State Park Sunset - Syracuse, NY

Wellesley Island - St Lawerence, upstate NY
North Hampton Beach State Park - North of Albany, NY
Pawtuckaway State Park, NY - north of Boston

Lewey Lake Campground - Indian Lake, NY

|
|
|
|
|
06-25-2013, 08:07 PM
|
#158
|
Rivet Master  
2012 27' Flying Cloud
W
, New England
Join Date: Oct 2012
Posts: 7,402
|
Quote:
|
Originally Posted by campadk
Ok a few of our favorite shots from our last two trips!
|
Stunning! Great sites, great pics - wow!!
|
|
|
|
|
06-25-2013, 08:09 PM
|
#159
|
4 Rivet Member
2007 19' Bambi
Ottawa
, Ontario
Join Date: Jun 2006
Posts: 460
|
A few more...
Pawtuckaway again...
HDR from Northampton Beach...

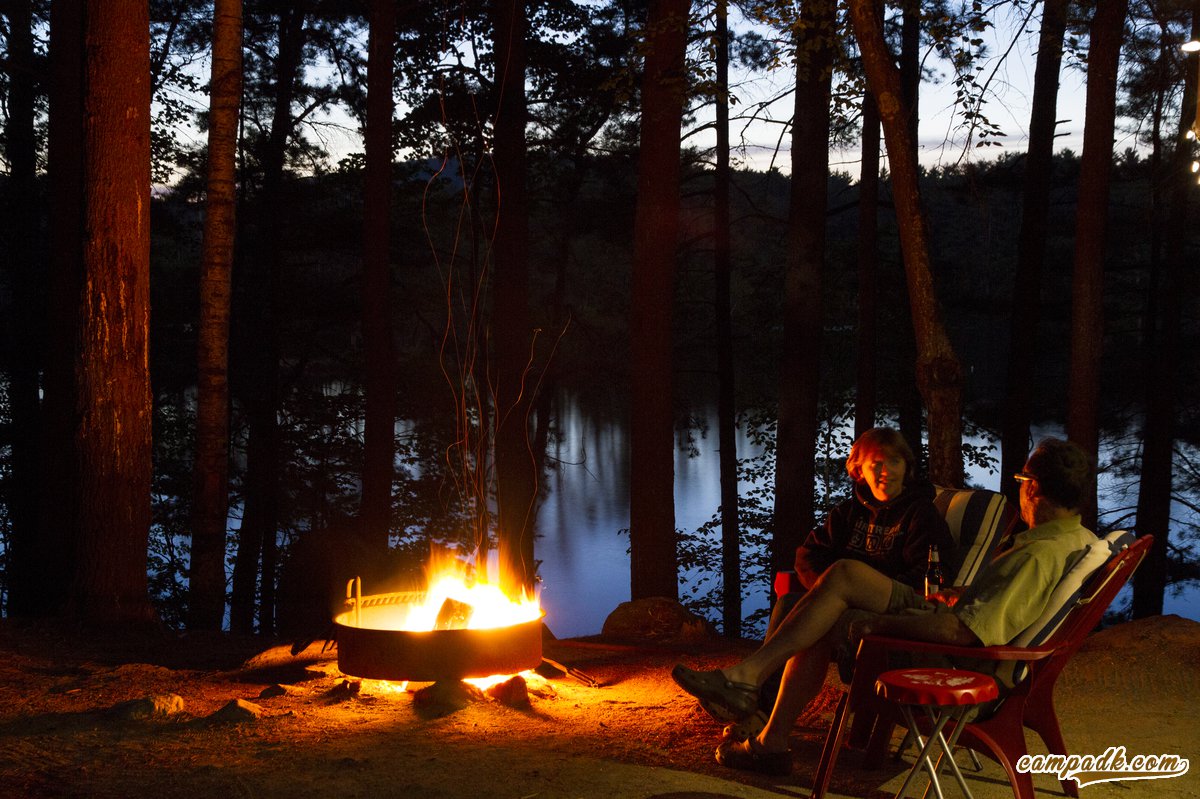
Night time campfire at Lewey Lake (oops! no A/S!)
|
|
|
|
|
06-26-2013, 08:01 AM
|
#160
|
|
CampADK
Orleans
, Ontario
Join Date: Jun 2006
Posts: 6
|
Straps and tweeks
We've been using the same method for the bottom drawers - I run a strap through the drawer handles and clip them through the bottom flip door. It works good and is easy to get on and off. We have the Shub shower stall as well. It was also easily put back in place and needs new caulking. I think that's the reason it fell. The caulking has dried up over the years. Again an easy fix. We've luckily never had any major issues with the trailer. Mice getting in is probably the biggest problem we've had and we think that's been taken care of now.
|
|
|
|
|
|
|
Currently Active Users Viewing This Thread: 1 (0 members and 1 guests)
|
|
|
 Posting Rules
|
You may not post new threads
You may not post replies
You may not post attachments
You may not edit your posts
HTML code is Off
|
|
|
|

 Recent Discussions
 |
|
|
|
|
|
|
|
|
|
|
|
|
|
|
|
|
|
|
|
|
|


 Linear Mode

