 |
|
 05-17-2017, 11:31 AM
|
#101
|
3 Rivet Member 
1971 27' Overlander
Jackson
, Tennessee
Join Date: Nov 2012
Posts: 166
|
The steel angle is the rear hold-down plate (there is a front one as well) that structurally ties together the frame, floor, and body of the trailer. Because of dissimilar metal corrosion, I replaced mine with .063 stainless then painted it heavily. It is important to match the angle of the old one, as you will be buck riveting it between the skin and the aluminum U channel. You should still be able to slide your new one in place as long as your skin is still unattached in the back. The picture shows mine from the bottom. The floor sits on top of the gray painted angle, on top of the refurbed crossmember. Those bolts go through all of those and through the U channel.
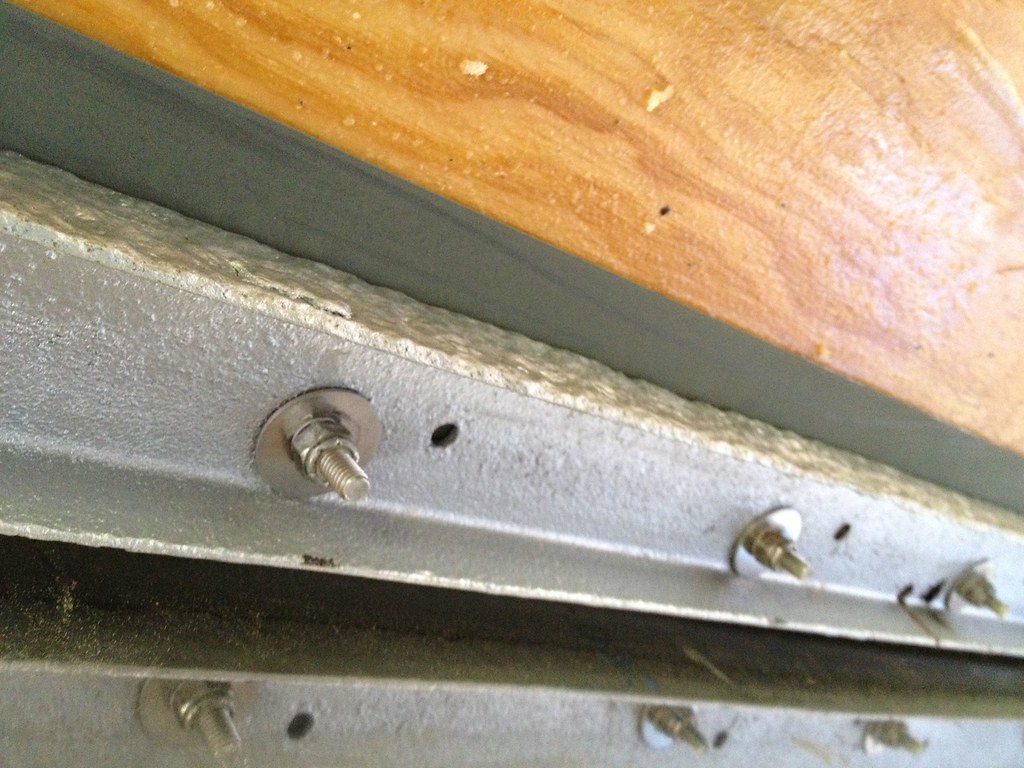
The reflection below is the alclad sheet I riveted in with the bottom of the hatch frame. This covers the rear end as I described in the previous post. More explanation here.
This is just one way to do this. Aerowood lengthened his plate and tied it in to the vertical wall members for added strength, if I remember correctly. Overall, I have been very pleased with the result.
Alan
|

|

|


|
05-17-2017, 11:45 AM
|
#102
|
3 Rivet Member
1971 31' Sovereign
Christine
, North Dakota
Join Date: Jun 2015
Posts: 142
|
I found a couple other threads like this one.
Late 70's steel angle end plate question -- AirForums.com
And now see that it was a stock piece, a dumb mix of metals, but still stock.
When I applied the poly to the board, I triple coated the outer 4" of the perimeter on the bottom and top, as well as coated the edge each time I went around the perimeter, in theory, there should be at least 8 coats of poly on the edge of the board.
When I get another one slid up in there I will likely extend it also, and use aluminum.
Not only could I slip one up in there now, but I will have that piece of aluminum off below the access door and can slip one in at that time also.
After your post, I was starting to wonder about building a small deflector to install in between the bottom of my access door and above the rub rail.
An effort to kick the water way from the undercut lower edge of the shell..
I'm in IT, not a graphic artist, so please excuse the crude drawing.
Not to scale, my frame is doubled in the rear, and I rotated this 90° left, I have no idea why its still in the wrong orientation.

Part of the reason I post as much as I do is I *hope* that if anybody sees me doing something stupid (or misinformed), they will let me know.
|
|
|
|
|
05-22-2017, 11:52 AM
|
#103
|
3 Rivet Member
1971 31' Sovereign
Christine
, North Dakota
Join Date: Jun 2015
Posts: 142
|
Motoring right along with repairs..
I already had the rear access door off, so I decided to clean it and apply new weather strip.

There was hardly any rubber weather strip left on the door and it had been reapplied once (poorly) so it came off easily. I scrubbed the whole thing with Simple Green and then my favorite steel wool and acetone on the area that the gasket seal would eventually be installed.


I used 3m black weather strip adhesive and applied it to both surfaces, then slowly adhered the gasket to the frame until I was done, and then I cut off my extra 'tail'

Then I moved to the top, it was finally time to install my 'used' Fantastic Fan.
First some cleaning

Then I used the inner trim piece to mark the outer skin.
I knew it was going to be too small.

That is why I trimmed about 1/4" outside the lines.

After initial cutting, I did have to go back and add some clearance to a few areas.

Eventually it dropped right in.

I didn't take pictures because it was getting late, but I did run about a 1/4" bead of TremPro around the bottom side of the fan frame near the screw holes before final installation.
And I did use the provided screws to fasten it down.

My order of more window weather strip and TremPro arrived Friday.
Good thing this box contains squishable items.


Also on Friday, I went and looked at this appliances in this motorhome.

They all work (or so claimed) and they were all mostly clean, at least there wasn't anything in the fridge, and NO mouse nests/droppings anywere.
Stovetop/Oven

Microwave

Large basin sink

The Fridge was taller than I expected.
For some reason i was thinking it would be a half height type that fits under a counter.

I need to make time to go back and get them.
When I came home Sunday, i had to snap a picture of the 70's goodness..

1971 Airstream
1975 Ford Crew Cab
1978 Scout II Rallye
1979 Scout II
My wife wants the interior window frames to be 'natural finish' so with the aid of my assistant. He was put in charge of disassembling the screen window frames while I started sanding the inserts for the lower oval windows.

I don't think that sanding is the preferred paint removal process, I'm going to try to find another process today.

Over the weekend we had lots of drizzly rain.
I'm happy to say that my leaks are under control (mostly).
The only leaks were the Astrodome, which I currently have covered by a piece of plywood.
And right under the rear access panel, where I expected that I would need more/better sealing.
This area..

I should also say how irritated I am with those rivets.
I bought a new rivet gun and rivets; half of them pulled correctly and the other half, the center stud ripped in half in the wrong area.
I have the pop locks ordered, and they should be here Wednesday, until then, I used a tarp strap to pull the door shut. I'm happy to say that the door sealed pretty darn good.
But I need to research or start thread to discuss ways to make this area more water proof/resistant.

|
|
|
|
|
05-30-2017, 01:20 PM
|
#104
|
3 Rivet Member
1971 31' Sovereign
Christine
, North Dakota
Join Date: Jun 2015
Posts: 142
|
I received the access door locks from Vintage Trailer
Comparing old and new.


And for the first time since I've owned it, the rear access door now has a latch; and it locks!

On the inside I used the 'dogleg' bracket.

I installed the other 2 pop locks, here is the refrigerator door with the new pop-lock.

I picked up this piece of 2024 T3 for use to repair under the rear access hatch.

This area under the hinge...

I'm going to spin up a thread asking about best ways to go about fixing that without replacing the whole panel. Also about how to best waterproof that area.
And I'm thinking about putting in a few more elevator bolts before I reinstall the aluminum inner skin around the rear access panel.

I'm thinking about adding one between each of the ones I already have installed, and then another one here.

From the same place that I already got aluminum from, I went back and got another piece 18"x18" to cover the water heater hole for this season, this is NOT T3 and is very flexible/bendable.

Monday I went out and finally finished the last pieces of the floor, it was windy and raining.

Last piece..

My helper approved.

The fact that it was raining sucked, but it was OK because it allowed me to get a good look around for any leaks.
I was expecting leaks in the rear because I haven't even attempted to seal it and only 3 rivets are in between the rear access door piano hinge and the access door frame.

I was not expecting the front vent to leak though.
Not a big deal since I was planning on replacing the vent eventually.

I knew I was missing a few of these window latch bracket, I need to order (5) of them.

A new issue cropped up.. there is a short in the electrical system. The only time I noticed was when I was standing on the ground and then leaned against the trailer with bare flesh.
And after I noticed that I unplugged the extension cord from the wall outlet and looked around for any obvious issue. When I went to plug it back in, there were sparks from the wall outlet common ground plug and it kicked the breaker.

I'm thinking about buying a marine stainless shore power outlet to mount into my temporary hot water panel, and a new piece of plug in cord.
I was also thinking about adding a water inlet spigot. The water spigot should allow me to use any pressurized water source if I get to the point of having plumbing on the inside this year.
This week, I'll continue replacing window weatherstrip, I hope to remove the (2) antennas, get the rear lower portion of the trailer put back together, grease the wheel bearings (new seals), install new LED marker lights where I am missing a couple, and get it titled.
Next weekend (June 2, 3, 4) I want to take it on its maiden voyage as a metal tent to Jamestown ND. I'm really only taking it to put some miles on the chassis, I might see if there is a space in the campground, or I'll end up in my father in laws yard.
|
|
|
|
|
05-31-2017, 03:52 PM
|
#105
|
3 Rivet Member
1971 31' Sovereign
Christine
, North Dakota
Join Date: Jun 2015
Posts: 142
|
It was a beautiful evening for working on the Airstream.

Last night I stripped the weather stripping from the big rear window and the big front windows and applied the new "D" weather strip.

The lower portion of the rear big window, its shot.

So dry and cracked..

Top wasn't any better.

Scraped it with a putty knife.

Lots of elbow grease, acetone, and steel wool later...


Front window was no better

Here is one issue that I noticed, on both front and rear windows, the top rivets seem to have been shaved/ground off.


Front window with new weatherstrip applied.

The square corners posed a bit of an issue.

The weatherstrip bunched up a little.

The "D" weatherstrip stuck out a bit past the window frame, I hope this doesn't cause any issues.

And I read somewhere that Airstream recommends putting the gasket splice at the top, whereas I put the seam at the bottom. I can see why, on the front window I might be bothered by this seam.


I took inventory of the marker lights that I had on hand.
Wal-Mart sells these for just under $8/each

I left the windows open over night, I thought this picture was cool this morning.

Last night while I was working, my wife set up a table and the kids played UNO.

I also cleaned up the goo that was around the original water heater hole.

|
|
|
|
|
05-31-2017, 04:18 PM
|
#106
|
2 Rivet Member 
1964 26' Overlander
Rancho Palos Verdes
, California
Join Date: Nov 2015
Posts: 84
|
"I don't think that sanding is the preferred paint removal process, I'm going to try to find another process today."
A de-burring wheel on an electric drill does a reasonable job of removing paint from painted over aluminum parts. Ask me how I know 
|
|
|
|
|
06-05-2017, 09:09 AM
|
#107
|
Rivet Master  
1972 31' Sovereign
Lexington
, Minnesota
Join Date: Feb 2009
Posts: 3,991
|
I repainted our interior window trim with Rustoleum spray paint. Used a hammered aluminum finish paint on some of them and it came out well. Not the "natural" aluminum finish, but looks good and lots less work!
Kay
|
|
|
|
|
06-05-2017, 11:23 AM
|
#108
|
3 Rivet Member
1971 31' Sovereign
Christine
, North Dakota
Join Date: Jun 2015
Posts: 142
|
riowerks, I've got a Dual Action Sander (DA) and it does a reasonable job, its just that the imperfections make it interesting for tight spaces or bends.
Thanks for the tip Kay, I'll have to give it a try.
By "try", it has to pass the boss lady's approval process. 
Any chance you've picked Chris' brain about the trailer breakaway box?
Working situation.

Friday I finished scraping all the windows and access doors in preparation for the new "D" gasket.
Scraping..

Most of it was in similar condition to this.

I got it off in 1pc.
I've found that when doing mundane tasks its best to challenge myself.

More steel wool and acetone..

I finished the street side window from above the original bed area. Stripped cleaned, and new weather strip installed.

And when I went to install it, the J-channel popped off.

So I pulled the weatherstrip back off while the glue was still tacky and then quickly applied it to one of the other windows that I had pre-prepped, this one was from the front window cluster in front of the walk door.

The "D" weatherstrip isn't an exact fit/match as the original.
On all the windows/access doors, the gasket protrudes slightly past the frames, luckily it still fits inside the skin frame, and it seals nicely.

Wednesday night I pulled the door and popped the latch out.


A friend of mine works at a local lock shop, and she was able to make an impression and then 3 new keys for me. Benefit of knowing 'a guy on the inside' at the shop was that she only charged me for the keys
While the door was off, I removed its old weatherstrip also, it was a mismash of different styles and multiple pieces.


I didn't take a picture of it when done, but now the door has a single U-shaped "D" gasket from one side to the other and a separate straight piece across the bottom.
It was a lot of weatherstrip.

Ever since I replaced the section of floor and installed the laminate the power cord that from the fuse box has just been dangling out the water heater door. And its long, about 20-23feet.

I stopped by a local RV outlet and they had a 65amp converter/charger for sale at a price I could live with.

While moving around some of my supplies, I found one of my window lock brackets. Now I only need 4 more..

I am a little surprised that the originals, which I read are stainless, are rusting.

Saturday I removed the rooftop TV antenna, I left the raise/lower assembly for now. I also removed the front radio antenna, I am a little shocked that I didn't take a pic of my patch..

Also on Saturday I cut the patch panel for the water heater hole, my helper came out and put in a few minutes of work. Actually I had him go inside and he did drill the holes for the top and rear rivet holes.

From the RV store I had purchased a generic 30amp shore power plug.
This is how I wired it. On the outside it has a screw/lock 30a to 15a 3 prong adapter.

I'd like to get this into a better color, but I don't want to impede the moving vents.

Saturday I wanted to take the AS on a short camping excursion, just to put some miles on it. Sadly that didn't happen. I got the trailer hooked up, and the marker lights worked, however none of the blinkers or stop lights.
Getting ready to leave the yard, you can see the new shore power connector.

I replaced the 7-pin connector from AS to TV.
No pics of the new connector, but I got rid of the crimp on connectors, one less point of failure.

After that didn't fix the light issue, I replaced the tail/brake lights, and then started probing the connector with a test light and found a bunch of terminals that weren't receiving power. So I looked at the TV (2005 F250 CCSB 6.0), the fuse block had number 38 listed as the trailer lights, it tested good.
Luckily google came to my rescue and informed me of another fuse box under the hood by the master cylinder/brake booster, and in there I found a 20amp fuse popped/blown. Instant trailer light fix. But by then it was too late to attempt a first trip.
So I turned on the AC and chilled for a bit.

Time to pull all that stuff back out and get some light fixtures ordered.
Get that converter installed.
Decide what I'm going to do about batteries, the age old 6v vs 12v question.
I still need to get the LED marker lights installed.
And pack the wheel bearings.
And I need to get purchase some insulation and reseal the streetside tail light housing on the inside before I can put the inner skin back in place.
Side note:
My wife wants to polish the outer skin, I already had a grinder style polisher, I bought a second random orbital polisher and some bonnets Friday. Time for some research on polishing techniques and products.
Polishing is very, very, very low on my priority list. Time consuming with no actual benefit for use.
|
|
|
|
|
06-05-2017, 11:35 AM
|
#109
|
Rivet Master
1971 21' Globetrotter
Currently Looking...
Currently Looking...
Currently Looking...
Arvada
, Colorado
Join Date: May 2006
Posts: 3,530
|
I just posted on my thread below about the "J" hinge and seal on the windows. its an easy fix.
|
|
|
|
|
06-06-2017, 08:07 AM
|
#110
|
Rivet Master
1972 31' Sovereign
Lexington
, Minnesota
Join Date: Feb 2009
Posts: 3,991
|
Sorry about that - he was traveling for business for 5 weeks straight and I didn't see him much. He says yes, our trailer had a break away switch. It was seized, so he had to replace it anyway.
I totally get the "wife" approval thing since I'm a wife also! 
Our window brackets are also rusting. My plan is to sand the rust off and lacquer them to seal them. Haven't gotten to it yet, but it's on the "list" that is kept in the trailer for adjustments, finishing issues, etc.
We haven't yet done the polishing either. We have some corrosion around the upper sides of the trailer that needs to come off. We have stripped the clear coat off, and that made a world of difference in the look of the trailer by itself. Our plan is to not polish to high shine as that's difficult to maintain (as in we don't want to spend every summer repolishing), but to find a lower shine level we can live with that looks more even than we currently have. It's not a high priority. But it IS on the list.
Kay
|
|
|
|
|
06-13-2017, 08:36 AM
|
#111
|
3 Rivet Member
1971 31' Sovereign
Christine
, North Dakota
Join Date: Jun 2015
Posts: 142
|
Aerowood, I'll have to do that once I get back in July and have time/money to acquire the proper riveting tools, for now I popped them back on using standard 1/8" aluminum rivets.
A pic of my old radio antenna hole patch.

And the not too fancy 30amp shore power box from the outside, I am going to pick up a 90° adapter, I don't like that cable sticking straight out.

I am going to remove the window shade brackets, I'll plug the holes with a little Trempro for now, eventually I will get new window shades and hopefully the holes will line up.

I am not really happy about the steel screws that hold the top bracket in place.

The other day I was pleasantly surprised to find out that the "scare light" worked, I thought it didn't...

I convinced my wife that we should paint the inner window frames 'aluminum' color.
Top is sanded to bare steel and the bottom is sanded/painted.

Left to right
painted, half sanded, original

My high tech painting station.

So far, I have only set the lower window frames in place, I need to replace the screen mesh material in the other window frames before I put them back in. I didn't rivet the lower ones in place yet because there are some paint touchups that need to happen with the inner skins.

The tiny dog gave his seal of approval.

|
|
|
|
|
06-13-2017, 08:48 AM
|
#112
|
3 Rivet Member
1971 31' Sovereign
Christine
, North Dakota
Join Date: Jun 2015
Posts: 142
|
Next fun project... wheel bearing replacing and packing.
I backed the trailer up the car ramps to get the front axle off the ground, then once the tires were off, I rolled back onto level ground.

I pulled the original bearings and had O'Reilly's cross reference them into their 'house brand'

With a new grease gun, a wheel bearing packer, and all the new parts, it was time to get the good times rolling.

New components on top, old ones on bottom.

I used a chisel to knock the bearing racess out each respective end.
Then to put them back in, I first put in the new race, then I stacked the original race up on top of them, then hit the old race with a hammer to drive the new race into place.

Stacking them this way makes it easy to knock the old race back out with a minor tap.

Outer race installed a little more difficult due to the stepped lip.

I've you've never used a bearing packer, you really should pick one up.
spin off the top and drop the bearing in with the narrow side at the top.

Spin down the top, making sure the bearing stays centered.

Hook up the grease gun to the grease zerk, and start pumping until grease gets pushed through the bearing rollers/cage.

I thought about cleaning and repacking the bearings, but once I popped the first dust cap and started cleaning the original bearings, this rust colored grease indicated that I'd be better off with new rather than risking these.

Last winter a tree branch fell on my Astrodome and busted my cover into a billion pieces, I used the inner window frame to make a piece of wood for a cover that has about 1/2" wide perimeter. I want to keep looking to find a solar grey one.

|
|
|
|
|
06-13-2017, 02:31 PM
|
#113
|
3 Rivet Member
1971 31' Sovereign
Christine
, North Dakota
Join Date: Jun 2015
Posts: 142
|
After packing the bearings, I took it out for the first camping trip.

We only went about 120miles each way and we set up in my sister in laws yard.

Overall the trip was a successful dry run, the kids had fun


On the way over, we pulled into 20mph headwind while driving 65mph. Over 188 miles we burned 14.5gallons of diesel (12.96mpg) not bad.
On the way home we took the interstate and I ran 70-75mph, but I haven't filled the tank again yet to calculate MPG.
I did have one issue with the TV, the blower motor gave out, but luckily it waited until we were back in Fargo on the way home.

The other failure that we ran into was that we NEED a real bed for the adults, the kids didn't complain about their cots.
We picked up an 8" foam core twin mattress from Costco on the way home, I'll get to work building a frame for it for next weekend.
I also talked to my wife about proper trailer weight distribution when packing.

Back at home, resting with the other projects..

Most of the window frames are painted now, I need to get screen material and new locking band/cord.
And I really need to get those rear belly pan and banana wraps installed.
|
|
|
|
|
06-19-2017, 08:10 AM
|
#114
|
Rivet Master
1972 31' Sovereign
Lexington
, Minnesota
Join Date: Feb 2009
Posts: 3,991
|
I don't remember if you changed out your tires for LTs? If you have trailer tires on, please be aware that they are rated for top speed of 65mph. Please be careful!
Kay
|
|
|
|
|
06-19-2017, 10:17 AM
|
#115
|
3 Rivet Member
1971 31' Sovereign
Christine
, North Dakota
Join Date: Jun 2015
Posts: 142
|
I still have the ST (trailer) tires on it.
I'll have to keep the speed in mind.
This week I knocked off a few more projects..
Internally my wife gave me some LED lights for Father's Day.


LED marker and tail lights.
Half of my old lights didn't work, the other half were so dingy that while they worked, they were not that great.
An example of how I attached the new lights to the original wiring.
Stripped the wires, twisted them together.
Stood there FOREVER while the wire warmed up.
Then let the solder flow through the junction/connection.

Then slid a piece of shrink wrap up over the connectino and melted it into place.

I do still have one problem that could rear its ugly head and that is that I removed the factory grommets, and I now need to insulate the wire from the shell.

I found only 1 light that had frayed wires, oddly the fray was INSIDE the AS, not where it went through the AS shell.

Here's an example of a red marker light old/new

The old lights were probably the originals in most locations.

The rear lights, one new one next to the other 2 old ones.
In this pic, you can also see that I removed the rear window shade bracket and covered the holes with TremPro to plug them, I think it cleaned up the area nicely.

New lights in all 3 locations.

The whole rear with LED lights, 1157 white replacements in the tail/brake lights.

The brake/tail lights have a weird shadow on the top toward the middle of the AS, but when viewed straight on, they do not show that shadow.

OK, there is only 1 light that is not LED, and that is the one for the license plate.

When I had the cover off, I also spotted this "clear" plate.
I need to find a replacement for this.


I also replaced the reflectors on the streetside
Old ones


See how drained of color the reflector is compared to the new LED marker light?
In this pic you can also see that I removed the window shade mount arm brackets and filled all the empty holes with TremPro.

Disgusting green moss/mud

Some of the holes are larger than the #8 screws that I used to hold the marker lights in place.

Nice shiny new color

Looking good if I do say so myself (and I do)

And the last lights were the front markers.
Only the center one worked, and it had been replaced at some point.

This is an example of how most of the lights looked on the inside.
On most of them, the grounding brackets had come disconnected from the light body.

New front marker lights all installed and shiny!

The other thing I did was made a frame for the Full mattress.
First I made a 54"x75" cardboard template to test where I wanted to put things, then moved it into a few positions while getting input from my wife.
1

2

3

Top support frame

Add some sides and a lot of screws.

The top was covered with particle board.

Once into the AS, I put on the mattress and a quilt my Mom had sent me a while back.

(I already asked her where I could get the matching pillow cases)
I finally reinstalled the belly pan and banana wraps in the rear.


Another project I worked on was the outer fenderwells (plastic) to outer skin. The connection had massive failures.
Before


I clamped them

I drilled out the old rivets, then clamped it on both sides before installing new rivets. I used 1/8" x 1/2" long rivets with 1/8" aluminum washers because the inside reinforcement plate had been torn through holes.

The washers

I haven't taken good pictures yet, I stuck my phone under the fenderwell this morning and you can see the new rivets and how I used the washers.

The lines are looking good.

On the pickup, I replaced the blower motor

I installed new wiper blades AND I installed a new 7 pin tail light connector.
|
|
|
|
|
06-19-2017, 10:35 AM
|
#116
|
3 Rivet Member
1971 31' Sovereign
Christine
, North Dakota
Join Date: Jun 2015
Posts: 142
|
LED lights this morning before work.
In the last week I've had plenty of opportunity to check for water leaks.
And I have only found 1 unexpected one.
And that was because after I removed the window shade rail above the street side, I forgot to plug the screw holes. Holes plugged no more leaks that I can find.
When I say rain, I mean rain...
Driving rain
Good old midwestern storms
except... 2 windows.
The streetside window cluster, the second one.

And the streetside window from above the original bed location.
They have both filled the window frame with water.
As best I can tell the water is coming through the window glass frame.
The thing is that this is going to have to wait, the water accumulates and then leaks to the outside not the inside. So for now its just an annoyance.
|
|
|
|
|
06-22-2017, 12:30 PM
|
#117
|
3 Rivet Member
1971 31' Sovereign
Christine
, North Dakota
Join Date: Jun 2015
Posts: 142
|
Based on this thread
Easy Peasy 10 minute backup camera -- AirForums
I ordered and received, but haven't yet installed, a wifi backup camera

I set it up at my desk and used a laptop power supply to operate it.

Everything worked exactly as described.
The only thing that I wish it had was a way to rotate the image.
In the "as shipped" configuration the image is upside down.
I looked in the software and online for a while to see if I had forgotten anything, and in the end, I removed these 2 screws and flipped the camera over then tightened it back down.

I didn't have time to install it last night because I decided to install the new charger/converter instead.
First I took pictures of the existing wire locations.

Then I straightened out the spaghetti mess of wires.

I decided to make a 1"x1" angle iron dual battery holder box/base.

And then never used it...

The wiring is still a bit of a mess, I ran out of sunlight, but the last picture was taken using battery power. The 12v portion of the converter upgrade is done.
This is the first time in 2 years of ownership that any light has worked under self contained 12v power. (small victories)

I couldn't complete the 120v portion because I didn't pay attention when I bought the converter. It is a 30amp plug.
After rummaging through my old spare parts, I thought I lucked out because I thought I had a 30amp replacement end for an extension cord, but it wasn't see where it says 20a? Of course I didn't actually read it or try to plug it in until I had done more work.
And I had an old horse water tank heater with a heavy duty cable. I cut the cable off the water heater and wired the new pigtail end onto it, only to find...
Incompatible.


Today I need to pick up a proper 30amp receptacle and I also want to get a couple 120v plug ins with USB charger ports built into them.
This trailer doesn't have any GFI outlets in it, do I need to add one or 2?
On to other things..
While I was working on the charger; my wife started painting the bedframe, she thought the bare 2x4's were a little 'too rustic'

This morning I made this, I'm not really sure what to call it.
18"x96"x38" tall storage shelf with potential counter top?

For this trip, it is going to go right here.

Clearly I didn't take into account all other items in the AS when I made this.
As one leg is partially in the fresh water tank hole in the floor.

And the counter top height is blocking the power outlet.

both are manageable.
i.e. make a horizontal brace for the leg and maybe shorten the table legs depending on whether or not we need to use that power outlet.
|
|
|
|
|
06-23-2017, 11:39 AM
|
#118
|
3 Rivet Member
1971 31' Sovereign
Christine
, North Dakota
Join Date: Jun 2015
Posts: 142
|
Time is drawing near for "the big trip" so more things got done.
I bought and installed a 20amp plug in for the battery charger/converter, not the color I wanted, but it will do.

The stand I built yesterday, which was basically for my wife to shove storage totes into and to have a working counter top got shortened 2 inches and painted.

The microwave has been cleaned and tested, works good.
I need to invent a way to lock it in place while traveling.

I also plugged in the fridge for the first time ever, and it works on AC and LP.

It has a crazy plumbing configuration.

My tasks for today are to find a replacement break-away switch, then wire it when I get home. when those 2 wires hanging off the curbside of the tongue are connected the brakes all hum.

Other tasks
hubcaps
new tire for the spare
a pair of 120v outlets with USB ports built in.
and get an inverter.
Tomorrow wheels hit the tarmac.
|
|
|
|
|
06-23-2017, 12:23 PM
|
#119
|
4 Rivet Member 
1962 22' Safari
1973 25' Tradewind
1968 30' Sovereign
Salt Lake City
, Utah
Join Date: Apr 2007
Posts: 264
|
Fun times! Lots of work . . .
Edit: Just scanned the whole project. Wow! Very impressive. Makes me feel like a slacker for hiring so much out.
|
|
|
|
|
07-10-2017, 10:36 AM
|
#120
|
3 Rivet Member
1971 31' Sovereign
Christine
, North Dakota
Join Date: Jun 2015
Posts: 142
|
Sorry about the picture links everybody.
I have them hosted on photobucket and they changed their 3rd party linking policy while I was on vacation.
I have to decide if I am going to pay them $400/yr or find another host.
On the flip side.
We took the Airstream on vacation.
15 days 4400 miles
Pictures will be forthcoming.
Medora
Yellowstone (into the park without the AS)
Glacier (area, not the park)
Mt Hood (Odell)
Oregon Coast
Oregon Sand Dunes
Crater Lake (into the park without the AS)
Craters of the Moon
and then back home.
I roughly outfitted the AS with a bed frame and a makeshift "counter" before we left home. The only issues with the AS were that one of the new marker lights shorted out through the shrink tubing and I lost a window.
Yes, I lost a window... curbside from above the original twin bunk.
Operator error (or stupidity) I only had one window strike latch in place and NEITHER of the window prop rods had c-clips on them. The only thing holding it shut was the latch. The latch was not 'locked' and it twisted/turned enough to release the window and I imagine it was sucked off when I passed a semi somewhere between Bozeman and Billings in the early morning hours, as it was GONE when we stopped to use a rest area.
ISO, a window with frame. Measurements 33 1/2" wide by 22 1/8" tall.
My tow vehicle (TV) a 2005 F250 6.0 crew cab short bed had only 2 issues also..
On the way west, about 120 miles on the East side of Bozeman, one of the turbo boots split/ruptured. When I took it off, the rupture looked like a 1.25" long slice right through the boot. We were supposed to be staying outside Yellowstone at "Red Cliff Campground" but had to 'settle' for the Bozeman Hot Springs that night. Luckily Ford had one in stock the next morning, I picked it up and installed it (15 minute job) and we were on the road again.
The other issue I haven't fixed yet. The power window main power wire inside the 'convolute' (wiring harness) between the body and driver side door must have finally split/cracked in half from 12years of opening and closing the driver door. Now that I'm home I'll figure out the best route to solder that back together.
|
|
|
|
|
|
|
Currently Active Users Viewing This Thread: 1 (0 members and 1 guests)
|
|
|
 Posting Rules
|
You may not post new threads
You may not post replies
You may not post attachments
You may not edit your posts
HTML code is Off
|
|
|
|

 Recent Discussions
 |
|
|
|
|
|
|
|
|
|
|
|
|
|
|
|
|
|
|
|
|
|


 Linear Mode

