 |
|
 04-15-2017, 06:21 PM
|
#41
|
2 Rivet Member 
1984 31' Excella
Lenexa
, Kansas
Join Date: Jan 2017
Posts: 56
|
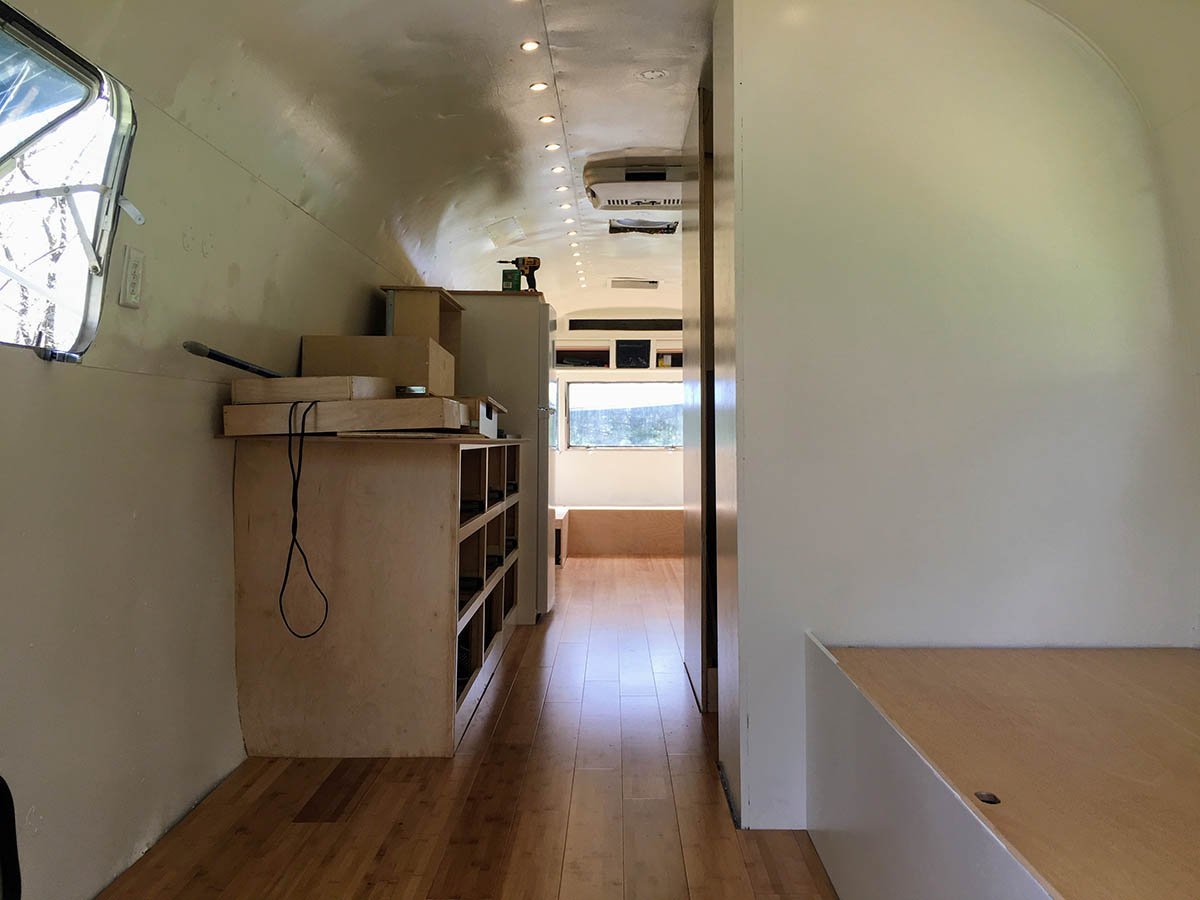
Wood Floors
What a HUGE difference putting in the wood floor does for the way this thing looks. We are floored (haha) with how it came out.
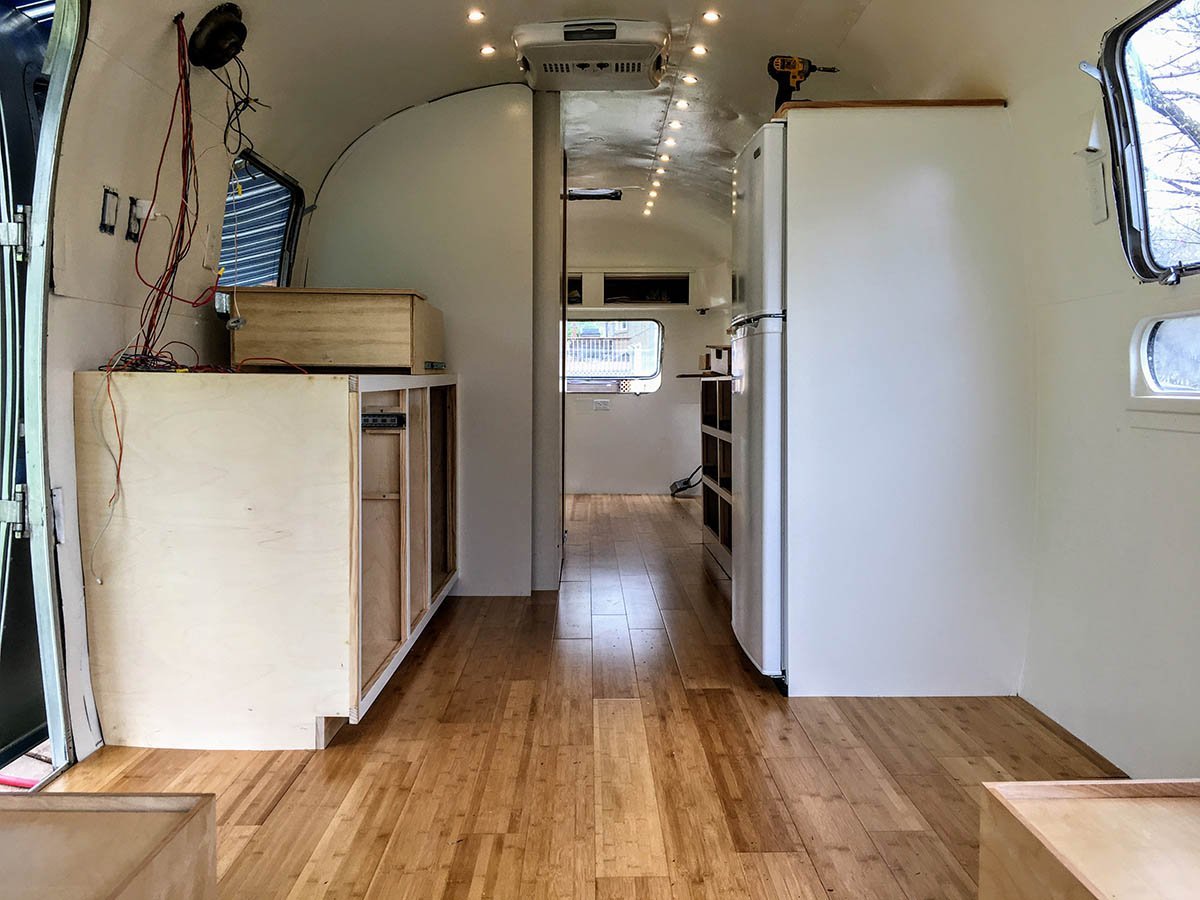
Installation was a breeze. This is the click lock floating stuff so no fasteners required - just cut to size, snap in and repeat.
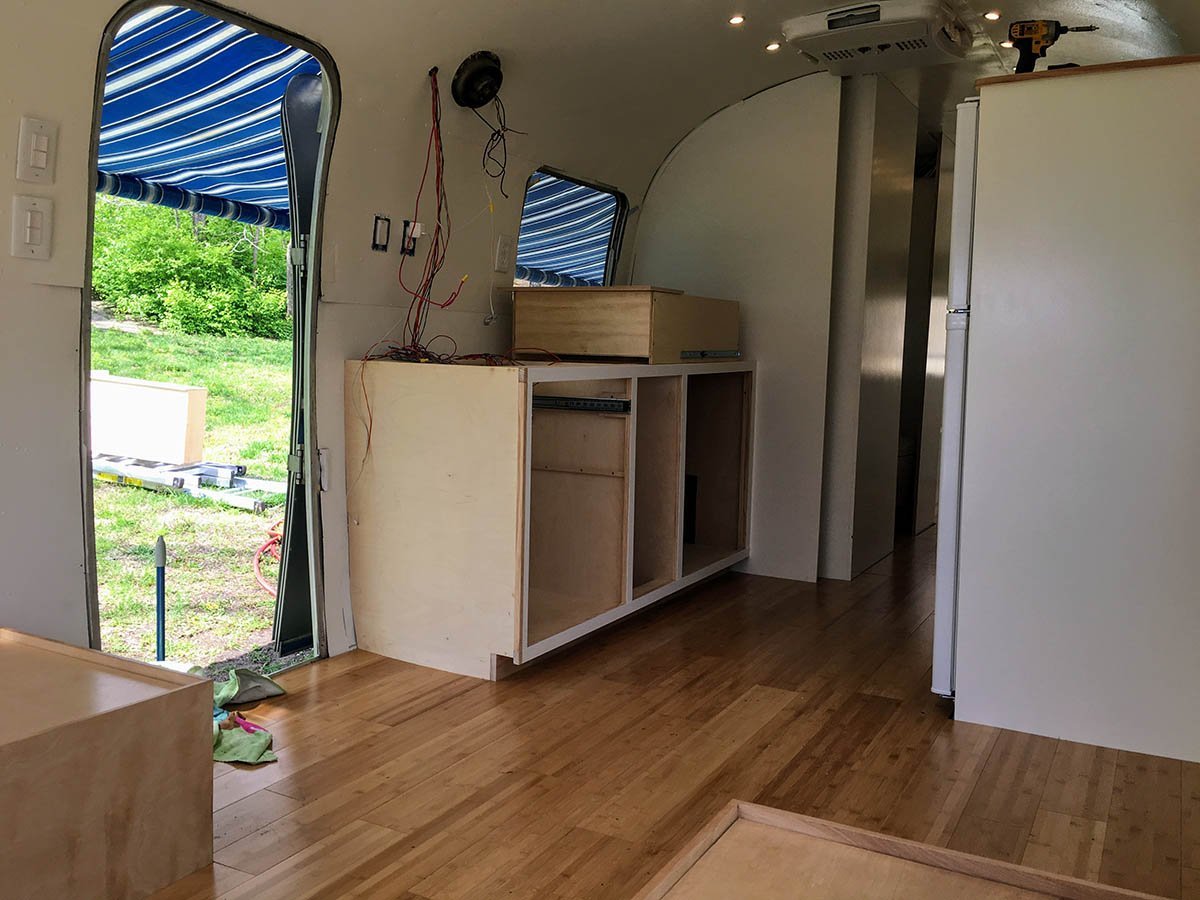
I will be purchasing some small quarter round/shoe for the walls/edges, but in some areas (such as the "fronts" of these drawers), I won't have the space so I tried to make the floor extra tight to the edge of the dinette.
My office is going to be amazing, I can't wait to start working out of this (we had to wait on installing the desk until this wood floor was put in, so that is coming soon!).
The bathroom had me a bit nervous as I wasn't sure if the floor flange would fit with these floors - however it went in and screwed in several rotations without issue, which was an unexpected relief!
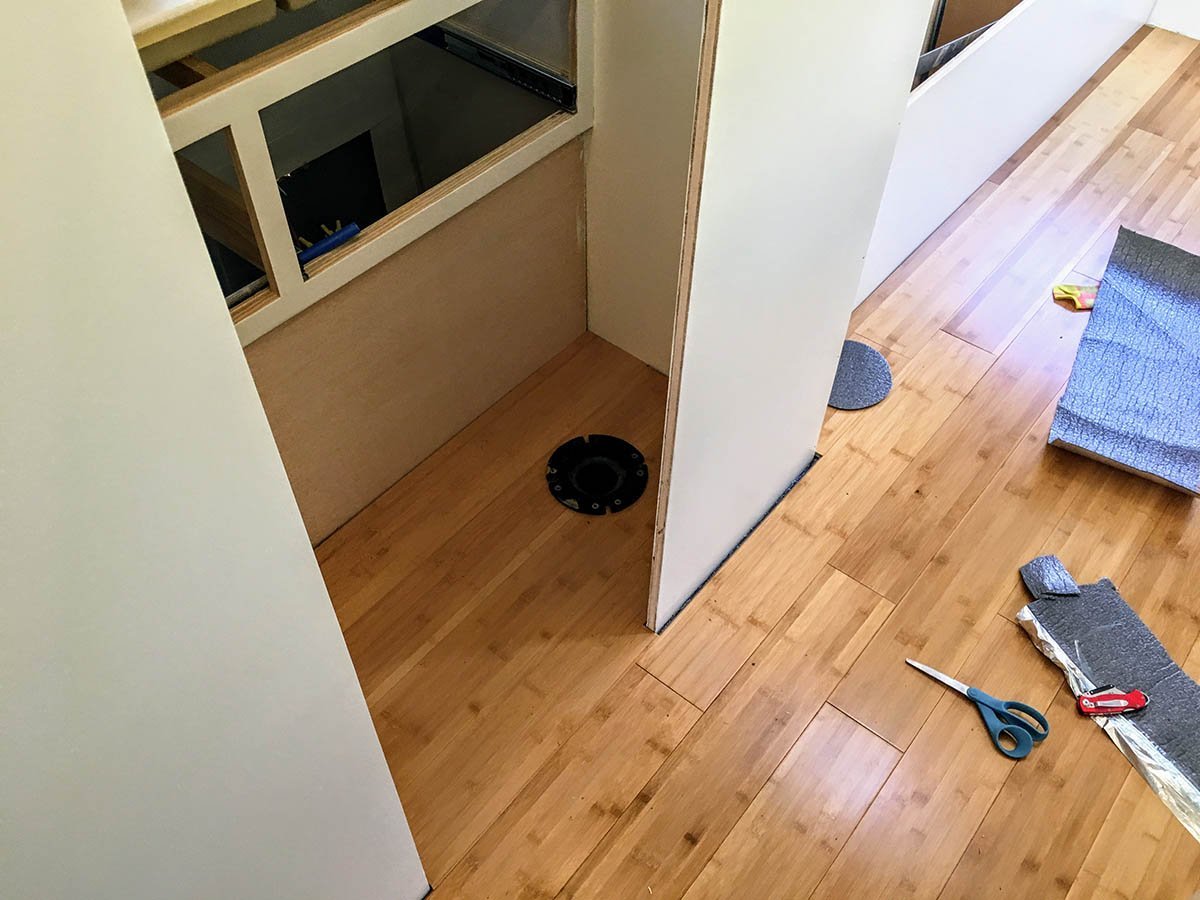
We used some premium (yeah right) underlayment from the Home Depot to help with noise and to help protect the floors*in the unlikely event of moisture.
We have come a very long way from where we started a few months ago; we went from this:

To this!
 For "in between" details of how we got from A to B, we decided started a blog and post the details there.
|

|

|


|
04-15-2017, 06:21 PM
|
#42
|
2 Rivet Member
1984 31' Excella
Lenexa
, Kansas
Join Date: Jan 2017
Posts: 56
|
Quote:
Originally Posted by Iansk

Thank you for taking the time to post your progress, I'll share this with my wife for inspiration...
I have a question about your choice of insulation though...
"Next up is working on installing the insulation. We decided to go with Roxul. This stuff is apparently made from stool and spun into a fibrous wool sheet. Its supposedly mold resistant and less likely for rodents to build nests in, but time will tell."
I have the sense of humor of a seventh grader...
|
Haha nice typo, geez! STONE. Stone, I promise.
|
|
|
|
|
04-15-2017, 06:23 PM
|
#43
|
2 Rivet Member
1984 31' Excella
Lenexa
, Kansas
Join Date: Jan 2017
Posts: 56
|
Quote:
Originally Posted by Minno
Now that your insulation is all up, this is too little too late but maybe it'll help someone else: we used spray adhesive to adhere our insulation to the walls and ceiling until we could get the panels in over it. That way we weren't battling the falling insulation as we worked. Looks good, and you are making a ton of progress!
Kay
|
That would have been very helpful  , I should have stayed on top of posting and probably 99% of the headaches we ran into could have been avoided. I wish there was more time in the day!
|
|
|
|
|
04-30-2017, 09:27 PM
|
#44
|
2 Rivet Member
1984 31' Excella
Lenexa
, Kansas
Join Date: Jan 2017
Posts: 56
|
How to Fabricate an Airstream/RV Shower Pan with No Mortar - Part 1
If anyone is interested, I have started the process of detailing our solution to fabricating a custom shower pan for Stella. Details can be found here:
http://runningfromordinary.com/renovation/?id=278436
I plan on posting a second post after we wrap things up along with videos, and will share the links here when those are up.
__________________
-------
www.runningfromordinary.com
Because of course we have a blog, every hipster family is remodeling an airstream these days and has a blog.
|
|
|
|
|
05-17-2017, 02:45 PM
|
#45
|
3 Rivet Member 
1976 29' Ambassador
Dallas
, Texas
Join Date: Dec 2016
Posts: 140
|
Renovation looks great! How many batts of Roxul did it take to complete the insulation? I am looking to do the same!
|
|
|
|
|
05-17-2017, 02:50 PM
|
#46
|
2 Rivet Member
1984 31' Excella
Lenexa
, Kansas
Join Date: Jan 2017
Posts: 56
|
Quote:
Originally Posted by tabney0315
Renovation looks great! How many batts of Roxul did it take to complete the insulation? I am looking to do the same!
|
Thanks! We're making huge progress, just got the bathroom pretty much finished other than putting the doors on the cabinetry.
I should have wrote it down somewhere, but I think we bought 6 or so bats. We didn't use it in the floor, only the walls.
__________________
-------
www.runningfromordinary.com
Because of course we have a blog, every hipster family is remodeling an airstream these days and has a blog.
|
|
|
|
|
05-20-2017, 07:07 PM
|
#47
|
2 Rivet Member
1984 31' Excella
Lenexa
, Kansas
Join Date: Jan 2017
Posts: 56
|
More Progress!
We've made more progress! I think we should be able to have it finished by tomorrow, other than cleaning and probably a million other little things that will come up along the way .
__________________
-------
www.runningfromordinary.com
Because of course we have a blog, every hipster family is remodeling an airstream these days and has a blog.
|
|
|
|
|
06-08-2017, 11:05 PM
|
#48
|
3 Rivet Member
1981 28' Airstream 280
Austin
, Texas
Join Date: Feb 2014
Posts: 144
|
So, I've just started gutting my AS -1989 excels 1000. I have more than 2 bolts holding in the floor in the front and the rear. Bolts run along the entire outer edge of my subfloor. Did you just use self tapping screws on the sides or did yours not have bolts? I know you mentions going through the trunk to add 2 bolts in the rear but that's all you mentioned about bolts on subfloor. If I recall correctly, my floor had bolts throughout and not self tapping screws. Just curious about what you used where and why. Thank you.
|
|
|
|
|
06-09-2017, 06:23 AM
|
#49
|
2 Rivet Member
1984 31' Excella
Lenexa
, Kansas
Join Date: Jan 2017
Posts: 56
|
Quote:
Originally Posted by ASTailgate
So, I've just started gutting my AS -1989 excels 1000. I have more than 2 bolts holding in the floor in the front and the rear. Bolts run along the entire outer edge of my subfloor. Did you just use self tapping screws on the sides or did yours not have bolts? I know you mentions going through the trunk to add 2 bolts in the rear but that's all you mentioned about bolts on subfloor. If I recall correctly, my floor had bolts throughout and not self tapping screws. Just curious about what you used where and why. Thank you.
|
There were four "mega bolts" (I can't recall the size, but they are very thick) in the four corners of the unit, but then throughout the perimeter much smaller bolts, with the fixed head on the bottom under everything and the nut sitting on top of the c-channel with the bolt bent over the top. I replaced the four corner large bolts with new, and for the perimeter I used a combination of bolts/nuts where I could easily access them, and 3/8" self tapping screws where I couldn't easily reach. Then throughout the middle of the sub floor I used self tapping screws everywhere, probably at 2x the frequency of what was originally there.
On a separate note - WE'RE DONE (with the interior anyways)! We are currently roaming north and west, and right now are in (super hot) South Dakota, on our way to Custer State Park and then beyond.
__________________
-------
www.runningfromordinary.com
Because of course we have a blog, every hipster family is remodeling an airstream these days and has a blog.
|
|
|
|
|
07-17-2017, 07:49 AM
|
#50
|
3 Rivet Member
1981 28' Airstream 280
Austin
, Texas
Join Date: Feb 2014
Posts: 144
|
Quote:
Originally Posted by ctaulborg
Subfloor Install
Wow, what turned out to be something I hoped would take a few days has really stretched out. First the leaks, then delays because of deciding on layout, and then dealing with new tank sensors and plumbing put a wrench in our plans. However we still pushed on, start with first addressing the lack of center supports in the front of the trailer:

We once again enlisted the help of our neighbor to grind and weld on new supports:

Next up, using the old floor pieces as much as possible as a template:

By the way, in the end the old floor was so damaged we ended up not being able to rely on it. We ended up using cardboard as a template and that worked well.
Then on to installing it. I didnt take many photos of this process, but let me say that if I were to restart this project, I would strongly consider a frame-off restoration. Dealing with getting the plywood jammed into the c-channel was a chore to say the least. Of course by the time the last pieces were installed it was down to a science, but boy it was slow-going at first:


But we got it done (with help from my kids and father-in-law):


I also had a college buddy who is an electrician come down to setup and test our new Boondocker Power Center. He had it rigged up in no time and we confirmed working shore power and battery power:

While my father and law and I were finishing up the floors, my better-half was diligently working away on scraping away the final bits of caulk on the exterior so we can put on new:

I will say, there were some moments this last week where I was ready to completely throw in the towel (or light this thing on fire) - one specific moment that stands out was when I had cut out (for a third time) a new curved plywood piece for the the endcap, installed it (whacking with a 2x4/sledgehammer) and then realized I needed to pull it back out because it was pushed the frames close to falling off the outriggers. However, getting the floors installed and having a solid surface to walk on was a huge win, and we are more motivated than ever to get this finished out.
|
How did you attach the floor to the frame without the belly off? Did you use any bolts?
|
|
|
|
|
07-17-2017, 08:11 AM
|
#51
|
2 Rivet Member
1984 31' Excella
Lenexa
, Kansas
Join Date: Jan 2017
Posts: 56
|
Quote:
Originally Posted by ASTailgate
How did you attach the floor to the frame without the belly off? Did you use any bolts?
|
We were able to attach the four corner bolts with replacement bolts/nuts (access was barely available for these four bolts).
For the bolts that connected to the outriggers down the sides of the unit, we doubled up and put in two thicker gauge self-tapping screws for each outrigger. It's held up well so far, and we're currently in Washington (started in Kansas in June).
If I were to do it again, I would just drop the belly pan however - I ended up having to do this anyway on the front-section of the airstream and it was super easy to take off and put back on.
__________________
-------
www.runningfromordinary.com
Because of course we have a blog, every hipster family is remodeling an airstream these days and has a blog.
|
|
|
|
|
|
|
Currently Active Users Viewing This Thread: 1 (0 members and 1 guests)
|
|
|
 Posting Rules
|
You may not post new threads
You may not post replies
You may not post attachments
You may not edit your posts
HTML code is Off
|
|
|
|

 Recent Discussions
 |
|
|
|
|
|
|
|
|
|
|
|
|
|
|
|
|
|
|
|
|
|


 Linear Mode

