 |
|
 10-25-2020, 07:53 PM
|
#4021
|
Rivet Master 
2014 23' International
Hurst
, Texas
Join Date: Jan 2016
Posts: 1,495
|
Quote:
Originally Posted by switters

[snip] So if I can keep it warm until then, and get it to the storage facility on Wed, maybe I'll be okay.
Or, maybe I'll be learning a very expensive lesson.
|
OK, good that you don't have to sleep tonight in a trailer you need to keep really warm. If your dump valves will open, then open them to get any water out of those pipes. Then close the valves to keep cold air from infiltrating through them.
Stand the mattress up toward the front of the trailer. You might even consider taking out the six screws or so that hold the plywood bed base to the cabinetry (I'm assuming here that you have a 23D. That will help the interior warmth get to the water heater area (pipes go through there). BE SURE the lower vanity doors are open.
You might also consider this: openi the little door under the street-side wardrobe (there is a round furnace vent mounted in that door). Unscrew the two screws that hold the flex duct to the round furnace vent. This would let you point that furnace flex duct to your left, toward the back of the trailer. This would keep that area pretty warm, and there's lots of piping and stuff in there.
I really would do those things... 20 minutes and you'll sleep a lot better.
|

|

|


|
10-25-2020, 08:17 PM
|
#4022
|
|
Overkill Specialist
Commercial Member
2020 30 Globetrotter
2014 23' International
Dadeville
, Alabama
Join Date: Oct 2015
Posts: 4,516
|
Quote:
Originally Posted by pcskier
Ronnie abandoned us for the fancy 30ft Globetrotter life. Plus between having a busy family AND tearing apart a different Airstream just about every week to do Solar/Battery installs, he surely doesn't have much spare "Airforums Relaxation time." Rob in Denver must be busy with life. Others have gone in to hibernation mode and storage for the winter? Sad.
I'm still here, full-timing it for winter!
Great job on the grey tank! It sounds like you did yours as well as your brother's? I'll add this to my springtime list. With some of the gnarly places I boondock, this sounds like a must-do hardening project. Did you just remove each bolt, drill through the tank cover and frame, and then use a bolt with a larger head, or use a washer? Or was it possible to move the cover out of the way to drill into the frame? For the fresh water tank too, you think? (EDIT: I am not clear if you did this to the fresh or the gray tank)
Also re the Micro-Pulse thread, I agree, it's just a wonderful water pump on/off switch!
|
Im still lurking, but yes staying very busy working on Airstreams.
|
|
|
|
|
10-25-2020, 08:19 PM
|
#4023
|
3 Rivet Member 
2018 23' Flying Cloud
Park City
, Utah
Join Date: Jul 2020
Posts: 223
|
Quote:
Originally Posted by RFP
OK, good that you don't have to sleep tonight in a trailer you need to keep really warm. If your dump valves will open, then open them to get any water out of those pipes. Then close the valves to keep cold air from infiltrating through them.
Stand the mattress up toward the front of the trailer. You might even consider taking out the six screws or so that hold the plywood bed base to the cabinetry (I'm assuming here that you have a 23D. That will help the interior warmth get to the water heater area (pipes go through there). BE SURE the lower vanity doors are open.
You might also consider this: openi the little door under the street-side wardrobe (there is a round furnace vent mounted in that door). Unscrew the two screws that hold the flex duct to the round furnace vent. This would let you point that furnace flex duct to your left, toward the back of the trailer. This would keep that area pretty warm, and there's lots of piping and stuff in there.
I really would do those things... 20 minutes and you'll sleep a lot better.
|
Thanks, really appreciate this. I should have mentioned I have a 23FB. I turned on the water pump, then opened the cabinet under the clothes drawers. It seemed like I could hear water flowing through the pipes, which I take as a good sign? I also removed the floor panel from the closet next to the fridge. I have a space heater positioned between both of those open cabinets now. See attached pictures.
Under the bed in the 23FB, we just have storage space... unless I need to remove the floor panels?
I do not see a round furnace vent under the street side wardrobe. It's just an empty wall with a tiny bit of storage space. (I attached a picture of this too.)
Also, I put a bucket under the kitchen sink faucet and turned it on. Water comes out, but in spurts. Does this mean the tank is almost empty, or something else? Here is a video of water coming out of the faucet:
Quote:
Originally Posted by RFP
OK, good that you don't have to sleep tonight in a trailer you need to keep really warm. If your dump valves will open, then open them to get any water out of those pipes. Then close the valves to keep cold air from infiltrating through them.
Stand the mattress up toward the front of the trailer. You might even consider taking out the six screws or so that hold the plywood bed base to the cabinetry (I'm assuming here that you have a 23D. That will help the interior warmth get to the water heater area (pipes go through there). BE SURE the lower vanity doors are open.
You might also consider this: openi the little door under the street-side wardrobe (there is a round furnace vent mounted in that door). Unscrew the two screws that hold the flex duct to the round furnace vent. This would let you point that furnace flex duct to your left, toward the back of the trailer. This would keep that area pretty warm, and there's lots of piping and stuff in there.
I really would do those things... 20 minutes and you'll sleep a lot better.
|
Thanks, really appreciate this. I should have mentioned I have a 23FB. I turned on the water pump, then opened the cabinet under the clothes drawers. It seemed like I could hear water flowing through the pipes, which I take as a good sign? I also removed the floor panel from the closet next to the fridge. I have a space heater positioned between both of those open cabinets now. See attached pictures.
Under the bed in the 23FB, we just have storage space... unless I need to remove the floor panels?
I do not see a round furnace vent under the street side wardrobe. It's just an empty wall with a tiny bit of storage space. (I attached a picture of this too.)
Also, I put a bucket under the kitchen sink faucet and turned it on. Water comes out, but in spurts. Does this mean the tank is almost empty, or something else? (See video of water coming out of faucet https://www.dropbox.com/s/8pmpq2foxh..._5114.mov?dl=0
|
|
|
|
|
10-25-2020, 08:46 PM
|
#4024
|
Rivet Master
2014 23' International
Hurst
, Texas
Join Date: Jan 2016
Posts: 1,495
|
Quote:
Originally Posted by switters
Thanks, really appreciate this. I should have mentioned I have a 23FB. I turned on the water pump, then opened the cabinet under the clothes drawers. It seemed like I could hear water flowing through the pipes, which I take as a good sign? I also removed the floor panel from the closet next to the fridge. I have a space heater positioned between both of those open cabinets now. See attached pictures.
Under the bed in the 23FB, we just have storage space... unless I need to remove the floor panels?
I do not see a round furnace vent under the street side wardrobe. It's just an empty wall with a tiny bit of storage space. (I attached a picture of this too.)
Also, I put a bucket under the kitchen sink faucet and turned it on. Water comes out, but in spurts. Does this mean the tank is almost empty, or something else? Here is a video of water coming out of the faucet:
Thanks, really appreciate this. I should have mentioned I have a 23FB. I turned on the water pump, then opened the cabinet under the clothes drawers. It seemed like I could hear water flowing through the pipes, which I take as a good sign? I also removed the floor panel from the closet next to the fridge. I have a space heater positioned between both of those open cabinets now. See attached pictures.
Under the bed in the 23FB, we just have storage space... unless I need to remove the floor panels?
I do not see a round furnace vent under the street side wardrobe. It's just an empty wall with a tiny bit of storage space. (I attached a picture of this too.)
Also, I put a bucket under the kitchen sink faucet and turned it on. Water comes out, but in spurts. Does this mean the tank is almost empty, or something else? (See video of water coming out of faucet https://www.dropbox.com/s/8pmpq2foxh..._5114.mov?dl=0 |
Yep, your fresh water tank is pretty empty. While I know pretty much every cubic inch of a 23D, I really don't know diddly about. FB. Dang, I wish I did. Of course, all my suggestions about beds and ducts work only on the 23D. Want to hear from you tomorrow... to be sure you're OK!
|
|
|
|
|
10-26-2020, 08:03 AM
|
#4025
|
3 Rivet Member
2018 23' Flying Cloud
Park City
, Utah
Join Date: Jul 2020
Posts: 223
|
Well, seems like we made it through the night. It's 68F inside of the trailer, and when I turned the water pump on and opened the kitchen faucet, some water came out. Wouldn't that suggest the water in the lines isn't frozen?
Today I will pick up more LP and then decide whether I will winterize myself or take the storage facility and let them do it. Thanks again for your help last night.
|
|
|
|
|
10-26-2020, 10:59 AM
|
#4026
|
Rivet Master 
2006 23' Safari SE
I'm In
, Kentucky
Join Date: Dec 2012
Posts: 4,251
|
If your spigots are spitting water then you have water in the lines and they can freeze and crack.
There are several threads on the forum about how to winterize and the sequence. You have been pumping water from your tank so the line to the pump has water in it. You don't want to put RV antifreeze in the water tank but you should find and open the screen filter on the line from the tank to the pump. (Cheap vodka would be better in the water tank.) The filter should be on the water line, very close to the pump. This will let water go back to the tank and keep that line from freezing. You should also disconnect the output line from the pump, then run the pump to get all of the water out of it. At the very least, after you open the screen filter, run the pump to get the water out of the pump itself.
You should get the winterization kit to allow you to use the water pump to push RV antifreeze through the lines, including the outside shower. I've done that on the road and didn't use an air pump. Don't forget to put AF in the drains to keep them from freezing. You should also have holding tank heaters or maybe you have the furnace ducts running past them to keep from freezing.
__________________
-Rich
Rich & Yvonne
2006 Safari SE -Dora-
2004 4Runner SE 4.7L V8
|
|
|
|
|
10-26-2020, 11:12 AM
|
#4027
|
3 Rivet Member
2018 23' Flying Cloud
Park City
, Utah
Join Date: Jul 2020
Posts: 223
|
Quote:
Originally Posted by richw46
If your spigots are spitting water then you have water in the lines and they can freeze and crack.
There are several threads on the forum about how to winterize and the sequence. You have been pumping water from your tank so the line to the pump has water in it. You don't want to put RV antifreeze in the water tank but you should find and open the screen filter on the line from the tank to the pump. (Cheap vodka would be better in the water tank.) The filter should be on the water line, very close to the pump. This will let water go back to the tank and keep that line from freezing. You should also disconnect the output line from the pump, then run the pump to get all of the water out of it. At the very least, after you open the screen filter, run the pump to get the water out of the pump itself.
You should get the winterization kit to allow you to use the water pump to push RV antifreeze through the lines, including the outside shower. I've done that on the road and didn't use an air pump. Don't forget to put AF in the drains to keep them from freezing. You should also have holding tank heaters or maybe you have the furnace ducts running past them to keep from freezing.
|
Thanks. I've got the furnace ducts running past the tanks instead of the heaters. It's 70F in the trailer now, and I think that is keeping the lines and the grey/black tanks from freezing. My plan was to keep the heat on until Wed, when I'm taking it to storage and they will winterize this year. They also do service, so I was planning to have them install the winterization kit so I can easily winterize in the future.
How did you push the RV antifreeze through the lines without a pump?
|
|
|
|
|
10-26-2020, 12:04 PM
|
#4028
|
|
The Aluminum Tent 3
2014 23' Flying Cloud
Park City
, Utah
Join Date: Aug 2015
Posts: 2,157
|
Quote:
Originally Posted by switters
Thanks. I've got the furnace ducts running past the tanks instead of the heaters. It's 70F in the trailer now, and I think that is keeping the lines and the grey/black tanks from freezing. My plan was to keep the heat on until Wed, when I'm taking it to storage and they will winterize this year.
|
I am in my 23CB and set my furnace to 57 degrees overnight with no additional heat source (I can't sleep in a warm temperature.) I normally keep it at 45 or 50 and bundle up to sleep, but was nervous about the belly if keeping it that low with the temps dropping to 3 degrees last night. I had no freeze-ups or issues. (I did dump my grey and black tanks yesterday so there was nothing in the exposed dump pipes and valves that are under the trailer (I will be heat-taping those and wrapping them for winter soon).
I measured the temp of the cold water coming out of the faucets to gauge how cold it was in the plumbing and the fresh tank. At 8 degrees, the water was 39 degrees, keeping furnace set to 57. So at 70 degrees in the trailer, you were in great shape last night and will be the next couple nights. I would open the low points again today and turn on both faucets, and hold open the toilet flush. This should get a majority of water out of the lines, but again, you sound like you'll be OK.
If you'd like a lesson on winterizing with a compressor to see how easy it is, let me know. Happy to come by with my compressor and winterize your trailer for you. I had a 23FB and am familiar with where everything is. If you pick up a winterizing bypass kit, happy to install that for you as well and show you how that works. Let me know, happy to help!
|
|
|
|
|
10-26-2020, 12:20 PM
|
#4029
|
2 Rivet Member 
2017 23' International
Oregon City
, Oregon
Join Date: Sep 2018
Posts: 47
|
Quote:
Originally Posted by RFP
Peter,
I did this only to my fresh water tank. I find no body of evidence that gray/black tanks coming loose; but falling fresh water tanks is a known - even if uncommon - 'thing.'
Here's the process I used (I'm sure there are other ways, but this is relatively easy and super-duper-strong):
1. Remove factory bolt.
2. Enlarge the factory bolt hole to 3/8" with a drill. You will notice that I slipped a short length of PVC pipe over the drill bit to limit how far up into the unknown recesses of the Airstream it could go.
3. Using a small hole saw (I used the 25mm I had on hand), drill the tank pan to provide relief for the head of the Plusnut. If the Plusnot is installed without this relief, the pan would be captured by the Plusnut, and if it ever became necessay to drop thge tank, the Plusnuts would have to be drilled out.
3a. In the photo, you can see that I used 3 little 1/4"ID X 3/8"OD X 1" long spacers over the 1/4" pilot bit on the hole saw. This let me insert the hole saw with spacer into the 3/8" I had drilled into the Airstream 'frame'
4. Drill out the 3/8" hole to a full 1/2"
5. Now the Plusnut can be installed. I used a few bucks worth of hardware from Ace to make my own installation tool. It worked perfectly and was easy.
5a. Before installation, I liberally coated each Plusnut with Corrosion-X. Even though the Plusnuts are cad plated, I wanted to do what I could to ensure corrosion resistance.
6. Re-install the screw and move on to the next bolt.
6a. I used a good quality anti-seize on the bolts before installation.
When re-installing the bolts, the bolts holding the straps do not require any additional washer. The strap itself provides plenty of washer to cover the enlarged hold. For the two-bolts-per-side without straps, I made big rectangular 'washers' from 1/8" aluminum stock.
All in all this project was relatively easy. I pulled the trailer up onto two 2 X 10 planks, giving me an extra 3" of clearance.
If you decide to do this and have any questions, just let me know... I'll certainly try to help.
Rob
|
Hi Rob,
Im looking on Amazon at 5/16-18 Plus Nuts and see some with a grip range of .020 - .280. Is this the grip range that you used?
__________________
Thanks,
Keith
--------------------------------------
2017 23D International Serenity
2014 1500 Silverado 5.3L
|
|
|
|
|
10-26-2020, 12:23 PM
|
#4030
|
3 Rivet Member
2018 23' Flying Cloud
Park City
, Utah
Join Date: Jul 2020
Posts: 223
|
Quote:
Originally Posted by pcskier
I am in my 23CB and set my furnace to 57 degrees overnight with no additional heat source (I can't sleep in a warm temperature.) I normally keep it at 45 or 50 and bundle up to sleep, but was nervous about the belly if keeping it that low with the temps dropping to 3 degrees last night. I had no freeze-ups or issues. (I did dump my grey and black tanks yesterday so there was nothing in the exposed dump pipes and valves that are under the trailer (I will be heat-taping those and wrapping them for winter soon).
I measured the temp of the cold water coming out of the faucets to gauge how cold it was in the plumbing and the fresh tank. At 8 degrees, the water was 39 degrees. So at 70 degrees in the trailer, you were in great shape last night and will be the next couple nights. I would open the low points again today and turn on both faucets, and hold open the toilet flush. This should get a majority of water out of the lines, but again, you sound like you'll be OK.
If you'd like a lesson on winterizing with a compressor to see how easy it is, let me know. Happy to come by with mine and winterize your trailer. I had a 23FB and am familiar with where everything is. If you pick up a winterizing bypass kit, happy to install that for you as well and show you how that works. Let me know, happy to help!
|
That would be fantastic! I'll DM you to see if we can find a time.
Where did you get the winterization kit? I called Airstream of Utah service dept. and the guy I talked to sounded like he had never heard of it. 
|
|
|
|
|
10-26-2020, 12:33 PM
|
#4031
|
|
The Aluminum Tent 3
2014 23' Flying Cloud
Park City
, Utah
Join Date: Aug 2015
Posts: 2,157
|
Quote:
Originally Posted by switters
That would be fantastic! I'll DM you to see if we can find a time.
Where did you get the winterization kit? I called Airstream of Utah service dept. and the guy I talked to sounded like he had never heard of it. |
That's SCARY that the dealer service dept. hadn't heard of that. Good Lord.
This is what you need, Valterra and Camco both make them. Might be able to find locally like at Camping World in Draper or State Trailer Supply in SLC if you feel like driving down there, otherwise just get one online and we can install it later since you are going in to storage for the winter? https://www.campingworld.com/pump-co...B&gclsrc=aw.ds
I'll check DM and get back to you. Since the high today is only 30, tomorrow would probably be better as it will get in to the low 40s?
|
|
|
|
|
10-26-2020, 12:52 PM
|
#4032
|
3 Rivet Member
2018 23' Flying Cloud
Park City
, Utah
Join Date: Jul 2020
Posts: 223
|
Quote:
Originally Posted by pcskier
That's SCARY that the dealer service dept. hadn't heard of that. Good Lord.
This is what you need, Valterra and Camco both make them. Might be able to find locally like at Camping World in Draper or State Trailer Supply in SLC if you feel like driving down there, otherwise just get one online and we can install it later since you are going in to storage for the winter? https://www.campingworld.com/pump-co...B&gclsrc=aw.ds
I'll check DM and get back to you. Since the high today is only 30, tomorrow would probably be better as it will get in to the low 40s? |
Yeah, I was pretty shocked. Though we bought our used 2018 FC 23FB from them and had a good experience, I haven't heard great things about their service department.
|
|
|
|
|
10-27-2020, 09:36 AM
|
#4033
|
Rivet Master
2006 23' Safari SE
I'm In
, Kentucky
Join Date: Dec 2012
Posts: 4,251
|
Quote:
Originally Posted by switters
How did you push the RV antifreeze through the lines without a pump?
|
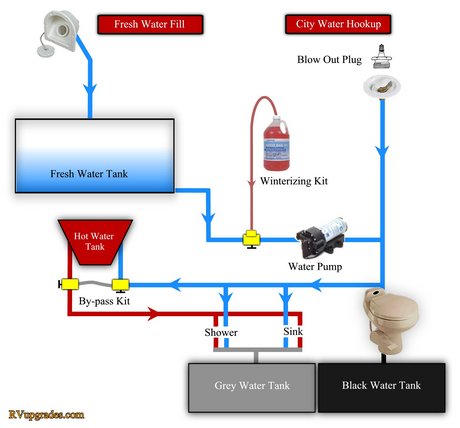
The pump is the water pump that draws from the water tank to all of your pipes, there is no separate pump to push the AF. The winterization kit is a valve that can switch from that water tank line to another opening that is connected to a tube that you put into the gallon jug of AF. In the picture, the yellow device is that valve. It's a simple toggle that switches between water inputs. Don't forget to switch to the bypass for the hot water tank so you don't fill it with AF.
Kits are available at Amazon or Camping World 
__________________
-Rich
Rich & Yvonne
2006 Safari SE -Dora-
2004 4Runner SE 4.7L V8
|
|
|
|
|
10-27-2020, 09:48 AM
|
#4034
|
Rivet Master
2006 23' Safari SE
I'm In
, Kentucky
Join Date: Dec 2012
Posts: 4,251
|
Quote:
Originally Posted by pcskier
I measured the temp of the cold water coming out of the faucets to gauge how cold it was in the plumbing and the fresh tank.
|
If you're parked for the night and there isn't a strong wind, it won't get that cold under the AS. But if the outside temp is in the 20s and you're going 65-70 down the Interstate, under the AS is going to get cold fast. I've read that some people buy bales of straw and put them under the edges of the AS to keep the wind out, if they're going to be parked for a while. Best bet is to get a kit and install it, then just pump the AF into all the lines by opening a tap at a time.
When we go south for the winter I keep a couple of gallons of AF under the counter. If we come back before the temps have warmed I just pump AF into the lines. I may get a portable air compressor and stop using AF but until then, this has worked. Anyway, better safe than sorry. 
__________________
-Rich
Rich & Yvonne
2006 Safari SE -Dora-
2004 4Runner SE 4.7L V8
|
|
|
|
|
10-27-2020, 09:55 AM
|
#4035
|
3 Rivet Member
2018 23' Flying Cloud
Park City
, Utah
Join Date: Jul 2020
Posts: 223
|
Quote:
Originally Posted by richw46
If you're parked for the night and there isn't a strong wind, it won't get that cold under the AS. But if the outside temp is in the 20s and you're going 65-70 down the Interstate, under the AS is going to get cold fast. I've read that some people buy bales of straw and put them under the edges of the AS to keep the wind out, if they're going to be parked for a while. Best bet is to get a kit and install it, then just pump the AF into all the lines by opening a tap at a time.
When we go south for the winter I keep a couple of gallons of AF under the counter. If we come back before the temps have warmed I just pump AF into the lines. I may get a portable air compressor and stop using AF but until then, this has worked. Anyway, better safe than sorry. |
I've added RV antifreeze to my packing checklist and will definitely bring it with me next time we go to a warmer area during the shoulder season and may come back to below-freezing temps. I may pick up an air compressor too... though I've been happy with the Ryobi 18v Power Inflator for adjusting tire pressure. It's pretty compact and it uses the same batteries as the other Ryobi power tools I bring with me.
|
|
|
|
|
10-27-2020, 01:59 PM
|
#4036
|
Rivet Master
2006 23' Safari SE
I'm In
, Kentucky
Join Date: Dec 2012
Posts: 4,251
|
Quote:
Originally Posted by switters
I've added RV antifreeze to my packing checklist and will definitely bring it with me next time we go to a warmer area during the shoulder season and may come back to below-freezing temps. I may pick up an air compressor too... though I've been happy with the Ryobi 18v Power Inflator for adjusting tire pressure. It's pretty compact and it uses the same batteries as the other Ryobi power tools I bring with me.
|
Using the water line attachment in the picture, it may be possible to use the Ryobi to blow out the water lines with air. Attach the plug to the water line, attach the air hose to the plug, close all taps, turn on the Ryobi. After it builds up pressure in the lines, open the low point drains (assuming you put the water heater in bypass mode). You may have to close them and open a few times because of your low volume of air. Close when complete.
Go to the kitchen sink, when pressure builds, open the cold tap, close, open again when pressure builds. When just a fog of air comes out the line is clear, do the hot side and the sprayer. Close when done, then do the other sink(s), toilet, shower and outside shower. Put a cup of AF in each drain.
Do the low point drains one more time to ensure they are empty.
Detach the inlet to the water pump (or open the winterization valve like you were going to draw AF into the system) detach the outlet pipe from the pump and run the pump to ensure there's no water in the pump. Pressurize the system one more time and see if any water comes out the water pump outlet pipe you disconnected. Reconnect the water pump pipes.
Disconnect the plug and Ryobi.
__________________
-Rich
Rich & Yvonne
2006 Safari SE -Dora-
2004 4Runner SE 4.7L V8
|
|
|
|
|
10-30-2020, 01:33 PM
|
#4037
|
|
The Aluminum Tent 3
2014 23' Flying Cloud
Park City
, Utah
Join Date: Aug 2015
Posts: 2,157
|
The 23D thread
Yesterday I went to unplug the HDMI cable from the back of the lounge tv set. The wire pulled out of the fitting! The other end of the cable continues to cavity behind the microwave.
When I pull the microwave, am I going to find that the HDMI cable terminates at a fitting where another from the DVD player terminates, so I can just replace the broken cable...or does Airstream use one cable from the DVD player all the way to the TV? I hope that's not the case 
I know there are HDMI repair kits, but they are not simple to install and don't get great reviews....HDMI cables can be very temperamental and it would tedious doing it standing up without being able to have the cable on a table to work on it, and easy access to the other end to check for continuity, etc. Relocating my DVD player and Apple TV to a shelf above the tv would probably be my move, though not my favorite. Unless anyone else has some brilliant idea for an alternative!

|
|
|
|
|
10-30-2020, 02:11 PM
|
#4038
|
Rivet Master
2014 23' International
Hurst
, Texas
Join Date: Jan 2016
Posts: 1,495
|
Quote:
Originally Posted by pcskier
[snip]
When I pull the microwave, am I going to find that the HDMI cable terminates at a fitting where another from the DVD player terminates, so I can just replace the broken cable...or does Airstream use one cable from the DVD player all the way to the TV? I hope that's not the case [snip]
|
Peter, it's been a while since I've been into the space behind the microwave, but I am 99.9% sure it's your worst case version: one cable, uninterrupted, from DVD player to TV. Sorry 'bout that.
|
|
|
|
|
10-30-2020, 02:16 PM
|
#4039
|
|
The Aluminum Tent 3
2014 23' Flying Cloud
Park City
, Utah
Join Date: Aug 2015
Posts: 2,157
|
Quote:
Originally Posted by RFP
Peter, it's been a while since I've been into the space behind the microwave, but I am 99.9% sure it's your worst case version: one cable, uninterrupted, from DVD player to TV. Sorry 'bout that.
|
Oh man. Why, oh WHY, Airstream?  I don't even understand how I managed to do this in the first place. Went to pull it out and found myself staring at the naked strands of wire  Probably will just relocate the DVD player and Apple Tv to a nice shelf of some sort I'll install above the tv. Dang.
|
|
|
|
|
10-30-2020, 05:00 PM
|
#4040
|
|
The Aluminum Tent 3
2014 23' Flying Cloud
Park City
, Utah
Join Date: Aug 2015
Posts: 2,157
|
The 23D thread
There looks to be plenty of room to mount the DVD player and Apple TV on a recessed shelf in the cavity above the microwave. Its warmer up there because of the fridge, hopefully not an issue?
Just thinking of ways to trim out the hole. Aluminum riveted in would look cool, though it would require four mitered piecesnot so cool. Maybe I can get something fabricated by a local shop. Any other ideas? Rob you excel at this stuff! Can you noodle on this and see what your creative brain comes up with?
Another benefit of this will be gaining the storage that the ridiculous structure in the overhead that elevates and contains the DVD player.


|
|
|
|
|
|
|
Currently Active Users Viewing This Thread: 1 (0 members and 1 guests)
|
|
|
 Posting Rules
|
You may not post new threads
You may not post replies
You may not post attachments
You may not edit your posts
HTML code is Off
|
|
|
|

 Recent Discussions
 |
|
|
|
|
|
|
|
|
|
|
|
|
|
|
|
|
|
|
|
|
|


 Linear Mode

